
What is Git?
Git is a Version Control System (VCS). Version control is a system that keeps track of the changes we make to a file or a set of files over time so that we may recall an earlier version in the future.
Version Control System?
VCS systems give us a lot of power over our projects, which sometimes can even save us from critical mistakes. Accidentally deleting files or messing up the code so much nothing works anymore, can frustrate any person, but with git, all you need to do is write some simple commands and it reverts as if nothing happened.
Git can help us go back not only to the last version of our code but as many versions as we can only want, which can allow us even to compare changes over time and in case the same project is worked on by a team we can see who made modifications over time, who introduced an issue and much much more!
How does Git Work?
What git does is taking “snapshots” of the directory, and saves it locally. Those snapshots are saved in the git repository, and each time we make any change to the files, adding or deleting files git takes a new snapshot and saves it. Each snapshot is actually the current version of the project, in this article, we will talk about how it does it and how it affects the files in more details, so let's jump into it!
Files states
The most important thing to understand as a starting programmer in git is the three main states your files can reside in.
- Committed – which means that the data is safely stored in your local database.
- Modified – which means that you have changed the file but have not committed it to your database yet.
- Staged – which means that you have marked a modified file in its current version to go into your next commit.
This leads us to the three main sections of a git project: The git directory or the repository, the working directory, and the staging area.
The git directory is where git stores all the data of your project. The directory is the most important part of git, and it gets copied when you clone a repository to your computer.
The working directory is your workstation, it contains one version of your project. Git pulls this version from the database (local or remote) on to your computer so you can use and modify it.
The staging area is just a file, which is stored in your git directory, that contains information about what will go into your next commit.
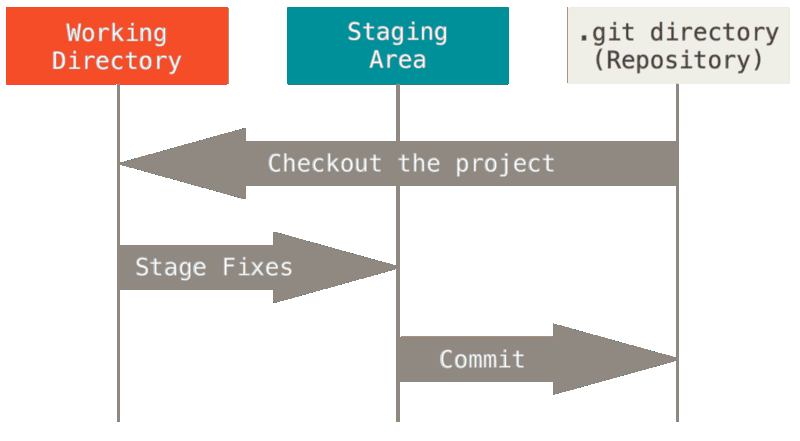
To understand better let’s look at the basic and most common git workflow:
- You modify or add files in your working tree.
- You select which changes you want to be part of your next commit, which adds only them to the staging area.
- You do a commit, which takes the files with the changes you selected from the staging area and stores them permanently to your git directory.
Now, all left is to connect between the three file states to the three main git sections.
If a particular version of a file is in the git directory, it is considered committed. If we make any change to that file, we added it to the staging area, and now the file is staged. And if the file was changed but has not been staged, the file is now modified.
Let’s Get Our Hands Dirty
There are two main ways to get out git repository start:
- We can take a local directory that is not under version control and convert it into a Git repository.
- We can clone an existing Git repository from some other place.
Creating a Repository in an Existing Directory
I will use a simple HTML file, Git bash terminal, and using Visual Studio Code IDE we can see the changes that occur at each step.

We will start by getting our terminal into the directory of our HTML file, you can see that my HTML file is in /d/sandbox/git, your directory can be in a different place than mine of course.

The next step is to type the git init command in our terminal, this creates a new subdirectory named .git that contains a git repository skeleton. At this point, nothing in our project is tracked by git.
VSCode note:
A nice feature that Visual Studio Code gives, is that it paints our files in the directory (Explorer panel at the left side) and adds a ‘U’ next to the file name. The ‘U’ stands for ‘Untracked’, and in addition to all this, on the Activity Bar in the Source Control tab, it adds the number of changes our code has.

We initialized git on our directory, but our repository is still empty, the next step is to add our HTML file to the next stage, the staging area. To do so we type git add index.html, but what will we do if we have more than one HTML file? In this case, we can use git add *.html, this command will add all the HTML files in our directory. Yet again we have a problem, what if we have a full directory project? With all sorts of files? For this situation, we can use git add –A or git add ––all which will update all our directory to the staging area.
There is also the git add . command, which also adds all the files to the staging area, but the difference between it and ––all / –A is that is doesn’t add all the content from sub-directories.
VSCode note:
Now that we added our HTML file to the staging area, VSCode changed the ‘U’ to ‘A’ which stands for ‘Added’.

All left to do now, is to commit our files to the local git repository and create our first version of it. Typing git commit -m “first commit” to the terminal will make git take a screenshot of all the files from the staging area, and store them in the git repository.
VSCode note:
In the terminal we see a couple of lines explaining the commit we just did, I’ll explain the important parts:
master (root-commit) – which branch we committed to.
first commit – our message we passed to the commit -m flag.
1 file changed – we added our HTML file to the repository.
11 insertions (+) – the number of lines we added to the repository.
Cloning an Existing Repository
If we want to get a copy of an existing Git repository, we will use the command git clone in our terminal, and in addition to the project itself, we also receive a copy of the project’s history with all available versions of that project. To make this command work we need to add the URL from where we clone the project, so for example, we write:
git clone https:// github.com / userName / repositoryName .git

This line will clone the repository stored in that URL to your directory and initialize a git repository skeleton along with it.
Another option is to create a new directory using this command in our directory:
git clone https:// github.com / userName / repositoryName .git myNewDiretoryName
This command does the same but the target directory is called myNewDirectoryName.
Status of our files
If you already have a working directory with files you created from scratch or cloned from some repository, each file in your working directory, can be one of two states: tracked or untracked.
Tracked files are files that were in the last commit, they can be modified, unmodified, or staged. In short, tracked files are files that git knows about.
Untracked files are any other file in your working directory which weren’t in your last version of the repository. When you first clone a repository all your files will be tracked and unmodified, because git just checked them and they haven’t been modified.

To know what is the status of the files in the directory we use git status command. For example, if we run this command just after cloning, we will see some messages.

They mean you have a clean working directory, or in other words, all your tracked files are unmodified. In addition, Git doesn’t see any untracked files in your directory, or else you would have seen them.

Now, let’s add a new file, a readme file to our directory, and then type git status again, we can see that now our new file is shown under untracked files and even shown in red, it’s asking us to use git add in the last sentence, so let’s add our new file to the staging area.

Now our new file is changed from untracked files to be under changes to be committed, and the file is now green.

If we add some text in the readme file now, it will be shown as a modified file as we can see next to the file name ‘M’, and in our terminal, we see it in both the changes to commit and in the changes not staged for commit. It happens because the creation of the file has been added to the staging area, but the changes we made didn’t. If we commit now, the changes will not be part of the commit. So to include the latest change to file all we need to do is to type the git add command one more time and then the last changes we made will be also committed.
Let’s talk about committing
In the article, we already used the git commit command, but we didn’t fully understand what it does.
Just a small reminder, that the only files that will get committed to our git repository, are the files you added to the staging area, other unstaged files will be left out and not be included in the next commit command.

Now, type in the most basic command git commit, doing so will open your editor with the file which gives some information about the commit. We see all the details regarding our commit, all we need to do is write a message for the commit to start, as a commit cannot be without a message.
All the lines starting with # are only there to summerise the commit and are optional, deleting or not will not affect the commission. Once we typed in our message we close the file and the commit is completed.
A very common and way more convenient way to commit is to use a flag to shorten the commit step ‘-m‘, all it does is letting us write the commit message right in the commit line instead of opening the editor typing the message and closing it.
git commit -m 'Your message goes here'
Deleting files
So we have our project all well and good, but there is a file we forgot about that we want to delete, how do we get it removed?

There are a couple of answers, the question is in what stage does the file in? Is the file staged? Has the file been committed? or still untracked?

If the file didn’t get committed or staged we can use rm , and in the terminal after typing git status, the untracked file will not show up at all.
If the file was already added to the staging area, we can use git restore ––staged
to un-stage the file, and use rm to delete the file completely.

If the file is already known by git then using git rm is the better option because if we type this command without the git keyword the file will get deleted but the change will be unstaged and we will have to manually stage the deletion to the staging area while using the git keyword it will stage the deletion automatically for the next commit.
A small side note, if we try and type git rm while the file is not known by Git, it will give an error.
Connecting to Github
After we talked about all the basics of git, how it works, and what it does, it is time to share the code we wrote with the world.
In this article, I will use GitHub as an example, but connecting to other online repositories may be possible exactly in the same way if not only a little different.

First let’s type in the command git remote to check if we already have any remote repositories connected, if the command returned with no output then there are no repositories connected.

In order to add a remote repository we use the command git remote add with two other parameters, first one is the name you give to your remote, second parameter is the URL of the remote.
git remote add , in the example above I chose to name my remote as "myGitHub", and wrote the URL to remote repository right after.
We can see that after adding the remote if we type git remote once more, it will return our remote with the name I gave to it.
Pulling and fetching from remote
To get data from the remote projects, we can use git fetch or git pull.

Let’s have a look at git fetch first, in my example I named my remote "myGitHub" when I added it, but if you first cloned to your directory a remote repository, then the default name is ‘origin’.
What it does, is downloading any changes that happened to the remote repository since you last cloned or fetched from it. It is important to note that it doesn’t merge or modify any files on your local directory automatically, so you have to merge it manually using the git merge /master*, which will merge your directory with the downloaded files.

Now for git pull , it does exactly as git fetch, downloading the latest changes from the remote to your local repository, the difference is that git pull tries to merge automatically the changes into the code you are currently working on.
Pushing Back to Your Remote
Finally, after a long journey of git commands, creating, deleting, modifying files, and committing it all to your local git repository, it is time to publish and share your project.
To push your project to your remote repository all you need to type is:
git push .


Top comments (0)