
For a better viewing experience find the original post at middleverse.dev.
Prologue
I'm going to show you how to engineer a system that will help you track your productivity on a daily basis. We're going to be working with Unix Shell, GitHub, Watson and Cron.
You can find the finished product here & here. The process won't include an accurate command by command tutorial. I'll be covering all the important parts for you to have a complete architectural understanding. And most of the code will be included. But refer to the repos linked for the complete code. And it's good to have them open while you follow along.
Tired Of Ambiguity
This project started with a few questions. How much did I work last year? What exactly did I work on? How much of that was on personal side projects? What days of the week are my most productive, are there any patterns I can find?
Consistency of effort makes me feel good. And I've never quantified or qualified the effort I’ve put in. I wanted to change this.
I Hoped Today Might Be A Good Day
One of my favourite recent flicks is 1917. The movie entails a Lance Corporal William chosen to deliver an important message about a strategic war-time countermove to Colonel Mackenzie, by foot. For Lance Corporal William, finding Colonel Mackenzie meant getting through many unknown hurdles, putting his life at risk. William was shown to persist until the message was delivered.
This sounded like a great metaphor for our newly coined bot, william. It guarantees that no matter what, if I worked on a given day, the message is to be delivered to my server, mackenzie 😉.
Before The Prologue Ends
I have to admit one last thing. I've always feared working with Shell scripts. It was one of those things that I felt that everyone else is just better at. If you've got the same fear, you need not turn away, this turned out to be quite fun and insightful about how some Unix systems level processes work.
Also, calling this a "bot" might not be semantically correct, or it might be. It might be apt to describe it as a system, process or just a cron job. Let's build, and you can call it what you like.
Introduction
Requirements
- Daily tracking
- Easy to use
- Automated
- Tracking across all machines (1x MacBook Pro & 1x Mac Mini)
- Central data aggregation in the cloud
A Quick Visual
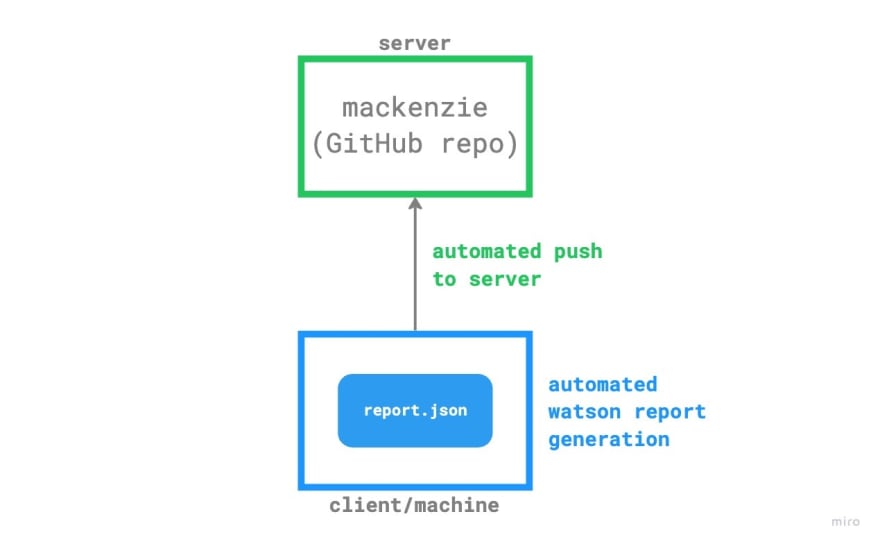
Each dev machine will host william, our tracking bot. Before the day ends, william needs to capture how much work was done on that machine, and send that information to mackenzie, our central server. It looks something like this:

A Typical Day At Work
Each day, we work in slots. My personal schedule is composed of 2-4 slots on average, and each slot varies in it's duration & type of work. On some days, it could be the same task/project all day long. Here's how it looks:

Quite typical. I rarely work after 8:00 PM, and I'm going to use that fact when thinking about mackenzie.
The Engineering Process
Technical Requirements
Here's a few technologies we'll need:
- Something to track time locally
- Converting the tracking data into a format that we can later analyze
- An automated method to send that data to our server
- A centralized server (mackenzie) to use as the source of all truth
1 - Starting With The Star Player
We need a tool to track our time locally, on each dev machine. Thankfully, there's Watson. Watson is a cross-platform CLI to track our time. Before this project began, I'd been using Watson for months. Here's a snippet of how it works:
➜ watson start writing +blog +william
Starting project writing [blog, william] at 15:30
watson start takes a main task and optional tags that start with a +. It responds with the starting project message and the time.
➜ watson stop
Stopping project writing [blog, william], started an hour ago and stopped just now. (id: 7e5edc9)
After we're finished with our current period of work, let's capture the slot with watson stop.
It's that easy. Every time you work for a block of time, you log it manually with Watson. I promise this will be the only manual step in the whole process, and it takes a few seconds of your time when working.
You can install Watson with brew and start playing around. One awesome feature is the --at argument during the start and stop commands in case you'd like to insert some logging for a specific time period in the past.
Aggregating Data With Watson
We can also use Watson to give us a report of our daily productivity and output it in certain formats. Here's the command to view today's report in JSON:
➜ watson report --day --json
{
    "projects": [
        {
            "name": "programming",
            "tags": [
                {
                    "name": "algo",
                    "time": 4327.0
                },
                {
                    "name": "data_structures",
                    "time": 4327.0
                }
            ],
            "time": 4327.0
        },
    ],
    "time": 4327.0,
    "timespan": {
        "from": "2022-10-06T00:00:00-04:00",
        "to": "2022-10-06T23:59:59.999999-04:00"
    }
}
As you can see, Watson generates a succinct report outlining the total time spent on all tasks, time spent on each task (which it calls projects), including time spent on each tag related to the task. We can use this data to generate various reports in the future, so it's nice to log it all.
The example here is quite simple, I worked on one task called "programming" for a total of 4327.0 seconds. "algo" and "data_sctructures" are the tags related to the main task. Again, the Watson docs are going to be your best bet to familiarize yourself with the syntax and all the flexibility this tool offers.
We've found a wonderful tool to log our productivity locally. Big step.
2 - Finding A Place On The Cloud
Let's put our focus on mackenzie, our timesheet server. Currently, we've got some work logged on our dev machine. At some point we have to figure out how to send that to mackenzie as our log of the day. We'll leave those details for the next section. Right now, let's build mackenzie.
For that, we're going to use a free tool, GitHub. We're simply going to create an empty repository on our GitHub to store our timesheets, I'm going to call this mackenzie. GitHub is highly available and secure. It's going to act as the perfect server.
You can initialize it as a private or a public repo. Up to you. You can check mine here (it's the final version). For now, mackenzie is going to be an empty directory, and that's where this section ends. We'll populate mackenzie after we build william, our bot.
The Gift That Keeps On Giving - GitHub
One of the best things about GitHub is the Activity Overview section, the small grid on your profile page (it might be hidden for some). The tiny squares on that grid light up green if any contributions were made that day. Since we're using GitHub to store our timesheets, with time we'll see a nice visual of our working days vs non-working days. Kind of like this:

Moving on.
3 - Forging The Happy Path With william
In The Last Episode
So we've got Watson installed, which records slots of work (in Watson language, that's a frame), and we have a place to send that JSON data, our GitHub repo. We're left with building:
- an automated workflow to generate reports locally
- an automated workflow to push these reports to mackenzie
Here's our current situation visually:
* * * * * /take/us/home/cron
We need to build william. It's essentially the umbrella term for our automations. The missing link is a system utility. We're going to be using the system's main scheduler for running jobs, cron. william at its core is a cron job.
A Bit Of Background On Cron
We can use the crontab command to add a cron job to our user. A crontab is a file that contains jobs. There can be multiple crontabs on each machine. The 2 main ones are a crontab for the root user and a crontab specific to each user that is not root. cron reads from all crontabs installed on the machine, and executes jobs at the scheduled times.
Let's say we have one user account on the machine, joey. Additionally, the superuser root account exists by default. If we run Watson as the root user, Watson is not going to find the frames (aka Watson data) previously recorded for Joey's account. Here's a system overview:

As you can see, there's separate crontabs. I spent too many hours debugging, unaware of this. The not-so-good-hours-of-my-life.
Using The Scheduler System
Here's how to list the logged in user's currently installed jobs with crontab:
➜ crontab -l
01 22 * * * cd /path/to/my/script.sh && ./script.sh
** 01 22 * * * ** is the system readable time format written inside this crontab. Following is the shell command to be executed. You can familiarize yourself with the time format using this tool. And there's some further cron examples here.
Our listed job runs at 10:01 PM every night. The task is to change directories into the path specified above and run a script named script.sh.
crontab -e will open up (or create first if none) your user's crontab file:
➜ crontab -e
01 22 * * * cd /path/to/my/script.sh && ./script.sh
~
~
~
~
~
~
~
~
"/tmp/crontab.2yZoYQ3aTH" 1L, 62B
The command-line editor shows that we only have one cron job in our crontab.
One thing we have to be careful of is to not run sudo crontab -e since that'll open the root user's crontab. Why is that an issue? Well Watson, by default (if installed with brew, and optionally if installed with pip), stores frames for the specific user that executes watson's commands. And we want this behaviour. These frames, or the watson data, is stored somewhere (depends on the machine) within a user's $HOME path. We want to make sure we run the cron job as the specific user so that watson report gives us a report for that specific user!
If this was unclear, what you need to know is Watson is user specific, and crontab we add jobs to needs to be user specific for that reason.
The Automated Workflow
As I'd mentioned earlier, we need two things automated, generating a Watson report, and pushing that data to mackenzie. We can accomplish both these things in one Shell script. And we can create a cron job to run this script daily. This script is the essence of william, therefore we can name it william.sh.
Before we dive into what's in william.sh, the cron job that runs daily, we need to create a script to initialize william. Since there are already two scripts, lets create another folder called william to store all logic. If that's too much "william" for you, check out my repo structure for clarity.
The Initialization Flow
Back to the initialization script. When a user clones a repo, we want them to run a script called init.sh to initialize william into the system. Here's what the initialization script looks like:

The flow above outlines a fresh install of william on a machine.
➜ bash init.sh
We clone this repo anywhere on our system, and run bash init.sh. Again we have to make sure we do this as the user, and not as root (don't use sudo). Why? That brings us to what the script logic does next. It fetches the current user and stores it in a variable. If we run this script as root, the fetched user would be root, and we don't want that. We want joey.
Next, we store the user's current crontab (list of cron jobs) into a temp file called mycron. We'll append our cron job on to this temp file.
But first, we need a place to store our william related scripts and files. Let's do that in $HOME/bin/william. Currently we're working in the cloned repo. This repo has the init.sh file that we won't need in the future. And it might have other logic for one time-use as this bot evolves.
We need a place to store our bot and bot related stuff. It's good convention to store scripts in $HOME/bin (aka /Users/joey/bin) if we want scripts to be available only to joey's account. If you're confused about the two william folders, here's a visual:

Hopefully things are clear after the diagram above. There are two folders named william, one cloned, the other one created in our $HOME/bin path to store our script (& more) that will be called by cron.
Now we copy william.sh from our cloned repo to $HOME/bin/william/william.sh and use chmod to give it permissions. Btw on ocassion I might refer to $HOME/bin/william as $WILLIAMPATH.
➜ cp william.sh $HOME/bin/william/william.sh
➜ chmod a+x $WILLIAMPATH/william.sh
Now let's create the cron job. We append the william cron job to mycron, the temp file we created earlier.
➜ echo "01 22 * * * cd $HOME/bin/william && ./william.sh" >> mycron
We've added a daily cron job for 10:01 PM to change directories into $HOME/bin/william and run william.sh. Things are coming together. You could write this cron in another manner:
➜ ~ echo "01 22 * * * bash $HOME/bin/william/william.sh" >> mycron
I found the first version to be more readable.
At this point, we haven't added the cron job to the crontab, only to our temp file mycron. Now we set mycron as our new crontab (aka overwrite the crontab):
➜ ~ sudo crontab -u $USER mycron
We want to make sure we set joey's crontab. To set a specific user's crontab, we can give it the -u argument followed by the user's name, and run it with sudo because this argument requires root privileges. Setting the crontab using the -u argument makes our intended outcome explicit and I like this format. We could've done crontab mycron as well, but it's not as explicit.
Quite the progress, but job's not over. We now need to clone mackenzie into $HOME/bin/mackenzie so that william.sh can write to our server:
➜ ~ git clone git@github.com:middleverse/mackenzie.git $HOME/bin/mackenzie
Please don't use my mackenzie, this is an example. Create your own, name it whatever you like.
One last thing before we can move on to building our william.sh script logic. We need to store a few key environment variables in an .env file for william.sh to read from. These include:
- The Watson installation path. Watson could be installed outside of the user, or the user cron may have the installation directory in it's path. So we're going to make it explicit to william.sh where Watson is installed.
- Where to store an error and/or event logfile for william to write to locally. This is not our timesheet log in mackenzie, but more so a local copy of what our script tried to do.
- Where mackenzie is stored on the machine. william.sh needs to write to mackenzie so this is important.
And setting up the .env file is the last thing the init.sh script does. William has been initialized! That was the end of the init script. Now let's see what's executing in william.sh.
William & The Daily Cron
Let's start from the top. In our init script, we installed a cron job to run $HOME/bin/william/william.sh at 10:01 PM. But what if the machine is shut down? The cron won't run. To resolve this issue, we need to make sure we change our power settings. If you're using a Mac, you can schedule the machine to wake up at a certain time and set it to go back to sleep some time after. This functionality is essential, and it's part of most modern computers.
For me, I want to run the cron sometime after I'm done work, so I chose 10:00 PM (I usually never work past 6 PM). So I set the machine to wake up at 10:00 PM as well since it may be powered off or sleeping. But what happens if the machine takes too long to wake up?
On average, a Mac can power up before 30 seconds from power off state, and less if it's in sleep mode. But the cron's issue is that if the machine is off or sleeping, it won't run the scheduled job(s).
For this reason, to be sure the machine is on, William is scheduled for 10:01 PM. 1 minute should be enough time for the machine to turn on. At 10:01 the cron executes william.sh and here's what we want to happen (let's build william (It might help to see the full code first on a split window)):

The machine wakes up at 10:00 PM, william.sh is executed at 10:01 PM (essentially). The first thing it does is source the environment variables that our initialization process had kept in the .env file.
A Random Note On The Perils Of Cron Environments
The most important of these env variables is the path for Watson. When we initialized william, we run which watson to find Watson's installation path and store it in the .env file for william.sh to use while executing Watson's commands.
➜ which watson
/opt/homebrew/bin/watson
This is needed because when cron runs a script, the $PATH variable is set to a default, usually PATH=/usr/bin:/bin. In the example above, if cron ran that command, it wouldn't be able to find watson since opt is not in it's $PATH.Running watson report would then give an error or an empty string due to watson not being a valid command. So we prefetch watson's executable path during init and store it in william/.env for william.sh to use. You won't find .env in the GitHub repo since .evn is only generated for the local $HOME/bin/william directory.
Here's another visual to help with understand:

Continuing with william
Then it checks if any work was done through Watson:
➜ watson report --day --csv
I found a useful behavior in Watson. If we run the report command with the --csv argument, it'll return the csv version of our report (duh, but wait). In the specific case that no work was done, it returns an empty string. Running with the --json argument or no argument for formatting, always gives some sort of "no projects started." error message. Using an empty string as a condition check is more favourable, hence we'll stick with --csv.
Next, if work wasn't done (response to above command was empty string), it's logs a "no work done by joey" message to our local logfile in $HOME/bin/william/william.log.
If work was done, it does a few things. First it logs "Some work done" along with a timestamp to our logfile. Then we switch directories to mackenzie in $HOME/bin/mackenzie.
Our job here to write to mackenzie. To make sure we have the most up to date data, since our other dev machines (if any) will be writing to mackenzie as well, and we don't want any conflicts, we do a git pull.
Now that we're ready to log, we need to organize our timesheets. Here's how I made mackenzie's structure:

At the root level, we have a directory containing years, each year has a file for each month. At the time of initialization, there are no directories or files, it's an empty repo.
Continuing our William trail, since we're ready to log, william.sh fetches the current year in YYYY format. If there's a directory without that name, it creates it, otherwise it changes directory into YYYY.
Subsequently, it fetches the current month in YY format, and if there is no file named YY.txt, it creates it.
➜ [ ! -d "$YEAR" ] && mkdir $YEAR
➜ cd $YEAR
➜ [ ! -f "${MONTH}.txt" ] && touch ${MONTH}.txt
Next we dump today's Watson report in JSON into a $DUMP variable like so:
➜ WORK=$(watson report --day --json)
And next we append $WORK to the respective timesheet, lets say if its November 2022, we'd append to /2022/11.txt:
➜ echo "${WORK}" >> ${MONTH}.txt
In my script, I've stored month in a $MONTH variable earlier, and there are some smaller details I've skipped over like concatenating two days JSON with a comma as the delimiter. But clarity can be found here.
The Finish Line
And finally, we use git to add, commit and push the updated timesheet to mackenzie's origin. William has logged our productivity💥!
You can now delete the cloned william repo, it's of no use, we just need the local copy of william it made in $HOME/bin/willaim.
As a wrap up here's what we built. A repo named william that lives on GitHub that we can clone on any machine. This repo contains a script that installs itself locally and creates a cron job. We built another repo named mackenzie that acts as a timesheet store. The cron job uses Watson to generate a daily productivity report and push to mackenzie.
This project was was full of nuances, but we're at the finish line. Seriously, pat yourself on the back if you made it here.
V2 And Beyond
I want to say that this isn't the only way to create William. We could entertain the thought of wrapping Watson around with a script which runs Watson commands and pushes data to mackenzie on watson stop (aka everytime a frame is logged). In this case for each frame, we'd get a GitHub contribution, and I just didn't want that. But it does get rid of using a cron job.
You could probably think of other adaptations and evolutions of this project, and I hope you build your own version!
Congrats But There's a Bug Under The Microscope
What's up with .txt?
One detail that does matter is why are we using .txt? Well as we concatenate and append daily JSON in one file, it turns our our format is invalid JSON. We'll have to build a parser for data analysis. It's out of scope for this project, but it's not very complicated (wrap around with an array and a few other syntax changes to make it work).
A Note About Git & GitHub Configurations
Another thing to note is, if we don't have ssh keys configured for pushing to mackenzie from our machine, we need to do that. For a script to push to origin, it can only be through ssh. You can also setup a project level .gitconfig to push as a specific GitHub user. If you're happy with your global git config, it doesn't need to be edited further.
What If I Need To Remove William?
While there's no remove script, you can remove william by accessing your crontabs through crontab -e and removing the specific cron job. Make sure to delete william and mackenzie from $HOME/bin. Along with this, the project isn't a polished production version of anything. It might have a few other kinks. But it works, and I'm putting the finished label on it for myself.
Conclusion
That was a mouthful. I hope this gave you a starting point for building yourself a personal productivity system. My own william is passing the message on to Colonel Mackenzie on a nightly basis, exactly at 10:01 PM. And it feels great to have the expectation that in a year, I can look back and say something like,"Hey, my most productive work day is Thursday!".
Arshi Bhasin

Top comments (0)