
In-Depth Tutorial: Building a Modern, Full-Stack Web App
In this series, I want to build a modern, extensible, yet simple set up that allows me to quickly build and deploy a web-frontend, -backend and database. While this project functions as a template for future projects, we still need some sort of goal. This is why we will create the simplest todo-app ever. Todo-apps are a good use case as it is simple but still covers most aspects of a modern application. We will have to:
- connect a database to store todos
- work with that database by reading, creating, updating and deleting entries
- create a backend that exposes a REST-API for our frontend
- secure our backend properly
- build a frontend that works well with data from an API
There are several ways to build this modern web-application. I chose the following frameworks, each of which is covered in one tutorial:
- Part I: The Backend Using Java With Spring
- Part II: The server-side-rendered Frontend Using VueJS And NUXTJS
- Part III: Dockerizing Our Front- & Backend
- Part IV: Deploying Our Front- & Backend In The Cloud using Heroku dynos
- Part V: Automating The Build- And Deployment-Process using GitLab CI/CD
Prerequisite
- Good knowledge of object-oriented programming and java
- Good knowledge of javascript
- Basic knowledge of the terminal
- A mac - While all of this should also work on windows I did not spend any time to check for or provide solutions for windows
The Frontend Using VueJS And NUXTJS
In this part we will initialise and program our web frontend. As with the backend, this part is divided into four subparts:
- Choosing the framework
- Initialising a NUXTJS project
- Programming the frontend with additional changes to our backend
- Building the frontend
Choosing the framework
Similar to the backend there are hundreds of ways to accomplish what we set out to do. I worked with angularjs and a little with angular before but in general I don't have any experience with modern js-frontend-frameworks at this point. If we look at the three main frameworks angular, vuejs and react one might argue which is better but I think it is commonly agreed on that they are all good, modern frameworks. For this series I went with vuejs just because I liked the fact that is completely community driven.
However, before we start lets take a step back. In general frontend frameworks, especially Java-Script-Frameworks gained significant popularity over the last couple of years. However, most of them rely heavily on the client, as the side is build dynamically using javascript. This has two main disadvantages:
- The side is not SEO friendly
- The performance of the side depends on the performance of the client
The solution to this is to create most of the html, css and js on the server. These applications are known as server-side-rendered (SSR) applications. Most of the modern js-frameworks offer ways for SSR.
For vuejs there is a framework called NUXTJS for SSR.
Initalising a NUXTJS project
NUXTJS uses nodejs to run javascript on the server. It also uses nodes package manger npm for dependecy manger. Please note, that you can also use yarn but we will go with npm here. To initialise a NUXTJS project, make sure you have installed a recent nodejs version and run the following command on the terminal (in your projects root folder):
npx create-nuxt-app frontend
This initialiser will then ask us a couple of questions. As before the point of this series is to keep everything as simple as possible. We will select:
- frontend as the project name
- whatever description you like
- your name as author
- NPM as package manager
- No UI Framework
- No custom server framework
- Axios as module for network requests (use the spacebar to select)
- ESLint to help us with formatting or code (we will look into that in a bit - again select using the spacebar)
- No test framework
- SSR for rendering
- Select jsconfig.json (using the spacebar) if you are using vs code (like I do)
Programming the frontend
Now that we have initialised or project, lets program the frontend. We will do that in four steps.
- Understanding what was generated
- Preparing our setup for development
- Implementing the interface
- Connecting our components to our backend
- The login page
Understanding what was generated
Let's open the project in our favourite code editor. For me that Visual Studio Code. Lets have a look what was generated. As with the backend we will look at every folder and file in the root directory. There is actually a really good documentation about the folder and what they should be used for. That's why I will just go very briefly into it here.
- Assets → Any kind of files that should be compiled and are needed in our project (e.g. stylesheets, fonts)
- Components → That's where we store our vuejs components. A component is a reusable vue instance (e.g. footer, navigation, todo-item).
- Layouts → Layouts are used to customise the look and feel of our pages. We will only use the default layout in this tutorial.
- Middleware → Here we can define function that run before pages are rendered. We will not use middlewares in this tutorial.
- node_modules → All of our dependencies (see package.json) are stored here
- Pages → The pages of our application.
- Plugins → Here we can and will define plugins that are run before initialising our vuejs application.
- Static → Place for static files, which we will not have.
- Store → If we were to use vuex store, the files would go here
- .editorconfig → This files just provides some settings for our code editor, such as that trailing whitespaces should be deleted
- .eslintrc.js → This is where we configure ESLint. So what is ESLint?
- ESLint basically looks at your code and checks if it conforms to predefined rules in terms of formatting and code style
- Our eslint config file contains five blocks
- Root → This tells eslint that the config file is located in the root directory of the project. Parent files and directories are not considered. Further documentation can be found here.
- Env → Here we define the environment of the project. In our case our project is for the browser and uses node
- ParserOptions → Here we set the parser for eslint. As NUXTJS is using babel under the hood to build our application, we use the babel-parser here.
- Extends → Here we define sets of rules that our project uses
- Rules → Here we could define additional rules
- .gitignore → Files and folders to be ignored by git
- jsconfig.json → Settings for VS Code
- nuxt.config.js → Here we configure nuxt. As this is documented pretty good with inline-comments, I won't go into it.
- package.json → Here we configure our nodejs-application. We set basic attributes such as name, version. Additionally we define scripts, dependencies and devDependencies.
- Scripts can be executed via npm run and execute the command respectively
- Dependencies are the modules that we need to run our app. They are then pulled from the npm-registry and stored in node_modules. The version can be defined using special syntax, documented here.
- devDependencies behave just like dependencies, only that there are not needed to run the app, only to develop it. More on that here.
- package-lock.json → This file contains every single dependency and the exact version number used. That way you can rebuild a project and reproduce errors someone else might have gotten more reliable.
- README.md → The readme file.
After we run our app at least once there will also be
- A .nuxt directory that contains to compiled output
Preparing our setup for development
Before we start to program our application, we will do further configuration to ensure a smooth development workflow.
ESLint auto-fix on save
When I first started programming the app I found the ESLint errors immensely annoying, as you can't use your application unless all the errors are fixed. However, there is a way to automatically fix all ESLint errors on save. All we have to do is go to our nuxt.config.js file and replace the current extend method by the following.
    extend(config, ctx) {
      if (ctx.isDev && ctx.isClient) {
        config.module.rules.push({
          enforce: 'pre',
          test: /\.(js|vue)$/,
          loader: 'eslint-loader',
          exclude: /(node_modules)/,
          options: {
            fix: true
          }
        })
      }
    }
Styling using Sass
In this tutorial I will not explain the css we use. To ensure your app looks and feels the same, I will provide you with the complete stylesheet every time we create a new layout, page or component. We could just use plain css but I prefer Sass, as it is more powerful, thanks to variables, nesting and so on. As Sass has to be compiled (converted into plain css) we have to add a dependency for development. Do so by running the following command in your terminal inside the frontend project folder:
npm install sass-loader node-sass --save-dev
Running our application
We can run our application in development mode by executing the following command on our terminal inside the frontend folder. The frontend is then accessible from the browser at http://localhost:3000
npm run dev
Cleaning up
Nuxt provided us with a base setup, which is nice but we will just get mostly rid of it.
- Delete default.vue in layouts
- delete index.vue in pages
- delete logo.vue in components
Congrats, our application is now broken :)
Implementing the interface
To work with our backend we want to have a login page, as well as an interface to list, create, delete and complete todos. This tutorial does not aim to build a perfect todo app. The purpose is to have a base set up that can easily be used for other projects. That's why our focus is to work with data from our api.
We will have
- one layout for the entire app
- one page for the login → we will do this at the very end, when connecting our backend
- one page to work with todos
- three componets
- one to create todos
- one that acts as a container for existing todos and provides us with an interface to create todos
- one for every single todo
The layout - default.vue
Nuxt uses vues single file components. In every .vue file we have a template section (our html) an optional script section (our javascript) an optional style section (our css).
Create a new layout called default.vue in the layout folder and insert the following code:
    <template>
      <div>
        <nuxt />
      </div>
    </template>

    <style>
    html {
      font-family: 'Source Sans Pro', -apple-system, BlinkMacSystemFont, 'Segoe UI',
        Roboto, 'Helvetica Neue', Arial, sans-serif;
      font-size: 16px;
      word-spacing: 1px;
      -ms-text-size-adjust: 100%;
      -webkit-text-size-adjust: 100%;
      -moz-osx-font-smoothing: grayscale;
      -webkit-font-smoothing: antialiased;
      box-sizing: border-box;
    }

    *,
    *:before,
    *:after {
      box-sizing: border-box;
      margin: 0;
    }

    .container {
      margin: 0 auto;
      min-height: 100vh;
    }

    .title {
      font-family: "Quicksand", "Source Sans Pro", -apple-system, BlinkMacSystemFont,
        "Segoe UI", Roboto, "Helvetica Neue", Arial, sans-serif;
      display: block;
      font-weight: 300;
      font-size: 64px;
      color: #35495e;
      letter-spacing: 1px;
      margin-top: 20px;
      text-align: center;
    }

    </style>
As I said I will not talk about styling. Our template section is really straight forward as we just define a div element where our NUXTJS app is rendered into.
The todo page - todo.vue
Create a new file called todo.vue in the pages folder and insert the following code:
    <template>
      <div class="container">
        <h1 class="title">
          My To Do List
        </h1>
      </div>
    </template>

    <script>

    export default {
      data () {
        return {
          todos: {
            type: Array
          }
        }
      },
      asyncData (ctx) {
        return {
          todos: [
            {
              'id': '1',
              'title': 'A',
              'completed': false
            },
            {
              'id': '2',
              'title': 'B',
              'completed': true
            }
          ]
        }
      }
    }
    </script>
Let's go through the template and script section.
- There is nothing really happening here, besides a wrapper and a headline.
- The data function returns an object that we can use in our template. We will need to work with an array to store our todos. We can not make any http request here.
- The asyncData function is used to fetch data, which will then replace the corresponding variable in the data block. For now we will use dummy data but instead of a static array, this is where we are going to call our api. AsyncData is called whenever a page is loaded.
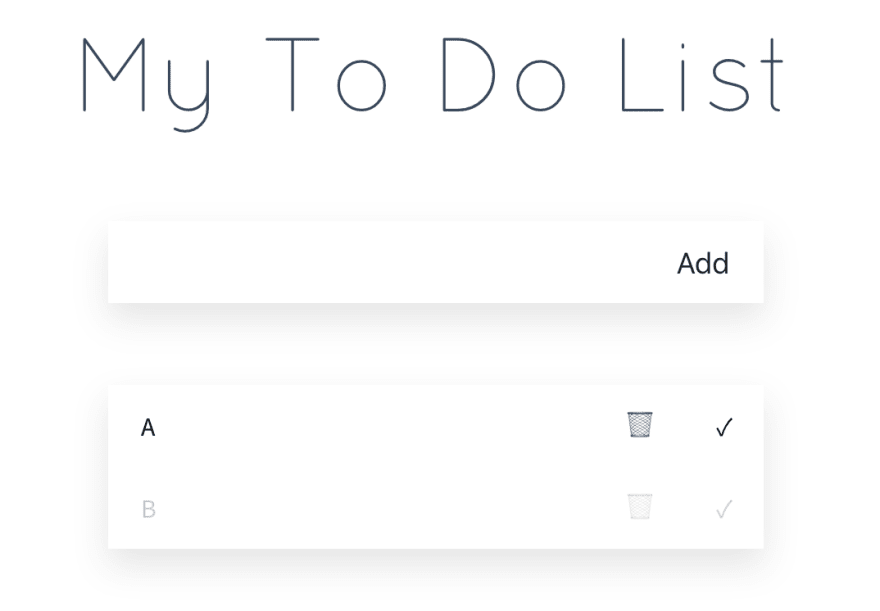
If we open our application in the browser we will just see our headline.

However, if we download and open the vue extension for chrome we can see that the asyncData method injected the objects in our todo array.

Now lets create our first component to work with our todos.
Component I - ToDoList.vue
This component is responsible for managing our todos.
- It will be provided with the initial todos from the backend
- It will display all todos using another component
- It will handle the creation of new todos
Create a new file called ToDoList.vue in components and insert the following code.
    <template>
      <div class="to-do-container">
        <div class="create-container">
          <input v-model="titleOfNewToDo" type="text">
          <button @click="create">
            Add
          </button>
        </div>
        <div class="to-do-list-container">
        </div>
      </div>
    </template>

    <script>

    export default {
      props: {
        todos: {
          type: Array,
          default () {
            return []
          }
        }
      },
      data () {
        return {
          titleOfNewToDo: ''
        }
      }
    }
    </script>

    <style lang="scss">
    .to-do-container {
      width: 400px;
      margin: auto;
      margin-top: 50px;
      display: block;

      .create-container {
        width: 100%;
        height: 50px;
        box-shadow: 0px 10px 20px rgba(0, 0, 0, 0.1);

        input {
          height: 50px;
          width: 250px;
          border: none;
          padding-left: 10px;
          font-family: "Quicksand", "Source Sans Pro", -apple-system,
            BlinkMacSystemFont, "Segoe UI", Roboto, "Helvetica Neue", Arial,
            sans-serif;
          font-size: 18px;
          &:focus {
            outline: none;
          }
        }

        button {
          height: 45px;
          width: 145px;
          border: none;
          cursor: pointer;
          text-align: right;
          padding-right: 20px;
          font-size: 18px;
          &:focus {
            outline: none;
          }
        }
      }
    }
    .to-do-list-container {
      width: 400px;
      margin: auto;
      margin-top: 50px;
      display: block;
      box-shadow: 0px 10px 20px rgba(0, 0, 0, 0.1);
    }
    </style>
Lets see what is happening here.
Besides a few containers there are only two elements worth mentioning.
- The input
- The input element is used to give new todos a title
- To store and access the typed title we link the input to a property of our data object called titleOfNewToDo
- The button
- The button is used to actually create the todo
- We want vue to trigger a method (called create) when this button is clicked
Components work a little different than pages. We can not fetch any data here using asyncData. If we want to provide our components with inital data, we have to pass it using properties (props). In our case we need a property for our todo of type array. If our component is not provided with an array we default to an empty array. The title of a new todo is stored in the returned object of our data function.
So far we have created our new component but we are not using it. Lets go back to our todo.vue page and add the component. To do so we need to register the component in our script section.
    <script>
    import ToDoList from '~/components/ToDoList.vue'
    export default {
      components: {
        ToDoList
      },
      data () {
    ...
We can then use the component in our html and pass the todos array as property to the component.
    <div class="container">
      <h1 class="title">
        My To Do List
      </h1>
      <to-do-list :todos="todos" />
    </div>
If we refresh our app in the browser we can see the input field to create new todos. It isn't working yet but it is there.

Also there aren't any todos. So let's create a new component.
Component II - ToDoListItem.vue
This component is responsible for handling a single todo.
- It will display a single todo
- It will handle the completion of this todo
- It will handle the deletion of this todo
Create a new file called ToDoListItem.vue in components and insert the following code.
    <template>
      <div class="to-do-item" :class="{ completed: todo.completed }">
        <span>{{ todo.title }}</span>
        <div class="controls">
          <span @click="deleteItem">🗑</span>
          <span @click="completeItem">✓</span>
        </div>
      </div>
    </template>

    <script>

    export default {
      props: {
        todo: {
          type: Object,
          default () {
            return {}
          }
        }
      }
    }
    </script>

    <style lang="scss">
    .to-do-item {
      width: 100%;
      display: block;
      height: 50px;
      &.completed {
        opacity: 0.2;
      }
      span {
        height: 50px;
        padding-left: 20px;
        line-height: 50px;
        width: 300px;
        display: inline-block;
      }
      .controls {
        display: inline-block;
        height: 50px;
        line-height: 50px;
        span {
          line-height: 50px;
          height: 50px;
          display: inline-block;
          width: 45px;
          text-align: center;
          padding: 0;
          cursor: pointer;
        }
      }
    }
    </style>
Lets go through this.
There are three things worth point out here.
- Our wrapper div will be given the class completed if the property completed of our todo is set
- We can display properties of our todo by using curly brackets and our todo object (e.g. todo.title)
- Analog to our create method we bind two functions to a span element in the event of a click
Analog to our todo-list-component we declare a property of type object to store our todo.
Lets go back to our ToDoList component to actually use our new component. For the script section we make the following changes.
    <script>
    import ToDoListItem from '~/components/ToDoListItem.vue'

    export default {
      components: {
        ToDoListItem
      },
      props: {
    ...
In our template section we add the component link this
    </button>
    </div>
    <div class="to-do-list-container">
      <to-do-list-item v-for="todo in todos" :key="todo.id" :todo="todo" v-on:delete="deleteItem" />
    </div>
    </div>
Our component has three attributes
- We use the v-for declaration to create this component for each todo in our todos array
- The :key attribute lets vue know which property of our todo uniquely defines it (this is not mandatory but considered best practise)
- The :todo attribute sets the todo property in our ToDoListItem component to the corresponding todo
- The v-on:delete attribute tells the component to call its deleteItem method if the child component (to-do-list-item) raises the event "delete" → We will talk more about this in a second
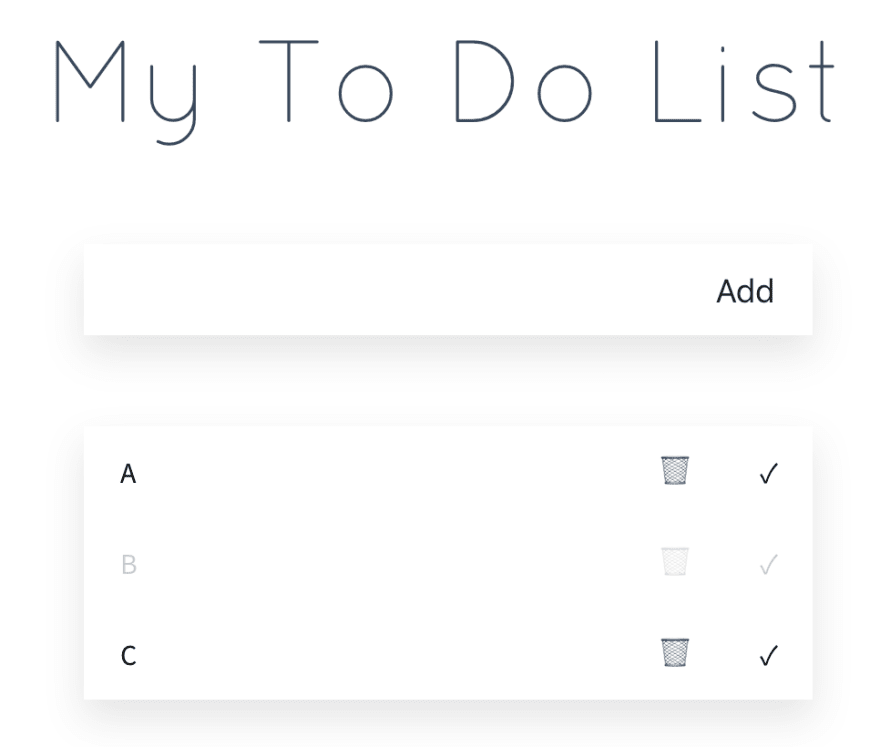
If we refresh our app we can actually see our todos. However, we can not create, complete or delete todos.
Creating new todos
To create new to dos we have to implement the create function in our ToDoList component. We do this in the script section.
    data() {
        return {
          titleOfNewToDo: ''
        }
      },
    methods: {
       create() {
         this.todos.push({ id: this.titleOfNewToDo, title: this.titleOfNewToDo, completed: false })
         this.titleOfNewToDo = ''
       }
    }
As with data, we create a new object for methods and define the functions in there. For now our create function we add to lines. We will change that once we connected our backend. At this point it is just a proof of concept.
- Our create method adds a new object to our todos array. Id and title are the current value of our input field. Completed is false.
- We then reset the input field.
We are now able to create new todos, locally at least.
Completing and deleting todos
To complete and delete todos we need to make changes in our ToDoListItem component.
    methods: {
        completeItem () {
          this.todo.completed = true
        },
        deleteItem () {
          this.$emit('delete', this.todo)
        }
    }
- Completing a todo
- To complete a todo we simply set the completed-property to true
- Vue will then automatically assign the completed css class to the element since the property has changed
- Deleting a todo
- We could just delete the item by removing the element, however this is not good practice as we want our data object (the array of todos) to be consistent. We therefore want to remove the todo from the array. Vue will notice that the item no longer exsists and remove it.
- Our ToDoListItem component does not have access to the array of all the todos. To remove the item, we have to communicate with the parent component. By calling the $emit method, we do exactly that. We trigger the event "delete" and pass the todo object to it.
- In our ToDoList component we add a method block in the script section.
- As you may recall we added a v-on attribute to the component stating that whenever the event "delete" is called, we want to trigger the "deleteItem" method.
- The method simply removes the item from the array
    methods: {
      deleteItem (item) {
        this.todos.splice(this.todos.indexOf(item), 1)
      }
    }
When we reload the app in the browser we now find our interface fully working.

Refactoring the to do item creation
Now that we know how to use components and how to communicate between them, it seems wise to also move the creation of todos to a seperate component.
Create a new component by the name ToDoItemCreate.vue and insert the following code:
    <template>
      <div class="create-container">
        <input v-model="titleOfNewToDo" type="text">
        <button @click="create">
          Add
        </button>
      </div>
    </template>

    <script>

    export default {
      data () {
        return {
          titleOfNewToDo: ''
        }
      },
      methods: {
        create () {
          this.$emit('create', this.titleOfNewToDo)
          this.titleOfNewToDo = ''
        }
      }
    }
    </script>
The template is the same as before in our ToDoList-component. In the script section we have the titleOfNewToDo as data attribute and similar to the deletion of todos we call the event create in our parent component.
Therefore we have the following changes in our ToDoList component.
In the template section we replace the div "create-container" with the component.
<to-do-item-create v-on:create="createItem" />
In the script sections we refactor accordingly:
    import ToDoItemCreate from '~/components/ToDoItemCreate.vue'
    import ToDoListItem from '~/components/ToDoListItem.vue'

    export default {
      components: {
        ToDoItemCreate,
        ToDoListItem
      },
      props: {
        todos: {
          type: Array,
          default () {
            return []
          }
        }
      },
      methods: {
        createItem (item) {
          this.todos.push(item)
        },
        deleteItem (item) {
          this.todos.splice(this.todos.indexOf(item), 1)
        }
      }
    }
Now our app is even cleaner and should still work as well as beofre.
Connecting our components to our backend
So far our frontend works but it is isolated and resets on every reload. We now want to connect our frontend to our backend.
Configuring the backend
Wait, why do we need to make changes to our backend? This is because we made our backend super secure. That is why we have to talk about Cross Site Request Forgery (CSRF) for a second.
I will only cover the basics here so you know why we have to make changes to our backend. If you want to go into more detail I would recommend these links: What is CORS?, What is CSFR, Cross Site Request Forgery (CSRF), Is CORS helping in anyway against Cross-Site Forgery?.
We want to make it as hard as possible for hackers to mask as actual users. We try to ensure that by making sure that every request to the backend must contain an unique token inside the header. This token is set by vue using the cookie-to-header method. In our current set up this will not protect us as soon as or cors setup fails as the token is transmitted via a cookie. It does however add an extra layer of protection.
CSRF-Configuration in the backend
In our WebSecurityConfiguration we add an additional line to our configure method.
        @Override
        protected void configure(HttpSecurity http) throws Exception {
        ...
           http.csrf().ignoringAntMatchers("/api/login").csrfTokenRepository(CookieCsrfTokenRepository.withHttpOnlyFalse());
        }
We configure
- that csrf protection should not be applied to our login endpoint, as this is where the user gets the token
- that csfr prrotection should be used with a standard cookie-csrf-token-repository
- that this repository should set httponly to false so that our frontend can use the cookie-to-header-method
Before we switch back to the frontend make sure that your MonogDB and your backend is running as we will now try to access it.
Implementing the API
Now we can switch back to the frontend. We will use axios for making web request to our backend. We also need the proxy module. Install it as npm dependecy using
npm install @nuxtjs/proxy
Let's start by configuring the url of our backend in axios. Open the nuxt.config.js file and replace the axios part as followed.
    /*
      ** Axios module configuration
      ** See https://axios.nuxtjs.org/options
      */
      axios: {
        proxy: true,
        host: 'localhost',
        prefix: '/api/'
      },
      proxy: {
        '/api/': 'http://localhost:8080/'
      },
The reason why we use the proxy module here is that we want to be able to run front- and backend from different domains. Without the use of the proxy module this would not be possible, let me explain.
When we log in, we make a request from our browser directly to our backend. Our backend then tells the browser to use cookies for every request that goes to the backend. This is where the problem lies. Since we are rendering parts of our frontend from the server-side, we make requests to the backend that are not directly triggered by the browser. They are triggered by our frontend-server-side. These request will not carry any cookies because this is not the same host that was used when we logged in. In other words, the cookies can only be used for request directly from the browser.
To solve this problem we have to make every single requests from the server-side. Even request directly from the browser should go to our frontend-server and should then be redirected / proxied.
This is why our configuration results in the following behaviour:
- All requests in our app have the prefix localhost/api/
- All requests to /api/ are proxied to http://localhost:8080/api/
Right now this does not make a difference as it is always localhost. However, this will change once we deploy the application.
Now we can work with the data. Create a class in javascript for our todos. Create a folder in assets called data and a new file called ToDo.class.js with the following content.
    export default class ToDo {
      constructor (id, title, completed) {
        this.id = id
        this.title = title
        this.completed = completed
      }
    }
We could implement our api calls in every page and component where we need to. Yet, I prefer to bundle all our calls to the api in one file. That way it can be maintained and reused more easily. For that we create another folder in assets called service containing a new file called ToDoService.js with the following code.
    import ToDo from '~/assets/data/ToDo.class'

    export default class ToDoApi {
      constructor ($axios) {
        this.axios = $axios
      }

      findAll () {
        return this.axios({
          method: 'get',
          url: 'todo',
          withCredentials: true
        }).then((response) => {
          const todos = []
          response.data.forEach((todo) => {
            todos.push(new ToDo(todo.id, todo.title, todo.completed))
          })
          return todos
        })
      }

      create (title) {
        return this.axios({
          method: 'post',
          url: 'todo',
          data: {
            title,
            completed: false
          },
          withCredentials: true
        }).then((response) => {
          return response.data
        })
      }

      complete (todo) {
        return this.axios({
          method: 'put',
          url: 'todo/' + todo.id,
          data: {
            id: todo.id,
            title: todo.title,
            completed: true
          },
          withCredentials: true
        }).then((response) => {
          return response.data
        })
      }

      deleteItem (id) {
        return this.axios({
          method: 'delete',
          url: 'todo/' + id,
          withCredentials: true
        })
      }
    }
Okay so there is a lot going on here, don't panic. Lets go through it step by step.
- First we import our newly created ToDo class
- We then define a constructor that takes in the $axios object
- Then we define the functions (endpoints) of our API
- findAll
- Here we send a get request to todo
- The option "withCredetilas" tells axios to send the tokens we acquired through the login with the request
- We convert the array of objects to an array of todos using our class and return it
- create
- The creation of todos is pretty similar to getting the todos
- Instead of get we will perform a post request
- The method body contains the title and completed (which should always be false)
- complete and delete
- These request are similar to create
- They differ in the request type (put and delete) and they use the id of the todo to dynamically extend the url
- findAll
That wasn't that complicated, was it? Now you may ask yourself how we can access our api in our components. For that we need to expose it. We do that by creating a plugin called services.js in plugins. The new plugin contains the following code
    import ToDoService from '~/assets/service/ToDoService'

    export default (ctx, inject) => {
      const services = {
        todo: new ToDoService(ctx.$axios)
      }

      inject('services', services)
    }
- We firstly import or ToDoService
- In our main plugin-code we define a new object called services and add the ToDoService.
- The idea is to define a service for every data type and then to simply add it here
- We finally inject the services object under the name services so we can use it everywhere
We now need to register the plugin in the nuxt.config.js file in the plugin section.
    /*
      ** Plugins to load before mounting the App
      */
      plugins: [
        '~/plugins/services.js'
      ],
What about errors?
It might happen that the request to our backend fails. This can happen for a number of reasons, the most simple one is that the internet connection of the user drops. We could add a catch block to every request in our Api class. This should be done if we need to handle a specific error individually. However, it also makes sense to bundle all errors, to handle the most basic ones in one central place. We do this by using another plugin, the interceptor.js.
    export default (ctx) => {
      ctx.$axios.onError((error) => {
        const errorMsg = error.response ? error.response.data.message : 'Unknown error'
        const errorCode = error.response ? parseInt(error.response.status) : -1
        if (errorCode === 401) {
          console.log(errorCode + ' - ' + errorMsg)
          ctx.redirect('/')
        } else {
          throw new Error(error)
        }
      })
    }
- We extract the status code and message of the error
- If it is a 401 error we simply redirect to our login (index) page → that we still have to create
- If it is any other error we just throw it. In a real application the errors should obviously be handled much better. However, as this project is about the setup, we are done.
Again, we need to register the plugin in the nuxt.config.js file.
    /*
      ** Plugins to load before mounting the App
      */
      plugins: [
        '~/plugins/services.js',
        '~/plugins/interceptor.js'
      ],
The login page
We are now at the point where we would access our backends api. However, it would not let us in, due to our security configuration. We therefore need a login page. Create a new page in pages called index.vue and insert the following code:
    <template>
      <div class="container">
        <h1 class="title">
          Login
        </h1>
        <form @submit.prevent="performLogin" action="post">
          <p>
            <input
              id="username"
              v-model="username"
              type="text"
              name="username"
              placeholder="Username"
              required
              autofocus
            >
          </p>
          <p>
            <input
              id="password"
              v-model="password"
              type="password"
              name="password"
              placeholder="Password"
              required
            >
          </p>
          <button type="submit">
            Sign in
          </button>
        </form>
      </div>
    </template>
    <script>

    export default {
      data () {
        return {
          username: '',
          password: ''
        }
      },
      methods: {
        async performLogin () {
          if (await this.$services.login.performLogin(this.username, this.password)) {
            this.$router.push('todo')
          } else {
            this.username = ''
            this.password = ''
          }
        }
      }
    }
    </script>
    <style>
    form {
      width: 200px;
      margin: auto;
      text-align: center;
    }

    input {
      width: 100%;
      border: none;
      border-bottom: 1px black solid;
      background: none;
      height: 50px;
      line-height: 50px;
      font-size: 24px;
      font-family: "Quicksand", "Source Sans Pro", -apple-system, BlinkMacSystemFont,
        "Segoe UI", Roboto, "Helvetica Neue", Arial, sans-serif;
      font-weight: 300;
      margin-top: 20px;
      margin-bottom: 20px;
      outline: none;
    }

    button {
      width: 100%;
      height: 50px;
      border: none;
      background-color: #f0c808;
      font-family: "Quicksand", "Source Sans Pro", -apple-system, BlinkMacSystemFont,
        "Segoe UI", Roboto, "Helvetica Neue", Arial, sans-serif;
      font-size: 18px;
      font-weight: 600;
      cursor: pointer;
      outline: none;
      margin-top: 20px;
      border-radius: 10px;
    }
    </style>
Lets start with the template section:
- We create a form with to inputs
- Both inputs are binded to a vue property using the v-model directive
- When submitting the form we will call the performLogin method and also prevent the browser from executing any default behaviour
In the script section we added a method for the login
- We call a method from a login service (which we will create in a second)
- If the method returns true, we redirect to the todo page
- If the method returns false, we simply reset the input fields
Next, let's create a new service in assets/service called LoginService.vue and insert the following code:
    export default class LoginService {
      constructor ($axios) {
        this.axios = $axios
      }

      performLogin (username, password) {
        const data = new FormData()
        data.append('username', username)
        data.append('password', password)
        return this.axios({
          method: 'post',
          url: 'login',
          data
        }).then(() => {
          return true
        }).catch(() => {
          return false
        })
      }
    }
This should be vrey straightforward. We perform a post request and return either true or false based on the response. As you may recall, we configured our backend to simply return 200 in case of a successful and 401 in case of an unsuccessfull login.
Lastly, we got to inject our new service, by updating our our services.js plugin.
    import ToDoService from '~/assets/service/ToDoService'
    import LoginService from '~/assets/service/LoginService'

    export default (ctx, inject) => {
      const services = {
        login: new LoginService(ctx.$axios),
        todo: new ToDoService(ctx.$axios)
      }

      inject('services', services)
    }
Go ahead, and test the login it should work fine.
Accessing the API
Okay after all the preperation it is now time to use our repository. Due to our setup this is incredibly simple.
In our todo.vue page we simply do the following to get our todos from the api.
    async asyncData (ctx) {
        return {
          todos: await ctx.app.$services.todo.findAll()
        }
      }
Our app now displays the entries from our MongoDB database using our Spring backend. Awesome!
Now lets also implement todo creation, completion and deletion.
Creation
Navigate to ToDoListCreate.vue and replace our creation method with this.
    create() {
      this.$services.todo.create(this.titleOfNewToDo).then((data) => {
        this.$emit('create', data)
        this.titleOfNewToDo = ''
      })
    }
Simple, eh?
Completion
Navigate to ToDoListItem.vue and replace our completeItem method.
    completeItem() {
      this.$services.todo.complete(this.todo).then((data) => {
        this.todo.completed = true
      })
    },
Deletion
In the same component we also change the deleteItem method.
    deleteItem() {
      this.$services.todo.deleteItem(this.todo.id).then(() => {
        this.$emit('delete', this.todo)
      })
    }
Testing the application
- Open localhost:3000/todo without logging in first → you should be redirected to /login
- Type in some random login credentials and hit enter → the login should fail and you should still be on /login
- login with user and password → as we defined in our WebSecurityConfiguration
- Add a new todo
- complete the todo
- delete the todo
- add three more todos
- Reload the page, your todos should still be there
Congratulations for completing this tutorial!!!
As this is my first tutorial series, I would really appreciate feedback. You can find me on twitter, instagram or send me an email.
This tutorial was originally published on my personal website.

Oldest comments (0)