
In-Depth Tutorial: Building a Modern, Full-Stack Web App
In this series, I want to build a modern, extensible, yet simple set up that allows me to quickly build and deploy a web-frontend, -backend and database. While this project functions as a template for future projects, we still need some sort of goal. This is why we will create the simplest todo-app ever. Todo-apps are a good use case as it is simple but still covers most aspects of a modern application. We will have to:
- connect a database to store todos
- work with that database by reading, creating, updating and deleting entries
- create a backend that exposes a REST-API for our frontend
- secure our backend properly
- build a frontend that works well with data from an API
There are several ways to build this modern web-application. I chose the following frameworks, each of which is covered in one tutorial:
- Part I: The Backend Using Java With Spring
- Part II: The server-side-rendered Frontend Using VueJS And NUXTJS
- Part III: Dockerizing Our Front- & Backend
- Part IV: Deploying Our Front- & Backend In The Cloud using Heroku dynos
- Part V: Automating The Build- And Deployment-Process using GitLab CI/CD
Prerequisite
- Good knowledge of object-oriented programming and java
- Good knowledge of javascript
- Basic knowledge of the terminal
- A mac - While all of this should also work on windows I did not spend any time to check for or provide solutions for windows
Automating The Build- And Deployment-Process
Okay, at this point we already achieved a lot. Now, we are just showing off. Wouldn't it be great if you wouldn't have to build and deploy your application? If it would just magically do it all automatically. We can achieve this using GitLab and CI. It is common to manage code using a git repository. After this tutorial, our applications will automatically build and deploy whenever we make a commit to the master branch. I will not cover the basics of git here, for that I recommend this series by atlassian. To complete this tutorial you will need a GitLab account and push this project into a new repository. Again, we could achieve the same by using bitbucket or GitHub. GitLab is just my personal preference.
After setting up your GitLab project you will find a CI/CD tab on the left sidebar. This basically enables us to run a script that, if it succeeds deploys our app. If you want to lear more about CI and CD have a look here.
GitLab automatically looks for a .gitlab-ci.yml file in the project root directory. If present it will run a pipeline. Create this file and add the following code, make sure to replace all placeholders.
    variables:
      APP_NAME_FRONTEND: "<YOUR FRONTEND APP NAME>"
      APP_NAME_BACKEND: "<YOUR BACKEND APP NAME>"

    stages:
      - build
      - deploy

    Build-Deploy-Frontend-to-Heroku:
      stage: build
      image: docker:latest
      services:
        - docker:dind
      only:
        - master
      script:
        - echo "Deploying Frontend..."
        - docker login -u _ -p $HEROKU_API_KEY registry.heroku.com
        - docker build --file=frontend/frontend.dockerfile --rm=true -t registry.heroku.com/$APP_NAME_FRONTEND/web .
        - docker push registry.heroku.com/$APP_NAME_FRONTEND/web
        - docker run -e HEROKU_API_KEY=$HEROKU_API_KEY wingrunr21/alpine-heroku-cli:latest container:release web -a $APP_NAME_FRONTEND
        - echo "Frontend Deployment Complete!"

    Build-Backend:
      stage: build
      image: gradle:6.0.1-jdk13
      before_script:
        - export GRADLE_USER_HOME=`pwd`/backend/.gradle
      script:
        - echo "Building Backend..."
        - cd ./backend
        - gradle build
        - echo "Backend Build Complete!"
      cache:
        key: "$CI_COMMIT_SHA"
        policy: push
        paths:
          - backend/build
      artifacts:
        paths:
          - backend/build/libs/*.jar
        expire_in: 1 week
      only:
        - master

    Deploy-Backend-to-Heroku:
      stage: deploy
      image: docker:latest
      services:
        - docker:dind
      only:
        - master
      script:
        - echo "Deploying Backend..."
        - docker login -u _ -p $HEROKU_API_KEY registry.heroku.com
        - docker build --file=backend/backend.dockerfile --rm=true -t registry.heroku.com/$APP_NAME_BACKEND/web .
        - docker push registry.heroku.com/$APP_NAME_BACKEND/web
        - docker run -e HEROKU_API_KEY=$HEROKU_API_KEY wingrunr21/alpine-heroku-cli:latest container:release web -a $APP_NAME_BACKEND
        - echo "Backend Deployment Complete!"
Let's go through each part of the file.
Variables
These variables will be used in the other parts.
Stages
Each block below stages (Build & Deploy Frontend to Heroku, Build Backend, Deploy Backend to Heroku) is a job to GitLab. Each job belongs to one of the following stages
- build → this is run in parallel by GitLab and should be used to build the front- and backend
- test → test the application, we don't do this here
- deploy → If all jobs passed the deploy stage to deploy our app is executed
We have only the two stages build and deploy here.
Build & Deploy Frontend to Heroku
This job builds and deploys our frontend to Heroku. It would be cleaner to have two separate jobs to build and deploy the frontend. However, I' satisfied with it being this way for now.
- As the job does both it doesn't really matter if we set the stage to build or deploy
- As we will execute docker commands we use the docker image as a base for or job with the docker in docker (dind) service
- The job should only be executed on the master branch
- The script contains
- The login to our Heroku account - as we did in the last tutorial
- Building the docker image (remember the build process of the frontend is part of the dockerfile) - as we did in the last tutorial
- Pushing the image to Heroku - as we did in the last tutorial
- Lastly we release the app. What's new here is that we use a predefined image as we need the heroku cli.
Build Backend
This job builds our backend to Heroku.
- As the job build the backend, the stage is set to build
- We will need gradle, so we select the image needed
- Next we need to tell gradle where its home directory is
- The script contains
- Navigating into the backend folder
- Building the app using gradle
- Since we are building a .jar file, we declare it as artefact so we could download it from gitlab if needed. We also set it to expire in one week
- We also cache the artifact
- Lastly, we specify that the job should only be executed on the master branch
Deploy Backend to Heroku
- This is where we depoy the backend
- This is basically the same procedure as for the frontend
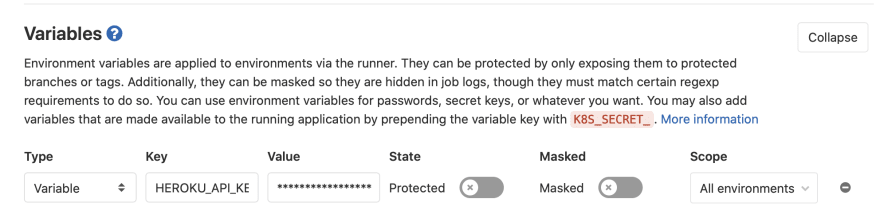
Setting the Heroku API Key
In our gitlab-ci file we reference to the heroku API key. We wouldn't want to store this in our file for security reasons. That is why we store it as a gitlab variable. Go to settings → CI /CD and then to variables to create a new one.
If you commit this file to your gitlab repository you will see a new pipeline running your jobs. After there are all done your application was deployed successfully to heroku. From now on you can develop locally using and then build and deploy your app by simply committing your changes to the master branch.
This was the final part of this tutorial series. I would really like to hear your feedback.
You can find me on twitter, instagram or send me an email.
This tutorial was originally published on my personal website.

Top comments (0)