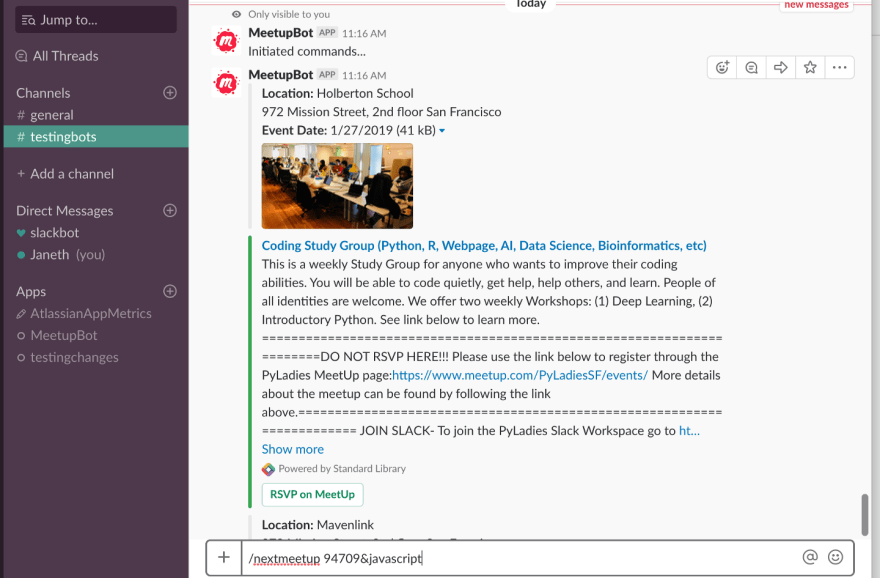
In this guide, you will learn how to set up a Slack application that will display information from Meetup’s API, which serves stored data from Meetup to other application software.
Meetup is a popular website where individuals with similar interests form groups to organize events in their local cities. Once we’ve successfully made a request to Meetup’s API, we will receive a response from Meetup, we’ll pull specific data from the JSON payload, and display that data in Slack. We will design our Slack application’s attachment so that it displays the event’s name, description, date and time, location, and more!
How it Works:
When you submit /nextmeetup 94709&javascript (or any zip code and a topic of interest) in Slack’s message box; a webhook will be triggered. The webhook, built and hosted on Standard Library, will first make a request to Meetup’s API, which will return a JSON payload with results from the query.
The webhook will then create Slack messages for each event, and post those to a specified channel.
No need to get overwhelmed! Let’s take it a step at a time!
What You’ll Need:
#Step 1: Set up your Slack Application
Make sure you’re signed in to Slack and visit your Slack Apps Dashboard at https://api.slack.com/apps. You’ll see a screen that looks like the following.

Click Create New App. You’ll be presented with a modal to enter your App Name and the Development Slack Workspace you’d like to add it to.

From here, click Create App, you’ll find yourself on a Basic Information page.
Scroll down to Display Information. This is where you can give your Slack app a name, description, and an image if you’d like.
Keep the Basic Information page open in your browser; we’ll be using it in a second to retrieve your Slack app’s credentials to connect this application to the backend logic hosted on Standard Library — the code running your application.
#Step 2: Create a Free Standard Library Account
We’ll be hosting our Slack application’s code on Standard Library— the code that will be requesting and receiving specific information from Meetups API. So head on over to Code on Standard Library and claim your free account.

#Step 3: Copy and Modify the Slack App Code Template on Standard Library
Once you’ve logged in or signed up, you will land on “Featured API Source.” These are application code templates available on Standard Library for anyone to easily copy and modify apps. You’re going to select the Slack application code template and modify it to create your API that will power your Slack app.
Enter a unique name for your API project and hit Okay.
A Brief Explanation of the Slack App Sourcecode Template:
Ok great! Let’s pause for a moment to understand what we are looking at. The left sidebar is an API project scaffold that Standard Library has set up for you to build Slack apps.
The code template for Slack Apps has four directories. For this tutorial, we will only work within the functions directory which comes equipped with three more folders actions/, commands/, and events/, as well as a single file __main__.js. The instructions for Slack actions, slash commands, and events for your app live inside those folders.
When you deploy your API, Standard Library will automatically generate HTTPS endpoints (URLs) for each directory. The resulting URLs will allow us to configure webhooks that listen and respond to Slack’s actions, slash commands, and events.
All five folders (including the functions folder are set up with a __main__.js file (the directory’s main endpoint). These endpoints __main__.js dispatch the appropriate functions when they receive a message from Slack. For this tutorial, the file __main__.js will be dispatching the commands endpoint when we call our API via our Slack Bot. Now, let’s return to our bot setup!
#Step 4: Add a Command to your Standard Library API
commands: The commands directory is the endpoint for all Slack slash commands. Create an additional command by placing your cursor over the commands directory and right-clicking. Select New File and name your slash command file nextmeetup.js and click Okay.
At this point, you will notice a “hello world” JavaScript function inside (__main__.js), which is automatically generated.
Replace the contents of nextmeetup.js with the following:
A Brief Explanation of the Code:
When you submit /nextmeetup via your Slack app, a GET request is made to Meetup’s API :
Every request to Meetups API has to be authenticated with an API key, so we pass our Meetup key from our env.json file into our request. We also send our GET request with the two parameters, zip and topic.
The Meetup API returns an array of meetup event objects, which we can view from Code on Standard Library logs by logging our response: console.log(response.data). Your logs tab is located underneath the debug section.
The response.data is an array of events that match your query, and we want to create two attachments for each event (one for location and one for details). We have a function called formatAttachement that we can call on each of the events. The results get put in an array called attachments that gets sent to Slack.
Once you’ve copied and pasted the code into your file nextmeetup.js, save the changes and navigate to the env.json file on the left bar menu.
#Step 5: Fill your env.json File with App Credentials and Keys
Inside the env.json you will notice environment variables for your API. You can set different values for local, dev, and release (production) environments. This file will hold all of your unique access keys to your Standard Library account, Meetup account and Slack app credentials.
We’ll only be making modifications to the "dev" environment variables — make sure you’re modifying the right set! Note that "dev” values are for your development environment and "release" values should only be populated when you’re ready to release your app. “local” variables can be left blank when deploying from Code on Standard Library, but they should be filled out when working with the command line tools.
Let’s start off by filling in the “STDLIB_TOKEN” variable. Place your cursor in between the quotation marks (see screen) and either right-click and select Insert Library Token… or use the shortcut ⌘ + K.
Select Library Token to fill in "dev" environment.
Now go back to the Basic Information page of your Slack App and scroll down to App Credentials:
Copy your Client ID, Client Secret, and Verification Token. Paste them into their respective fields in “dev” section of the env.json file.
Add the name you gave your Slack app for the SLACK_APP_NAME.
Ex: SLACK_APP_NAME:Meetup-bot
The “SLACK_REDIRECT” value will be an https endpoint generated by Standard Library once you deploy your API. Even though we haven’t yet deployed, go ahead an fill it in now using this structure:
https://<username>.lib.id/<apiname>@dev/auth/ — with your standard library username and your API name. Once we deploy the code you can return to confirm that you filled this value properly.
My SLACK_REDIRECT looks like this: https://Janethl.lib.id/slack-meetup-bot@dev/auth/ — make sure you add authentication path with a slash at the end.
Your Slack app’s capabilities and permissions will already be set up with the following scopes:
“SLACK_OAUTH_SCOPE”:bot,commands,chat:write:bot,chat:write:user,files:write:user,channels:history
The last variable that you will need to add is your Meetup API key. Meetup requires that every request is authenticated with an API key.
#Step 6: Retrieve your Meetup API Key
Login or create an account at Meetup.com. Head on over to https://secure.meetup.com/meetup_api/key/ to retrieve your unique API key. Click the lock to reveal your API key and copy it.
Return to your env.json file on Code on Standard Library. Add your Meetup key as a "key" value, exactly as I have done in the image:
Make sure to save the changes with ‘⌘ + s’ (or hit Save in the bottom right).
On the sidebar menu pen the __main__.js file located below the events directory. Deploy the code of your Slack app to Standard Library by clicking “Run”.
Shortly after deploying your code, Standard Library generates an HTTPS API endpoint URL where your code lives. This address consists of your and the name you gave your API followed by @ and the name of the environment: https://janethl.lib.id/slack-meetup-bot@dev/
We now have the URL that will allow us to send and receive messages from our Slack app to Meetup’s API. Now we need to set our URL as webhook in Slack, so let’s head back to the Slack app dashboard
#Step 7: Create a New Slash Command and Set a Webhook
We now need to set our Slack app to respond to a slash command (/). For this, we need to set up a webhook on Slacks API page.
What is a Webhook?
Perhaps we can understand what a webhook is by comparing it to an API. APIs are request based — meaning that they operate when a request is made from a third party application. A webhook is event-based — the code will run when a specific event triggers it.
To set a webhook, a service provider must allow it’s consumers to register a URL where the provider can send information when an event happens. In this example, Slack enables us to register our URL address, and once registered a slash command can trigger our webhook, which will execute the code in our URL.
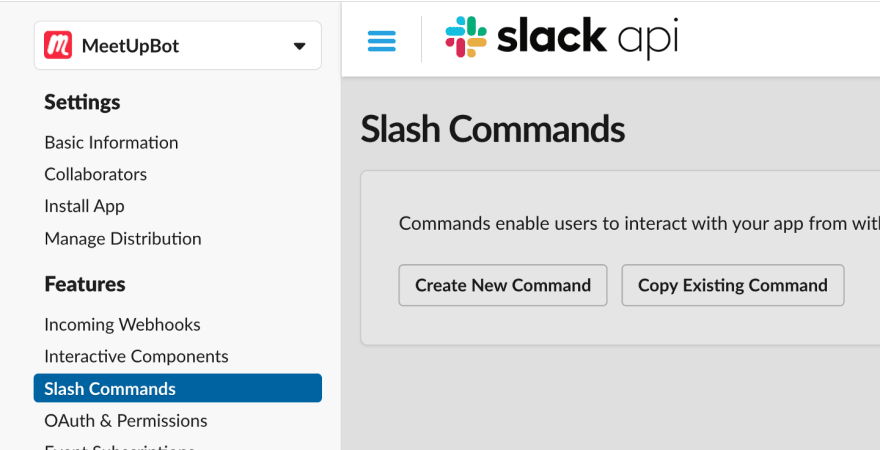
Now that we understand this, let’s head on over to Slack’s API page to set our webhook. Find and select Slash Commands on the sidebar menu.
After clicking Create New Command, you’ll be asked to enter your command details, for this example use:
Command:/nextmeetup
RequestURL:https://<username>.lib.id/ <apiname>@dev/commands/:bg
Short Description: retrieves Meetup events
Usage Hint:[<zip>&<topic>]
Hit “Save” once complete
#Step 8: Enable OAuth & Permissions
Return to your Slack App, On the sidebar menu, click OAuth & Permissions.
Once there, you’ll want to enter in a Redirect URL as follows: https://<username>.lib.id/ <apiname>@dev/auth/
click “Add” and “Save URLS.”
This Redirect URL should match the URL that we set on the env.json file on Code on Standard Library.
#Step 9: Add a Bot to Your Slack App
Return to your Slack App page, and click Bot Users on the left sidebar. Click Add Bot User. Keep the default settings.
The final step is to authorize the app. In your browser, type: https://<username>.lib.id/<apiname>@dev/
Click the Add to Slack button. You will be taken to another authorization screen.
Click Authorize. You should see a success message!
#Step 10: Test Your Slack Meetup Application
You’re all done. Try it out! Your Slack App is now available for use in the Slack workspace you authorized it for. Your Slack app should respond to a /nextmeetup<94709>& as I show in the screenshot above.
That is it & Thank You!
I hope you found this tutorial helpful. I would love for you to comment here, e-mail me at Janeth [at] stdlib [dot] com, or follow Standard Library on Twitter, @stdlibhq .
Janeth Ledezma is a Developer Advocate for Standard Library and Cal grad — go bears! When she isn’t learning the Arabic language, or working out, you can find her exploring NorCal on her CBR500R. 🏍💨🤗 Follow her journey with Standard Library through Twitter @mss_ledezma.


Top comments (0)