
Welcome to Day 3 of learning CSS.
As i have told earlier, this series is inspired by this awesome youtube series in freecodecamp channel.
We will start with Useful Broken Image on day-3. Open your code editor and create a new 3.1-BrokenImage folder and two files index.html and sandbox.css inside it.
 Broken Image
Next, in index.html put the basic html.
 index.html
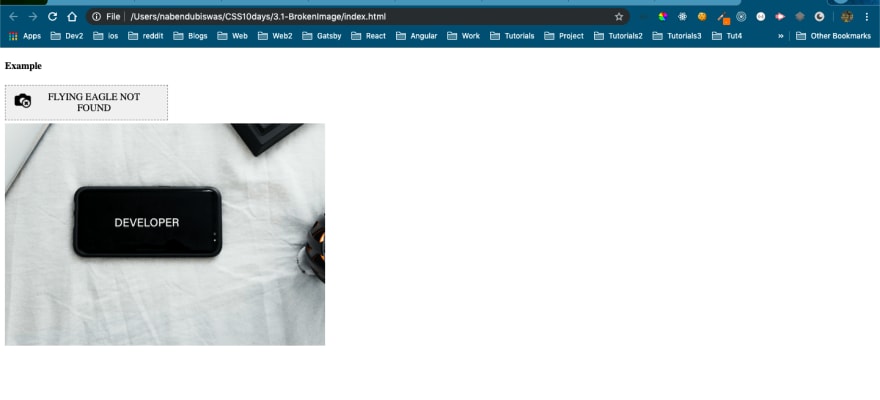
Open the index.html in browser and you will see, the ugly default broken image of the browser.
 Default Broken
Let’s now put two images. One for brokenimage2 and other to be displayed when no image is found. Both images can be downloaded from the github link which i will provide later.
 Images
Next, we will put the code to show image using after pseudo element. In sandbox.css put the below code.
 sandbox
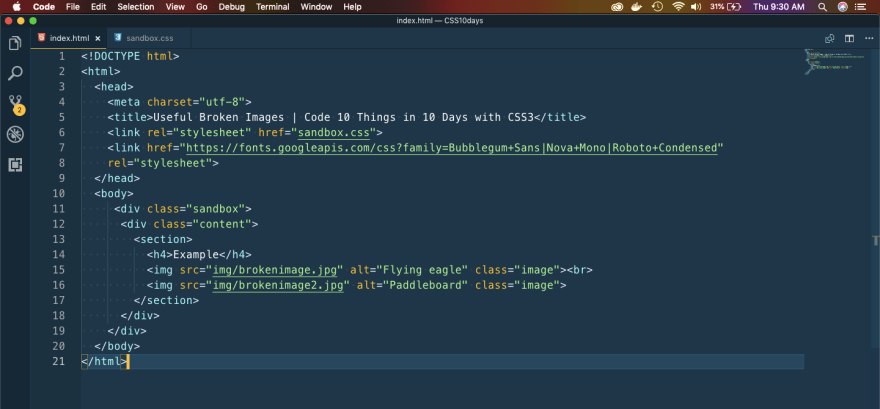
Now our index.html, will look like below.
 index.html
Next, we will learn to make Print Specific Styles. So, that when you hit print of the webpage, you get the minimal texts only.
Again in your code editor and create a new 3.2-PrintStyles folder and two files index.html and sandbox.css inside it.
Next, in index.html put the basic html.
 index.html
Let’s put some style for print. We will be using media queries for this.
 sandbox
Open the index.html in browser and hit Cmd+p to open print preview. We are hiding final-result h2 and doing some default styles.

Next, we will add styles for h1 and other tags and we are also expanding the anchor tag for print.
 anchor updates
So, our print is completed and is perfect to take a print.
 The Print
Next, we will learn Image Manipulation. In CSS3 we can do some cool tricks of blurring and inverting image.
Again in your code editor and create a new 3.3-ImageManipulation folder and two files index.html and sandbox.css inside it.
Next, in index.html put the basic html.
 index.html
It will show 4 images from unsplash, which we will manipulate in sometime.
 Default image
Let’s add code for first two images. We will make them grey and blur respectively.
 First two
Our first two images looks like below. Once we hover over them they will change back to original.
 First two
Now we will add code for next two images. We will make them invert and sepia respectively.
 invert
Our next two images looks like below. Once we hover over them they will change back to original.
 Last two
This completes day 3 of the course.
You can find the code for the same here.

Top comments (0)