What is it?
According to the official React documentation,
Portals provide a first-class way to render children into a DOM node that exists outside a DOM hierarchy of the parent component.
Take a look at this example - let's say you have a Calculator component, inside which there is a Buttons component. It would look something like this:
The root component App along with all its child components will be rendered inside a single DOM node (most likely a div with an id of #root). With React Portal, a child component like Buttons can be rendered outside the div with an id of #root. You can imagine the structure of the DOM to look something like this:
Why should I know this?
In certain situations, it is necessary to render some JSX or a component outside the root element. The best example of such a situation would be a modal.
A modal would typically cover the entire screen. One would expect this to be reflected in the DOM structure as well. However, that's not what happens in React. If a modal is nested inside a component, that is also how the DOM structure would look like. This can be confusing for people who use screen readers. From an accessibility standpoint, this is an issue.
Resolving this might be a bit easy to do in Vanilla JS and HTML, but harder to do in React. Since React applications have a single mount point, putting an element or component outside this mount point is a challenge. With React Portal, this becomes an easy task.
Although the element or component will be portaled to a different DOM node, it will still function as a regular React element. For our modal this means that it is in a different DOM node than the mount point. But it can still receive props and state and behave like a regular nested React element.
How do I use it?
Let's use the modal example from the section above. Creating a React Portal and mounting it to a different DOM node can be done in 2 steps:
Step 1:
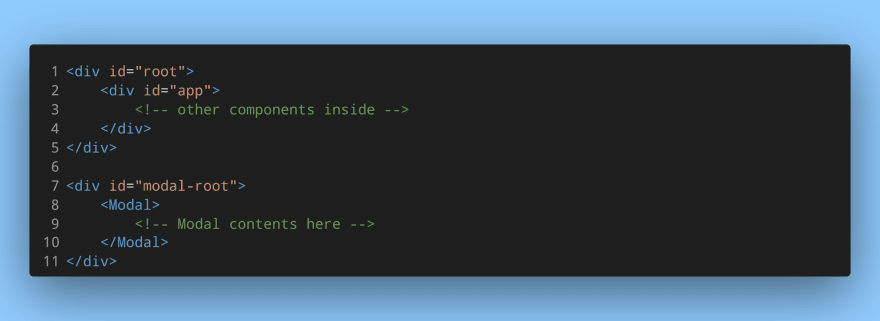
Create another DOM node for mounting the modal:
The React application will be mounted to the div with an id of #root. And the modal will be mounted to the div with an id of #modal-root.
Step 2:
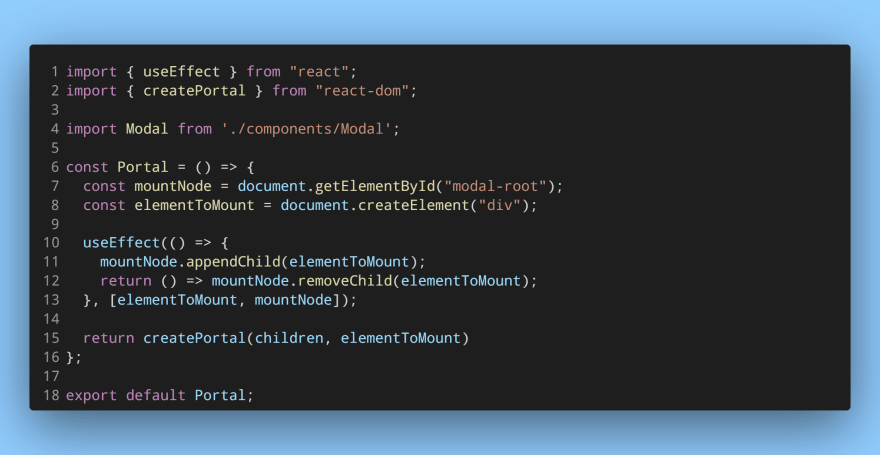
Create a Portal wrapper component:
This wrapper component will take a child element and create a Portal for it. The useEffect hook mounts the element and cleans up when the component is unomunted.
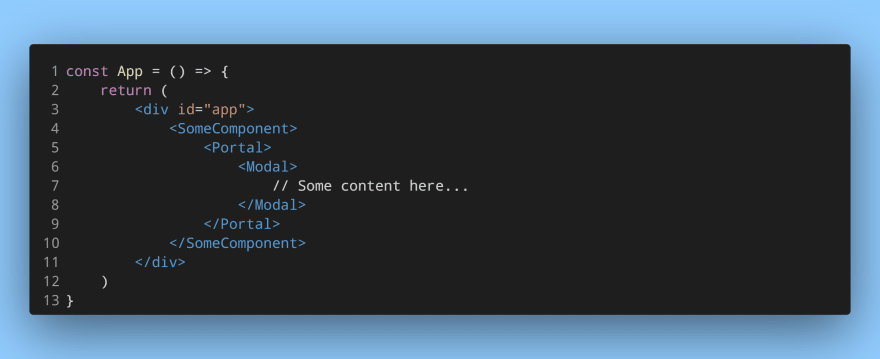
Here is how it might look:
Even though the Modal component is nested in the app hierarchy, it will look different in the DOM structure:
In the real DOM structure, you won't see the Modal component directly like this, but a div instead. This is simply a demonstration.
Extra resources
- This article has another good use-case for using React Portals.
- A dialog component is also a good scenario where React Portals is quite handy.
- Do you need a ref from a React Portal? Then this solution for React 16 might help.
- Learn how to create a Modal component with React Hooks, Context, and Portals.


Top comments (0)