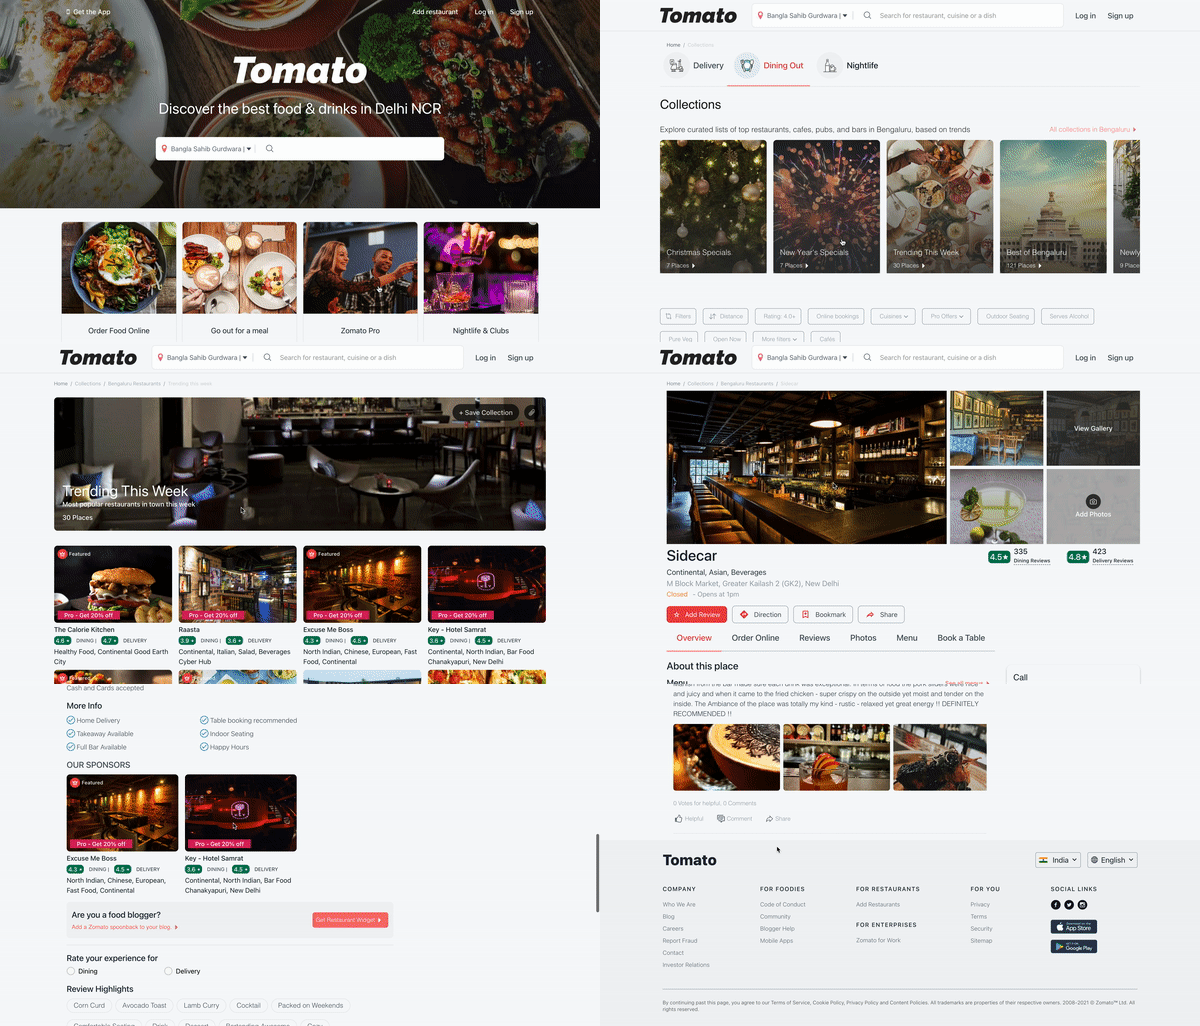
This experiment is a part of our NativeBase Clone Experiment Series. We have taken inspiration from famous food ordering apps to build our own using NativeBase React & React Native. The goal is to write the demo once and it will run anywhere with the behaviour of React Native.
Sneak peek
The final result of the experiment looked like this. Live demo.
Source code
The source code is available in this Github project.
Project setup
We have created a new project using Next.js CLI with NativeBase template by a simple command.
yarn create next-app -e https://github.com/GeekyAnts/nativebase-templates/tree/master/nextjs-with-native-base-typescript
The difficult parts
Let's dive into the code of the below banner and understand how easy it is to build with NativeBase.
import React from "react";
import {
Center,
Image,
HStack,
Text,
Heading,
VStack,
Icon,
Divider,
Input,
Pressable,
} from "native-base";
import { AntDesign, Entypo, FontAwesome } from "@expo/vector-icons";
function Banner() {
return (
<VStack w="100%" h={500}>
<Image
position="absolute"
zIndex="-1"
source={{
uri: "https://b.zmtcdn.com/web_assets/81f3ff974d82520780078ba1cfbd453a1583259680.png",
}}
alt="Alternate Text"
w="100%"
h={500}
/>
<HStack
alignItems="center"
justifyContent="space-between"
mx={{ base: 10, md: 20, lg: 40 }}
py={4}
>
<Pressable flexDir="row" alignItems="center">
<Icon as={FontAwesome} name="mobile" size="xs" color="white" />
<Text color="white" fontWeight="medium" fontSize="md">
Get the App
</Text>
</Pressable>
<HStack space={{ base: "5", sm: "10" }} alignItems="center">
<Pressable>
<Text color="white" fontWeight="medium" fontSize="md">
Add restaurant
</Text>
</Pressable>
<Pressable>
<Text color="white" fontWeight="medium" fontSize="md">
Log in
</Text>
</Pressable>
<Pressable>
<Text color="white" fontWeight="medium" fontSize="md">
Sign up
</Text>
</Pressable>
</HStack>
</HStack>
<Center mt={20} w="100%">
<Image
width={80}
height={16}
src={"/images/tomatoWhite.png"}
alt="Alternate Text"
/>
<Heading
textAlign="center"
w={{ base: "90%", md: "60%", lg: "48%" }}
color="white"
fontSize={{ base: "3xl", md: "3xl", lg: "3xl", xl: "4xl" }}
fontWeight="normal"
lineHeight="xs"
mt={10}
mx={{ base: 10 }}
>
Discover the best food & drinks in Delhi NCR
</Heading>
<HStack
bg="white"
space="3"
alignItems="center"
w={{ base: "90%", md: "60%", lg: "48%" }}
py={2}
mt={12}
borderRadius="lg"
>
<Pressable flexDir="row" alignItems="center">
<Icon
ml="2"
as={Entypo}
name="location-pin"
size="6"
color="red.400"
/>
<Text color="coolGray.500" fontSize="md" mx="1">
Bangla Sahib Gurdwara |
</Text>
<Icon
as={AntDesign}
name="caretdown"
size="3"
color="coolGray.600"
/>
<Divider h={5} w={0.5} ml={2} orientation="vertical" />
</Pressable>
<HStack space="3" alignItems="center" flex={1}>
<Icon
ml={3}
as={AntDesign}
name="search1"
size="5"
color="coolGray.500"
/>
<Input
_hover={{ bg: "white" }}
_focus={{ bg: "white" }}
color="coolGray.500"
fontSize="md"
flex={1}
borderWidth={0}
outline="undefined"
/>
</HStack>
</HStack>
</Center>
</VStack>
);
}
export default Banner;
Most of the components in NativeBase are self-explanatory.
Conclusion
Building this app with NativeBase was super easy and fun. Lines of code get reduced significantly with NativeBase. We discovered that by creating with NativeBase, we have access to all of the components that we can utilize directly. All of this was done while also being able to alter them in inconceivable ways for creating complex designs. By default support of Next.js, it lets you use its powerful features of it.


Top comments (0)