Introduction
Windows Terminal 1.0 was released at Microsoft Build 2020. There are docs on how to customise your theme and sites to download them from. But what if you want to use different fonts and a scheme that's not available to just copy?

This is Windows Terminal with the awesome Remedy Theme from VSCode, which isn't readily available for Windows Terminal. The font is Fira Code which contains ligature support, converting multi-character representations to glyphs. This is how the prompt displays icons for Git, using powerline-go setup for bash.
This page is a walkthrough of how to set this configuration up, port themes from other terminals along with finding standard schemes for download. There's also a brief introduction on Powerline enabled fonts and where to download them.
Pre-reqs
- Download Windows Terminal
- Download Fira Code Font - note Light isn't working with ligatures
- Download latest Remedy iTerm Colors file and place into convert_color folder in this repo
- Download Visual Studio Code
Windows terminal settings and using a readily available scheme from GitHub

This is a themed command prompt profile, it's a good place to start as it uses a scheme readily available to copy from GitHub called Firewatch. If you click on the down arrow at the top of your windows terminal, your Windows Terminal menu opens. At the bottom of the menu is Settings:

Choose Settings and the settings.json file will open for editing in VSCode. There are some great msdocs on how to edit your settings. Here you are going to start by adding a new scheme. Schemes are added into the schemes section of the settings.json file, which is near the bottom of the page:

Copy the Firewatch scheme, including the curly braces and paste it into the settings.json between the square brackets, it should now look like this:
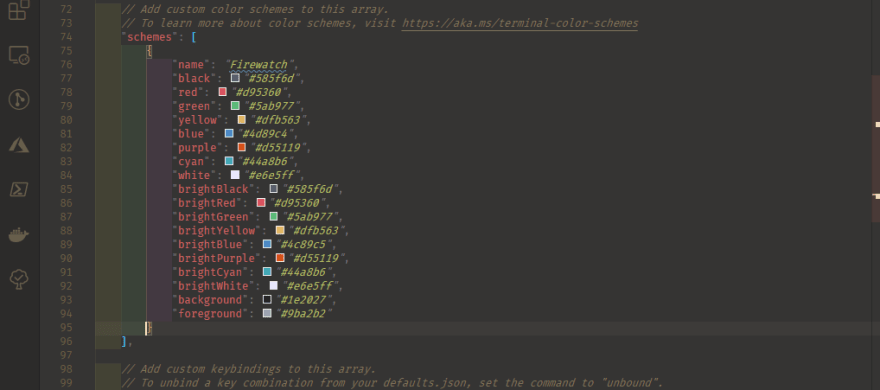
If you don't like the look of that scheme, go up a level in the GitHub repo, there are hundreds more, with screenshots here!
The scheme is named "Firewatch", this name is used to reference the scheme. The reference can be used in the default profile, which will apply it to all profiles, or a single profile. A profile is each terminal type that has been set up in Windows Terminal, such as Command Prompt, Powershell or WSL.
In this example, the firewatch scheme is only to be applied to the command prompt. Scroll up in the settings.json file until you see // Make changes here to the cmd.exe profile.:

To reference the firewatch scheme add
"colorScheme": "Firewatch"
into the cmd.exe profile, make sure you add a comma after
"hidden": false,
:

Save the file, if you have the Command Prompt open in your windows terminal it will change automatically. Note that settings at the profile level override those at the default level.
Setting up your own theme and converting one from iTerm2
Creating your own Scheme
The color schemes section of msdocs gives the format required to create your own scheme. You can paste a second section into the schemes array (the square brackets) and give it a name other than one that already exists. For example, this could be "powershellScheme", add the named reference to another profile using
"colorScheme": "powershellScheme"
. Now as you edit the hex representation of the colours for powershellScheme and save the file, the changes will be displayed immediately in Windows Terminal.
Conversion from iTerm2
Another way is to take a theme from a different terminal. The schemes structure uses a JSON variant of the iTerm2 colour scheme format. This format can be ported for use by many terminals as listed on the iTerm2-Color-Schemes GitHub page. The scheme displayed on the first screenshot in this page is from the Remedy VSCode theme. The Remedy GitHub repo contains the .itermcolors file which enables the same theme in iTerm2. You can also export schemes directly from iTerm2 to .itermcolor files.
The .itermcolors file looks complicated, but it can be ported for use in Windows Terminal using an itermcolors to hex convertor. There are many scripts available to do this on various sites, for this walkthrough a PowerShell converter example and a go convertor will be shown.
Conversion with PowerShell
For PowerShell, download the ConvertFrom-ItermColoursToHex.psm1 and save as a file of the same name. To load in the module, open a PowerShell terminal and from inside the same folder you downloaded the psm1 file:
Import-Module ./ConvertFrom-ItermColoursToHex.psm1

With the module imported, it can be used to convert a .itermcolors file. You'll need to have an .itemcolors file to convert in the directory you run the following command from. Step 3 in the prereqs has the GitHub repo for Remedy Dark, which has been renamed to "remedy-dark.itermcolors"
[xml](Get-Content ./remedy-dark.itermcolors) | ConvertFrom-ItermColoursToHex
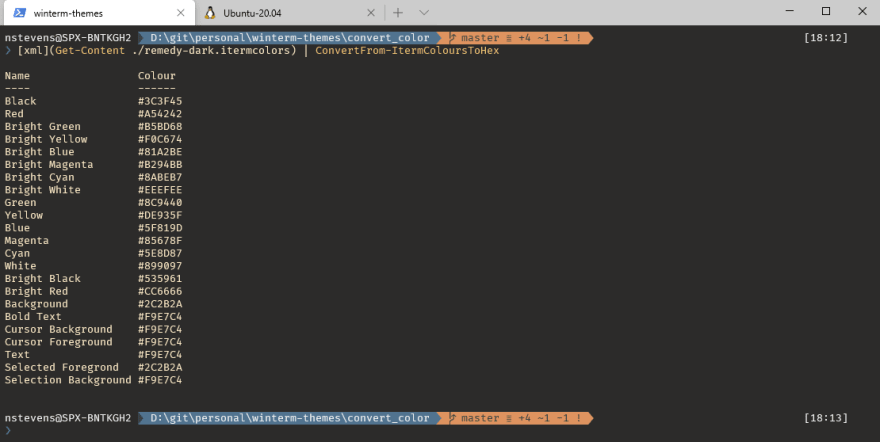
The names listed correspond to the equivalents in the Windows Terminal scheme. Open the settings file within Windows Terminal once more. Copy a scheme within the settings.json file and rename the scheme as "Remedy-dark". Now match up the names and overwrite the hex values as shown, note they are not in the correct order:

Assign the name reference to a profile, in this case, I'd like the scheme to be my default colour scheme. Scroll to the top of the page and add
"colorScheme": "remedyDark"
into the defaults section:

Save the file, and all of the profiles will have the same theme, unless you have a colour scheme defined at the profile level.
Conversion with Go
To complete the same steps using go on a Ubuntu WSL distro. Install go if you don't already have it:
sudo apt update
sudo apt install golang-go
go version
Download the palette.go file and save as a file of the same name. With go setup, you can run the script. Note you'll need to have an .itemcolors file to convert in the directory along with your palette.go script. Step 3 in the prereqs has the GitHub repo for Remedy Dark itermcolors file, which has been renamed to "remedy-dark.itermcolors". In the same Ubuntu WSL distro that you installed go on, cd to the directory with your script and color file in and run:
go run palette.go -colors remedy-dark.itermcolors

The output this time is slightly different, the hex values are in the correct order, but the names do not tally. "Ansi 0 Color" is "black", "Ansi 1 Color" is "red" and so on. Copy a scheme within the settings.json file and rename the scheme as "Remedy-dark". Now match up the top 16 rows and overwrite the hex values as shown, then copy "Background Color" into "Background" and "Foreground Color" into Foreground.
Assign the name reference to a profile, in this case, I'd like the scheme to be my default colour scheme. Scroll to the top of the page and add
"colorScheme": "remedyDark"
into the defaults section:
Save the file, and all of the profiles will have the same theme, unless you have a colour scheme defined at the profile level.
Changing your font
Cascadia Code became the default font for all profiles automatically generated by Windows Terminal in release 0.11. Cascadia Code is an awesome font for developers, but I'm a fan of Fira Code and JetBrains Mono. If you downloaded FiraCode and installed the fonts from the pre-reqs steps you are ready to go.
Open your Windows Terminal settings once more and scroll to the defaults section for profiles, this will set the same font for all of your profiles. Add the following into defaults:
    "fontFace": "Fira Code",
    "fontSize": 10,

Save the file and the font settings will be applied.
As described in the introduction, Fira Code contains Powerline Glyphs, which means it will automatically show the special characters in my prompt (See the "What about a funky prompt!" section below). If you are sticking with Cascadia Code, you'll need to download the Cascadia Code PL fonts which are not shipped with Windows Terminal. The process to install and use the font is the same as above, except the fontFace is
"fontFace": "Cascadia Code PL"
You don't have to stick with Cascadia Code or Fira Code either, the Powerline Fonts GitHub repo contains many fonts that have been patched for Powerline.
Note - if your fonts don't automatically load after you've shut WIndows Terminal down and re-opened it, I found that installing the Font for all fixed this. I haven't looked into why.
If you are running Windows Terminal 1.1 preview or above and have a font that support it, you can now also specify a weight:
    "fontFace": "Fira Code",
    "fontSize": 10,
    "fontWeight": "light",
What about a funky prompt!
There are a few ways to do this, however, msdocs has a good tutorial which is how the prompt in these screenshots is setup.
SSH With Windows Terminal profile
Thomas Maurer has a great tutorial on how to set up profiles to SSH you straight in, it focuses on Azure VM's but the
commandline
can be altered to any address.

Oldest comments (0)