Have you ever wanted to scrape data but didn’t know where to start? Or have you struggled with websites that hide extra data behind interactions like a "Load More" button? Don’t worry; web scraping doesn’t have to be complicated, and you don’t need to be a pro to get started.
In this tutorial, you’ll learn how to scrape data in Node.js. We’ll use tools like Puppeteer and Cheerio to extract data from the website.
Prerequisites
To follow along with this tutorial, you’ll need to meet the following prerequisites:
- Basic knowledge of JavaScript and Node.js
- Node.js installed
- A code editor
- Basic knowledge of web scraping
Project Scope
For this project, we’ll scrape products along with the necessary information about the products from this demo website. You can check it out to get familiar with
Below are some of the libraries needed for scraping the data in this project:
Puppeteer: For the project, it will be used to scrape data and simulate browser interactions, such as the “Load More” button.
Cheerio: For this project, it will be used to parse and extract data.
Csv-writer: exporting data into a structured CSV file
Set Up the Project
Open your terminal and navigate to the folder where you want this project set up. Initialize a new Node.js project by running this command:
npm init -y
Next, install the required libraries:
npm install puppeteer cheerio csv-writer
Access the Content
First, check out the site from which you want to extract the data for this project. Below is an image of what the webpage you’ll extract data from looks like:
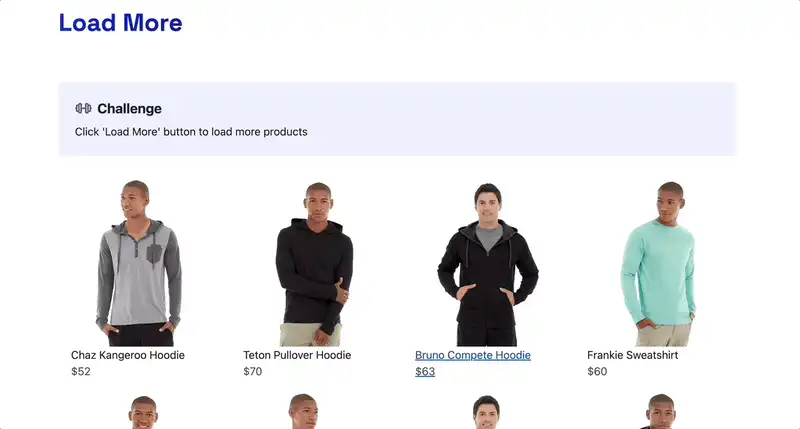
You’ll notice that 12 products are displayed on the webpage. We're focusing on extracting these 12 products. This will be achieved using CSS selectors.
Go back to the demo webpage. Right-click on an element and select Inspect to open the Developer Tools. Alternatively, you can open the Developer Tools by pressing Ctrl+Shift+I (or Cmd+Option+I on Mac).
Locate the container for all products. In this case, it's a div with the ID #product-grid. Copy the selector.
The selector you just copied will be used to access the content.
In order to extract the product grid's HTML structure, Puppeteer will be used to navigate to the demo webpage and extract the product grid’s HTML using the #product-grid selector.
In your project folder, create a file called scrape.js. Inside it, add the following code:
const puppeteer = require("puppeteer");

(async () => {
  const url = "https://www.scrapingcourse.com/button-click";
  const browser = await puppeteer.launch({ headless: true });
  const page = await browser.newPage();

  await page.goto(url, { waitUntil: "domcontentloaded" });

  await page.waitForSelector("#product-grid");
  const productGridHTML = await page.evaluate(() => {
    return document.querySelector("#product-grid").outerHTML;
  });

  console.log("Initial product grid HTML:", productGridHTML);

  await browser.close();
})();
The await page.waitForSelector ensures the #product-grid element is loaded. This guarantees the content is available before scraping. It then uses page.evaluate to extract the HTML structure of the #product-grid and logs the result to the console.
Run your code using this command:
node scrape.js
You’ll see an output in your terminal printing the HTML structure of the #product-grid, which contains the first 12 products:

Load More Products
Each time you click the “Load More” button, it displays more products. This means there are still other products that have yet to be scraped. To achieve this, you need to simulate clicking the button multiple times to retrieve all the available products.
You first need to identify its selector, so go back to the demo webpage. Right-click on the "Load More" button and select Inspect. The HTML code for the button will then be highlighted:

In the Developer Tools, you’ll see the button's structure:
<button id="load-more-btn" data-offset="10">Load More</button>
This tells you two important things: First, you can uniquely identify the button using the id attribute, which is #load-more-btn.
Secondly, the data-offset attribute keeps track of the number of products loaded. After each click, the data-offset value changes to reflect the updated count.
Select Copy > Copy selector to use the selector in your code.
To ensure new products are fully loaded before scraping, we’ll use await page.waitForFunction. This waits for the data-offset value of the "Load More" button to update.
Update the logic in the async function as follows:
(async () => {
  const url = "https://www.scrapingcourse.com/button-click";
  const browser = await puppeteer.launch({ headless: true });

  const page = await browser.newPage();
  await page.goto(url, { waitUntil: "domcontentloaded" });
  await page.waitForSelector("#load-more-btn");
  for (let i = 0; i < 5; i++) {
    const currentOffset = await page.evaluate(() => {
      return document
        .querySelector("#load-more-btn")
        .getAttribute("data-offset");
    });
    await page.click("#load-more-btn");
    await page.waitForFunction(
      (prevOffset) => {
        const button = document.querySelector("#load-more-btn");
        return button && button.getAttribute("data-offset") !== prevOffset;
      },
      { timeout: 5000 },
      currentOffset,
    );
  }
  const productGridHTML = await page.evaluate(() => {
    return document.querySelector("#product-grid").outerHTML;
  });
  console.log("Updated product grid HTML:", productGridHTML);
  await browser.close();
})();
The main logic introduced here is the ability to handle product dynamic loading. Each time the button is clicked, the data-offset attribute of the button is tracked to verify that new content has been loaded.
You'll also notice a for loop in the logic. it used to click the button multiple times. after each click the await page.waitForSelector waits for the data-offset value to update, until it disappears which indicates that there are no more products availble to be displayed.
For additional techniques on handling dynamic content, check out how to do web scraping with Puppeteer and NodeJS.
Your code should now look like this:
const puppeteer = require("puppeteer");

(async () => {
   const url = "https://www.scrapingcourse.com/button-click";
   const browser = await puppeteer.launch({ headless: true });
    const page = await browser.newPage();
   await page.goto(url, { waitUntil: "domcontentloaded" });
   await page.waitForSelector("#load-more-btn");

   for (let i = 0; i < 5; i++) {
     const currentOffset = await page.evaluate(() => {

         .querySelector("#load-more-btn")
         .getAttribute("data-offset");
     });
     await page.click("#load-more-btn");
     await page.waitForFunction(
       (prevOffset) => {
         const button = document.querySelector("#load-more-btn");
         return button && button.getAttribute("data-offset") !== prevOffset;
       },
       { timeout: 5000 },
       currentOffset,
     );
   }
   const productGridHTML = await page.evaluate(() => {
     return document.querySelector("#product-grid").outerHTML;
   });
   console.log("Updated product grid HTML:", productGridHTML);
   await browser.close();
 })();
Re-run the code, and you’ll see all the products loaded and displayed in your terminal:

Parse Product Information
Now that the full HTML of the products has been captured, the next step is to parse the product details. This is where Cheerio comes in. It will be used to parse the HTML of the product grid and extract specific details for each product, such as name, price, and image URL, into a JSON file. The .product-item selector will be used to help locate individual products.
Import the Cheerio and fs library:
const cheerio = require("cheerio"); // Import Cheerio for parsing HTML
const fs = require("fs"); // Import the file system module for saving data
Update the logic in the async function to this:
(async () => {
  const url = "https://www.scrapingcourse.com/button-click";   const browser = await puppeteer.launch({ headless: true });

  const page = await browser.newPage();

  await page.goto(url, { waitUntil: "domcontentloaded" });
  await page.waitForSelector("#load-more-btn"); // Wait for the "Load More" button to be available

  for (let i = 0; i < 5; i++) {
    const currentOffset = await page.evaluate(() => {

      return document
        .querySelector("#load-more-btn")
        .getAttribute("data-offset");
    });

    await page.click("#load-more-btn");

    await page.waitForFunction(
      (prevOffset) => {
        const button = document.querySelector("#load-more-btn");
        return button && button.getAttribute("data-offset") !== prevOffset;
      },
      { timeout: 5000 },
      currentOffset,
    );
  }

  const productGridHTML = await page.evaluate(() => {
    return document.querySelector("#product-grid").outerHTML;
  });

  const $ = cheerio.load(productGridHTML);
  const products = [];


  $(".product-item").each((_, element) => {
    const name = $(element).find(".product-name").text().trim();
    const price = $(element).find(".product-price").text().trim();
    const image = $(element).find(".product-image").attr("src");
    const url = $(element).find("a").attr("href");

    const fullImageUrl = image.startsWith("http")
      ? image
      : `https://www.scrapingcourse.com${image}`;
    const fullUrl = url.startsWith("http")
      ? url
      : `https://www.scrapingcourse.com${url}`;

    products.push({
      name,
      price,
      image: fullImageUrl,
      url: fullUrl,
    });
  });

  // Save the product details to a JSON file
  fs.writeFileSync("products.json", JSON.stringify(products, null, 2));
  console.log("Product data saved to products.json");

  await browser.close();
})();
Since the full HTML of the product has already been scraped into productGridHTML all that Cheerio needs to do is process the productGridHTML by converting it into a DOM-like structure in memory. This enables queries and manipulations like how you would use CSS selectors in a browser. Cheerio uses .product-item to locate each product container and .product-name, .product-price, .product-image, and <a> elements to retrieve specific details.
Your code should now look like this:
const puppeteer = require("puppeteer");
const cheerio = require("cheerio");
const fs = require("fs");

(async () => {
   const url = "https://www.scrapingcourse.com/button-click";
   const browser = await puppeteer.launch({ headless: true });
    const page = await browser.newPage();
    await page.goto(url, { waitUntil: "domcontentloaded" });
   await page.waitForSelector("#load-more-btn"); // Wait for the "Load More" button to be available

   for (let i = 0; i < 5; i++) {
     const currentOffset = await page.evaluate(() => {

       return document
         .querySelector("#load-more-btn")
         .getAttribute("data-offset");
     });
      await page.click("#load-more-btn");
      await page.waitForFunction(
       (prevOffset) => {
         const button = document.querySelector("#load-more-btn");
         return button && button.getAttribute("data-offset") !== prevOffset;
       },
       { timeout: 5000 },
       currentOffset,
     );
   }

   const productGridHTML = await page.evaluate(() => {
     return document.querySelector("#product-grid").outerHTML;
   });
    const $ = cheerio.load(productGridHTML);
   const products = [];

   $(".product-item").each((_, element) => {
     const name = $(element).find(".product-name").text().trim();
     const price = $(element).find(".product-price").text().trim();
     const image = $(element).find(".product-image").attr("src");
     const url = $(element).find("a").attr("href");

     const fullImageUrl = image.startsWith("http")
       ? image
       : `https://www.scrapingcourse.com${image}`;
     const fullUrl = url.startsWith("http")
       ? url
       : `https://www.scrapingcourse.com${url}`;

     products.push({
       name,
       price,
       image: fullImageUrl,
       url: fullUrl,
     });
   });

   fs.writeFileSync("products.json", JSON.stringify(products, null, 2));
   console.log("Product data saved to products.json");
    await browser.close();
 })();
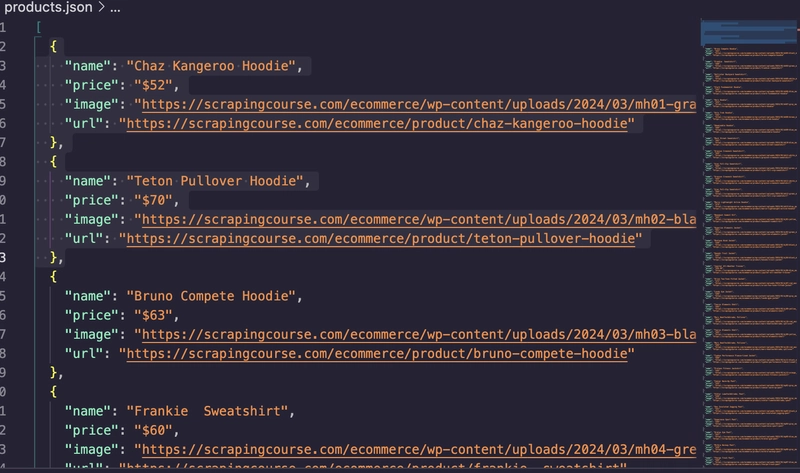
Re-run the code, and you’ll have a product.json displaying the details like this:
You’ve successfully scraped a dynamic website, Node.js, using Puppeteer and Cheerio. Now, you can decide to stop here or go further and convert the JSON file to CSV. If you decide to stop here, no problem, but if you decide to continue, then let’s get on with it!
Export Product Information to CSV
Import the csv-writer library:
const createCsvWriter = require("csv-writer").createObjectCsvWriter;
Import the csv-writer library:
Next, add this code inside the async function right before the await browser.close:
const csvWriter = createCsvWriter({
   path: "products.csv",
   header: [
     { id: "name", title: "Name" },
     { id: "price", title: "Price" },
     { id: "image", title: "Image URL" },
     { id: "url", title: "Product URL" },
   ],
 });

 const jsonData = JSON.parse(fs.readFileSync("products.json", "utf-8"));
 await csvWriter.writeRecords(jsonData);
 console.log("Product data successfully written to products.csv");
Now your code looks like this:
const puppeteer = require("puppeteer");
const cheerio = require("cheerio");
const fs = require("fs");
const createCsvWriter = require("csv-writer").createObjectCsvWriter;

(async () => {
 const url = "https://www.scrapingcourse.com/button-click";
 const browser = await puppeteer.launch({ headless: true });

 const page = await browser.newPage();

 await page.goto(url, { waitUntil: "domcontentloaded" });
 await page.waitForSelector("#load-more-btn");

 for (let i = 0; i < 5; i++) {
   const currentOffset = await page.evaluate(() => {
       .querySelector("#load-more-btn")
       .getAttribute("data-offset");
   });

   await page.click("#load-more-btn");

   await page.waitForFunction(
     (prevOffset) => {
       const button = document.querySelector("#load-more-btn");
       return button && button.getAttribute("data-offset") !== prevOffset;
     },
     { timeout: 5000 },
     currentOffset
   );
 }

 const productGridHTML = await page.evaluate(() => {
   return document.querySelector("#product-grid").outerHTML;
 });

 const $ = cheerio.load(productGridHTML); // Load the HTML into Cheerio for parsing
 const products = [];

 $(".product-item").each((_, element) => {
   const name = $(element).find(".product-name").text().trim();
   const price = $(element).find(".product-price").text().trim();
   const image = $(element).find(".product-image").attr("src");
   const url = $(element).find("a").attr("href");

   const fullImageUrl = image.startsWith("http")
     ? image
     : `https://www.scrapingcourse.com${image}`;
   const fullUrl = url.startsWith("http")
     ? url
     : `https://www.scrapingcourse.com${url}`;
   products.push({
     name,
     price,
     image: fullImageUrl,
     url: fullUrl,
   });
 });

 fs.writeFileSync("products.json", JSON.stringify(products, null, 2));
 console.log("Product data saved to products.json");
 const csvWriter = createCsvWriter({
   path: "products.csv",
   header: [
     { id: "name", title: "Name" },
     { id: "price", title: "Price" },
     { id: "image", title: "Image URL" },
     { id: "url", title: "Product URL" },
   ],
 });

 const jsonData = JSON.parse(fs.readFileSync("products.json", "utf-8"));
 await csvWriter.writeRecords(jsonData);
 console.log("Product data successfully written to products.csv");

 await browser.close();
})();
Re-run your code, and you’ll see that a products.csv has been created. It contains all the data that was scraped.

Now we’re finally done!
That’s How To Scrape Data in Node.js using Puppeteer and Cheerio
In this tutorial, we explored how to scrape data in Node.js using Puppeteer and Cheerio. With the right tools, web scraping can be effective and approachable, even for beginners.
Remember to always respect the ethical boundaries of web scraping and adhere to the terms of service of the websites you work with. To ensure you’re scraping responsibly, check out Web Scraping Best Practices and Tools 2024 for more information.

Top comments (0)