
ServiceNow is a great tool for delivering excellent customer experiences. It is primarily used as a single tenant system, where a company has their own dedicated database, applications, and data isolated on each ServiceNow instance. One area where ServiceNow is currently lacking in is there UX/UI. They are making some strides in the right direction with their Now Experience UI framework, but most companies are still using Service Portals for many customer UI experiences. These Service Portals are built on AngularJS, which is on its way out the door.
While we are in this weird transition period, I thought it might be fun/useful to show how we can integrate a common 3D JavaScript library into ServiceNow to possibly deliver better and more modern customer experiences along the way.
First off, you'll want to make sure you have a PDI (Personal Developer Instance) you can play around in.
Then you'll want to navigate over to the Service Portal Configuration module:

Then go to widget editor and create a new widget:

After creating a new widget you will be taken to the code editing screen with HTML, CSS-SCSS, Client Script, Server Script, and Link Function(this is the tab we will be using to do our 3D logic). You can paste this into the HTML template
<div id="main">
<!-- your widget template -->
  <div id="box-id"/>
</div>
Take note of the div with the id of "box-id" and "main", these are the tags we will be appending our 3D mesh to.
You can leave the CSS-SCSS, Client Script, and Service Script tabs alone.
In the Link Function tab we will add our Three.JS code (We will be creating a simple cube with orbit controls for this tutorial)
var scene = new THREE.Scene();
var clientHeight = document.getElementById('main').clientHeight - 100;
var clientWidth = document.getElementById('main').clientWidth;
var container = document.getElementById('box-id');
var camera = new THREE.PerspectiveCamera(75, 900 / 700, 0.1, 2000);
Here we are setting up the Three.JS scene and defining the camera and container based on the current div we are in.
camera.position.y = 500;
camera.position.z = 100;
camera.position.z = 5;
camera.lookAt(scene.position);
var renderer = new THREE.WebGLRenderer();
renderer.setSize(600, 600);
container.appendChild(renderer.domElement);
var mesh = new THREE.Mesh(
        new THREE.BoxGeometry(200, 200, 200, 1, 1, 1),
        new THREE.MeshBasicMaterial({
            color: 0xff0000,
            wireframe: true
        }));
var controls = new THREE.OrbitControls(camera, renderer.domElement);
controls.minDistance = 100;
controls.maxDistance = 500;
scene.add(mesh)
In this step we are creating and adding the mesh to the scene we created.
 var animate = function() {
        requestAnimationFrame(animate);

        mesh.rotation.x += 0.01;
        mesh.rotation.y += 0.01;

        renderer.render(scene, camera);
    };

animate();
We will then create a animation function and run that infinitely.
The next part is the important one, we will be adding the Three.JS library into our ServiceNow instance so we can access the function we were using above. Click on the hamburger menu and click "Open in platform"

You will then want to scroll down to the related list that says "Dependencies":

Click new and make sure your record looks like this, make sure the order is set to 100 and source is set to "URL":

CDN URL for Three.JS https://unpkg.com/three@0.134.0/build/three.js
Then you will want to do the same thing for the OrbitControls function and set that order to 200, link to OrbitControls https://unpkg.com/three@0.134.0/examples/js/controls/OrbitControls.js
Go back to the Service Portal Configuration page and click "Designer" to add the widget to a portal, I will be adding this test one to the "index" page which is at the route /sp

And that's it! Go to your PDI Service Portal homepage and you should see your creation.
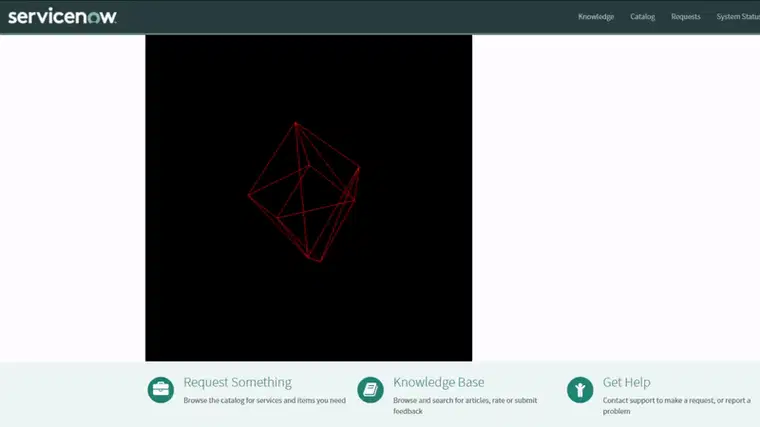
Play around with it and see what fun stuff you can create!

Top comments (1)
Nice blog and informative content,
We are providing Best SERVICENOW Training in Hyderabad,
Thanks for sharing with us,
SERVICENOW Online Training in Hyderabad
SERVICENOW Training in Hyderabad
SERVICENOW Course in Hyderabad