
What is a web application? An app that can be accessed only through a browser? An app that cannot replicate the rich offline experience that a native application can provide? Or, an app that requires a constant internet connection to work properly?
In case you agree with any of these answers, this article will be a huge revelation for you! But as most of us already know, a modern web application can do so much more than just running a few scripts on the browser to display HTML.
It can cache content so that it can be accessed offline. It can be installed just like any native app, to provide all the rich experiences of a native app. It can push notifications to its users and also provide a periodic background sync for data backup!
This is where service workers come into the picture! Put simply, a service worker is a JavaScript file used to cache certain assets of your application.
It works by allowing a developer to control how network requests are handled by the app. Before we start with the code involved, let us learn about the lifecycle of a service worker, which will make it easier to understand how an app’s assets can be stored in cache.
Note that we make use of ES6 Promises to implement service workers, and in case you aren’t aware of the topic, you can go through this article I had posted a while back.

There are a few steps involved in getting a service worker up and running, and they are referred to as the life cycle of the service worker. This image displays the simplified version of the various stages involved.
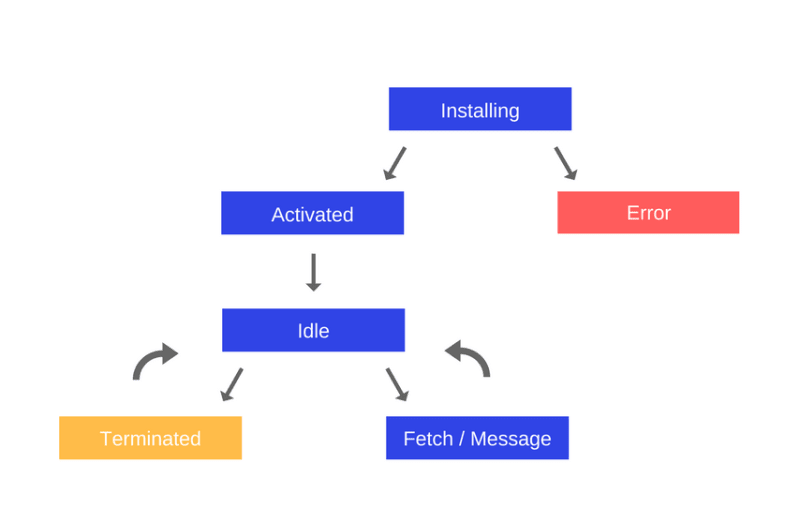
Note that each step is asynchronous. Here, the 3 major milestones are:
- Installing a service worker: This includes registering a worker. Doing so will in turn cause the browser to start installing the service worker in the background. In this step, most of the static files are cached successfully. In case you are curious as to where you can find the cached assets, open the Application tab of the Chrome DevTools, as follows.

Activating the service worker: This step is mostly used to delete an older version of the service worker. You would want to do this when you have updated some assets of your app, and you want the service worker to cache the newer assets*,* after deleting the older ones.
Fetching the required content from cache: This step will be responsible for fetching the cached assets, in order to allow an app to function offline. This step usually takes place whenever a network request is made and the required data has already been cached.
We now know that a service worker has to follow certain steps before it can help us convert our web app into a Progressive Web Application. So let’s start writing some code to do the same.
Start by creating a file called worker.js or sw.js in the root of you project. It is easier if your index HTML file is at the same level as your service worker file.
First, you will need to register a service worker. You can choose to do it in a separate file and link it to the index.html (Or, the main HTML file in the root of your project). But you will often see a service worker being registered in the HTML file itself, within a <script> tag.
<script>

if ('serviceWorker' in navigator) {
    window.addEventListener("load", () => {
    navigator.serviceWorker.register('/sw.js')
    .then(reg => console.log("Service worker registered"))
    .catch(err => console.error(`Service Worker Error: ${err}`));
    });
} else {
    console.log("Service Worker is not supported by browser.");
}

</script>
Here navigator is an object which has methods and properties about the application running the script.
The other steps are done within the sw.js file. In order to do that, we will be adding several event listeners to the window object.
Suppose we have a very simple app with just 3 files index.html, index.css, script.js. Then we will need to add the following lines of code to the sw.js file.
const cacheName = "v1"; // Can be any string

const cachedAssets = ["index.html", "index.css", "script.js"];

// Call install event
self.addEventListener("install", (e) => {
    e.waitUntil(
        caches
        .open(cacheName)
        .then((cache) =>
                cache.addAll(cachedAssets);
            })
        .then(() => self.skipWaiting())
    );
});
Here you can see that we need to store the assets (files) that we need to store as cache, in an array and attach an install event listener to the window object (self / this). Once the event is fired, a new cache folder is created by the name cacheName v1 and the different assets are added to it.
The next step of the process is to add an activate event listener to the window object, and to check if the current cache v1 is the latest version available. To do so, copy the following code in the sw.js file.
// Call activate event

self.addEventListener("activate", (e) => {
    // Remove unwanted cached assets
    e.waitUntil(
        caches.keys().then(cacheNames => {
        return Promise.all(
            cacheNames.map(cache => {
            if (cache !== cacheName) {
                return caches.delete(cache);
                }
            })
        );
        })
    );
});
Here, we are accessing the various cached assets stored. In case you want to test it out yourself, try commenting out the above lines and changing the cacheName to v2 , before saving the file. You will see that there are now 2 sets of cached assets, namely v1 and v2

This will end up consuming a lot more storage on the browser unless we delete the unwanted assets cached under a different cacheName. This is where the activate event listener comes in handy.
Once the event is fired, all the keys of the caches object are obtained. These are nothing but the various cached assets under the name v1 , v2 and so on. These cacheNames are then compared with the current cacheName, and if they do not match, that particular set of assets is deleted from the cache storage!
Finally, the most vital step of the process is to fetch assets from cache storage. This is done by attaching a fetch event listener to the window object, as shown below.
// Call fetch event

self.addEventListener("fetch", (e) => {
    e.respondWith(fetch(e.request)
                    .catch(() => caches.match(e.request))
                    );
});
The way that we have set up our service worker is pretty simple, hence the process of gathering cached assets, whenever a network request is made from the app is also pretty simple.
All that we do in this step is wait until the fetch event is fired, after this, we first try to access the required assets by making a network request. We perform the network request using the fetch() API (Do not confuse this with the event listener we have set up).
But in case the app is offline, the fetch() API will not return the required data. This allows us to return the cached assets as the response to the app’s original request. This will ensure that even though the app is offline, no error occurs when making a request for a cached asset!
At the end of all 3 steps, your sw.js file will be looking like this.
This was just one method of creating a service worker, but if you want to cache every page of your app, then modify your sw.js file as follows.
You will notice that most of our work is now being done after the fetch event is fired. This is because we are now adding every page we visit to the cache storage, by making a clone of all the assets required to render that particular page.
Although this seems like a pretty easy fix for caching the assets required for any app to function offline, this isn’t a one stop solution for all you caching needs! You will need to vary your service worker depending on the needs of your application.
Lastly, in order to test if your app registers a valid service worker, you can take a look at the Service Workers section under the Application tab of the Chrome DevTools. To test if your app works offline, check the option that states offline and refresh the page.

Top comments (2)
To see a real-world example of a service worker, you can visit my website. It caches the main pages and a default offline page used to make sure the
doesn't bother you.
Cool explanation.