
We have already seen how to make decisions based on some conditions in the previous article. In this article, we will look at the switch statement which can be used to replace the if...else statements in some cases to reduce the complexity and improve the readability of the code.
Normally, if we have to choose one case among many choices, nested if-else or else if is used. But if the number of choices is large, switch..case is a better option as it makes code neat and easier to understand. In switch statements, we can jump to various cases based on our expression. Let’s see how.
Consider a case in which we want to print a message based on the name of fruit we get from the user
if (grade == 'A') {
    System.out.println("Excellent !");
} else if (grade == 'B') {
    System.out.println("Outstanding !");
} else if (grade == 'C') {
    System.out.println("Good !");
} else if (grade == 'D') {
    System.out.println("Can do better");
} else if (grade == 'E') {
    System.out.println("Just passed");
} else if (grade == 'F') {
    System.out.println("You failed");
} else {
            System.out.println("Invalid grade");
We can make this program more readable by using a switch..case instead of else if.
Switch Syntax
switch(expression) {
    case value1:
        statement(s)
        break;

    case value2:
        statement(s)
        break;

    /* you can give any number of cases */

    default:
        statement(s)
}
In switch(expression), the value of the expression is compared with the values of all the cases. If the value of the expression matches the value of a case, then the statement(s) corresponding to that case is executed.
So we can write the above example using switch case as
class Test {

    public static void main(String[] args) {
        char grade = 'B';

        switch (grade) {
            case 'A':
                System.out.println("Excellent !");
                break;
            case 'B':
                System.out.println("Outstanding !");
                break;
            case 'C':
                System.out.println("Good !");
                break;
            case 'D':
                System.out.println("Can do better");
                break;
            case 'E':
                System.out.println("Just passed");
                break;
            case 'F':
                System.out.println("You failed");
                break;
            default:
                System.out.println("Invalid grade");
        }
    }
}
Understanding break statement
Take a look at the following example
Let's say we want to print a message based on the fruit value entered by the user.
import java.util.Scanner;

public class Switch{
    public static void main(String[] args) {
        Scanner input = new Scanner(System.in);

        System.out.print("Enter a fruit: ");
        String fruit = input.next();

        switch(fruit){
            case "mango":
                System.out.println("King of fruits");
            case "apple":
                System.out.println("A sweet red fruit");
            case "orange":
                System.out.println("Round fruit");
            case "grapes":
                System.out.println("small fruit");

        }
    }
}
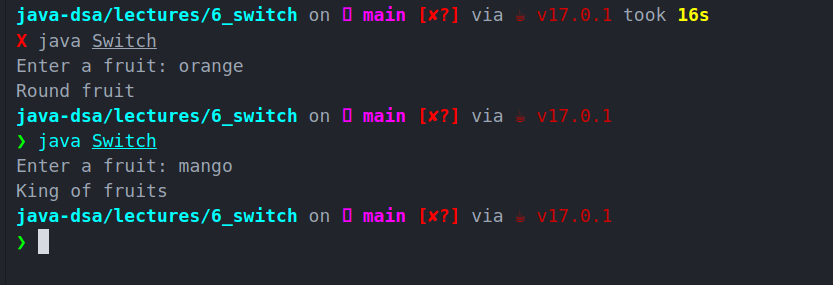
output


This is unexpected. When we entered orange the code should have only printed Round fruit but it printed all the next along with it.
By this, we understand the behavior of switch-statement. If we do not give a break statement to our switch cases, the switch not only executes the matched case but all the following cases until it encounters the next break statement. That's the reason when we enter mango, all the statements are printed by our program
That's the reason we have a break statement after every case so that the program will know that once a case is matched it should break out of the switch statement. So the correct code is
import java.util.Scanner;

public class Switch{
    public static void main(String[] args) {
        Scanner input = new Scanner(System.in);

        System.out.println("Enter a fruit");
        String fruit = input.next();

        switch(fruit){
            case "mango":
                System.out.println("King of fruits");
                break;
            case "apple":
                System.out.println("A sweet red fruit");
                break;
            case "orange":
                System.out.println("Round fruit");
                break;
            case "grapes":
                System.out.println("small fruit");
                break;
        }
    }
}
output
Understanding default statement
Let's see what happens if we enter some irrelevant input in the above code

We get no output when we enter any fruit which is not in the given cases or anything gibberish. But the code should give some output because no-output would not make much sense to our user. Its cases like this when default case is used. The default will execute when none of the above cases execute.
import java.util.Scanner;

public class Switch{
    public static void main(String[] args) {
        Scanner input = new Scanner(System.in);

        System.out.print("Enter a fruit: ");
        String fruit = input.next();

        switch(fruit){
            case "mango":
                System.out.println("King of fruits");
                break;
            case "apple":
                System.out.println("A sweet red fruit");
                break;
            case "orange":
                System.out.println("Round fruit");
                break;
            case "grapes":
                System.out.println("small fruit");
                break;
            default:
                System.out.println("Please enter a valid fruit name");
        }
    }
}
output
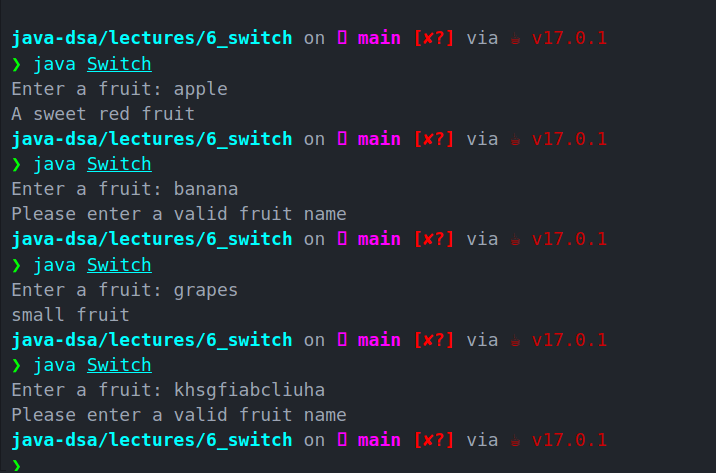
As we can see, the program now prints a statement for invalid inputs.
You may have a default statement anywhere in the switch case and not at the end, but then you'll have to write a break statement following the default case so none of the following cases is executed when the default condition is met.
Notes for Switch
-
Cases have to be of the same type as expression, must be constant or literal.
The cases can not be an expression like
marks < 50It has to be either a constant or a literal Duplicate cases are not allowed
Break is used to terminate
If
breakis not used, it will continue to execute all the next casesDefault will execute when none of the above cases execute
If the default is not at the end, put a
breakafter it
Enhanced switch
Enhancements to switch statements were introduced by Java 12 and then further modified by Java 13.
Let’s dive into the important features of this improved version of the Switch statement.
- Switch with arrows
The statements on the right side of an ⇾ are executed if an exact case matches on the left side.
for example, let say we take int input for a day of the week form the user and want to print the name of the day
switch (day) {
    case 1 -> {
        // you can add braces like this if you want to have multiline code
        System.out.println("Monday");
    }
    case 2 -> System.out.println("Tuesday");
    case 3 -> System.out.println("Wednesday");
    case 4 -> System.out.println("Thursday");
    case 5 -> System.out.println("Friday");
    case 6 -> System.out.println("Saturday");
    case 7 -> System.out.println("Sunday");
}
-
Supports multiple values per case
With multiple values being specified per case, it simplifies the code structure.
In our previous example, if we do not want the name of the day; instead we only want whether the day is a weekday or weekend
switch (day) {
    case 1:
    case 2:
    case 3:
    case 4:
    case 5:
        System.out.println("Weekday");
        break;
    case 6:
    case 7:
        System.out.println("Weekend");
        break;
}
This code can even be enhanced as follows. The case values need to be separated by commas and the break should follow the case block.
switch (day) {
    case 1, 2, 3, 4, 5 -> System.out.println("Weekday");
    case 6, 7 -> System.out.println("Weekend");
There are so many other new features about which you can read in this article
Nested switch case
In our last article, we saw nested if statements. Similarly, nested switch cases are basically switch-case inside a switch-case
You can have a look at an example of nested switch and other code samples we discussed in this article in my git repo.
Feel free to connect via socials

Top comments (0)