
It's about time we start adding a data layer to our delicious React application cake. Let's see when, where and how we should add this data!
Fetch Me Some Data
We have been serving static React sites so far, probably that won't be the case for long. We will need to exchange data in our applications, whether it is from our own backend or from remote endpoints. For that APIs are life! Basically, React communicates with anything and everything using APIs.
React is flexible and wouldn't mind the language as long as it's a response that can be parsed and read. You can use REST, GraphQL and even SOAP, but we will stick to REST APIs for now.
We have many options, but I'd like to highlight that Javascript has blessed us with fetch and also axios's advantages have been bestowed on us, so we are well prepared, when it comes to APIs in Javascript.
Component Lifecycle Methods
Before we fetch our data, we need to know our component's lifecycle first and how it works to be able to call our endpoints and update our data in the most suitable location for it without disturbing the peace of our lifecycle.
I found the following useful to play with, to get to know these methods
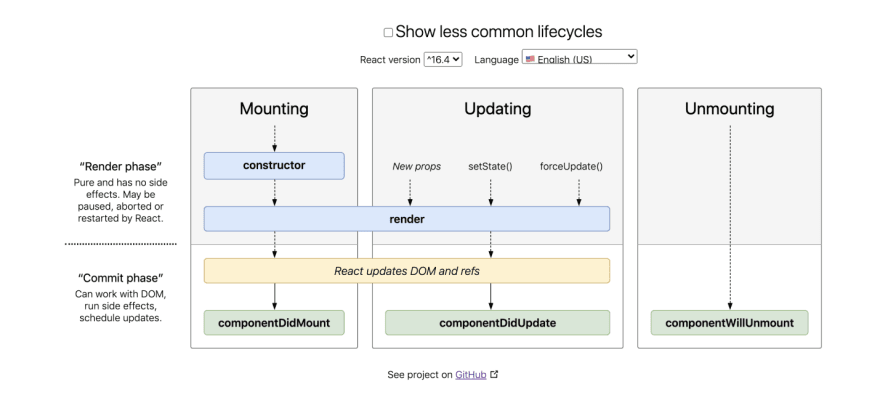
And here is my interpretation of the most common lifecycle methods we are more likely to meet:
render()
Our famous render method have been helping us display our elements to the screen ever since we've started. It is the only required method and it is expected to return our elements whether in their normal form as JSX elements or in an array form or a textual form in case the output is a string or a number.
No changes to state or props or any sort of modification should take place in this method, as it is only as, the name suggests, for rendering.
constructor()
The constructor method is called before the component is mounted.
It is used for only 2 purposes:
- Setting our states using this.state
- Binding event handler methods
If we are not doing any of those, implementing a constructor for our component would not be necessary.
componentDidMount()
This method is called right after the component is mounted or in other words inserted into the tree. This is our go to method, if we want to load things first thing after the component is initiated, so it is good for fetching data from remote endpoints and adding event listeners.
componentDidUpdate()
This method is invoked immediately after the occurrence of an update, be it a prop, a state or any other update.
It is passed the prevProps and prevState as parameters to enable us to assign our change to a certain case determined by the comparison of our current value and our previous value.
We can also set our states in this method, but we must wrap it in a condition or else we will end up stuck in an infinite loop.
componentWillUnmount
This method can act as our tear down method. It is called immediately before a component is unmounted or in other words destroyed. We can use it for clean up like resetting counters or clearing arrays or anything we want to get rid of when the component has fulfilled its purpose.
Well, that covers the basics. We have our lifecycle methods in a row, let's start building!
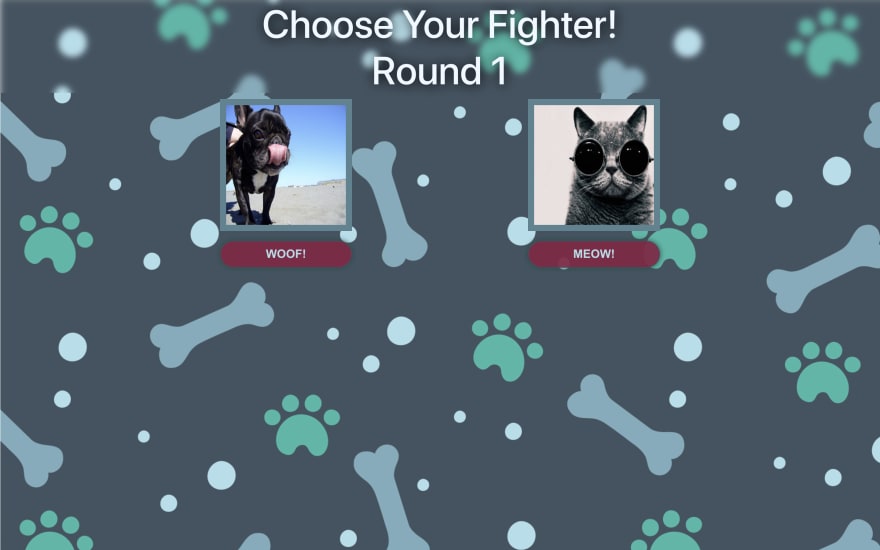
Build What?
We are going to make humanity's sweethearts compete for its love. We are building a React script that runs a mini contest between dogs and cats. We are going to fetch random images of dogs versus random images of cats with the help of APIs and calculate the accumulated score to determine our final winner.
Choose your fighter HERE
What's the Plan?
What we want is to have 3 rounds. For each round we want to fetch 2 images from 2 endpoints, one for a dog and one for a cat. We want to click a button in each round to decide which image is the winner and at the end of the 3 rounds, we will calculate the total score and declare our winner!
What we need:
- A Dog component to handle the dog image fetching and have the button for adding dog points
- A Cat component to handle the cat image fetching and have the button for adding cat points
- A Winner component to declare our winner at the end of the rounds
- Our App component to bootstrap it all together
Off we go!
Dog
After running npx create-react-app . in our root folder of choice and laying out our folder structure by adding our components folder inside our src folder, let's start by adding our Dog component!
We will create a Dog folder and add to it a Dog.js file and a Dog.css file.
In our component, we are planning on having the image we are going to fetch and a button to increase the dog score, so the basic layout will be as follows:
import React from "react";
import "./Dog.css";

class Dog extends React.Component {
  constructor() {
    super();
    this.state = {
      img: "",
    };
  }

  handleClick=()=>{}

  render() {
    return (
      <div className="dog">
        <img alt="dog" src={this.state.img} />
        <button className="btn btn-bright" onClick={this.handleClick}>WOOF!</button>
      </div>
    );
  }
}

export default Dog;
Let's leave our handleClick empty for now and see how we are going to deal with it later.
Now, we want to fetch the image. I have chosen https://dog.ceo/ as my API, but feel free to use any API of your choice.
I will set my endpoint in a url variable in the constructor for ease of use when calling it later.
constructor() {
    super();
    this.url = "https://dog.ceo/api/breeds/image/random";
    this.state = {
      img: "",
    };
  }
I am going to use good -not so old- fetch, but if you prefer axios don't let me stop you!
fetchImg = () => {
    fetch(this.url)
      .then((response) => {
        return response.json();
      })
      .then((data) => {
        if (data.status === "success") {
          this.setState({ img: data.message });
        }
      })
      .catch((error) => {
        console.error(error);
      });
  };
My first intuition was to call the fetchImg method in the constructor, but remember, it is advised to avoid introducing any side-effects or subscriptions there and as we discussed earlier, components have a certain lifecycle to be respected, so we are not going to call it there.
We want to fetch the image immediately after the component mounts, so the most suitable lifecycle method for that is componentDidMount
componentDidMount() {
    this.fetchImg();
  }
Lovely! Now let's add our Dog component to our App.js file to display what we've done so far.
import React from "react";
import "./App.css";
import Dog from "./components/Dog/Dog";

function App() {
  return (
    <div className="app">
      <Dog />
    </div>
  );
}

export default App;
Cat
Since everything is working as expected, let's repeat the same process for cat, but with a different API. My API of choice is https://thecatapi.com/
It requires an API key, but don't worry, you can sign up and get one for free.
import React from "react";
import "./Cat.css";

class Cat extends React.Component {
  constructor() {
    super();
    this.url = "https://api.thecatapi.com/v1/images/search";
    this.state = {
      img: "",
    };
  }

  componentDidMount() {
    this.fetchImg();
  }
  fetchImg = () => {
    fetch(this.url, {
      headers: {
        "x-api-key": "YOUR API KEY GOES HERE",
      },
    })
      .then((response) => {
        return response.json();
      })
      .then((data) => {
        if (data.length > 0 && data[0].url) {
          this.setState({ img: data[0].url });
        }
      })
      .catch((error) => {
        console.error(error);
      });
  };

  handelClick=()=>{}

  render() {
    return (
      <div className="cat">
        <img alt="cat" src={this.state.img} />
        <button className="btn btn-bright" onClick={this.handleClick}>MEOW!</button>
      </div>
    );
  }
}

export default Cat;
We will also add it to App.js
import React from "react";
import "./App.css";
import Dog from "./components/Dog/Dog";
import Cat from "./components/Cat/Cat";

function App() {
  return (
    <div className="app">
      <Dog />
      <Cat />
    </div>
  );
}

export default App;
App
Now, that we have have both our components set, we are going to need to add states to keep each component's score and what round we're in, so let's convert our function component to a class component and add our states!
import React from "react";
import "./App.css";
import Dog from "./components/Dog/Dog";
import Cat from "./components/Cat/Cat";

class App extends React.Component {
constructor() {
    super();
    this.state = {
      round: 1,
      catScore: 0,
      dogScore: 0,
    };
  }
  render() {
    return (
      <div className="app">
        <Dog />
        <Cat />
      </div>
    );
  }
}

export default App;
Awesome! Now, what we need is to add the score when the corresponding button is pressed. So we need to make our onClick handler send data to the App component hmmm... That's a tough one.
Turns out it really isn't. We can accomplish that by creating a method in our App and send it as a prop to both the Dog and the Cat components. That way, when we handle the click event we can call that prop and instruct it to do whatever we want!
Our method will receive a string, that indicates who won and accordingly, we're going to increase the score and move to the next round.
handleWin = (type = "dog") => {
    if (type === "cat") {
      this.setState((state) => ({
        catScore: state.catScore + 1,
        round: state.round + 1,
      }));
    } else {
      this.setState((state) => ({
        dogScore: state.dogScore + 1,
        round: state.round + 1,
      }));
    }
  };
We will send this method as a prop to both Cat and Dog
render() {
    return (
      <div className="app">
        <Dog win={this.handleWin} />
        <Cat win={this.handleWin} />
      </div>
    );
  }
In our Dog component we will call our prop in the handleClick method and pass it the string dog
handleClick = () => {
  this.props.win("dog");
};
We will also do the same for the Cat component with changing the passed string
handleClick = () => {
  this.props.win("cat");
};
Perfect! Now, all our functionality for updating the rounds and score are done!
Let's add a header and display which round we're in, in App.js
render() {
    return (
      <div className="app">
        <div className="header">
          <h1>Choose Your Fighter!</h1>
          <h1>Round {this.state.round}</h1>
        </div>
        <div className="fighters">
          <Dog win={this.handleWin} />
          <Cat win={this.handleWin} />
        </div>
      </div>
    );
  }
And also make things look prettier with our CSS. We will need to add the paws.jpg image in our src folder first.
App.css
* {
  box-sizing: border-box;
}

.btn {
  padding: 10px;
  border-radius: 100px;
  border: none;
  cursor: pointer;
}
.btn-bright {
  background-color: #862042ed;
  box-shadow: #0b4c42 0px 0px 9px 0px;
  border: 1px solid #425361;
  color: #b0deea;
  font-weight: 900;
  font-size: 1.2rem;
}

.app {
  background-image: url("./paws.jpg");
  min-height: 100vh;
  background-size: cover;
  background-repeat: no-repeat;
  display: flex;
  flex-direction: column;
  justify-content: flex-start;
  align-items: center;
}

.app h1 {
  color: aliceblue;
  font-size: 4rem;
  text-shadow: black 1px 1px 20px;
  font-weight: 500;
  text-align: center;
  margin: 0;
}
.app .header {
  width: 100%;
  backdrop-filter: blur(5px);
  margin-bottom: 10px;
}

.fighters {
  width: 50%;
  display: flex;
  justify-content: space-between;
}

.animate-fighters {
  animation-name: fighters;
  animation-duration: 2s;
}

@keyframes fighters {
  from {
    opacity: 0;
  }
  to {
    opacity: 1;
  }
}

@media screen and (max-width: 900px) {
  :root {
    font-size: 16px;
  }
}
@media screen and (max-width: 700px) {
  :root {
    font-size: 10px;
  }
}
@media screen and (max-width: 400px) {
  :root {
    font-size: 5px;
  }
}
Dog.css
.dog {
  display: flex;
  flex-direction: column;
}

.dog img {
  width: 15vw;
  height: 15vw;
  border: 10px #5b8390 solid;
}

.dog .btn {
  margin-top: 1rem;
}
Cat.css
.cat {
  display: flex;
  flex-direction: column;
}

.cat img {
  width: 15vw;
  height: 15vw;
  border: 10px #5b8390 solid;
}

.cat .btn {
  margin-top: 1rem;
}
Great! Everything looks the way we want it to look, but we have a problem. When we choose a winner for our round and move to the next one, the images don't change, as our states stay the same, so we need to trigger our fetchImg in Cat and Dog to get fresh images for every round.
We can't do that in the handleClick method in the component itself as it will only update the winner and leave the other image unchanged.
Our solution would need to trigger both fetch methods from our parent component. For this problem, I chose refs as my solution.
Refs provide us with a way to access our child elements. Sometimes like in our case, we would want to modify our child without using props, so refs step up for the job.
To add Refs we will do that in the constructor using React.createRef()
constructor() {
    super();
    this.state = {
      round: 1,
      catScore: 0,
      dogScore: 0,
    };
    this.dogRef = React.createRef();
    this.catRef = React.createRef();
  }
And then, we will add a ref attribute to our components calling our declared refs
render() {
    return (
      <div className="app">
        <div className="header">
          <h1>Choose Your Fighter!</h1>
          <h1>Round {this.state.round}</h1>
        </div>
        <div className="fighters">
          <Dog ref={this.dogRef} win={this.handleWin} />
          <Cat ref={this.catRef} win={this.handleWin} />
        </div>
      </div>
    );
  }
In our handleWin method we can access our desired nodes using current and then, we can call the fetchImg method.
handleWin = (type = "dog") => {
    if (type === "cat") {
      this.setState((state) => ({
        catScore: state.catScore + 1,
        round: state.round + 1,
      }));
    } else {
      this.setState((state) => ({
        dogScore: state.dogScore + 1,
        round: state.round + 1,
      }));
    }

    this.dogRef.current.fetchImg();
    this.catRef.current.fetchImg();
  };
Lovely! Our images are changing!
Winner
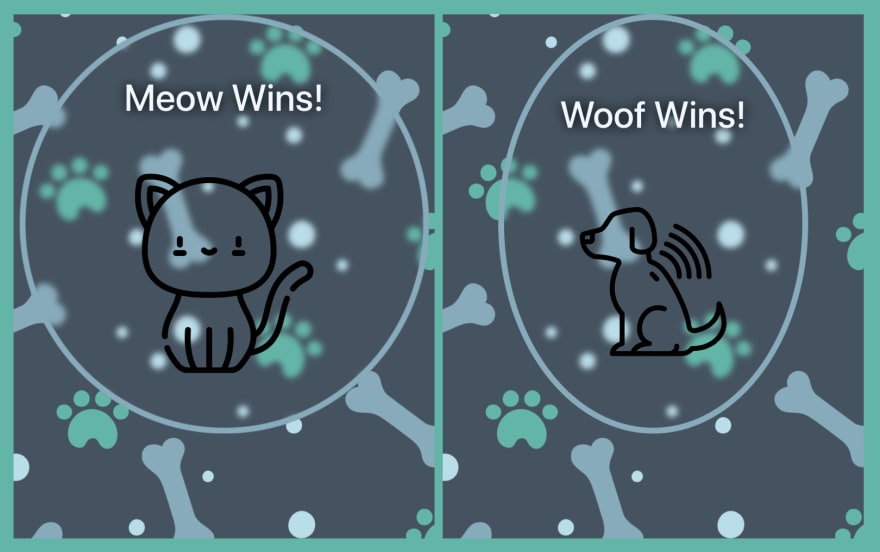
For now our rounds increase infinitely without declaring a winner and it's about time we fix that!
We should have our cat.svg and dog.svg images placed in our Winner folder. We will just render a simple header and image depending on the winner passed to us as a prop.
import React from "react";
import "./Winner.css";
import cat from "./cat.svg";
import dog from "./dog.svg";

class Winner extends React.Component {
  render() {
    let winner = (
      <>
        <h1>Woof Wins!</h1>
        <img alt="dog" src={dog} />
      </>
    );
    if (this.props.winner === "cat") {
      winner = (
        <>
          <h1>Meow Wins!</h1>
          <img alt="cat" src={cat} />
        </>
      );
    }

    return <div className="winner">{winner}</div>;
  }
}

export default Winner;
We will add our CSS to our Winner.css
.winner {
  display: flex;
  flex-direction: column;
  align-items: center;
  justify-content: space-evenly;
  height: 80vh;
  backdrop-filter: blur(5px);
  border-radius: 100%;
  border: 10px solid #7dacbc;
}
.winner img {
  width: 50%;
}
Good! Now, that we have our component all set we need to import it, set a condition and render it in our App component.
Our threshold for the rounds is 3, if we passed that, we will compare scores and declare our winner.
render() {
    let content = (
      <>
        <div className="header">
          <h1>Choose Your Fighter!</h1>
          <h1>Round {this.state.round}</h1>
        </div>
        <div className="fighters">
          <Dog ref={this.dogRef} win={this.handleWin} />
          <Cat ref={this.catRef} win={this.handleWin} />
        </div>
      </>
    );
    if (this.state.round === 4) {
      let winner = "dog";
      if (this.state.catScore > this.state.dogScore) {
        winner = "cat";
      }
      content = <Winner winner={winner} />;
    }
    return <div className="app">{content}</div>;
  }
Lovely! As a last greedy thing let me just add some animation in between the transition of rounds.
I'll use the animate-fighters class to give us some sort of fade in.
It will need to be initialized in our constructor
constructor() {
    super();
    this.state = {
      round: 1,
      catScore: 0,
      dogScore: 0,
      animateFighters: "animate-fighters",
    };
    this.dogRef = React.createRef();
    this.catRef = React.createRef();
  }
Also, Added in render and reset after the animation ends to be able to repeat the process in the 3 rounds
let content = (
      <>
        <div className="header">
          <h1>Choose Your Fighter!</h1>
          <h1>Round {this.state.round}</h1>
        </div>
        <div
          className={`fighters ${this.state.animateFighters}`}
          onAnimationEnd={() => this.setState({ animateFighters: "" })}
        >
          <Dog ref={this.dogRef} win={this.handleWin} />
          <Cat ref={this.catRef} win={this.handleWin} />
        </div>
      </>
    );
And set in handleWin to re-animate at the beginning of the next round
handleWin = (type = "dog") => {
    if (type === "cat") {
      this.setState((state) => ({
        catScore: state.catScore + 1,
        round: state.round + 1,
        animateFighters: "animate-fighters",
      }));
    } else {
      this.setState((state) => ({
        dogScore: state.dogScore + 1,
        round: state.round + 1,
        animateFighters: "animate-fighters",
      }));
    }

    this.dogRef.current.fetchImg();
    this.catRef.current.fetchImg();
  };
Annnd it works like charm!
The code can be found HERE
By this mini contest, I shall end my fourth baby step towards React greatness, until we meet in another one.
Any feedback or advice is always welcome. Reach out to me here, on Twitter, there and everywhere!

Top comments (2)
Nice rana!
Thanks, Omar!