
Unit testing is a very important aspect of software development. It involves testing the smallest units of code (eg. functions or methods) and if written well, they act as a guard rail whenever your code violates its expected behavior.
In this article, we'll cover all the steps required to write unit tests for your node express API.
By the end of this article, you'd have an understanding of how unit tests work, how to write them, and how to be less lost finding the bugs.
Here's the overview of how the article is structured:
- 🌠 Our express API
- 🧪 Let's begin testing
- 🔎 Install mocha and chai
- 🧩 Create your first test
- ✨ Running your first test
- 🔮 Try async
- 🪝 Before and After hooks
- 📈 One unit at a time
- 🎭 Stubbing private resources with Rewire
- 🏭 Testing our database
- 🐫 Testing our routes
- 👓 Check your coverage
- 🏎️ Test driven development
- 💠 Conclusion
- 🏄🏼♂️ Resources
Our express API
We'll be using a simple express API throughout this article to demonstrate unit testing. You can find the code on Github.
The API only provides five endpoints:
-
GET /health/sync- returns 'OK' synchronously -
GET /health/async- returns 'OK' asynchronously -
GET /item/:hash- fetches an item from MongoDB with matchinghashvalue -
POST /item- creates new item in MongoDB -
PUT /item- updates item'shashvalue in MongoDB
Let’s begin testing
We are now ready to write some unit tests. We'll be using mocha and chai for our API. Mocha is open-source, can be combined with various assertion libraries, and has great community support. Moreover, it is used by Coursera, Asana, Intuit, and the like.
There are several components (or units) that we need to test in our API:
- Controllers (or services or business logic handlers) - it is responsible for performing the business logic and returning the result.
- MongoDB models (database schemas) - Constraints are defined in the schema and are enforced at runtime.
- Express routes - It is responsible for mapping the HTTP requests to the corresponding controller and eventually returning the response to the client.
Install mocha and chai
First off, we need to install mocha and chai:
npm install -D mocha chai
Done? Great! Time to create our first test ⚡.
Create your first test
Let's start by creating a test file. Here's how the current project structure looks like:
- src
-- controllers
---- item.controller.js
---- health.controller.js
-- models
---- item.model.js
-- routes
---- index.js
---- item.route.js
---- health.route.js
-- tests
---- health.spec.js
-- app.js
We'll be adding our tests inside the tests folder. We have created a new file health.spec.js inside the folder.
Let's start writing some basic tests for our /health API:
describe('Test /health', () => {
  describe('Health check on /sync', () => {
    it('health should be okay', () => {
      const actualResult = healthCheckSync();
      expect(actualResult).to.equal('OK');
    });
  });
});
describe block
We use this outer-most describe block to group related test suites similar to how we've structured our application code.
You can also create nested describe blocks to contain your test suites. For example, here's how we will structure the tests for /health endpoint:
- describe('Test /health')
-- describe('Test /health/sync')
-- describe('Test /health/async')
We will be adding a lot unit tests for our express API and it is usually a good idea to split your unit tests across different files corresponding to different modules (or business logic).
NOTE: It is helpful to write messages in test suites to showcase what your code does from product's perspective instead of application/software perspective.
it block
This is the place where we actually write our test suites and check for assertions, return values, etc.
Running your first test
Now that we have our first test suite ready, we are all set. To run the test we've written, let's add the following line to the package.json file inside the scripts section:
"test": "mocha ./src/tests/*.spec.js"
This script will look for all the files inside the tests folder and run them using mocha. So we just need to run the below command whenever we want to run our test suites:
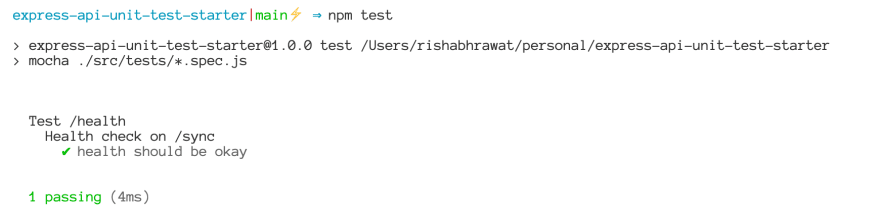
npm test
And here we have our first test suite passing 🎉!
If you want to run mocha in watch mode to automatically trigger on file changes, you can have another test script in your package.json file like this:
"test:watch": "mocha --watch ./src/tests/*.spec.js"
Try async
The tests we write are probably going to test async operations that happen across our express API. Let’s write a test for our /health/async endpoint as well which is async in nature:
describe('Test /health', () => {
  describe('Health check on /sync', () => {
    it('health should be okay', () => {
      const actualResult = healthCheckSync();
      expect(actualResult).to.equal('OK');
    });
  });

  describe('Health check on /async', () => {
    it('health should be okay', async () => {
      const actualResult = await healthCheckAsync();
      expect(actualResult).to.equal('OK');
    });
  });
});
We get a lot of flexibility here because mocha supports multiple ways we can handle async operations in our test suites:
- We can use async/await like show above,
- We can have the thenables attached which perform assertions on the result, or
- We can use done parameter with callbacks to handle the result and perform assertions.
Before and After hooks
We sometimes need to run some setup/teardown code before/after each test suite. For example, we might need to connect to a database before each test suite and disconnect it after each test suite.
In a describe block, you get access to the following hooks:
-
before- runs before all the tests inside the describe block runs -
beforeEach- runs before each test inside the describe block runs -
after- runs after all the tests inside the describe block have run -
afterEach- runs after each test inside the describe block has run
Let's take a look at the following example for clarity:
describe('Test /health', () => {
  before('before', () => {
    console.log('Ran before all the test suites');
  });

  after('after', () => {
    console.log('Ran after all the test suites');
  });

  beforeEach('beforeEach', () => {
    console.log('Ran before EACH test suite');
  });

  afterEach('afterEach', () => {
    console.log('Ran after EACH test suite');
  });

  describe('Health check on /sync', () => {
    it('health should be okay', () => {
      const actualResult = healthCheckSync();
      expect(actualResult).to.equal('OK');
    });
  });

  describe('Health check on /async', () => {
    it('health should be okay', async () => {
      const actualResult = await healthCheckAsync();
      expect(actualResult).to.equal('OK');
    });
  });
});
Running the above code gives the following output:
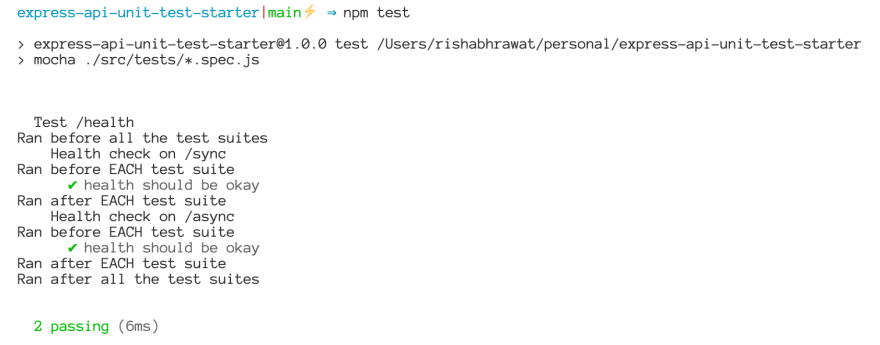
We can observe that:
- Before and after hooks ran at the start and end of the outer-most describe block.
- BeforeEach and afterEach ran before & after each test suite (i.e. each test or
itblock).
One unit at a time
When testing a function, the idea of unit testing is to only test that function and not the other stuff present in that function. So if a function involves a database call, we don’t actually want to make that database call when testing. Here's why:
- We're performing "unit" test on the function, not the database.
- Any problem in the database would cause the function to fail for no reason.
We'll test our readItem function to understand this better. But first, let's install the necessary dependencies by running the following command:
npm install -D rewire sinon sinon-chai
NOTE: Sinon enables us to create stubs, spies, mocks with any unit testing framework. Rewire provides us setter and getter functions to replace the original functions with our own.
Now that we have our dependencies ready, let's look at the test suites for readItem:
describe('Testing /item endpoint', () => {
  let sampleItemVal;
  let findOneStub;

  beforeEach(() => {
    sampleItemVal = {
      name: 'sample item',
      price: 10,
      rating: '5',
      hash: '123456891'
    };

    findOneStub = sandbox.stub(mongoose.Model, 'findOne').resolves(sampleItemVal);
  });

  afterEach(() => {
    itemController = rewire('../controllers/item.controller');
    sandbox.restore();
  });

  describe('GET /', () => {
    it('should return error when called without hash', async () => {
      itemController
        .readItem()
        .then(() => {
          throw new Error('⚠️ Unexpected success!');
        })
        .catch((err) => {
          expect(result).to.be.instanceOf(Error);
          expect(err.message).to.equal('Invalid item id');
        });
    });

    it('should succeed when called with hash', async () => {
      itemController
        .readItem('someRandomHash')
        .then((item) => {
          expect(item).to.equal(sampleItemVal);
        })
        .catch((err) => {
          throw new Error('⚠️ Unexpected failure!');
        });
    });
  });
});
Let's go through it step-by-step:
- We stub the
findOnemethod of mongoose in thebeforehook for/itemendpoint. - We reset the
itemControllerto the original one after each test suite (i,e., "it" block) runs. - We restore the sandbox afterEach test suite to reset the stubs (it is generally a good practice to use sandbox).
- In the first test suite, we call
readItemwithout hash. - We expect the result to be an error and make an assertion inside the catch block.
- In the second one, we pass the hash. It results with a
sampleItemValbecause we stubbed thefindOnemethod. - We make the assertion on the result.
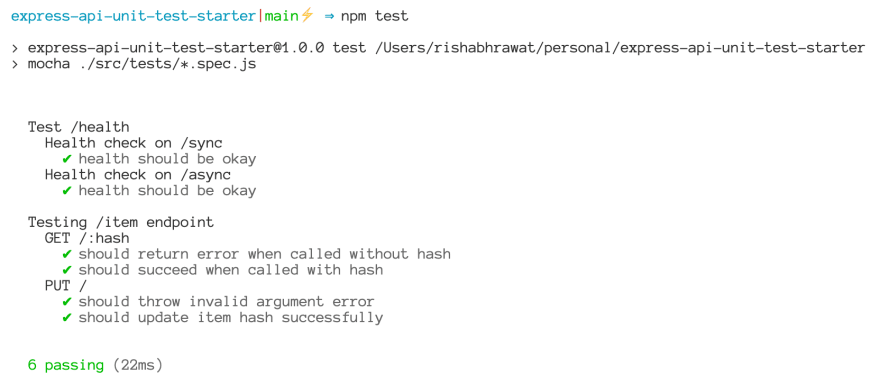
As expected, tests pass seamlessly:

We have now successfully tested our readItem function by stubbing out the findOne method of mongoose. This is one of the extremely important concept to understand when writing unit tests.
NOTE: Test one unit at a time. Pay extreme care that your tests don't reach out for the production resources (for example, production database and API calls over the network).
Stubbing private resources with Rewire
There is a lot that we have covered starting from scratch. If you're following along, you would've started noticing how the same process can be replicated to test most of the things.
Let's try to replicate the same process to test our updateItem function:
exports.updateItemHash = async function (hash) {
  try {
    if (!hash) {
      throw new Error('Incomplete arguments');
    }

    let item = await Item.findOne({
      hash
    });
    item.hash = getUniqueHash(item);

    return await item.save();
  } catch (err) {
    return Promise.reject(err);
  }
};
As you can see, there is a helper function we're using here called getUniqueHash. And unfortunately, we can't access this function outside the module since it is not exported.
function getUniqueHash(item) {
  if (!item) return null;
  const currentHash = item.hash;
  let newHash = nanoid(10);

  while (newHash === currentHash) {
    newHash = nanoid(10);
  }
  return newHash;
}
If you look at the documentation of sinon stub, you'll see that we cannot use the stub in this case.
For it to work, we would need to use the rewire package. It is just like require but comes with a setter and getter function to modify the behavior of private functions and variables in modules.
Let's see the test suite for updateItem and understand how it works:
describe('Testing /item endpoint', () => {
  let sampleItemVal;
  let findOneStub;
  const sampleUniqueHash = '1234567891';

  beforeEach(() => {
    sampleItemVal = {
      name: 'sample item',
      price: 10,
      rating: '5',
      hash: sampleUniqueHash
    };

    findOneStub = sandbox.stub(mongoose.Model, 'findOne').resolves(sampleItemVal);
  });

  afterEach(() => {
    itemController = rewire('../controllers/item.controller');
    sandbox.restore();
  });

  describe('PUT /', () => {
    let getUniqueHashStub, saveStub, result, sampleUpdatedItemVal;
    const sampleUpdatedHash = '9876543219';

    beforeEach(async () => {
      // forcefully restore sandbox to allow re-write of findOneStub
      sandbox.restore();

      // Stub to mock getUniqueHash's Functionality
      getUniqueHashStub = sandbox.stub().returns(sampleUpdatedHash);

      sampleUpdatedItemVal = {
        ...sampleItemVal,
        hash: sampleUpdatedHash
      };
      // save stub to return updated item
      saveStub = sandbox.stub().returns(sampleUpdatedItemVal);

      // make findOneStub return save() method in addition to sampleItemVal
      findOneStub = sandbox.stub(mongoose.Model, 'findOne').resolves({
        ...sampleItemVal,
        save: saveStub
      });

      // Use rewire to modify itemController's private method getUniqueHash
      itemController.__set__('getUniqueHash', getUniqueHashStub);
    });

    it('should throw invalid argument error', () => {
      itemController
        .updateItemHash()
        .then(() => {
          throw new Error('⚠️ Unexpected success!');
        })
        .catch((err) => {
          expect(result).to.be.instanceOf(Error);
          expect(err.message).to.equal('Incomplete arguments');
        });
    });

    it('should update item hash successfully', async () => {
      result = await itemController.updateItemHash(sampleUniqueHash);
      expect(findOneStub).to.have.been.calledWith({
        hash: sampleUniqueHash
      });
      expect(findOneStub).to.have.been.calledOnce;
      expect(saveStub).to.have.been.calledOnce;
      expect(result).to.equal(sampleUpdatedItemVal);
    });
  });
});
Let's go through this step-by-step again:
- We have stored the initial unique hash in
sampleUniqueHashvariable. - Inside test suites for PUT endpoint, we have stored the updated unique hash inside
sampleUpdatedHashvariable. - We need a slightly different stub for
findOneso we have completely restored/reset the sinon sandbox. This will allow us to write a new stub forfindOne. - We have created a stub for
getUniqueHashfunction which will be invoked instead of the original private function insideitemController. - On line 41, we have created a new stub for
findOnewhich contains the save method in addition to the sample item value. - We are using rewire to modify the private function and replace it with our stub.
- In first test suite, we have called
updateItemHashwith an empty hash. It should throw an error. - In second test suite however, we have called
updateItemHashwith a valid hash. It should update the hash and return the updated item.
This lands us shiny green check marks ✅ on the terminal:
Keeping up the momentum, let's test our mongoose models in the next section ✴️.
Testing our database
We usually put some constraints on our models when we create schemas. This ensures that our data follows certain characteristics and is consistent.
Here's our item schema:
const mongoose = require('mongoose');
const Schema = mongoose.Schema;

const itemSchema = new Schema({
  name: {
    type: String,
    required: true
  },
  rating: {
    type: String,
    required: true
  },
  price: {
    type: Number,
    required: true
  },
  hash: {
    type: String,
    required: true,
    unique: true,
    minlength: 10,
    maxlength: 10
  }
});

module.exports = mongoose.model('Item', itemSchema);
Let's create a new file named model.spec.js inside our tests folder. We will add some basic checks for our model to make sure that our data respects those constraints:
describe('Testing Item model', () => {
  let sampleItemVal;

  beforeEach(() => {
    sampleItemVal = {
      name: 'sample item',
      price: 10,
      rating: '5',
      hash: 'hashGreaterThan10Chars'
    };
  });

  it('it should throw an error due to missing fields', (done) => {
    let item = new Item();

    item.validate((err) => {
      expect(err.errors.name).to.exist;
      expect(err.errors.rating).to.exist;
      expect(err.errors.price).to.exist;
      expect(err.errors.hash).to.exist;

      done();
    });
  });

  it('it should throw an error due to incorrect hash length', (done) => {
    let item = new Item(sampleItemVal);

    item.validate((err) => {
      if (err) {
        expect(err).to.be.instanceOf(ValidationError);
        // this is expected, do not pass err to done()
        done();
      } else {
        const unexpectedSuccessError = new Error('⚠️ Unexpected success!');
        done(unexpectedSuccessError);
      }
    });
  });

  it('it should create the item successfully with correct parameters', (done) => {
    let item = new Item({
      ...sampleItemVal,
      hash: '1234567891'
    });

    item.validate((err) => {
      if (err) {
        const unexpectedFailureError = new Error('⚠️ Unexpected failure!');
        done(unexpectedFailureError);
      } else {
        expect(item.hash).to.equal('1234567891');
        done();
      }
    });
  });
});
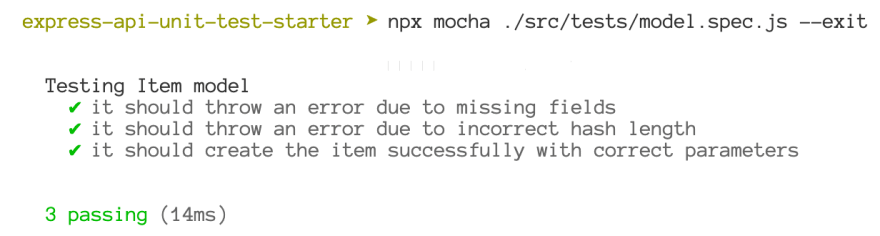
We have create three test suites to check for three things:
- Item validation should fail when we don't pass required fields.
- Item validation should fail when we don't pass the correct hash length.
- Item should be created successfully when we pass the right parameters.
Tests pass successfully 🎉:
Testing our routes
Finally, let's test our express app routes. We will create a new file named routes.spec.js inside our tests folder.
Just for your reference, here's how the final project structure looks like:
- src
-- controllers
---- item.controller.js
---- health.controller.js
-- models
---- item.model.js
-- routes
---- index.js
---- item.route.js
---- health.route.js
-- tests
---- health.spec.js
---- item.spec.js
---- model.spec.js
---- routes.spec.js
-- app.js
The next step would be to install supertest package from npm. It makes testing HTTP requests really easy and clean.
npm install -D supertest
Finished installing? Awesome!
Let's add some tests for our routes now:
describe('Testing express app routes', () => {
  afterEach(() => {
    app = rewire('../app');
    sandbox.restore();
  });

  describe('Testing /item route', () => {
    let sampleItemVal, hash;

    beforeEach(() => {
      hash = '1234567891';
      sampleItemVal = {
        name: 'sample item',
        price: 10,
        rating: '5',
        hash
      };
      sandbox.stub(itemController, 'readItem').resolves(sampleItemVal);
      sandbox.stub(itemController, 'createItem').resolves(sampleItemVal);
      sandbox.stub(itemController, 'updateItemHash').resolves(sampleItemVal);
    });

    it('GET /:hash should successfully return item', (done) => {
      request(app)
        .get(`/item/${hash}`)
        .expect(200)
        .end((err, response) => {
          expect(response.body).to.have.property('message').to.equal('Item read successfully!');
          expect(response.body)
            .to.have.property('item')
            .to.have.property('name')
            .to.equal('sample item');
          expect(response.body).to.have.property('item').to.have.property('price').to.equal(10);
          expect(response.body).to.have.property('item').to.have.property('rating').to.equal('5');
          expect(response.body).to.have.property('item').to.have.property('hash').to.equal(hash);
          done(err); // err is null in success scenario
        });
    });

    it('POST / should successfully create a new item', (done) => {
      request(app)
        .post('/item/')
        .send(sampleItemVal)
        .expect(200)
        .end((err, response) => {
          expect(response.body).to.have.property('message').to.equal('Item created successfully!');
          expect(response.body)
            .to.have.property('item')
            .to.have.property('name')
            .to.equal('sample item');
          expect(response.body).to.have.property('item').to.have.property('price').to.equal(10);
          expect(response.body).to.have.property('item').to.have.property('rating').to.equal('5');
          expect(response.body).to.have.property('item').to.have.property('hash').to.equal(hash);
          done(err);
        });
    });

    it('PUT / should successfully update hash for a given item', (done) => {
      request(app)
        .put('/item')
        .send(hash)
        .expect(200)
        .end((err, response) => {
          expect(response.body).to.have.property('message').to.equal('Item updated successfully!');
          expect(response.body)
            .to.have.property('item')
            .to.have.property('name')
            .to.equal('sample item');
          expect(response.body).to.have.property('item').to.have.property('price').to.equal(10);
          expect(response.body).to.have.property('item').to.have.property('rating').to.equal('5');
          expect(response.body).to.have.property('item').to.have.property('hash').to.equal(hash);
          done(err);
        });
    });
  });
});
It follows a similar structure to what we've been doing so far. We are essentially:
- Stubbing the controllers because we want to test routes, not controllers (we've tested them already).
- Making the request using supertest and asserting the response.
Before you run the tests, make sure to update your test script to include the --exit flag:
"test": "mocha ./src/tests/*.spec.js --exit",
This makes sure your tests exit once finished.
There we go on our successful tests streak 🚀:
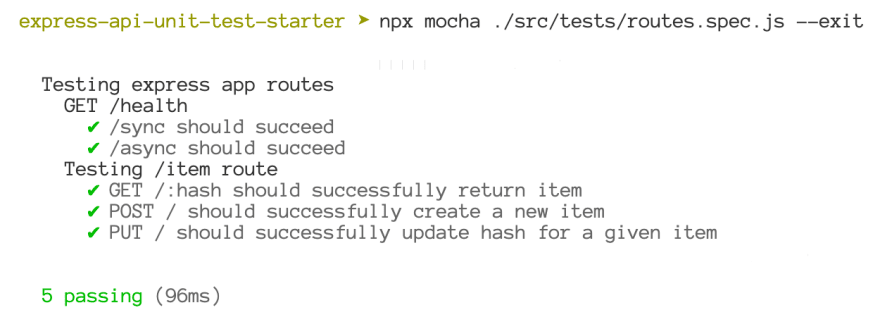
NOTE: To test protected routes, simply pass the authentication headers or auth credentials when making the request. You can read more on supertest documentation.
Check your coverage
Code coverage is the indication of the code percentage covered under tests. Now that we have finished writing them, it would be nice to see the code coverage of our unit tests.
Code coverage often affects developer confidence. But there is a catch. A 100% code coverage does not necessarily mean that your code is perfect.
TL;DR: code coverage is just the percentage of code covered by the tests. It does not tell whether the tests cover all the scenarios.
Let's take one example.
We have a function named getUniqueHash in our API:
function getUniqueHash(item) {
  const currentHash = item.hash;
  let newHash = nanoid(10);

  while (newHash === currentHash) {
    newHash = nanoid(10);
  }
  return newHash;
}
And here's one unit test:
describe('Test getUniqueHash'), () => {
  it('should return a new hash', () => {
    const item = {
      hash: '1234567890',
    };
    const newHash = getUniqueHash(item);
    expect(newHash).to.not.equal(item.hash);
  });
});
This test technically covers the function getUniqueHash but it doesn’t cover all the scenarios.
What if the length of the hash generated in the function changes to 100? What if it is null? How about a malicious script as a string? Test coverage won't be affected but the functionality will be, drastically.
NOTE: The situation does not change even if we stub the nanoId result. The library on production can choose to return a different output in the future. While we cannot control it, we can prepare for it with a unit test covering that scenario.
Now that we have that out of the way, let's add coverage to our app.
- First step, let's install nyc:
npm install -D nyc
- Next, let's add the following script to the
package.jsonfile:
"coverage": "nyc --reporter=text npm test"
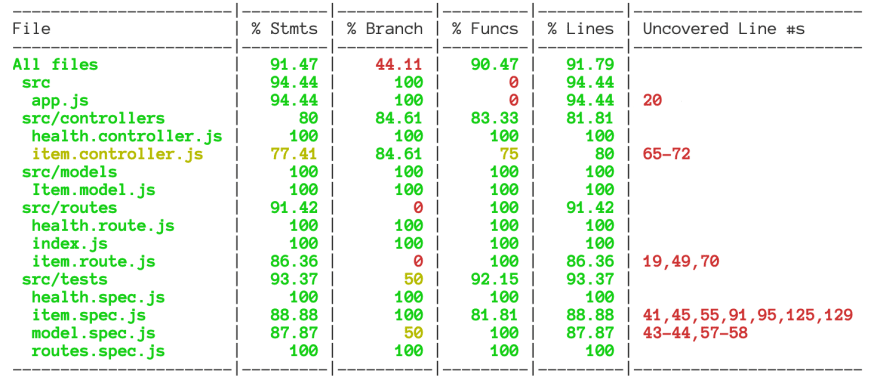
And we're done! You can now run the coverage script with npm run coverage and see the coverage report in the terminal.
Here's how it looks for our express API:
Optional: Brief on Test Driven Development (TDD)
Test-driven development is a practice where unit tests for a feature are written before that feature is developed. Development happens progressively to fix each test case until all of them pass.
Here is a brief overview of how TDD works:
- Write a unit test for the feature to be implemented
- Run the tests; they all fail.
- Implement the feature to fix the first unit test. It passes, rest of them fails.
- Repeat the above steps until all of the tests pass.
This is an agile way which makes the development strictly combined with tests and refactoring.
The obvious benefit of going with this approach is reliability and developer confidence. As the tests are written before implementing the feature, it makes sure that developed features cater to every test case.
NOTE: Developing an application first usually distorts the developers' view of the bigger picture when writing unit tests. And, it is more likely to result in a missed test case.
One common argument against this approach is the speed of development which is highly affected because the development is now combined with testing.
You can read more about test driven development here if you're curious.
Now you go, captain!
And that wraps up our unit testing endeavor! If you reached here, congrats! You are now equipped with the required knowledge to embark on your unit tests journey.
We covered a lot of ground in this article. We talked about the benefits of unit testing, how can we integrate it in our express JS API, and use stubs to mock external libraries and private functions. We also touched on the test coverage and test-driven development (TDD) programming paradigm.
Having said that, there are bound to be things that were not covered in this article. So I encourage you to use this as a starting point and explore further according to your requirements.
I hope you found this useful and actionable to implement in your express.js API. For any queries and feedback please feel free to reach out in the comments or hit me up on Twitter.
Resources
- Unit test library documentation: Mocha
- Assertion library we used: Chai (comes with a lot of plugins worth exploring)
- Standalone test spies, stubs and mocks for JavaScript: Sinon
- HTTP assertions library: Supertest
- Monkey patching for private functions and variables: Rewire
- Code coverage: Nyc
- Express.js API used in this article: Github
Want more such articles?
You can join my newsletter here. I'll share the articles with you as they come out.
Other interesting articles for you:
- Introduction to TCP connection establishment for software developers
- Learn how to use group stage in mongoDB aggregation pipeline
- How to implement idempotency using locks
I write about my learnings and experiences related to web development technologies biweekly. Feel free to join if interested ✌🏼.

Top comments (4)
This entire article is fantastic but I fell in love with it for this bit alone:
TL;DR: code coverage is just the percentage of code covered by the tests. It does not tell whether the tests cover all the scenarios.
I have a whole thing about developers leaning more heavily on happy paths then anything else and I'm glad I'm not alone.
But seriously, excellent article!
Thanks Dylan, glad you liked the article!
Yes, I brought that up as it is an obvious flaw in the coverage statistics. Tests often do not get the attention they deserve due to deadlines and them not having a direct impact on the feature being developed, making it harder to convey the importance to relevant stakeholders.
While I do not know of a definitive approach to enforce testing all possible scenarios, I feel there should be a dedicated effort towards this aspect of development as well.
In addition to a reliable application, it also makes the life of a new member joining the team much easier as they can read what a function is supposed to do or not do.
YES. Reliable documentation is an advantage I think is often overlooked. That's why I defend Cucumber a little bit; It might be janky as a testing solution, but as a set of documentation of intentions, it's pretty good.
Wow, looks like Cucumber puts testing intentions in the forefront which is definitely worth it given the challenges we face. Will definitely read more on it. Thanks!