Working with datasets that contain sensitive information is risky, and as a data scientist, you should be extremely careful whenever this type of data is present in a dataset. People dealing with sensitive information are often under the misunderstanding that by removing names, ID’s, and credit card numbers that the privacy risk is eliminated. While removing direct identifiers help, there are more information elements in a dataset that can be used to re-identify an individual. For example, Latanya Sweeney, Director of the Data Privacy Lab in the Institute of Quantitative Social Science (IQSS) at Harvard, proved that 87% of US population can be re-identified using zip code, gender, and date of birth.
In this post, I am going to show you how to effectively reduce the privacy risk of a dataset while maintaining its analytical value for machine learning.
For the following example, we will use Jupyter Notebooks, the popular environment among data scientists, to predict the salary class using both raw data and privacy-protected data. We will be using CryptoNumerics’ privacy libraries for the privacy algorithms and sklearn for the regression. (Here you can access the documentation for CryptoNumerics’ privacy library)
Let’s get to it.
The first thing to do is to import the libraries.
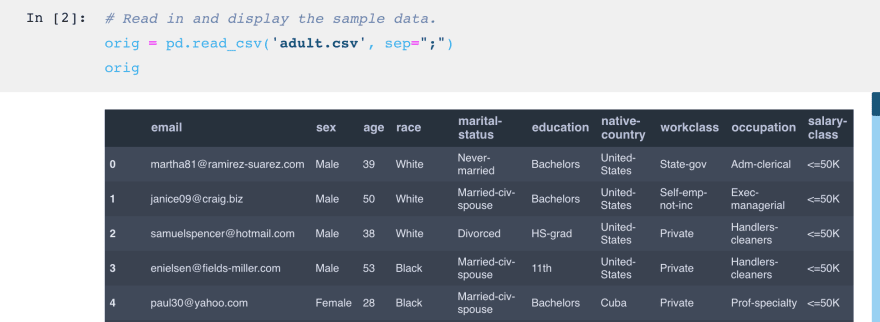
Now let’s read the dataset into Pandas.
Next, let’s choose the privacy model. In this case, we will use k-anonymity. A dataset is considered k-anonymous if each individual cannot be distinguished from k-1 individuals. In other words, for every data point in the dataset, it is in a group of at least k data points all of which are indistinguishable to an attacker. We will set k to 5, however, this can be adjusted depending on the risk requirements.

After that, we will choose a quality model. If the privacy model is defined as the constraints of the privacy, then the quality model is what we are trying to optimize given these constraints. The default for this is Information Loss or simply loss. Basically, we would like to obtain a dataset that is considered private, but at the same time minimizes the amount of information that I lose.

Broadly, there are two ways in which we can modify the dataset to provide privacy protection, but consequently, also induce information loss::
Generalization, where entire columns are replaced by more general versions of the data. For example, zip codes may be generalized to redact characters, so 12345 and 12346 can both be replaced by 123**. Or similarly, the ages 19, 25, 26 are replaced by ranges such as [10-19] and [20-29].
Suppression, where entire rows are removed from the dataset (replaced by a null character *). This can be useful when there are unique data points that are difficult to generalize. For example, if there is only one person in the [60-80] age range and we don't want them to be identifiable, rather than creating a much larger age range (say [40-80]), we can simply remove this person from the dataset and retain much more informative, yet private, information.
However, applying suppression, like many parameters, is a trade-off. We can set a suppression limit which gives the algorithm a maximum proportion of rows that it can suppress. By setting it to 0.1, no more than 10% (and likely many fewer) of the rows will be redacted. You can think of this as allowing up to 10% to be considered as "outliers" that can be removed.

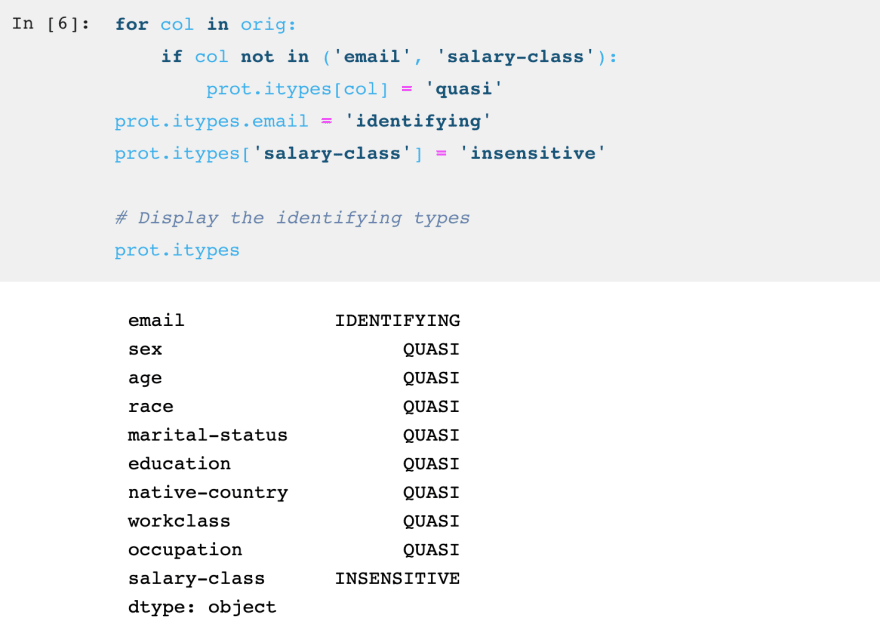
Now we will assign privacy attributes to our data. There are four different attributes:
Identifying: Types of data, such as a Social Security Number, that can be easily used on their own to re-identify a person.
Quasi-identifying: Types of data that, on their own, pose little risk of re-identification but, when used in tandem, can reliably be correlated to information from public records. Examples of quasi-identifying attributes are gender, ZIP code, birthdate.
Sensitives: Types of data that post no risk of re-identification but, in the event that a personal record is disclosed through re-identification, would be damaging to the customer if made public. Examples of sensitive attributes can range from medical diagnoses, political contributions, internet search history.
Insensitive: Points of data that present no privacy risk.
The last thing to do before privacy-protecting the dataset is to create hierarchies.
Hierarchies are used so that the algorithm knows how to generalize the columns. For example, a hierarchy can tell protect that it is allowed to replace the age 11 with the interval [10-14], [10-19], or [0-19] depending on how much generalization needs to occur.
There are several ways to create hierarchies automatically or they can be specified manually in a DataFrame. First, I will automatically create one for age using OrderHierarchy. OrderHierarchies are some of the easiest to generate and are often good enough for many purposes. The first parameter, 'interval', says that the format of the output should be [min-max]. The rest of the arguments say (multiplicatively) how large the intervals should be. For example, 5, 2, 2, means we give options for intervals of size 5, 10, and 20. However, OrderHierarchies always begin at the minimum element of the dataset, meaning the smallest interval will always be something like [17-26].

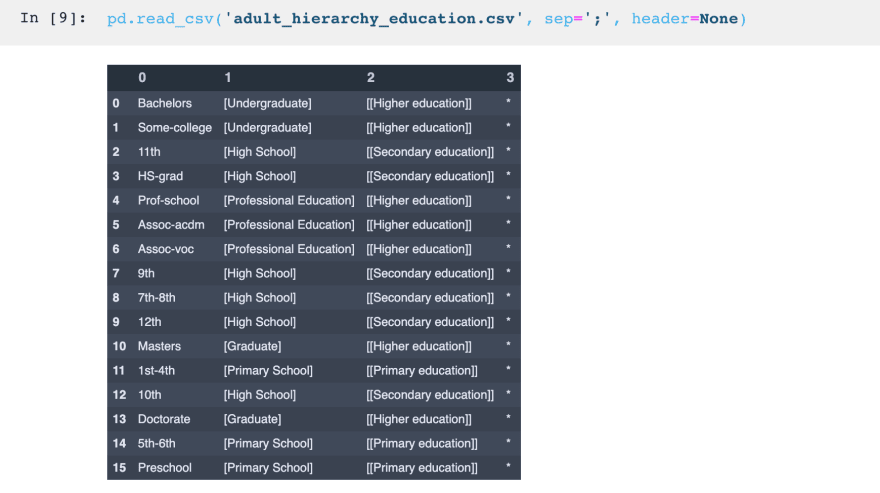
For the rest of the hierarchies, we will specify them using data frames from .csv files. Shown below is the hierarchy for education. Each column specifies a degree of generalization, where the first contains all of the possible original data values, and each successive column shows a further degree of generalization. The last level is the complete removal of the column. Note that I use square brackets to make clear which degree of generalization was used, but in practice, these are not necessary.
Now that all the parameters are set, we call protect() on the Protect object to apply the transformation. It returns an anonymized DataFrame meeting the Privacy Model criteria (as long as one exists). Note that the shape is the same as the original, as removed and generalized cells are simply replaced with a *.
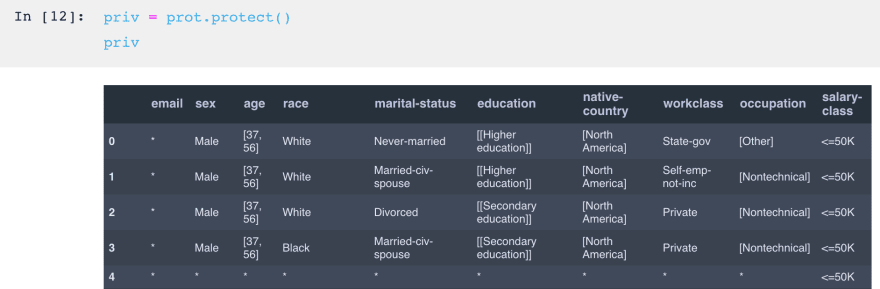
Let's take a look at some of the important statistics:
Information Loss tells is the percentage of information that was redacted. This is the value is optimized.
Highest Risk is the privacy risk of the dataset. There is a 20% probability of re-identifying an individual in the dataset.
Min Class Size is the k value. I set it to five earlier.


We will now run two logistic regressions to compare how applying privacy protection affects the analytical value of a dataset.
First, we will do it for the original (raw) data:
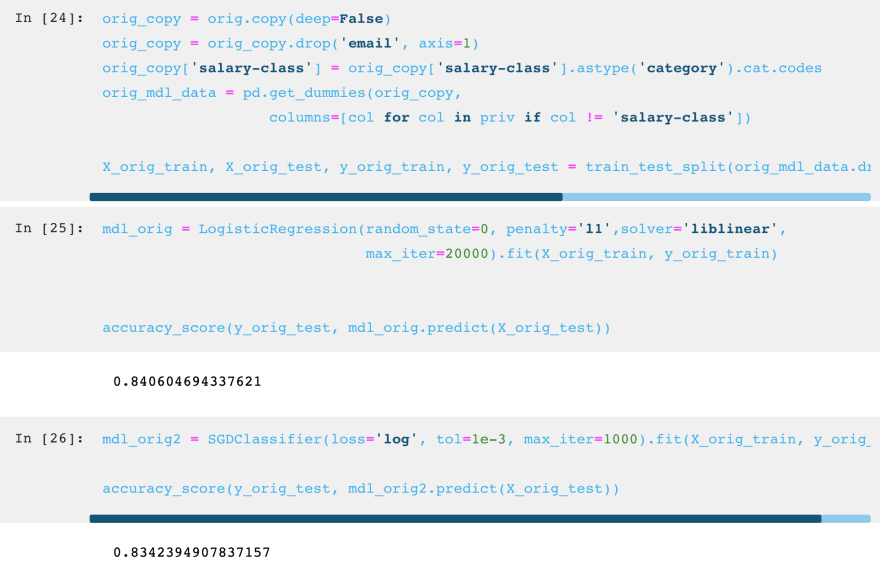
Finally, we can do the same with the privacy-protected data:


As we can see, we incurred a minor loss in accuracy (0.26%), but have now added privacy protection for the underlying data.
In practice the larger the dataset the better the performance: More observations mean more opportunity observations will fall into the same equivalence class (k group), and thus make it easier to meet our privacy model constraints. This means we should get even better accuracy as the dataset size increases.

Top comments (2)
This is really cool. I have been thinking about how to approach building analytical data stores without the risk inherent in ingesting PII into 3rd party cloud services and had simply settled on just abstaining from including emails.
Have you found that applying k-anonymity results in better generalization of ML models? It seems like it might actually make for a good feature-engineering step.
sir I am working on unstructured data so how to check the sensitive information and replace as generalized data can you help me, sir.
if you want to give me my mail id is mohithamma03@gmail.com