
Introduction
When building web applications, optimization is key for user experience. In most cases, requests made in the client-side prompt the back-end to communicate with the database.The back-end retrieves the data from the database and relays it to the client. In a normal use case, the client will prompt the server multiple times. Hence, multiple hits are made by the back-end to the database to retrieve data and process it to the client.
In Django, this can be a performance trade-off. Caching can help eliminate the performance trade-off by storing copies of data where it can be accessed more quickly in the client-side when the same request is made multiple times. A browser cache comes into play when handling client-side requests. There are more optimization tricks that one can implement as discussed in the official documentation
A visual of Browser Cache functionality
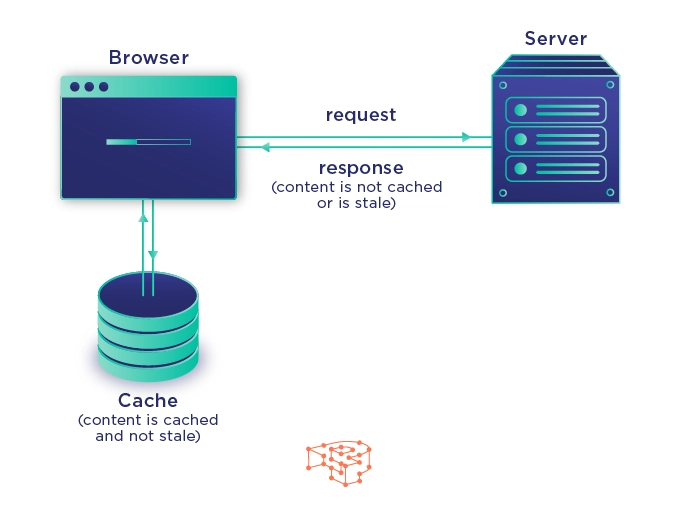
Learn more about the browser cache functionality here
Getting Started
To implement caching in Django application. First, set up your Django project and application. Then install django-redis, a project by Jazzband:
pip install django-redis
In settings.py file, add the following configuration:
CACHES = {
    "default": {
        "BACKEND": "django_redis.cache.RedisCache",
        "LOCATION": "redis://127.0.0.1:6379/1",
        "OPTIONS": {
          "CLIENT_CLASS":"django_redis.client.DefaultClient",
        }
    }
}
You can add more configurations as provided in the package documentation.
Implementing caching on views
In this case, the caching functionality will be implemented to a view in an e-commerce API I developed, you can check it here
from rest_framework.views import APIView
from django.core.cache import cache

class ProductDetailView(APIView):

   def get(self, request, *args, **kwargs):
       productID = kwargs['pk']
       if cache.get(productID):
          product = cache.get(productID)
          print("Cache hit")
       else:
           try:
             product = Product.objects.get(pk=productID)
                cache.set(productID, product)
                print("Cache miss")
           except Product.DoesNotExist:
                return Response(status=404)
       serializer = ProductSerializer(product, many=False)
       return Response(serializer.data)
In the code above, when a request is made to the ProductDetailView route, the database will be prompted to retrieve a product based on the productID. When the same request is made, the console will print out Cache hit and use the data stored prior to the request to serve to the client.
When the request is new in the subsequent queue, the console will print out Cache miss since no data regarding the request was cached prior to the request being made. Hence, the database will be prompted again and the back-end will process the new request. Otherwise, a code 404 will be raised to signal that the Product Model doesn't exist; hence, no data is retrievable.
Final Note
In production, the cache configuration in the settings.py file will require changes depending on the cache service used.
The example below is deployment on heroku:
CACHES = {
    "default": {
        "BACKEND": "django_redis.cache.RedisCache",
        "LOCATION": os.getenv('REDIS_URL'),
        "OPTIONS": {
          "CLIENT_CLASS":"django_redis.client.DefaultClient",
        }
    }
}
The location is changed to match the url of the Cache service for example ElastiCache from AWS.

Top comments (0)