Oracle VirtualBox provides several network adapter modes to help virtual machines (VMs) connect to external networks, such as the internet. These adapters include:
- NAT
- NAT Network
- Bridged Adapter
- Internal Network
- Host-only Adapter (Plus a few experimental options.)
In this post, we’ll focus on the NAT (Network Address Translation) Network adapter, which is the default mode for newly created VMs.
NAT Network is different from the NAT Adapter.
Among these, NAT Network is often confused with NAT Adapter, but they serve different purposes. In this post, we'll break down how NAT Network works, why you might use it, and how to configure it for optimal DevOps workflows.
What is NAT Network in VirtualBox?
The NAT Network adapter in VirtualBox acts as a private network for multiple VMs, allowing them to communicate with each other while still having access to the external internet through the host.
Key Features of NAT Network:
- Inter-VM Communication – VMs connected to the same NAT Network can talk to each other.
- Internet Access – Each VM can access the internet via the host machine.
- Port Forwarding – Allows specific ports to be forwarded from the host to the VM.
- DHCP Support – VirtualBox provides automatic IP assignment through DHCP.
- Network Isolation – The VMs in a NAT Network cannot be directly accessed by the host or other external devices, increasing security.
Can Multiple VMs Communicate with Each Other?
Not with NAT Adapter, but yes with NAT Network.
- NAT Adapter isolates VMs; they cannot talk to each other.
- NAT Network allows multiple VMs on the same virtual network to communicate while still having internet access.
- If you need both internet access and inter-VM communication, you should use NAT Network instead of the NAT Adapter.
What's the difference?
- NAT Adapter is best when you just need a single VM to have internet access without network visibility.
- NAT Network is useful when multiple VMs need to talk to each other while maintaining external internet access.
NAT Network Diagram
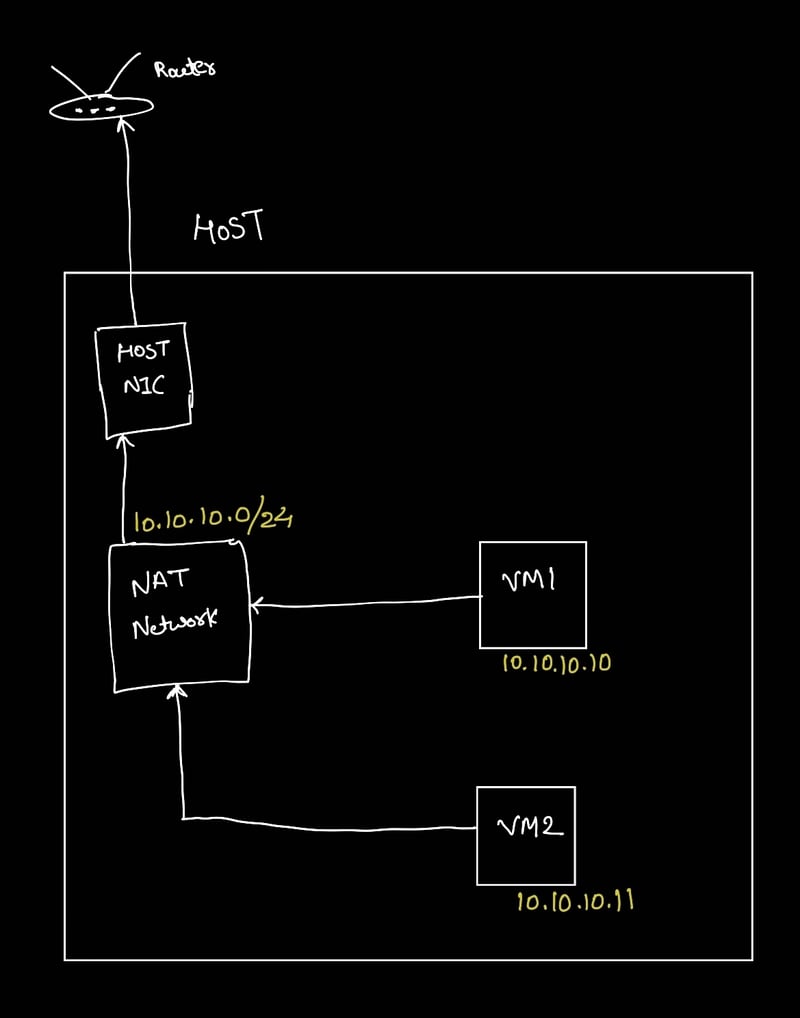
- Both VM1 and VM2 can communicate within the NAT Network.
- The VirtualBox NAT engine handles internet access for all VMs.
- Port forwarding enables external access if needed.
Setting Up NAT Network with a Custom Subnet in VirtualBox
Yes! You can set up a NAT Network in VirtualBox with a custom subnet from the 10.x.x.x private IP range. This allows you to define the IP addressing scheme and ensures VM-to-VM communication within the NAT Network, while still allowing internet access.
Step 1: Create a NAT Network with a Custom Subnet
- Open VirtualBox.
- Press (Ctrl+H) or Navigate to Tools -> File → Tools -> Network Manager
- Go to the NAT Networks tab.
- Click Add New NAT Network (green + icon).
- Select the new network and click Edit.
- Configure the following:
-
Network Name:
MyCustomNATNetwork - Enable DHCP: ✅ (Optional, if you want automatic IP assignment)
-
Subnet CIDR:
10.10.10.0/24
-
Network Name:
- Click OK and close the Preferences window.
Step 2: Attach VMs to the NAT Network
For each VM:
- Select a VM in VirtualBox.
- Click Settings → Network.
- Choose Adapter 1.
- Set Attached to:
NAT Network. - Select the NAT Network you created (
MyCustomNATNetwork). - Save the settings and start the VM.
Each VM will now receive an IP address in the 10.10.10.x range.
Example:
-
VM1:
10.10.10.10 -
VM2:
10.10.10.11
These VMs can now communicate directly with each other.
Step 3: Configure Port Forwarding for Inbound Traffic (Internet → VM)
By default, VirtualBox blocks inbound traffic from the internet. To access a VM from an external machine, port forwarding is required.
Enable Port Forwarding for SSH (Example)
- Open VirtualBox.
- Select the VM you want to access.
- Go to Settings → Network → Advanced → Port Forwarding.
- Add a new rule:
-
Name:
SSH -
Protocol:
TCP -
Host IP:
0.0.0.0(Oryour_host_IP) -
Host Port:
2222 -
Guest IP:
10.10.10.10 -
Guest Port:
22
-
Name:
- Save and restart the VM.
Now, you can SSH into the VM from the internet using:
ssh -p 2222 user@your_host_IP
Note:
0.0.0.0will listen on all network interfaces of the host. If you want to limit access to a specific interface, useyour_host_IP.
NAT Network Traffic Flow (10.x.x.x Subnet)
1. Outbound Traffic (VM → Internet)
-
VM1 (10.10.10.10) sends a request to
google.com. - The VirtualBox NAT Engine replaces the VM’s private IP (
10.10.10.10) with the host’s public IP. - The request is sent to the internet.
- The external website (Google) responds to the host’s public IP.
- VirtualBox identifies the VM that made the request and forwards the response to VM1 (10.10.10.10).
➡️ VM1 and VM2 can access the internet but are not directly reachable from the internet unless port forwarding is configured.
2. Inbound Traffic (Internet → VM in NAT Network)
By default, NAT Network blocks unsolicited inbound traffic. However, port forwarding allows selective traffic to be forwarded.
Example: SSH Access from the Internet to VM1
-
An external user runs:
ssh -p 2222 user@your_host_IP The request reaches the host machine.
The VirtualBox NAT engine checks the port forwarding rules.
The request is forwarded to VM1 (10.10.10.10:22).
The SSH connection is established.
➡️ Only explicitly forwarded ports allow inbound traffic; all other traffic is blocked.
3. Inter-VM Traffic (VM1 ↔ VM2 within NAT Network)
- VM1 (10.10.10.10) pings VM2 (10.10.10.11).
- The request remains inside the NAT Network (does not go through the host or internet).
- VM2 receives the request and responds.
- VM1 gets the response, completing the communication.
➡️ VMs within the same NAT Network communicate directly without port forwarding.
Best Practices for Using NAT Network in DevOps
- Use NAT Network for Multi-VM Setups – Ideal for running clusters (e.g., Kubernetes, Docker Swarm).
- Enable Port Forwarding for Remote Access – Allows SSH and web services to be accessible from the host.
- Combine with Bridged Adapters if Needed – If external devices need to reach the VM directly, consider adding a second adapter in Bridged Mode.
- Use Static IPs for Stability – Manually assign static IPs to VMs within the NAT Network to avoid conflicts.
- DHCP Lease Considerations - Be aware that DHCP leases will expire, and while VirtualBox will attempt to reassign the same IP, it is not guaranteed. For long term stability, static IPs are recommended.
- Security Best Practices - Remember that even with network isolation, it is important to maintain security best practices on the host OS. Keep the host OS up to date with security patches, and use strong passwords.
Conclusion
The NAT Network Adapter in VirtualBox is a powerful and flexible option for virtual machine networking, enabling inter-VM communication while maintaining external internet access. By understanding how to configure it properly, you can optimize your development, testing, and DevOps workflows.

Top comments (1)
very insighful!!