I’d been asked to prototype a shopping site for a job interview. This is part 3 of the process. Read Part 1 and Part 2 if you haven’t already.
Having got a decent chunk of the website working and with 8 days until my interview, I decided to start working on the chat bot. I’d never done any work with bots so I was really excited.
It started with a lot of Googling and I found countless ways to create a chat bot. One of the tutorials was on Chatbot’s Life on Medium. This tutorial created a bot using claudia-bot-builder and deployed it on AWS.
I worked my way through the tutorial but when I got to deploying it to AWS using Claudia, I hit a problem. It didn’t recognise my AWS credentials. I search stackoverflow, AWS and countless forums but couldn’t sort it. I spent almost the whole morning trying to get it to work. If you’ve got experience with AWS or Claudia comment and let me know what I should have done!

The next tutorial I found didn’t use Claudia or AWS so I gave that a go and it worked. I had to start by using ngrok to tunnel the webhook requests through to a local port.
With this set up I needed to create the webhook routes in my bot API. This meant creating a get route for Facebook verification and a push route for receiving any messages.
Now I had to go through the process of setting up Facebook so that it worked with my new bot API. this involved creating a Facebook page for my group, adding an app to that page, adding messaging to that app and then adding my ngrok route to verified messaging routes.
I verified the route and saw the request go through. I also decided to get my app approved for bot messaging by submitting a request. This allows the bot to reply to other users, not just me.
The next step was to create a simple function that sends the same message back to the user. This was great as it allowed me to see how the process works and find any errors. Luckily there weren’t and it worked great.
Having a chat bot that imitates whatever you say is quite cool but completely useless. To give this bot a purpose you can connect it to API.ai. There are probably loads of different natural language processing (NLP) libraries and resources but this one is the one the tutorial suggests.
Once I’d signed up, I created an agent. An agent is like the logic of a bot, it contains all of the ‘request → response’ paths. To start I added a ‘small talk’ add on which meant the bot could have small talk with the user.
You can customise any of the responses and it had a list of inputs which will result in this response. The clever part comes with the fact that the phrase doesn’t have to match exactly. If a user types ‘what is your name’ instead of ‘what’s your name’, it’ll still match. This is the real strength of using a NLP service rather than hard coding all the responses yourself.
Creating something more customised
The available add-ons are great and it looks like you can do a lot with them but sometimes you just need to do something that they don’t offer. This is where custom intents come in.
Intents
These are the building blocks of any successful chat bot. They have a defined set of training phrases and then a given response phrase.
Simple text response
This could be as simple as “we will, we will” getting the response of “Rock you!”. This is most commonly used for simple support questions like “What is your customer support number?” or “What is the website address?”. Any question that can have an answer that doesn’t change.
Complex Requests
The simple text response intents are fun but they aren’t able to deal with the more complex and relevant questions such as “Where is my order” or “Can I return my order”. For these we need to use webhooks.
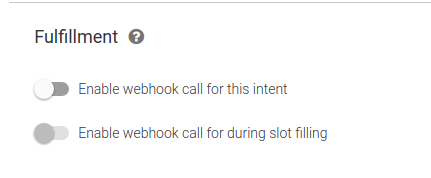
When you enable a webhook call for an intent, the data is sent to the webhook URL that you created. This webhook gets all of the information contained within the intent and you can use this however you want, then return a custom message.
Chaining Intents
Asking a question and then giving an answer isn’t how a normal conversation goes, it’s a back and forth of a series of questions and answers.
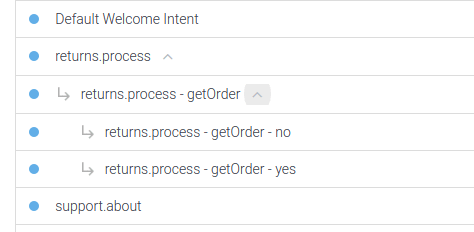
DialogFlow allows you to add follow-up intents to any intents you’ve already made. Here is my follow up intents for my returnOrder intent.
Customer — Can I return my order
Bot — Of course, can I take your order number please (simple text response)
Customer — It’s 12345678
Bot — Thank you, I’ll just check that order (simple text response)
Bot — 2 pairs of Fred Perry B72 lace ups for Lucy Jones (webhook that hit the API to search the database for the order)
Bot — Is this the order you want to return?
Customer — Yes
Bot — OK, you will receive an email with a free post label (simple text response but also hits the webhook to send the email)
This is much more like what you expect from customer service, and it’s all completely automated in this bot.
Creating this really wasn’t very hard, I managed to do this having never worked with chat bots before. It takes a little while to get your head around how everything works (especially with the webhooks) but if you follow a tutorial and can use stackoverflow then you should be fine.
The webhook API was very simple: receive a request, if it has an action of return order then do a get request to main API and format the order in a readable way.

Top comments (0)