
A Step-by-Step Guide
So you want to build your first VS Code extension? Awesome! Let's walk through this process together. I'll show you how to create a simple "Hello World" extension that displays a notification message when activated.
What We'll Build
We're going to create an extension that adds a command to VS Code. When you run the command, it'll show a friendly "Hello World" message. Simple, but it's the perfect starting point to understand how extensions work.
Prerequisites
Before we start, make sure you have:
- Node.js installed (version 14.x or higher)
- Git installed
- Visual Studio Code installed
Step 1: Install Yeoman and VS Code Extension Generator
First, we need to install some tools that will scaffold our project. Open your terminal and run:
npm install -g yo generator-code
Yeoman (yo) is a scaffolding tool that creates project structures, and generator-code is a template specifically for VS Code extensions.
Step 2: Generate Your Extension Project
Now, let's create the extension scaffolding:
yo code
You'll be asked several questions to set up your project:
- Select "New Extension (TypeScript)"
- Enter a name for your extension (e.g., "helloworld")
- Enter an identifier (usually in format: publisher.extension-name)
- Enter a description
- Initialize a git repository? (recommended: Yes)
Step 3: Explore the Generated Project
After the generator finishes, you'll have a folder structure like this:
helloworld/
├── .vscode/
│   ├── launch.json     // Config for launching and debugging the extension
│   └── tasks.json      // Config for build task
├── node_modules/
├── src/
│   └── extension.ts    // Main extension code
├── .gitignore
├── package.json        // Extension manifest
├── tsconfig.json       // TypeScript configuration
└── README.md
Let's look at the important files:
package.json
This is your extension's manifest file. It defines:
- Metadata (name, description, version)
- Activation events (when your extension loads)
- Contribution points (what your extension adds to VS Code)
The default file looks something like this:
{
  "name": "helloworld",
  "displayName": "HelloWorld",
  "description": "My first extension",
  "version": "0.0.1",
  "engines": {
    "vscode": "^1.60.0"
  },
  "categories": [
    "Other"
  ],
  "activationEvents": [],
  "main": "./out/extension.js",
  "contributes": {
    "commands": [
      {
        "command": "helloworld.helloWorld",
        "title": "Hello World"
      }
    ]
  },
  "scripts": {
    "vscode:prepublish": "npm run compile",
    "compile": "tsc -p ./",
    "watch": "tsc -watch -p ./",
    "pretest": "npm run compile && npm run lint",
    "lint": "eslint src --ext ts"
  },
  "devDependencies": {
    "@types/vscode": "^1.60.0",
    "@types/node": "14.x",
    "@typescript-eslint/eslint-plugin": "^5.0.0",
    "@typescript-eslint/parser": "^5.0.0",
    "eslint": "^8.0.0",
    "typescript": "^4.3.5"
  }
}
Notice the contributes section defines a command called helloworld.helloWorld with the title "Hello World".
src/extension.ts
This file contains the main code for your extension:
// The module 'vscode' contains the VS Code extensibility API
import * as vscode from 'vscode';

// This method is called when your extension is activated
export function activate(context: vscode.ExtensionContext) {

    // Register a command that can be invoked via Command Palette
    let disposable = vscode.commands.registerCommand('helloworld.helloWorld', () => {
        // Display a message box to the user
        vscode.window.showInformationMessage('Hello World from HelloWorld!');
    });

    // Add to a list of disposables which are disposed when this extension is deactivated
    context.subscriptions.push(disposable);
}

// This method is called when your extension is deactivated
export function deactivate() {}
Step 4: Understanding the Code
Let's break down what's happening:
- We import the VS Code API as
vscode - When the extension activates, the
activatefunction runs - Inside
activate, we register a command called 'helloworld.helloWorld' - When that command runs, it shows a notification with our message
- We add our command to the extension context's subscriptions for cleanup
Step 5: Run Your Extension
To test your extension:
Here’s your updated step-by-step guide with the additional commands:
- Install dependencies: Open the terminal in VS Code and run:
   npm install prettier
   npm run compile
Start the extension: Press
F5in VS Code.Open the development host: A new "Extension Development Host" window will appear.
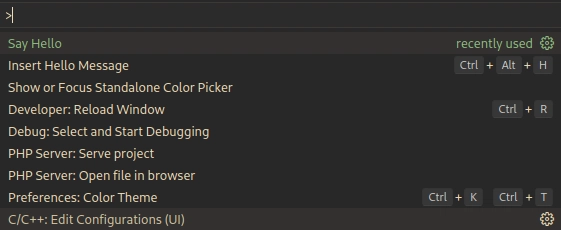
Access the Command Palette: In the new window, press
Ctrl+Shift+P(orCmd+Shift+Pon Mac).Run your command: Type
"Hello World"and select your extension's command.See the result: A message popup should appear with your notification!

Step 6: Making Changes
Let's modify our extension to make it more interesting. Update the extension.ts file:
import * as vscode from 'vscode';

export function activate(context: vscode.ExtensionContext) {
    // Register our first command
    let helloCommand = vscode.commands.registerCommand('helloworld.helloWorld', () => {
        // Get the active text editor
        const editor = vscode.window.activeTextEditor;

        if (editor) {
            // If we have an editor, get the document and its text
            const document = editor.document;
            const selection = editor.selection;

            // Get the selected text or the word at the cursor position
            const word = document.getText(selection) ||
                         document.getText(document.getWordRangeAtPosition(selection.active) || selection);

            // Show a personalized greeting if text is selected
            if (word && word.trim().length > 0) {
                vscode.window.showInformationMessage(`Hello, ${word}!`);
            } else {
                vscode.window.showInformationMessage('Hello, World!');
            }
        } else {
            vscode.window.showInformationMessage('Hello, World!');
        }
    });

    // Register a second command that inserts text
    let insertCommand = vscode.commands.registerCommand('helloworld.insertHello', () => {
        const editor = vscode.window.activeTextEditor;

        if (editor) {
            // Insert text at the current cursor position
            editor.edit(editBuilder => {
                editBuilder.insert(editor.selection.active, 'Hello, VS Code Extension World!');
            });
        }
    });

    // Add both commands to subscriptions
    context.subscriptions.push(helloCommand, insertCommand);
}

export function deactivate() {}
Now we need to update our package.json to include the new command:
"contributes": {
  "commands": [
    {
      "command": "helloworld.helloWorld",
      "title": "Hello World"
    },
    {
      "command": "helloworld.insertHello",
      "title": "Insert Hello Message"
    }
  ]
}
Step 7: Adding a Keybinding
Let's add a keyboard shortcut for our insert command. In package.json, add:
"contributes": {
  "commands": [...],
  "keybindings": [
    {
      "command": "helloworld.insertHello",
      "key": "ctrl+alt+h",
      "mac": "cmd+alt+h",
      "when": "editorTextFocus"
    }
  ]
}
Step 8: Adding Extension Settings
Let's make our greeting customizable through settings:
In package.json, add:
"contributes": {
  "commands": [...],
  "keybindings": [...],
  "configuration": {
    "title": "Hello World",
    "properties": {
      "helloworld.greeting": {
        "type": "string",
        "default": "Hello",
        "description": "The greeting to use"
      }
    }
  }
}
Then update extension.ts to use this setting:
// In the helloWorld command handler:
const config = vscode.workspace.getConfiguration('helloworld');
const greeting = config.get('greeting') || 'Hello';

if (word && word.trim().length > 0) {
    vscode.window.showInformationMessage(`${greeting}, ${word}!`);
} else {
    vscode.window.showInformationMessage(`${greeting}, World!`);
}
Create a New File to


Step 9: Package Your Extension
Once you're happy with your extension, you can package it for distribution:
- Install the VSCE packaging tool:
npm install -g vsce
- Package your extension:
vsce package
This creates a .vsix file that can be installed in VS Code.
Step 10: Installing Your Extension Manually
To install your packaged extension:
- Open VS Code
- Go to Extensions view (
Ctrl+Shift+X) - Click the "..." at the top of the Extensions view
- Select "Install from VSIX..."
- Choose your
.vsixfile
Complete Project Example
Here's a complete example of what your final files might look like:
package.json
{
  "name": "helloworld",
  "displayName": "HelloWorld",
  "description": "A friendly hello world extension",
  "version": "0.0.1",
  "engines": {
    "vscode": "^1.60.0"
  },
  "categories": [
    "Other"
  ],
  "activationEvents": [],
  "main": "./out/extension.js",
  "contributes": {
    "commands": [
      {
        "command": "helloworld.helloWorld",
        "title": "Say Hello"
      },
      {
        "command": "helloworld.insertHello",
        "title": "Insert Hello Message"
      }
    ],
    "keybindings": [
      {
        "command": "helloworld.insertHello",
        "key": "ctrl+alt+h",
        "mac": "cmd+alt+h",
        "when": "editorTextFocus"
      }
    ],
    "configuration": {
      "title": "Hello World",
      "properties": {
        "helloworld.greeting": {
          "type": "string",
          "default": "Hello",
          "description": "The greeting to use"
        }
      }
    }
  },
  "scripts": {
    "vscode:prepublish": "npm run compile",
    "compile": "tsc -p ./",
    "watch": "tsc -watch -p ./",
    "pretest": "npm run compile && npm run lint",
    "lint": "eslint src --ext ts",
    "test": "node ./out/test/runTest.js"
  },
  "devDependencies": {
    "@types/vscode": "^1.60.0",
    "@types/glob": "^7.1.3",
    "@types/mocha": "^8.2.2",
    "@types/node": "14.x",
    "eslint": "^7.27.0",
    "glob": "^7.1.7",
    "mocha": "^8.4.0",
    "typescript": "^4.3.2",
    "vscode-test": "^1.5.2"
  }
}
extension.ts
import * as vscode from 'vscode';

export function activate(context: vscode.ExtensionContext) {
    console.log('Congratulations, your extension "helloworld" is now active!');

    // Register our hello command
    let helloCommand = vscode.commands.registerCommand('helloworld.helloWorld', () => {
        // Get user settings
        const config = vscode.workspace.getConfiguration('helloworld');
        const greeting = config.get('greeting') || 'Hello';

        // Get the active text editor
        const editor = vscode.window.activeTextEditor;

        if (editor) {
            // Get selected text if any
            const document = editor.document;
            const selection = editor.selection;

            const word = document.getText(selection) ||
                         document.getText(document.getWordRangeAtPosition(selection.active) || selection);

            if (word && word.trim().length > 0) {
                vscode.window.showInformationMessage(`${greeting}, ${word}!`);
            } else {
                vscode.window.showInformationMessage(`${greeting}, World!`);
            }
        } else {
            vscode.window.showInformationMessage(`${greeting}, World!`);
        }
    });

    // Register our insert command
    let insertCommand = vscode.commands.registerCommand('helloworld.insertHello', () => {
        // Get user settings
        const config = vscode.workspace.getConfiguration('helloworld');
        const greeting = config.get('greeting') || 'Hello';

        const editor = vscode.window.activeTextEditor;

        if (editor) {
            // Insert text at current cursor position
            editor.edit(editBuilder => {
                editBuilder.insert(editor.selection.active, `${greeting}, VS Code Extension World!`);
            });

            // Show a confirmation message
            vscode.window.showInformationMessage('Text inserted successfully!');
        } else {
            vscode.window.showWarningMessage('No active editor found');
        }
    });

    // Add commands to the extension context
    context.subscriptions.push(helloCommand, insertCommand);
}

export function deactivate() {
    console.log('Your extension "helloworld" is now deactivated!');
}
Going Further
Once you're comfortable with the basics, you can explore more advanced features:
- Creating a status bar item
- Adding a view container and TreeView
- Creating a webview
- Adding language support features
- Working with workspace files
- Adding diagnostic information
Troubleshooting Tips
- If your extension isn't showing up, make sure the activation events are correctly set
- Check the Developer Console (Help > Toggle Developer Tools) for error messages
- Use
console.log()to debug (output appears in the Debug Console) - If you update
package.json, you often need to reload the extension (press F5 again)
That's it! You've created your first VS Code extension.

Top comments (4)
Awesome
Thank youuu
great >
Thank you jii