By Matt Sarrel, Director of Technical Marketing, MinIO
Today’s business requires accurate and timely data in order to make decisions. Data-driven applications and dashboards built on time series data are found in every enterprise. A great deal of business data is time series - from system and application metrics to weather, stock prices, network telemetry, IoT sensors, all rely on complex time series analysis and visualization to provide business insight.
There are more than a few databases that are built for this kind of analysis, such as Clickhouse (for more on Clickhouse and MinIO see Integrating ClickHouse with MinIO), Snowflake, Amazon’s TimeStream and RedShift, and Apache Druid. A typical workflow involves gathering data, likely being streamed in real time or pulled from a data lake, transforming and ingesting it into a database, and then building applications and dashboards using SQL queries running against the database.
This blog post focuses on Apache Druid, specifically how to run Druid with MinIO as deep storage. We’ll go into more detail later, but in short Druid saves data to S3 deep storage and swaps it in and out of local memory as needed when running queries. We’re going to install MinIO, install Druid, edit some configuration files to tell Druid to use MinIO, and then import demo data and visualize it using Apache Superset.
Prepare to be amazed at how quickly you can build a high-performance analytics and visualization stack with open source products.
Druid Overview
Druid is one of the fastest data stores around - it was built to combine the advantages of data warehouses, time series databases and search systems. Druid achieves tremendously speedy query responses by combining the key characteristics of these three systems into its ingestion layer, storage format, query layer and core architecture. Druid is typically deployed with other open source technologies such as Apache Kafka, Apache Flink and sits between a storage or processing layer and the end user, serving as a query layer for analytic workloads. To learn more about how Druid works, please see Apache Druid 101.
Druid is cloud-native and relies on a microservice-based architecture. Each core service in Druid (ingestion, query, coordination) can be deployed and scaled independently in containers or on commodity hardware. In addition, Druid services can independently fail and restart or be updated without impacting other services.
Druid has several process types:
- Coordinator processes manage data availability on the cluster.
- Overlord processes control the assignment of data ingestion workloads.
- Broker processes handle queries from external clients.
- Router processes are optional; they route requests to Brokers, Coordinators, and Overlords.
- Historical processes store queryable data.
- MiddleManagerprocesses ingest data.
These processes are typically deployed in groups onto three different server or node types:
Master: Runs Coordinator and Overlord processes, manages data availability and ingestion.
Query: Runs Broker and optional Router processes, handles queries from external clients.
Data: Runs Historical and MiddleManager processes, executes ingestion workloads and stores all queryable data.
Druid has three major external dependencies: deep storage, metadata storage and ZooKeeper. Briefly, metadata is used to track segment usage and task information, and is usually handled by PostgreSQL or MySQL. Zookeeper is used for internal service discovery and coordination.
As this is the MinIO blog, we’re going to focus on deep storage. Deep storage is a shared file system accessible by every Druid server where data is stored after it is ingested. In a single-server deployment this is simply a local drive. In clustered deployments, deep storage would take the form of a distributed object store like S3 or MinIO, HDFS or a network mounted filesystem.
Deep storage is how Druid transfers data between processes and backs up data. Druid stores data in files called segments. There’s an internal mapping that pulls segments from deep storage to cache them on local drives and in memory. In order to minimize latency, queries run against segments locally, not against segments stored in deep storage. Deep storage enables Druid’s elastic, fault tolerant design. Druid provides durability by bootstrapping from deep storage in the event that a data node goes down and comes back up. One caveat is that you’ll need enough free space on data nodes and in deep storage for the data you want to work with in Druid.
Druid uses the S3 API for object storage for deep storage. Using S3 API compatible object storage such as MinIO gives you the freedom to run Druid anywhere, which is something you might want to do to improve performance and security. MinIO is a superb deep storage for Druid because it has excellent S3 compatibility, the performance to meet requirements for real time OLAP and, perhaps most of all, the ability to deliver performance at scale. MinIO also provides necessary data protection and lifecycle management.
You can run Druid, MinIO and Superset directly on Linux or in containers on Docker or Kubernetes. There are already some great resources out there that show you how to get Druid up and running, so if for some reason this blog post doesn’t satisfy you, check out Apache Druid Quickstart for Linux, Docker · Apache Druid for Docker and Clustered Apache Druid® on your Laptop for Kubernetes.
Installing MinIO
If you’re not already running MinIO, here are installation instructions. The process is described thoroughly in The MinIO Quickstart Guide.
On Linux, for example, download MinIO and run it (feel free to change the root password - and remember it):
wget https://dl.min.io/server/minio/release/linux-amd64/minio
chmod +x minio
MINIO_ROOT_USER=admin MINIO_ROOT_PASSWORD=password ./minio server /mnt/data --console-address ":9001"
Launch a browser and connect to MinIO Server at http://:9000 using the root user and password you configured earlier.
The first time you log in, you’ll be taken to the Buckets page.
Create the bucket druidbucket.
In the real world, you would probably want to secure access to your Druid data, but we don’t have to do that in our lab. You would create a service account (under the Identity menu), edit the user policy to only allow access to druidbucket and in the Druid configuration below use the service account’s access key and secret key.
Installing Druid
The easiest way to test drive Druid is via Docker. Follow the Docker · Apache Druid instructions and use this docker-compose.yaml. This creates a container for each Druid service, as well as Zookeeper and PostgresSQL. This method uses an environment file to specify the Druid configuration. Download this file to where you’ve saved Druid’s containers. For the instructions below (Configure Druid for MinIO), you can edit the environment file to pass the variables to standard Druid configuration files or edit the configuration files directly within the container.
Start Druid with docker-compose up. Once the cluster comes up, open a browser and navigate to http://localhost:8888 to use the Druid console.
Configure Druid for MinIO
Now it’s time to configure Druid to use MinIO for deep storage. In this step, you will need to edit Druid config files (or the Docker environment files as described above) to reference MinIO and then restart Druid. The process is fully described in How to Configure Druid to Use Minio as Deep Storage - DZone Big Data and we’re including an abbreviated version here for quick reference.
Depending on how you’ve installed Druid, In the conf/druid/_common/common.runtime.properties file, add "druid-s3-extensions" to druid.extensions.loadList. Add extensions by name, in quotes and separated by a comma, for example:
druid.extensions.loadList=["druid-parser-route", "druid-s3-extensions"]
According to the above referenced article, the S3 extension for deep storage relies on jets3t under the hood. You need to create a jets3t.properties file on the class path. For this example, we’ll create a new jets3t.properties inside the conf/druid/_common directory with the following:
s3service.s3-endpoint=localhost
s3service.s3-endpoint-http-port=9000
s3service.disable-dns-buckets=true
s3service.https-only=false
Now, comment out the configurations for local storage under the “Deep Storage” section and add appropriate values for Minio. In my case, I’m running MinIO on the same machine as Druid so the S3 Endpoint URL includes localhost and a port. If you’re running on another machine or in a container, you’ll need to change this line to address MinIO in your environment.
After this, the “Deep Storage” section should look like:
#
# Deep storage
#
# For local disk (only viable in a cluster if this is a network mount):
# druid.storage.type=local
# druid.storage.storageDirectory=var/druid/segments
# For HDFS:
# druid.storage.type=hdfs
# druid.storage.storageDirectory=/druid/segments
# For S3:
druid.storage.type=s3
druid.storage.bucket=druidbucket
druid.storage.baseKey=druid/segments
druid.s3.accessKey= <insert your MinIO accessKey>
druid.s3.secretKey= <insert your MinIO secretKey>
druid.s3.protocol=http
druid.s3.enabePathStyleAccess=true
druid.s3.endpoint.signingRegion=us-east-1
druid.s3.endpoint.url=http://localhost:9000/
We’re also going to configure Druid to store indexing service logs in Minio. It is a good practice to store everything in one place to make it easier to find - Druid is complicated enough without having to search multiple locations for logs. Update the “Indexing service logs” section with appropriate values in conf/druid/_common/common.runtime.properties.
After this, the “Indexing service logs” section should look like:
# Indexing service logs
# For local disk (only viable in a cluster if this is a network mount):
# druid.indexer.logs.type=file
# druid.indexer.logs.directory=var/druid/indexing-logs
# For HDFS:
# druid.indexer.logs.type=hdfs
# druid.indexer.logs.directory=/druid/indexing-logs
# For S3:
druid.indexer.logs.type=s3
druid.indexer.logs.s3Bucket=druidbucket
druid.indexer.logs.s3Prefix=druid/indexing-logs
OK! That covers all of the configuration changes to make to Druid. Save the file and restart your cluster. As you work with Druid, you will see segments and indices written to druidbucket.
Installing Apache Superset
Apache Superset is a powerful visualization tool that is frequently used with Druid. Superset is a cloud-native business intelligence application that is fast, lightweight, feature-packed, and, best of all, it is free! Superset’s intuitive interface makes crafting interactive dashboards relatively easy. Superset provides out-of-the-box support for most SQL databases. Superset integrates with authentication backends such as the database, OpenID, LDAP and OAuth to secure visualizations.
As cloud-native software, Superset is highly scalable and highly available. It was designed to scale out to large, distributed environments.
We’re more interested in getting started with Superset than we are with scaling it in production, so we’re going to do the simplest installation we can using Docker Compose. This is the fastest way to try out Superset on Linux or Mac OSX.
If you don’t already have Docker installed, please follow Docker’s instructions. Once you’ve installed Docker, please install Docker Compose.
Open a terminal window and clone the Superset repo:
$ git clone https://github.com/apache/superset.git
This will create a superset folder in your current directory. Navigate to that directory and run the following commands (which may take several minutes to complete):
$ docker-compose -f docker-compose-non-dev.yml pull
$ docker-compose -f docker-compose-non-dev.yml up
You’ll see a whole lot of initialization text pass by on your terminal. Superset is ready once you see something like this:
superset_app            | Loaded your LOCAL configuration at [/app/docker/pythonpath_dev/superset_config.py]
superset_app            | 127.0.0.1 - - [12/May/2022:23:59:35 +0000] "GET /health HTTP/1.1" 200 2 "-" "curl/7.74.0"
Open a browser and navigate to http://localhost:8088 to access Superset. Log in with the default username “admin” and password “admin”.
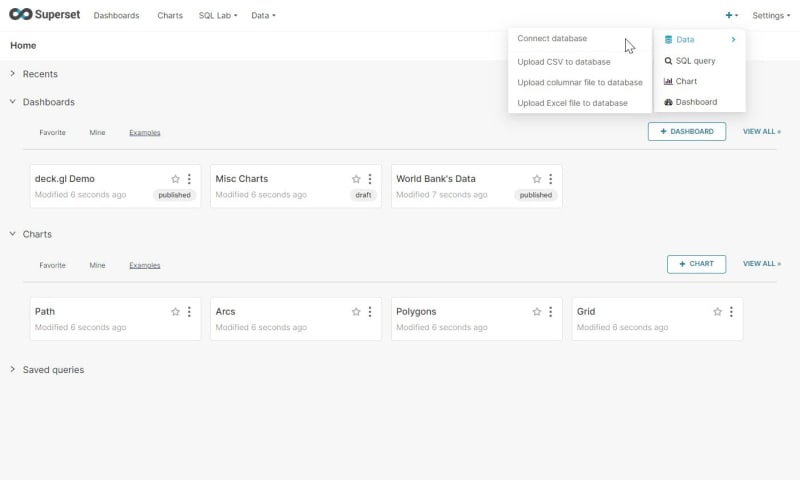
After logging in to Superset, you must connect it to Druid. On the top right, click the “+” to add a database.
From the dropdown list select Apache Druid. Then name the connection and enter the following under SQLALCHEMY URI, making sure to update the IP address or replace it with localhost as necessary. If we had protected the Druid API by requiring authentication, we would also enter a username and password.
druid://10.0.0.10:8888/druid/v2/sql
Test the connection to make sure it works, and then click Finish.
Woo-hoo! You now have Druid, MinIO and Superset running in your environment.
With the triumvirate of Druid, SuperSet and MinIO, we can have a complete and timely view of real-time data. There are numerous organizations that have built web-scale data-drive applications on top of this combination for clickstream analytics (web and mobile analytics), risk/fraud analysis, network telemetry analytics (network performance monitoring), supply chain analytics (manufacturing metrics) and application performance metrics.
This cloud-native analytics and visualization stack is flexible and extensible, and is scalable and performant so you can build applications that delight your users. Give them the power to monitor, analyze and visualize real-time data. Let them slice and dice, filter and group by any combination of columns so they can make conclusive action-oriented data-driven decisions at the pace business demands.
Putting it All Together
In order to demonstrate a bit of the functionality we’ve built, we’ll load a tutorial data file of Wikipedia edits over time into Druid and then visualize the edits in SuperSet. Remember, this is backed by MinIO as deep storage. The Wikipedia edits are covered in more detail in Quickstart · Apache Druid.
Ingesting into Druid
Druid loads data by submitting an ingestion task spec in JSON to the Overlord server. You can build an ingestion spec using the web GUI or write it yourself and schedule it. Once you build and tune an ingestion spec, you can reuse the JSON so you don't have to repeat the task. In production, teams frequently schedule and automate ingestion.
Open a browser and load the Druid web interface at http://localhost:8888.
At the top of the window, click Load Data. From here, select Example Data, then select Wikipedia Edits from the drop-down on the right and click the blue Load example button.
The web GUI walks you through building an ingestion spec that will read data from a source and store it in segments on deep storage. Ingestion is based on a time stamp that is used to partition and sort data, while data is stored as columns of dimensions and metrics. For more information about how to optimize for performance on ingestion, please see Data Modeling and Query Performance in Apache Druid.
With the tutorial data, we’ll simply click through the ingestion workflow accepting the defaults, or click Edit JSON spec and then click Submit. If you wanted (or needed) to, you could look at the raw file as JSON and parse it. Druid creates its own time column called __time to organize and segment data. Because time is so important to Druid, it’s very good at figuring out how to handle timestamps regardless of their format. In addition, we can transform data, and optimize for query performance by partitioning data and sizing segments. Finally, you can tune the ingestion job in terms of threads and memory utilization, then schedule it and run it.
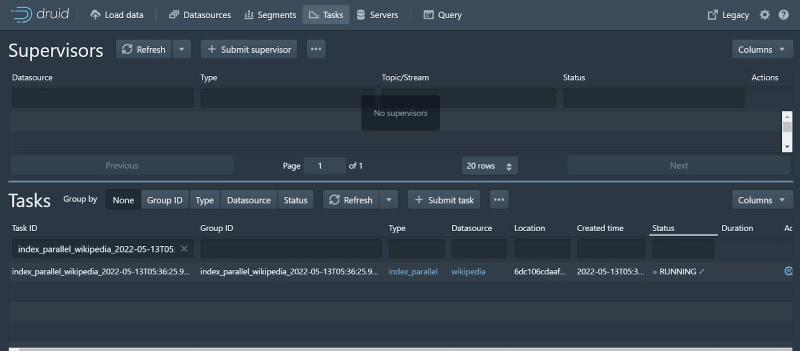
The GUI sends you to view Tasks:
This is a very small ingestion job so it finishes almost immediately.
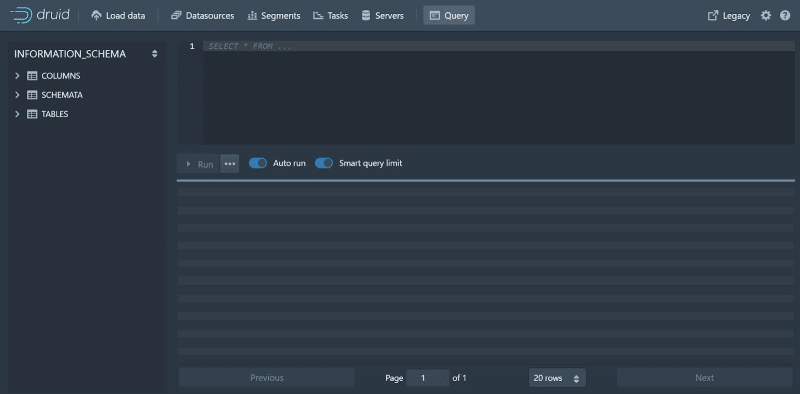
From here, you could run queries against the data in Druid and get lightning-fast responses. You can run queries via the web GUI or the API. Druid finds itself behind many a dashboard because of its ability to provide excellent query performance over massive amounts of data at scale.
Visualizing in Superset
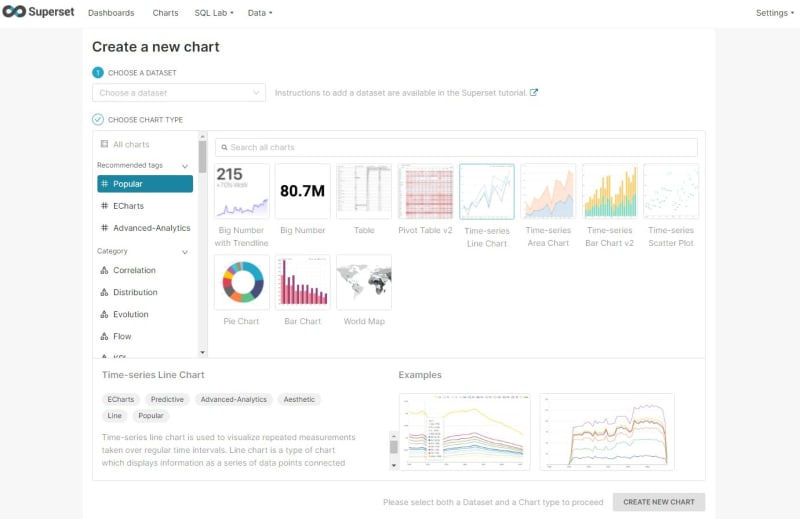
Return to the browser where you’ve logged into Superset, and once again click the “+” on the top right of the home screen. Then click Chart.
We could run individual SQL queries at the bottom of the screen. Dashboards are groups of individual queries. Responses to repetitive queries are cached in Superset to improve performance.
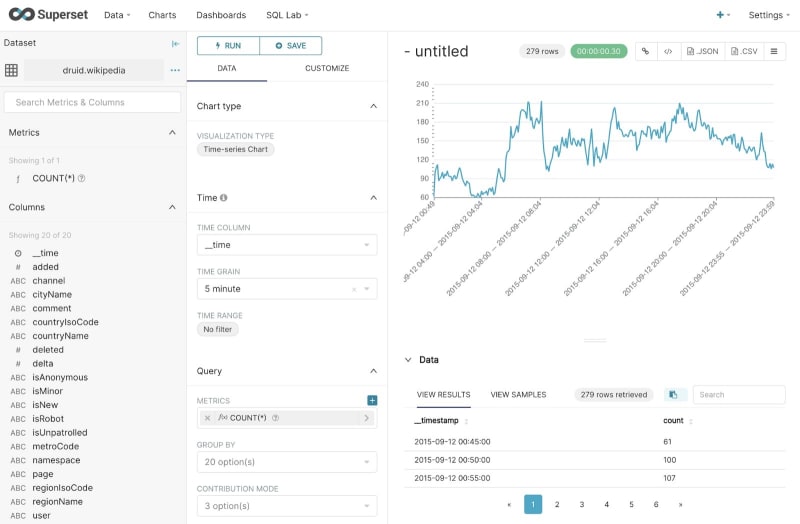
Select the dataset druid.wikipedia and then select a visualization. Superset includes a number of time-series visualizations. We’re going to choose Time-series Chart and then click New Chart.
Initially, you won’t see any results, but don’t let that fool you. First, remove the Time Range by setting it to “no filter”. The Time Grain is set too high at “day”, so change that to “5 minute”. We’re now viewing a chart of the number of Wikipedia edits happening in 5 minute windows in our sample data.
You can filter and group results using Superset. To save the chart, click Save at the top of the screen, then give the chart a name and save it.
By now you’ve learned the basic steps to install Druid and MinIO, ingest your first data set and generate your first Superset chart. A helpful next step could be to learn more about Exploring Data in Superset.
Massively Scalable Analytics
In this blog post, we introduced a group of cloud-native applications: Apache Druid for analytics, Apache Superset for visualization and MinIO for S3 deep storage. This simple demo is the start of building a cloud-native analytics and visualization stack, and can be extended with Apache Spark for ML or Jupyter for data science.
Thanks for reading through this demo. If you have any questions, please send us an email at hello@min.io, or join the MinIO slack channel and ask away.







Top comments (0)