Pods
A Pod is the basic execution unit of a Kubernetes application–the smallest and simplest unit in the Kubernetes object model that you create or deploy.
We will define a "Hello World" pod. We will define it with a yaml file. We will define the apiVersion and also instruct the kind of Kubernetes object (like Pod, Deployment, Service, etc.,).
apiVersion: v1
kind: Pod
Then we will have to specify some identifiers for the Pod that we are creating. These are called metadata. The metadata object holds the name for the pod and any labels to identify the pod.
metadata:
  name: hello-world
  labels:
    app: hello
We need to define the containers that will run in the Pod. A pod can contain one or more containers inside. We can define them in spec object.
spec:
  containers:
  - name: hello-world-container
    image: busybox
    command: ['sh', '-c', 'echo Hello World! && sleep 3600']
This is more similar to the Docker definition except the keywords differ. But all it does is get the busybox image from the repository and run the specified command. It also names the container to hello-world-container when running the image.
But why a pod and not a container?
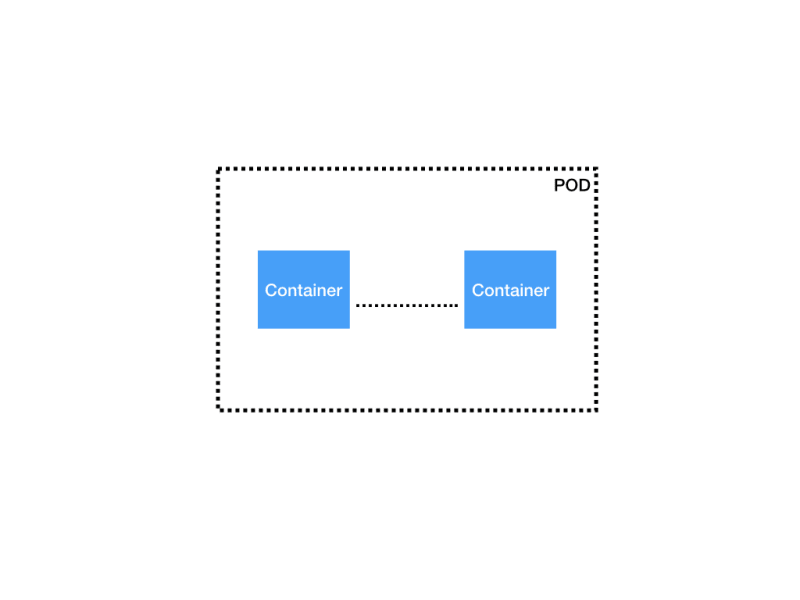
Sometimes we need to share the resource between two different containers. They need to connect with each other without any latencies. Making them coexist in a cohesive environment is desirable. We will add these containers in a pod. The Kubernetes also tries to schedule these containers in the same network namespace. This makes it easy for them to share and communicate easily.
These shared containers in a pod will have the following advantages:
- They communicate with each other using
localhost. - They share the storage volumes
- They form a cohesive unit of service.
Check out more about Pods here
Init and App container
The Kubernetes schedule the pods and run them inside the cluster. Sometimes we will need to run something before a container is started.
For example, we need to start the application only after the Database is started. We will use initContainers.

apiVersion: v1
kind: Pod
metadata:
  name: hello-world
  labels:
    app: hello
spec:
  containers:
  - name: hello-world-container
    image: busybox
    command: ['sh', '-c', 'echo Hello World! && sleep 3600']
  initContainers:
  - name: mysql-container
    image: busybox
    command:
      - '/bin/sh'
      - '-c'
      - |
          while true
          do
            rt=$(nc -z -w 1 hello-mysql 3306)
            if [ $? -eq 0 ]; then
              echo "DB is UP"
              break
            fi
            echo "DB is not yet reachable;sleep for 10s before retry"
            sleep 10
          done
The initContainers is similar to containers. Here we used another busybox container and wait till hello-mysql pod is up and running. The hello-mysql pod looks like this.
apiVersion: v1
kind: Deployment
metadata:
  name: hello-mysql
spec:
  volumes:
    - name: data
      emptydir: {}
  containers:
  - name: mysql
    image: mysql
    env:
    - name: MYSQL_USER
      value: root
    - name: MYSQL_ALLOW_EMPTY_PASSWORD
      value: 'yes'
    - name: MYSQL_DATABASE
      value: 'some-app'
  ports:
  - containerPort: 3306
---
apiVersion: v1
kind: Service
metadata:
  name: hello-mysql
spec:
  selector:
    app: hello-mysql
  ports:
  - port: 3306
The above definition consists of a deployment and service. We will explore them later. But the template for the Deployment is more similar to the Pod template.
The initContainers boots up a busybox container and wait till it returns success. Once the DB is UP, the appContainers or containers is started.
More about initContainers here.
Pods life cycle
Each pod has a status object. The status object holds the phase field.
The phase is not intended to be a comprehensive rollup of observations of Container or Pod state, nor is it intended to be a comprehensive state machine.

When the Kubernetes controller asks the scheduler to create a pod. The scheduler will schedule the pod for the creation. The controller decides whether it needs to create the pod. The scheduler will ask the kubelets to download the container image(s) from the repository. They are then downloaded over the network. During this stage, the Pods are in Pending phase.
Once the containers are downloaded then the pod is assigned a Node in the Kubernetes cluster. And the containers are initiated to run. It doesn't matter whether the container is booted up correctly and running all the required process, the Kubernetes assigns Running phase to the pod.
In the Kubernetes world, all containers will be terminated eventually. They are terminated either successfully or failed.
The pod which is in phase Succeeded means it is terminated successfully and the pod will never be restarted.
The pod that is terminated with a failure will be terminated with a Failed phase.
Sometimes, the Kubernetes master node will not be able to connect with the pods that are running. These pods are marked with Unknown phase.
The main advantage of Kubernetes is its ability to restart the pods/containers automagically. We can define this behaviour to a pod with the restartPolicy field. The restartPolicy accepts either Always | onFailure | Never. The default value is Always. That is whenever a pod is terminated with failed status, then the Kubernetes system will try to restart the pod.
Probe it
When running containers, the container might be running but Kubernetes cannot confirm whether the application works correctly. For that, we need to check periodically whether the endpoint or the application in the container is responding correctly. Kubernetes provides three types of handlers, that will probe the container and ensure that it is in the correct and expected state.
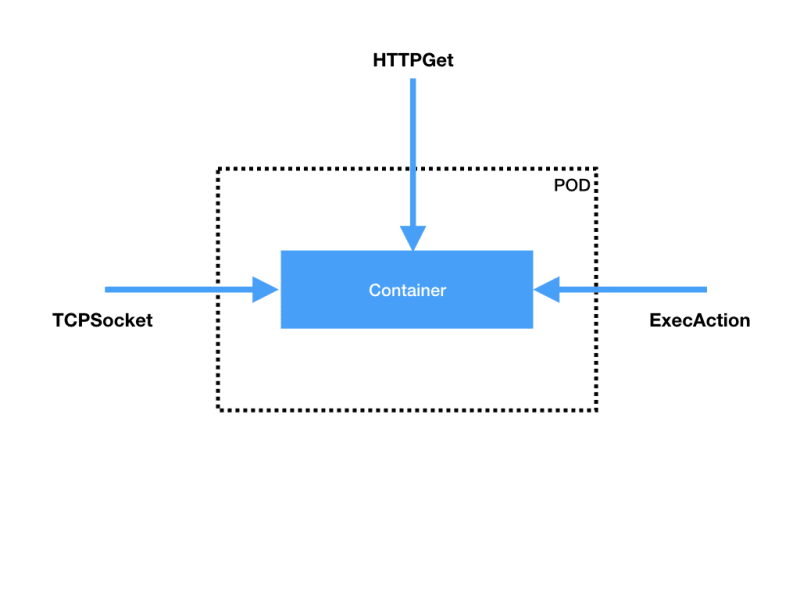
The handlers are:
- ExecAction
- TCPSocketAction
- HTTPGetAction
They are simple to understand. They allow us to probe by executing a command inside the container, check for TCP connection or HTTP request respectively.
The probe can result in either Success | Failure | Unknown.
But it is important to understand when to probe. For example, in the previous example with the Database. We were waiting until the Database is UP. During this time any probe to check the application is not possible. So the Kubernetes probe has to two kinds of a probe to check the running containers. They are:
- livenessProbe
- readinessProbe
readinessProbe
The readinessProbe is to probe into the container until the container is ready. That is all the initial jobs like initContainers are ran. The pod is made available only when the readinessProbe is succeeded.
Consider that your application has a health endpoint. That tells the application's health.
readinessProbe:
   httpGet:
     path: hello-world/health
     port: http
   initialDelaySeconds: 20
   periodSeconds: 15
   failureThreshold: 6
The above readinessProbe specifies to do an HTTPGetAction at the path specified hello-world/health. It initially waits for 20 seconds to start the probing with initialDelaySeconds. Then for every 15 seconds (periodSeconds) it probes the container for readiness.
The failureThreshold here specifies issue the state as failure only after receiving 6 consecutive failure messages.
livenessProbe
The livenessProbe indicates whether the container is running. When the probe fails the container is killed and then the container is restarted based on the restartPolicy.
livenessProbe:
 httpGet:
   path: hello-world/health
   port: http
 initialDelaySeconds: 120
Here the livenessProbe check the same end point as above but it only starts to check for the liveness after an initial delay of 120 seconds.
Limitations
The pods has containers inside them. It is very important for us to limit the amount of memory and cpus that it can utilize.
CPU and memory are collectively referred to as compute resources, or just resources.
resources:
  requests:
    memory: "512Mi"
    cpu: "500m"
  limits:
    memory: "1Gi"
    cpu: "1"
Here we are specifying the pod is allowed to request for 512Mi of memory and 500m which is 0.5% of total CPU available.
The limits specify the maximum memory and CPU allowed to the pod. When the memory overshoots, Kubernetes simply restart the pod based on the restartPolicy.
It is very important to give proper value here and allocate memory and CPU efficiently.
We can also define the resources at a pod or at the container level.
Hopefully, this might have given you a brief overview of Pods in Kubernetes. Head over kubernetes.io for more information on Kubernetes.
Want to understand the whole picture of Kubernetes and how it works check out this post.
Now you want to deploy a sample application on top of Kubernetes with Istio check out this post.
You can follow me on Twitter.
If you like this article, please leave a like or a comment. ❤️

Top comments (0)