
This article was originally published on my personal blog.
React is one of the most popular JavaScript frontend frameworks. It allows you to create responsive, reactive, and blazingly fast websites and apps. You can create almost any type of website with React.
One issue that you’ll run into when you create a React app is internationalizing it. Internationalization (or i18n) is adding support for multiple languages to your website. The process includes both translating the content as well as modifying the style to support the language’s direction.
There are many solutions out there, and in a previous tutorial, I went through how you can internationalize a React app using i18next. i18next is an open-source internationalization solution that allows you to internationalize a lot of types of projects, including a React app.
Another internationalization solution for React is Transifex Native. Transifex is a localization platform that makes internationalizing your projects, including your React project, much easier. Transifex bridges the gap between developers and translators, as it allows you to focus on the programming part while also working with translators to translate your website even if they’re not tech-savvy.
In this article, you’ll learn how to internationalize a React app using Transifex Native. I’ll be creating a website that’s exactly similar to the one I created in my tutorial for internationalization with i18next. This will allow you to see the comparison between the two more clearly and see which is a better option.
You can find the code for this tutorial on this GitHub repository.
Create a Transifex Account
The first step that you should take is to create a Transifex account. Transifex has a 15-day free trial and a free-forever plan for open-source projects!
After you create an account, you’ll be asked to create a project. You’ll need to enter a project name. Then, for project type choose “Native”. Finally, you need to enter the main language of your website and what language(s) you’ll be translating your website to. In my case, I’ll choose English as the main language and Arabic as the target language.
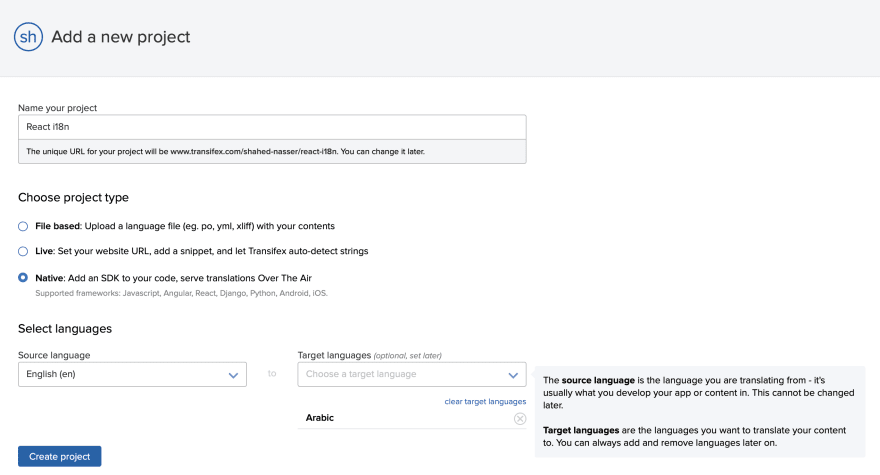
Once you’re done, click on Create Project.
On the next page, you’ll see instructions on how to create credentials for your project. Click on Generate Native Credentials Now at the bottom of the page.

This will open a pop-up where you can see the API token and secret. Make sure to copy both the keys as you’ll need them later.
Once that is done, you can start creating your React app and internationalizing it!
Create React App
In your terminal, run the following command:
npx create-react-app transifex-i18n
This will create the directory transifex-i18n with the React app inside. Change to that directory:
cd transifex-i18n
Install Dependencies
Now, you’ll install the dependencies that you’ll need for this tutorial. First, install React Bootstrap for easy styling:
npm install react-bootstrap@next bootstrap@5.1.0
Then, install Transifex Native’s libraries that are essential for internationalizing a React app:
npm install --save @transifex/native @transifex/react @transifex/cli
@transifex/native is the core Transifex Native library. @transifex/react is the React SDK that you can use in React projects. It provides an easy and React-compatible interface for the core library. @transifex/cli is a CLI tool that you’ll use to sync translatable strings between your codebase and your Transifex Native project.
Create Components
You’ll now create some components that you’ll use for your website.
Create src/components/Greeting.js with the following content:
function Greeting () {
  return (
    <h1>
      Hello
    </h1>
  );
}
export default Greeting;
Create src/components/Text.js with the following content:
function Text () {
  return (
    <p>
      Thank you for visiting our website.
    </p>
  )
}
export default Text;
Create src/components/Navigation.js with the following content:
import { Container, Nav, Navbar, NavDropdown } from "react-bootstrap";


import { Container, Nav, Navbar, NavDropdown } from "react-bootstrap";

function Navigation () {

  return (
    <Navbar bg="light" expand="lg">
      <Container>
        <Navbar.Brand href="#">Transifex React Internationalization</Navbar.Brand>
        <Navbar.Toggle aria-controls="basic-navbar-nav" />
        <Navbar.Collapse id="basic-navbar-nav">
          <Nav className="ms-auto">
            <NavDropdown title="Language" id="basic-nav-dropdown">
              <NavDropdown.Item href="#">English</NavDropdown.Item>
              <NavDropdown.Item href="#">Arabic</NavDropdown.Item>
            </NavDropdown>
          </Nav>
        </Navbar.Collapse>
      </Container>
    </Navbar>
  );
}
export default Navigation;
Finally, replace the content of src/App.js with the following:
import React from 'react';
import { Container } from 'react-bootstrap';
import 'bootstrap/dist/css/bootstrap.min.css';
import Greeting from './components/Greeting';
import Navigation from './components/Navigation';
import Text from './components/Text';

function App() {

  return (
    <>
      <Navigation />
      <Container>
        <Greeting />
        <Text />
      </Container>
    </>
  );
}
export default App;
Run the Website
In your terminal, run the following command to run the website:
npm start
This will open the website in your browser and you can see all the components you just created.

Localize Website
At the moment, the website is all in English and you can’t switch between languages or see any translations. You’ll now localize the website using your Transifex account.
Initialize Transifex
The first step is to initialize Transifex Native on the website. To do that, add the following import in src/App.js:
import { tx } from '@transifex/native';
Then, before the function App add the following code to initialize Transifex Native:
tx.init({
  token: process.env.REACT_APP_TRANSIFEX_TOKEN,
});
As you can see, you can use the init method of tx that is imported from the core Transifex Native library. You need to pass it the token that you copied earlier from your Transifex Native credentials. We pass it as a React environment variable.
To add the environment variable, create .env in the root of your React app with the following:
REACT_APP_TRANSIFEX_TOKEN=
Where the value is the API token that you copied earlier.
Add Translatable Strings
Now, you can make any string translatable. To do that, the Transifex Native React SDK has a component T that you can use to indicate that a text is translatable.
Open src/components/Greeting.js and add the import for T at the beginning of the file:
import { T } from '@transifex/react';
Then, replace “Hello” with the following:
<T _str="Hello" />
As you can see, the component T accepts a prop _str with the text that can be translated.
T can also accept the following props:
-
_context: The context of the string. -
_key: custom key string -
_comment: comments from the developer about the string -
_charlimit: set a character limit for the translator to adhere to -
_tags: tags separated by commas
Similarly, open src/components/Text.js and add the following import at the beginning of the file:
import { T } from '@transifex/react';
Then, replace "Thank you for visiting our website." with the following:
<T _str="Thank you for visiting our website." />
Push Translation Strings
You just added 2 translatable strings. The next step is to push these strings to your Transifex Native project so they can be viewed on the project dashboard.
In package.json add the following new script:
"scripts": {
  ...,
  "push-translation": "txjs-cli push src --token=<TOKEN> --secret=<SECRET>"
}
Make sure to replace the <TOKEN> with your API token and <SECRET> with your API secret.
Using the CLI library that you installed earlier you can push translations to the Transifex Native project using the push command. The push command takes the directory it should look inside for translatable strings as a parameter. It also needs the token and secret you copied earlier.
Now, in your terminal, run the following command:
npm run push-translation
After this is run successfully, you’ll see that 2 string resources have been created. If you open the Resources page on your Transifex Native project, you should see that there are 2 strings that need a translation.

If you click on the Translate button at the top right, you’ll be taken into a new page where you can select the language to translate the strings to. Select the language you want, and then you’ll be able to add the translations for each string using the easy-to-use interface.

Change Languages
Ok, so, now you added the translations, but you need to be able to switch between languages on your website to see this change in action.
The Transifex Native React SDK has the hook useLanguages that allows you to retrieve the available languages in your project. You can use that to display the languages and allow the user to switch between them. To change languages, you can use the setCurrentLocale method from the core native library.
Alternatively, you can use the [LanguagePicker](https://docs.transifex.com/javascript-sdk/localize-react-applications#languagepicker-component) component from the same SDK that provides the entire UI and functionality ready for you. However, you will not have the ability to customize the UI.
Open src/components/Navigation.js and add the following imports at the beginning of the file:
import { tx } from '@transifex/native';
import { useLanguages } from '@transifex/react';
Then, inside the Navigation function create a new languages variable:
const languages = useLanguages();
Then, replace the elements nested inside NavDropdown with the following:
{languages.map(({code, name}) => (
  <NavDropdown.Item key={code} href="#" onClick={() => tx.setCurrentLocale(code)}>{name}</NavDropdown.Item>
))}
This will loop over the languages variable. Each language inside it will have code and name attributes. You use that to display each language as a dropdown item in the navigation bar. When the item is clicked, the language will be changed to the clicked language using tx.setCurrentLocale, which accepts the language code (or locale) as a parameter.
If you open your website now, you should see the languages when you click on the Languages dropdown.

Try clicking on the second language, which in my case is Arabic. You’ll see that all the strings will be translated as you translated them in your Transifex Native project dashboard.

Translating More Text
Let’s now translate the “Language” string in the Navigation component.
In src/components/Navigation.js file add the import for T:
import { T, useLanguages } from '@transifex/react';
Then, change the title prop of NavDropdown to the following:
title={<T _str="Language" />}
The title prop can accept a component as a value.
You’ll need to push the new string to the Transifex Native project so run the push-translation command again:
npm run push-translation
This will push all new strings and skip already-created strings. If you open your project dashboard now you should see a new string “Language” added there.
Go ahead and translate the string, then run the website again. You might see that the “Language” string isn’t translated right away when you switch languages. That’s because Transifex Native caches your translations.
To invalidate the cache, you can use the invalidate command of the CLI tool.
In package.json add the new script refresh-translation and make changes to the start script so that the translations are refreshed whenever the server for your website is started:
"scripts": {
    "start": "npm run refresh-translation && react-scripts start",
    ...,
    "refresh-translation": "txjs-cli invalidate --token=<TOKEN> --secret=<SECRET>"
  },
Just like before, make sure to replace <TOKEN> and <SECRET> with your credentials.
Now, run the start command again or run the refresh-translationcommand on its own. The “Language” string should now be translated when you switch languages.

Changing Layout
The next part of internationalization is making sure that the layout conforms with the selected language’s directionality. As Arabic is a right-to-left (RTL) language, the layout needs to be flipped when the Arabic language is chosen.
The Transifex Native React SDK has a useLocale hook that you can use to retrieve the current chosen locale. We’ll use that to change the document direction and make any necessary changes based on the current language.
In src/App.js add imports at the beginning of the file:
import React, { useEffect } from 'react';
import { useLocale } from '@transifex/react';
Then, inside the App function, add the following before the returnstatement:
const locale = useLocale();
useEffect(() => {
  if (locale) {
    document.body.style.direction = locale === 'en' ? 'ltr' : 'rtl';
  }
}, [locale]);
You first retrieve the locale using useLocale. Then, whenever locale is changed, you change the direction style property of the body of the page based on the locale.
Next, in src/components/Navbar.js add the necessary import for useLocale:
import { T, useLanguages, useLocale } from '@transifex/react';
Then, create the locale variable inside the Navigation function:
const locale = useLocale();
Finally, change the className prop of the Nav element to the following:
className={!locale || locale === 'en' ? "ms-auto" : "me-auto"}
This will make sure that when the language is English the “Language” dropdown will appear at the right, otherwise, it will appear on the left.
Now, open the website and switch to an RTL language. You should see that the layout has changed.

If you try to switch back to English, the layout will go back to the way it was.
Benefits of Transifex Native React SDK
If you went through the previous i18next tutorial, or you already know how i18next works, and you went through this tutorial, you can easily spot all the benefits of the Transifex Native React SDK.
The main benefit of using Transifex Native is that the translations are not part of your codebase. For bigger projects or projects that require translators that aren’t tech-savvy, this makes it much easier to translate a website, as the translation can all happen from the dashboard. Developers can then just focus on developing the website as necessary.
This is also very beneficial for projects that include multiple environments. If you have a website, an iOS app, and an Android app, it’s a hassle to internationalize all these different projects as they each have a different way of translating string resources. As Transifex has SDKs for all these types of projects, and as it also has REST APIs that allow you to access your project resources from basically anywhere, all you need is to translate these strings on the Transifex Native project dashboard and any component of your application can have access to them.
Another benefit of using Transifex’s SDKs is how easy it is to retrieve languages and currently selected locales. When I used i18next in the previous tutorial, retrieving the current locale had to be done through React Context. This concept can seem complex to some, so to be able to easily retrieve the current locale is also a nice plus.
The Transifex Native React SDK adds an easy interface and components that you can use in your code to remove all the hassles that might come with internationalization. This is a big plus for the developer experience.
Conclusion
Transifex is the perfect platform for internationalizing a lot of types of projects, especially React apps. With Transifex Native, you can use the React SDK to add strings to be translated, get languages, get current locale, and more. You can then easily translate the strings from the dashboard and access them whenever.
I found Transifex Native very easy to use as a developer. Its process allows you to stay efficient and focused on the programming part. When it comes to localization and translating your content, you’ll most likely need the help of other team members, and there’s a chance they won’t know how to do it through editing the source code. This is something that you can solve with Transifex. You can also crowdsource your translation if you have an open-source project and need the help of the community.
Be sure to check out Transifex’s React SDK documentation to see all the functionalities it provides and see all the cool things you can do with this SDK and platform as a whole.

Top comments (0)