Beginning (Namaste reader 🙏)
Well, we always look ways to start our journey with, but couldn't understand what to write or what to start with? Many Node projects span thousands of lines of code, but some of the most useful and practical applications can be written in only a handful of lines. Let’s skip the part where you get overwhelmed and jump into the practical application. I also have suffered a lot where at times, I couldn't fathom from where I can start my journey with!
So, many new developers who are looking forward to explore Javascript and the nuances of Javascript, can start with this project, in which I will try to build a small yet efficient Javascript project, where I will try to demonstrate a small challenge. Now what will be the challenge? Are you excited to delve deeper into Javascript and it's magical frameworks? Let's dive then!
The challenge (Hey, don't fret yet!)
A travel agent wants to hire you as a developer, where they want to convert their physical information cards into digital format. They recently saw some problems of storing physical cards (termites and all), so they decided to convert their physical way of storing data into digital. They just bought a few new computers and want to start importing data. They don’t need anything fancy like a website or mobile application, just a computer prompt to create a tabular format (CSV) of data.
Start planning! (Yeah, bit overwhelming)
Luckily, you just started building Node applications and you see this as a great opportunity to use some of Node’s default, out of the box, libraries. This business only wants to manually enter data that can be written to a .csv file. So you start diagramming the requirements of the project.
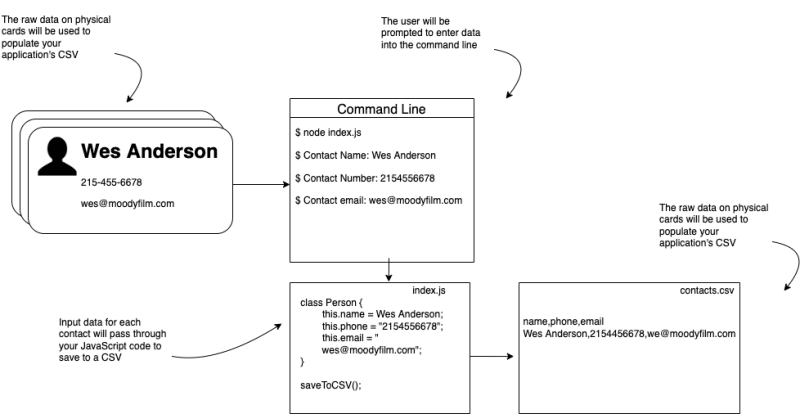
The diagram details the following steps:
- Physical information cards are collected by the user.
- Open the command line and start the application by running node index.
- Enter the name, phone number, and email address in the command line prompt.
- After each entry, contact data is saved through your application to a CSV file on your computer.
When you’re finished, the user should be able to open their command line, run
node index.js
and follow the prompts to enter contact information. After each contact is entered, it will be saved to a CSV file as a comma-delimited string.
Seat down to code!
With Node set up, you begin setting up your project. Choose a location where you’d like to store your project code for this chapter and run
mkdir csv_writer
in your command line to create the project folder.
Within the csv_writer folder run
npm init
to start the process of creating a new Node application configuration file. You will see a prompt and can fill out your responses as in here
package name: (csv_writer)
version: (1.0.0)
description: An app to write contact information to a csv file.
entry point: (index.js)
test command:
git repository:
keywords:
author: Shambashib
license: (ISC)
This process has created a new file for you. This is your application’s configuration file, where you’ll instruct your computer on how to run your Node app.
WHAT’S PACKAGE.JSON? Will be covered in a separate blog!
Your first step is to add "type": "module" to this file so we can use ES6 module imports. Since Node v13.2.0, ES6 modules have had stable support and growing popularity in Node projects over CommonJS syntax for importing code.
Coding part (Comes after a long setup process XD)
Next, you create the entry point to your application, a file titled index.js. This is where the guts of your application will go.
For this project, you realize that Node comes prepackaged with everything you need already. You can make use of the fs module - a library that helps your application interact with your computer’s file system - to create the CSV file. Within index.js you add the writeFileSync function from the fs module by writing import { writeFileSync } from "fs".
You now have access to functions that can create files on your computer. Now you can make use of the writeFileSync function to test that your Node app can successfully create files and add text to them. Add the code in listing 1.3 to index.js. Here you are creating a variable called content with some dummy text. Then, within a try-catch block, you run writeFileSync, a synchronous, blocking function, to create a new file called test.txt within your project’s directory. If the file is created with your added content, you will see a message logged to your command line window with the text Success! Otherwise, if an error occurs, you’ll see the stacktrace and contents of that error logged to your command line window.
The code:
import { writeFileSync } from "fs";

const content = "Test content!";

try {
  writeFileSync("./test.txt", content)
  console.log("Success!");
} catch (err) {
  console.error(err);
}
You’re ready to test this by navigating to your csv_writer project folder within your terminal window and running node index.js. Now, check to see if a new file called text.txt was created. If so, open it up to see Test content! within. Now you’re ready to move to the next step and cater this app to handle user input and write to a CSV file.
Translating user input to CSV (yeah, else forget the milestone payment XD)
Now that your app is set up to save content to a file, you begin writing the logic to accept user input in the command line. Node comes with a module called readline that does just that. By importing the createInterface function, you can map the application’s standard input and output to the readline functionality as seen in listing 1.4. Like the fs module, no additional installations are required other than the default out-of-the-box Node installation on your computer.
In this code, process.stdin and process.stdout are ways that your Node app’s process streams data to and from the command line and filesystem on your computer.
import { createInterface } from "readline";

const readline = createInterface({
  input: process.stdin,
  output: process.stdout
});
Next, you make use of this mapping by using the question function in your readline interface. This function takes a message, or prompt you’ll display to the user on the command line, and will return the user’s input as a return value.
Create a function called readLineAsync that waits for the user to reply and press the enter key before the string value is resolved (listing 1.5). In this way, your custom readLineAsync function will eventually resolve with a response containing the user’s input without holding up the Node app.
const readLineAsync = message => {
  return new Promise(resolve => {
    readline.question(message, answer => {
      resolve(answer);
    });
  });
}
The last step is to instantiate a new Person object for each new contact you’re manually entering into your application. To do that you create an async startApp function that defines the new person object and assigns the name, number, and email values in synchronous order. This way you way for the user input to collect each value before moving to the next one. After all the required values are collected, you call saveToCSV() on the person instance and ask the user if they would like to continue entering more data. If so, they can enter the letter y. Otherwise, you close the readline interface and end your application
const startApp = async () => {
  const person = new Person();
  person.name = await readLineAsync("Contact Name: ");
  person.number = await readLineAsync("Contact Number: ");
  person.email = await readLineAsync("Contact Email: ");
  person.saveToCSV();
  const response = await readLineAsync("Continue? [y to continue]: ");
  if (response === "y") await startApp();
  else readline.close();
};
Then add startApp() at the bottom of index.js to start the app when the file is run. Your final index.js file should look like this:
javascript
import { appendFileSync } from "fs";
import { createInterface } from "readline";

const readline = createInterface({
  input: process.stdin,
  output: process.stdout,
});

const readLineAsync = (message) => {
  return new Promise((resolve) => {
    readline.question(message, (answer) => {
      resolve(answer);
    });
  });
};

class Person {
  constructor(name = "", number = "", email = "") {
    this.name = name;
    this.number = number;
    this.email = email;
  }
  saveToCSV() {
    const content = `${this.name},${this.number},${this.email}\n`;
    try {
      appendFileSync("./contacts.csv", content);
      console.log(`${this.name} Saved!`);
    } catch (err) {
      console.error(err);
    }
  }
}

const startApp = async () => {
  const person = new Person();
  person.name = await readLineAsync("Contact Name: ");
  person.number = await readLineAsync("Contact Number: ");
  person.email = await readLineAsync("Contact Email: ");
  person.saveToCSV();
  const response = await readLineAsync("Continue? [y to continue]: ");
  if (response === "y") await startApp();
  else readline.close();
};

startApp();
In the project folder on your command line, run node index to start seeing text prompts

When you are done entering all the contact’s details, you can then see that the information has been saved to a file called contacts.csv in the same folder. Each line of that file should be comma-delimited, looking like Jon Shambashib,2156667777,shamba@happytrooper.com.
This should be just what the travel agency needs for now to convert their physical contact cards into a CSV file they can use in many other ways.
Conclusion (Yes, about to end now and receive payment)
In the next blog, I’ll try to guide how third-party libraries can simplify your code even further. Till then, adios amigos hermano!

Top comments (0)