The Internet, or the World Wide Web has taken over the world and changed our livestyles. We are spending on average 6 - 8 hours online each day. Sites like Youtube, Wikipedia, Netflix etc. have evolved a lot and provide uniterrupted service 24x7 to the whole world. Software Engineers are working hard to create and maintain highly reliable systems like these. These engineers can be classified into two broad categories, Front-End & Back-End.
Front-End engineers focus on User Interfaces, User Experience, Interactions, Animations and look and feel of the website which a user sees on the browser. Back-End engineers focus on providing functionality, building APIs, maintaining databases, scaling of infrastructure, improving performance etc.
In this blog post. I'll explain how to get started with back-end development with Node.js. This will be a very basic introduction.
Node.js is a JavaScript runtime built on Chrome's V8 JavaScript engine. A JavaScript engine is a program or an interpreter which executes JavaScript code. It allows javascript code to run on the server side.
Let's dive right into the code.
Disclaimer: It's assumed that you have some sort of programming experience before. Even if you don't, let's hope you leave with an understanding of how backend technologies work.
Installing Node.js
You can follow the instructions on official Node.js website.
There are numerous articles on getting Node.js installed on specific platforms. You can look up on google if you face any issues.
Open your terminal and verify if node and npm are installed.
$ node -v
v12.18.1

$ npm -v
6.14.5
Code Editor / IDE
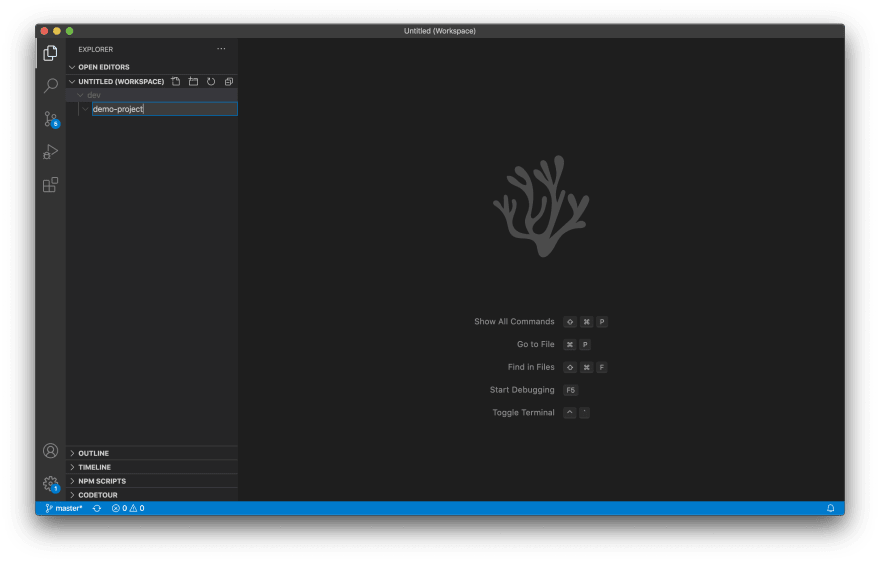
I'll be using Visual Studio Code for this demo. Open up your code editor and create a demo-project directory. Open integrated terminal in VS Code and change the currect directory to demo-project. Once inside the target directory follow the below steps.
Initiate Project
$ npm init
You can keep pressing enter to choose the default configuration parameters. I've just changed the description option in this configuration.
package name: (demo-project)
version: (1.0.0)
description: Getting started with Backend using Node.js
entry point: (index.js)
test command:
git repository:
keywords:
author:
license: (ISC)
It will write a new package.json file in demo-project directory, which holds the information about dependencies, config, repository, keywords, licence, author, scripts etc.
About to write to ~/Desktop/dev/demo-project/package.json:

{
  "name": "demo-project",
  "version": "1.0.0",
  "description": "Getting started with Backend using Node.js",
  "main": "index.js",
  "scripts": {
    "test": "echo \"Error: no test specified\" && exit 1"
  },
  "author": "",
  "license": "ISC"
}

Is this OK? (yes) yes
Now we'll get started with creating a HTTP server and serve some data to the client(browser).
Before getting into that let's clear up some basics.
HTTP (Hyper Text Transfer Protocol) is a client-server protocol which allows the fetching of resources, such as HTML documents. It is an application layer protocol that is sent over TCP.
A Protocol is a set of rules that we use for specific purposes. In the current scenario, it is about communication between front-end and back-end components. To make communication possible, we need both the parties to agree on the format of the data that is being exchanged.
Let's start with writing code for creating a server.
Create an index.js file in the root (demo-project) directory.
// http is an inbuilt module in Node.js
const http = require('http');

// createServer method takes a callback function as argument
// the callback function takes two arguments req and re
const server = http.createServer(function (req, res) {
    res.statusCode = 200; // 200 = OK
    res.setHeader('Content-Type', 'text/html');
    res.write("<h1>Demo page</h1>");
    res.end();
});

// server is listening to incoming requests on port 3000 on localhost
server.listen(3000, function () {
    console.log("Listening on port http://localhost:3000");
});
Now open up your browser and go to http://localhost:3000.
I have opened the developer console, where we can inspect the request and the response in detail.
Note: You can use shortcut Option ⌥ + ⌘ + J (on macOS), or Shift + CTRL + J (on Windows/Linux) to open developer console in Chrome
Click on Network tab in developer console panel and click on the first request localhost. You will be able to see the output as below.
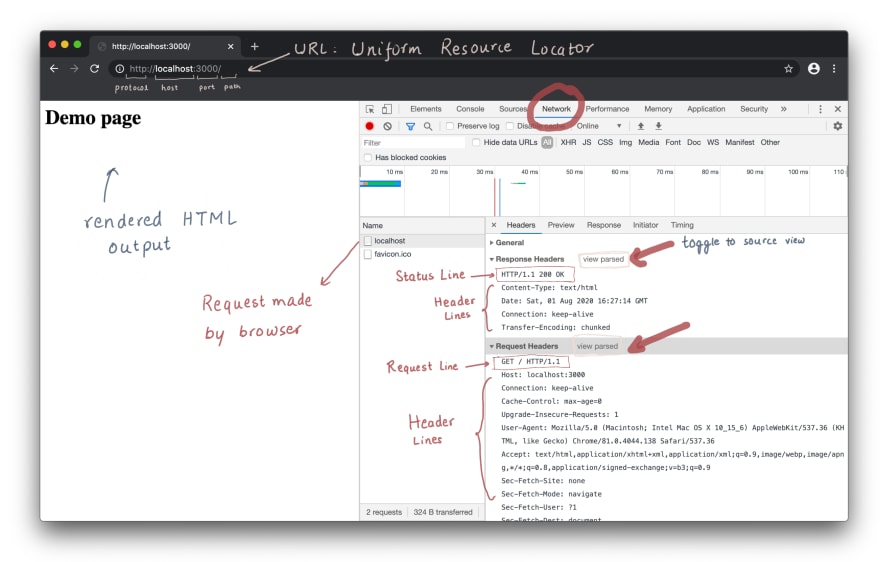
In Request Headers section we can see that browser has made a GET request to path / on host localhost:3000. It has added some other default headers to the request.
In Response Headers section in Status Line, we have status code as 200 and human readable meaning of the status OK. We have explicitly specified Content-Type: text/html, so browser has interpreted and rendered it as HTML. HTTP supports various MIME types to be served. Connection: keep-alive means that it's a persistent connection.
HTTP version 1.1 specifies a persistent connection by default in which the server leaves the connection open for more requests after sending a response. The server can close the connection at the request of a client or if a time-out has been reached.
Now try to change the URL in the browser's address bar.
http://localhost:3000/hello
http://localhost:3000/hello123
As you might have noticed on other websites that response on the web page changes as the url changes, but it's not happening in our case, since we haven't defined any conditional response yet.
This is called routing. Routing refers to determining how an application responds to a client request to a particular endpoint (URI) and a specific HTTP request method.
Let's try to write some conditions in our code. Make these changes to the code and restart the server again by using command node index.js.
const http = require('http');

const server = http.createServer(function (req, res) {
    console.log(`${req.method} request received at ${req.url}`);
    if (req.url === '/html') {
        res.setHeader('Content-Type', 'text/html');
        res.statusCode = 200; // 200 = OK
        res.write("<h1>Demo page</h1>");
        res.end();
    } else if (req.url === '/plain') {
        res.setHeader('Content-Type', 'text/plain');
        res.statusCode = 200; // 200 = OK
        res.write("<h1>Demo page</h1>");
        res.end();
    } else if (req.url === '/json') {
        res.setHeader('Content-Type', 'application/json');
        res.statusCode = 200; // 200 = OK
        res.write(JSON.stringify({"firstName": "Harry", "lastName": "Potter"}));
        res.end();
    } else {
        res.setHeader('Content-Type', 'text/html');
        res.statusCode = 400; // 400 = Bad request
        res.write("<h1>Sorry, this page is not available</h1>");
        res.end();
    }
});

server.listen(3000, function () {
    console.log("Listening on port http://localhost:3000");
});
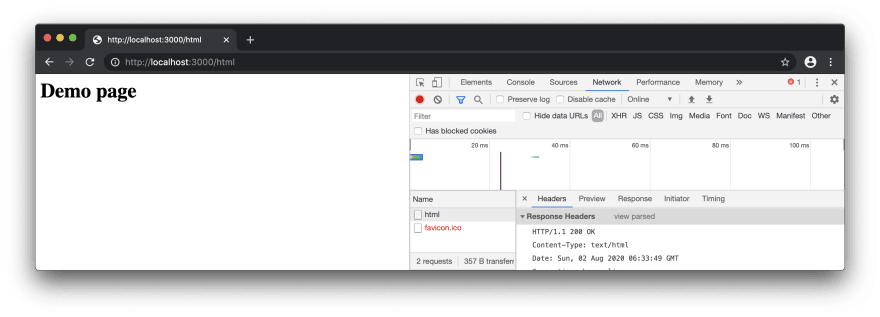
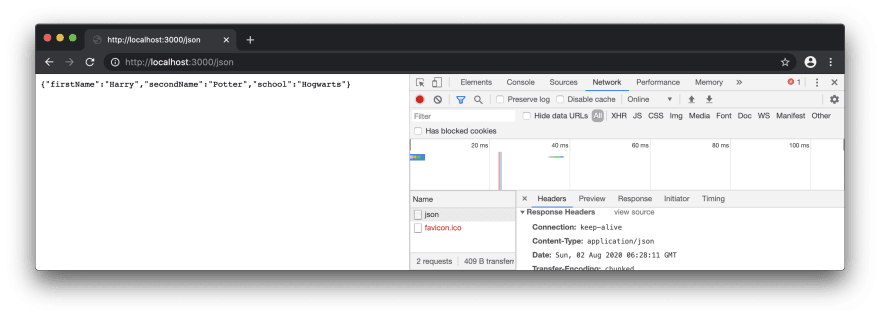
After running this code, try to visit these urls in your browser
http://localhost:3000/html
http://localhost:3000/plain

http://localhost:3000/json
http://localhost:3000/hello
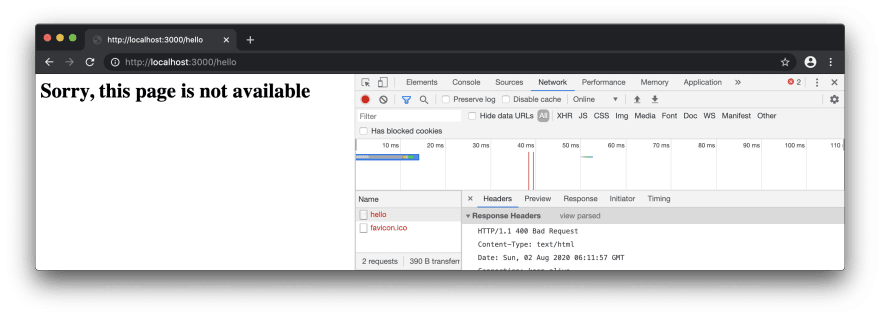
Now you can see that, output is changing as the relative path is changing. If you give anything other than /html, /plain and /json, it will show "Sorry, this page is not available".
You can see that <h1>Demo Page</h1> is not rendered as html when we explicitly specified Content-Type: text/plain.
json is the most used format for building backend APIs with node.js.
But this is not how the production code is written for the backend APIs. Libraries such as Express are widely used, which allows us to write robust and secure code.
We've just scratched the surface of backend development. There's much more to learn, which I will cover in upcoming articles. Stay tuned for more <3.
Originally published at https://themythicalengineer.com on July 31, 2020.

Top comments (2)
Very useful article for me... thank you
I've published a follow up of this article. You can check it out here: dev.to/sks147/getting-started-with...