![Cover image for Important GIT commands you'll need to know 🔥 [Part 2] (for the major part of your work)](https://media2.dev.to/dynamic/image/width=1000,height=420,fit=cover,gravity=auto,format=auto/https%3A%2F%2Fdev-to-uploads.s3.amazonaws.com%2Fuploads%2Farticles%2Flvy8aujkuz9myrr64oon.png)
📋 Summary
In this part, we will cover the following commands ⬇️⬇️⬇️
-
git clone <Remote_URL>: To clone the remote repo to your local machine. -
git checkout -b <Branch_Name> origin/<Branch_Name>: This will create a new local branch named "Branch_Name" AND will also set it to track the remote copy of the branch "origin/Branch_Name". -
git fetch: It will fetch the changes from the remote and put them in our local repo. It will not make the changes visible in the working directory. -
git merge: Will automatically merge those differences to the working directory. -
git pull=git fetch+git merge: It will fetch all the changes in remote and directly merge them to the working directory. -
git stash: Stash up changes in files that are currently tracked by git at some other place. It will not stash changes in untracked and ignored files. -
git stash -u: This allows us to stash even untracked files but not ignored files. -
git stash -a: Allows us to stash all types of files tracked, untracked and ignored. -
git stash list: List down all the entries in the stash. -
git stash pop: Removes the latest stash (stash@{0}) from the list and applies it to the working tree. -
git stash apply: Applies the latest stash (stash@{0}) from the list to the working tree and keep it in the stash list. -
git stash pop stash@{2}/git stash apply stash@{2}: Applies the 2nd stash (stash@{2}) from the list to the working tree and deletes it/ keep it in the stash list respectively.

Hello world 🖖. Welcome to the second part of the blog on Important GIT commands you'll need to know. The first part mainly covers the set of commands which are required probably when you are working alone on a project. It focuses mainly on the following points
- Initialise a git local repo
- Check which files you have made changes in
- Add those files to the staging area and commit them to a branch
- Create separate branches for separate features and checkout code in different branches
- And finally to push your code to a remote repository so that others can also see/ contribute to your code. If you haven't read the first part of this blog, do check it out here Important GIT commands you'll need to know 🔥 [Part 1] before moving forward to get a better perspective.
As you might remember that in the first part we discussed two possibilities viz.
- You want to start a new project (covered in Part 1) and
- You want to contribute to an existing code base
This part of the blog will cover the second scenario in depth. So let's get started...

How to get the codebase from the remote repo to my local machine? - git clone 👨💻
Suppose you want to contribute to a project. For that, you want to know that where the codebase is located. For this case, we are assuming that it's in a remote repo in Github. As you remember that we created a remote github repo in Part 1 of the blog. We will try to clone that repo in our local machine by using the following steps.

- Navigate to the remote repo (https://github.com/sohamderoy/demo-repo for this example) and copy the repo link under HTTPS section as shown in the figure above.
- Navigate to a new folder you want to clone the project and open the git bash terminal.
- Execute command
git clone <Remote_URL>or in this casegit clone https://github.com/sohamderoy/demo-repo.git - After successful cloning, you'll see the following screen

- The remote repo will get cloned in your folder and you'll be able to see the content of the remote repo in your machine.
Do note that 👆
- By default, after cloning the repo, you'll see the content of the main branch. To see the content of any other branch do
git checkout <branch_name>. - The cloned repo will already be initialized with git (you can see the .git folder has already been created) and we don't have to run the
git initcommand. So this local repo will automatically start tracking any changes done to files within it. - To check all the branch(es) linked to this repo, run command
git branch -a, and to check out any other branch run commandgit checkout <branch_name>. For all other important commands on branching and pushing your changes to the remote repo please refer to Part 1 of this blog. - Also in this case where you have cloned a remote repo, you don't have to run the command
git remote add <remote_repo_URL>, as this time the cloned repo is already connected to a remote repo. Directly runninggit remote -vwill show the push and fetch URL set to the cloned repo. See image below

Before we move forward, I think it's high time that we need to clear a concept about how many different levels are there in between our working directory and the remote repo. The following section explains
Working directory, Staging area, Local repo, Remote repo: Explained 👨🏫

The above image is a very important one that helps to explain the different layers in the original version controlling process.
- The working directory represents the state of files when we edit them. It is the state until we add it to the staging area.
- When we are a bit sure about the changes we made in the files, and we want to commit them to the branch, we add them to the staging area by doing
git add .orgit add <file_name>and do agit commit -m "Commit message"to commit it to the local branch. - To get these commits to the remote repo we run the command
git push.
Now, this was the part that we have learnt till now (including the Part 1 of this blog) i.e. the journey from the working directory to remote.
Journey from Remote repo to Local repo and working directory. 🛣️
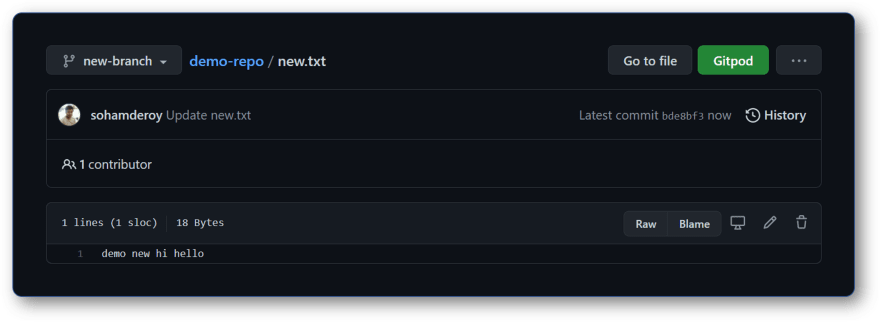
Let's suppose that a co-contributor of your project has made some changes and pushed it to the remote. Let's try to simulate that. Remember our Github repo, in the "new-branch" branch of that remote repo, we have a file "new.txt" with contents as shown below.
We have already cloned this repo in our local so let's check out this new branch using the command git checkout -b new-branch origin/new-branch. This will create a new local branch named "new-branch" AND will also set it to track the remote copy of the branch "origin/new-branch". Note 👆, we can also use git checkout new-branch, but that just create a new branch but will not track the remote branch. It will only do so if we push some changes in this branch to the remote using git push -u origin new-branch. But as of now, we do not have anything to push so we use git checkout -b new-branch origin/new-branch directly to create a new branch and track to the origin branch.

Now that it's clear let's make some changes in the remote repo directly via Github and commit it as shown in the image below (this is to simulate the process where someone else is contributing to our project)

To get these changes done by someone else in our local, we can use the following
git fetch (Remote repo to Local repo)
git fetch will fetch the changes from the remote and put them in our local repo. It will not make the changes visible in the working directory. Let's see how it works
We are in the new-branch branch in local. Let's run git fetch. It shows that all changes from the remote branch are added in origin/new-branch as shown in the image below.

While remaining in new-branch branch if we open "new.txt" (i.e. the one in the working directory), it will not show us the changes done in Github.

On the other hand if we checkout to "origin/new-branch" and open "new.txt" (i.e. the one in the copy of the remote "new-branch" branch), it will show us the changes done in Github.

git merge (Local repo to Working directory)
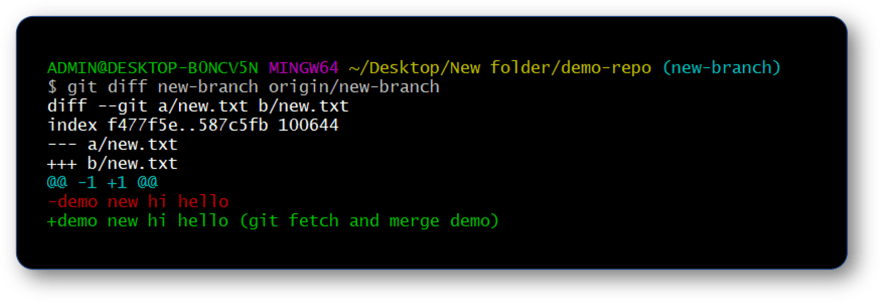
If we want to see the difference between new-branch and origin/new-branch using the command git diff new-branch origin/new-branch then it will show us the following difference.
Now to get these changes merged to the local branch of "new-branch" and get them reflected in files in working directory, we just need to run the command git merge. As the branch "new-branch" is tracking "origin/new-branch", git merge will automatically merge those differences to the working directory. Now all the changes will be reflected in the working directory as shown in the image below.

git pull (Directly from Remote repo to Working directory)
git pull is a shortcut to do git fetch and git merge is one go. It will thus download all the changes from the remote repo, and merge them directly to the local repo and working directory. So just remember the following

Let's say we again make some more changes in "new.txt" directly via Github and commit it.

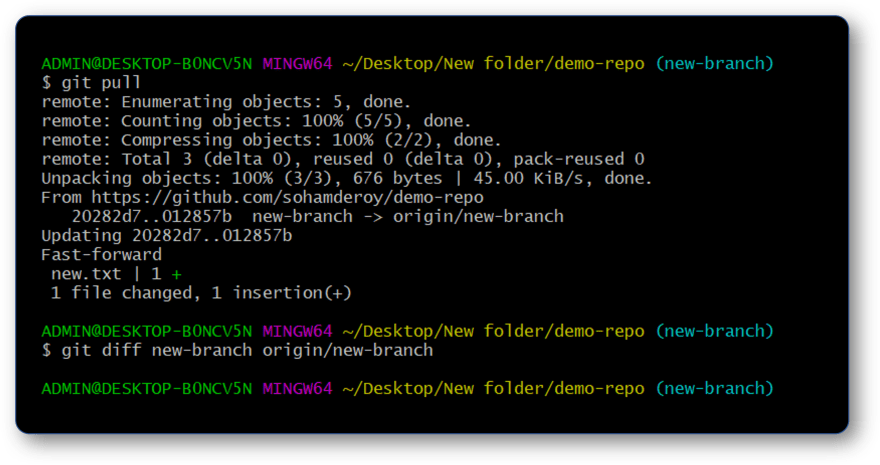
Now in local if we do a git pull, it will download all the changes and put them in both "origin/new-branch" and in "new-branch" (i.e. all changes will be directly merged to the working directory).

Running git diff new-branch origin/new-branch will thus show no results as seen below
How to "Stash up" some of my recent changes for the time being so that I get to keep those changes somewhere without committing it? 📦
In case you are working on some files, made some changes but also at the same time want to check out some different branch, git provides us with an option to stash up/ keep those current changes in some other place. We can achieve this by following:
-
git stash: Stash up changes in files that are currently tracked by git at some other place. Thus your file needs to be added at least once for it to be considered for getting stashed. - By default, we cannot stash any files that are in the "Untracked files" section or files mentioned in .gitignore file. For e.g. as per the image below, new.txt was modified and added in the staging area whereas newfile.docs is a new file that's created and is still in the "Untracked files" section. Running
git stashthus added only new.txt in the stash.

-
git stash -u: This allows us to stash even untracked files but not ignored files. -
git stash -a: Allows us to stash all types of files tracked, untracked and ignored. -
git stash list: List down all the entries in the stash. -
git stash pop: Removes the latest stash (stash@{0}) from the list and applies it to the working tree. -
git stash apply: Applies the latest stash (stash@{0}) from the list to the working tree and keep it in the stash list. -
git stash pop stash@{2}/git stash apply stash@{2}: Applies the 2nd stash (stash@{2}) from the list to the working tree and deletes it/ keep it in the stash list respectively.

This marks the end of this blog. Don't get me wrong, this (i.e. the content covered in Part 1 and Part 2) is not all of git. It can never be. I will be releasing some more blogs in the future related to other commands in git. But the content covered in both these parts will help you sail through 99% of your daily task. That was my main motive for these two parts. There are some more important commands in git, but those are not used that often when compared to the ones mentioned in both these parts. Don't worry, I'll soon gonna cover them separately.
I hope that the content provided in both these parts will be helpful to all the readers. Thanks for reading! If you like this blog and feel it's useful, do consider hitting the link button and share it with your friends, I'd really appreciate that. Stay tuned! 🖖

Top comments (0)