
Goal
In this article, we will build a startup site with forms functionality. The startup will be an estate site that helps us find new homes. We will use Strapi for the backend and React for the frontend.
Also, we will have a newsletter form for users who want to receive monthly emails about our products. On signup, the user will also receive a confirmation email that the signup was successful.
An Introduction to Strapi
Strapi is an open-source headless CMS solution that is self-hosted to allow customization and flexibility for your backend API service. One advantage of Strapi is the ease of scaffolding an API to expose endpoints that can be used as micro-services in your frontend. Strapi supports both a RESTful and GraphQL API.
Prerequisites
Before we continue this article, it is pertinent you know;
- React: This article will not be an introduction to React but about using Strapi for your backend services. Head over to React’s official documentation to get started with React.
Strapi’s CLI installation guide requires two things to be installed in your computer:
Nodejs: versions between v14 and higher are supported. To use v14, run the commands below in your terminal.
nvm ls // to see all versions available
nvm use 14 // to use version 14
nvm alias default v14 // to make v14 your default versionNpm: Only v6 of npm is suported by Strapi. To downgrade to v6, run
npm install npm@6.

-
Postman: We will be using postman to test our Strapi endpoints before connecting it to our React Frontend.
Backend Setup
We will be using Strapi for our backend setup; hence, we will install and scaffold a Strapi project.
Note: This article is written with the latest version of Strapi(v4.1.2) and tested with Strapi 4.1.2(Node 16 and yarn).
Strapi Setup
To install and scaffold a Strapi project, create a file called Marketing-Site, cd into it, and run either of the following commands below:
    cd Marketing-Site
    npx create-strapi-app@latest backend --quickstart
or
    cd Marketing-Site
    yarn create strapi-app backend --quickstart
From above, we are creating a project called backend inside our Marketing-Site folder and using the --quickstart flag to choose the quickstart installation type.
After installation, run yarn develop to start the new project. The command will open up a tab in your browser with a page to register your new admin. Fill out the form and submit it to log in to your Strapi dashboard.

After registering, we will be directed to the admin homepage to set up our backend content and APIs.
Create a Collection
Let us create an Estate collection type. On your admin homepage, click on Content-Type Builder and then Create a new collection type.*
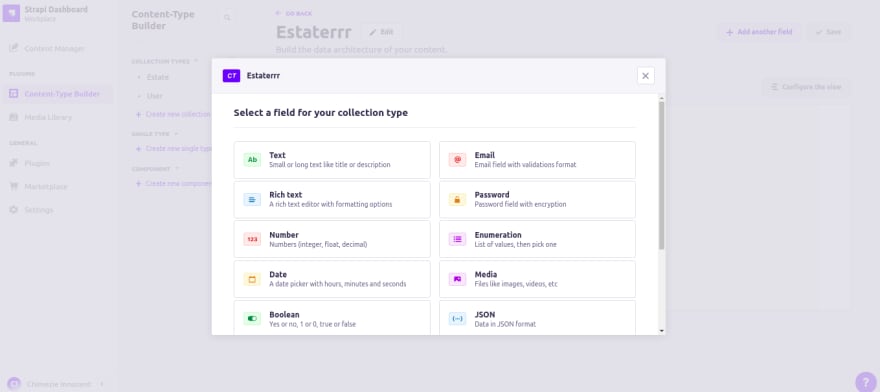
A modal will prompt you to create your content type and enter “Estate” as your Content-Type name because that is what we are building. Click on Continue and add the different fields you want on your website.
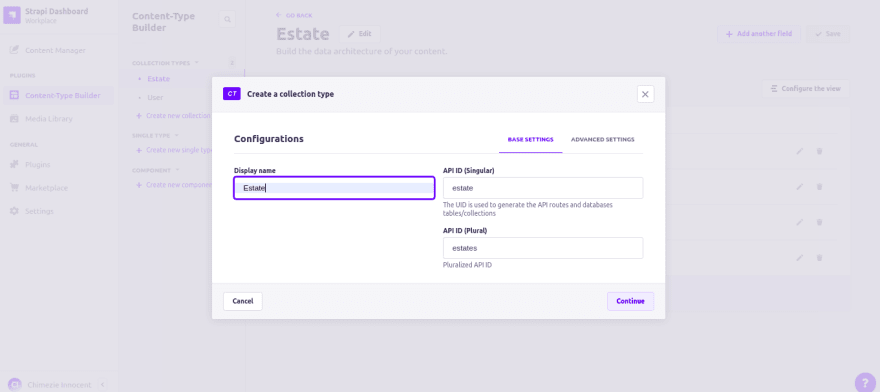
For this tutorial, we only need the Name, Description, Image and Price of our houses.
After you have selected the fields, click on Finish to leave the modal. There are Save and Publish buttons at the top-right side of our page. Click on Save to save the collection and Publish to publish our collection. You should have something like the image below;

Populate the Collection
Click on Content Manager at the top-left side of the admin page. This will navigate you to the page where we will populate our database.
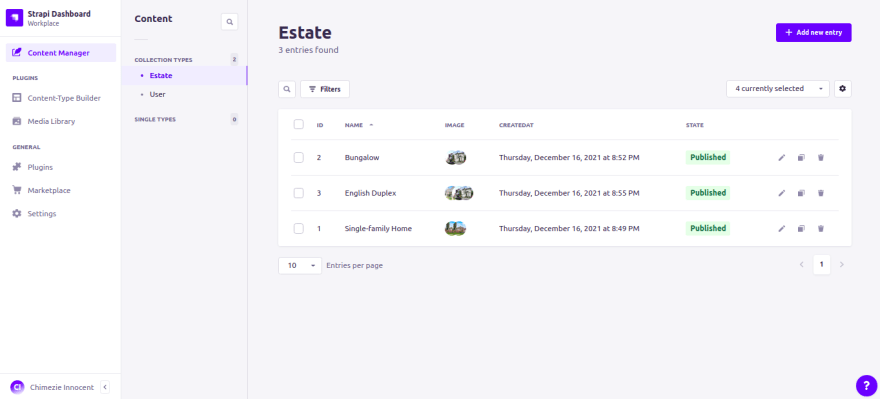
Click on Add new entry to add different houses. We will be needing the name, description, pictures and price of the house so go ahead and populate the collection with your data. After you have done that, click on the publish button on the top-right side of your page to publish the collection.
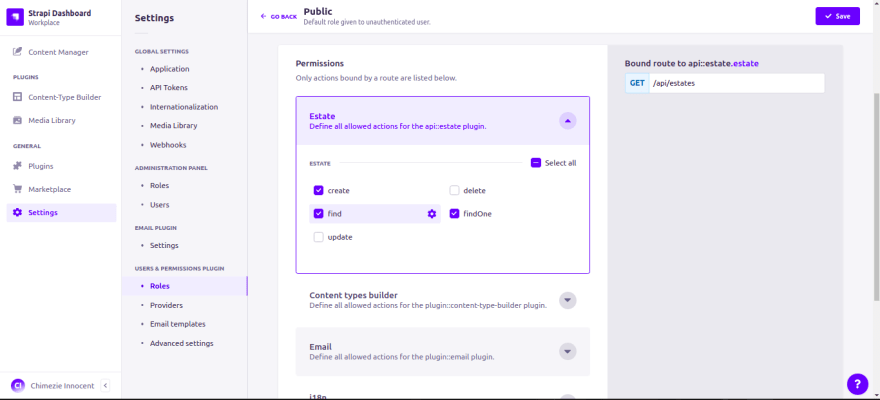
Now, let’s make the estate route available to consume it in our React frontend. Click on Settings to go to the settings page and click on Roles under Users and Permissions Plugins.
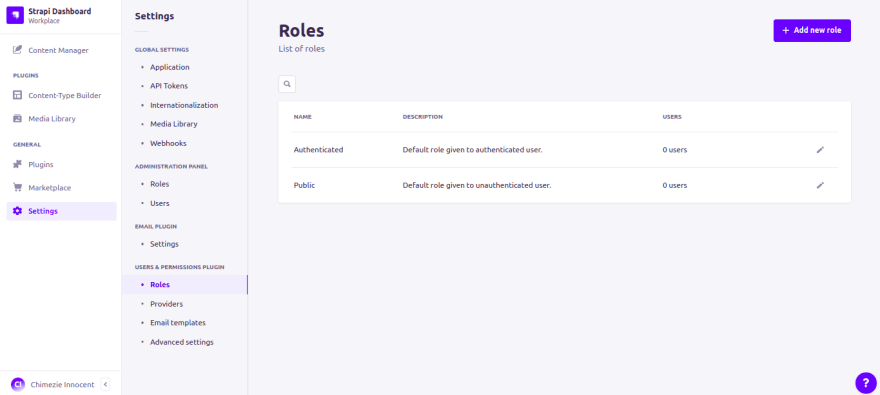
Next, click on Public and then check the find and findOne options under the Estate dropdown. This will make these two estate routes publicly available.
Test the Routes with Postman
You can test the routes with Postman to see how and what our Strapi API returns. Below is what the http://localhost:1337/api/estates will return:

Frontend Setup
Let’s create our frontend with React, install axios and react router packages, and connect them to Strapi. To spin up our React app, we will first exit or cd out of the backend folder before creating our React app, or we can open up a new terminal and run the commands below inside the Marketing-Site folder:
    npx create-react-app frontend
    cd frontend
    npm i axios react-router-dom --save
    npm start
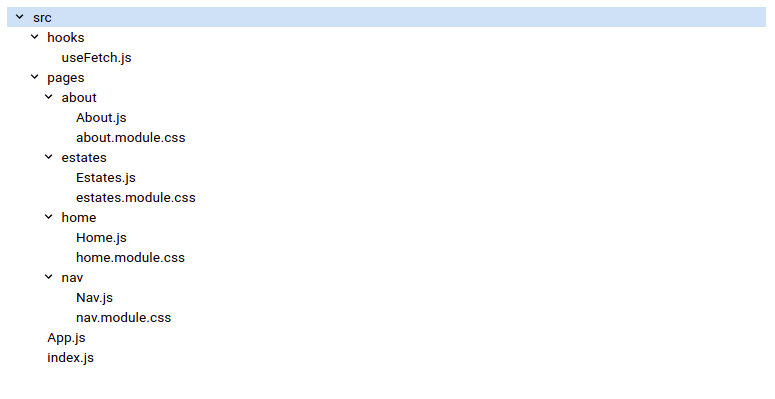
Below is what our folder structure will look like. I will also explicitly state and explain the pages so you won’t get lost.
I’ve written the code below according to the folder structure. You can copy and paste accordingly. You can also clone the Github repo here to access the CSS styling.
// frontend/src/hooks/useFetch.js
    import { useState, useEffect } from 'react';
    import axios from 'axios';
    export default function useFetch(url) {
        const [ estate, setEstate ] = useState(null);
        const [ error, setError ] = useState(null);
        const [ loading, setLoading ] = useState(true);

        useEffect(
            () => {
                const fetchData = async () => {
                    setLoading(true);
                    try {
                        const res = await axios.get(url);
                        setEstate(res.data.data);
                        setLoading(false);
                    } catch (error) {
                        setError(error);
                        setLoading(false);
                    }
                };
                fetchData();
            },
            [ url ]
        );

        return { estate, error, loading };
    }
// frontend/src/pages/about/About.js
    import React from 'react';
    import { useParams, Link } from 'react-router-dom';
    import classes from './about.module.css';
    import useFetch from '../../hooks/useFetch';

    function AboutPage() {
        const { id } = useParams();
        const { loading, error, estate } = useFetch(`http://localhost:1337/api/estates/${id}?populate=*`);
        if (loading) return <p> Loading... </p>;
        if (error) return <p> Error :( </p>;

        return (
            <article className={classes.aboutPage}>
                <h2>More Description</h2>
                <hr />
                <section className={classes.aboutBoard}>
                    <h2>{estate.attributes.name}</h2>
                    <div className={classes.aboutDescription}>
                        <div className={classes.aboutImgContainer}>
                            {estate.attributes.image.data ? (
                                estate.attributes.image.data.map((pic) => (
                                    <img
                                        src={`http://localhost:1337${pic.attributes.url}`}
                                        alt="img"
                                        key={pic.attributes.id}
                                    />
                                ))
                            ) : (
                                <img
                                    src={`http://localhost:1337${estate.attributes.image.data.attributes.url}`}
                                    alt="img"
                                />
                            )}
                        </div>
                        <div>
                            <h3>{estate.attributes.price}</h3>
                            <p>{estate.attributes.description}</p>
                            <Link
                                to={'/'}
                                style={{
                                    textDecoration: 'none',
                                    background: 'black',
                                    color: 'white',
                                    border: '1px solid black',
                                    padding: '5px 10px'
                                }}
                            >
                                {'< Back to Home'}
                            </Link>
                        </div>
                    </div>
                </section>
            </article>
        );
    }
    export default AboutPage;
// frontend/src/pages/estates/Estates.js
    import React from 'react';
    import { Link } from 'react-router-dom';
    import useFetch from '../../hooks/useFetch';
    import classes from './estates.module.css';

    export default function Estatepage() {
        const { estate, error, loading } = useFetch('http://localhost:1337/api/estates?populate=*');
        if (loading) return <p> Loading... </p>;
        if (error) return <p> Error :( </p>;

        return (
            <div className={classes['estates']}>
                <section>
                    <h2>Available Houses</h2>
                    <hr className={classes['horizontal-rule']} />
                    {estate.map((house) => (
                        <article className={classes['article']} key={house.id}>
                            <h2>{house.attributes.name}</h2>
                            <section className={classes['article-description']}>
                                <img
                                    src={`http://localhost:1337${house.attributes.image.data[0].attributes.url}`}
                                    alt="img"
                                />
                                <div>
                                    <p>{house.attributes.price}</p>
                                    <p>{house.attributes.description}</p>
                                    <Link to={`${house.id}`}>See More...</Link>
                                </div>
                            </section>
                        </article>
                    ))}
                </section>
            </div>
        );
    }
// frontend/src/pages/home/Home.js
    import React from 'react';
    import { Link } from 'react-router-dom';
    import useFetch from '../../hooks/useFetch';
    import classes from './home.module.css';

    export default function Homepage() {
      const { estate, error, loading } = useFetch('http://localhost:1337/api/estates?populate=*');
      if (loading) return <p> Loading... </p>;
      if (error) return <p> Error :( </p>;

      return (
        <div className={classes['home']}>
          <section>
            <h2>Welcome to our Estate</h2>
            <hr className={classes['horizontal-rule']} />
            <p>We help you find your new home</p>

          <form className={classes["home-form"]}>
            <h5>Interested in joining our Newsletter</h5>
            <h6>Sign up with your email below</h6>

            <label htmlFor="email">
              Email Address:
              <input type="email" />
            </label>
            <button>Signup</button>
          </form>
            {estate.splice(0, 2).map((house) => (
              <article className={classes['home-article']} key={house.id}>
                <h2>{house.attributes.name}</h2>
                <section className={classes['home-article-description']}>
                  <img
                    src={`http://localhost:1337${house.attributes.image.data[0].attributes.url}`}
                    alt="img"
                  />
                  <div>
                    <p>{house.attributes.price}</p>
                    <p>{house.attributes.description}</p>
                    <Link to={`estates/${house.id}`}>See More...</Link>
                  </div>
                </section>
              </article>
            ))}
          </section>
        </div>
      );
    }
// frontend/src/pages/nav/Nav.js
    import React from 'react';
    import { Link } from 'react-router-dom';
    import classes from './nav.module.css';

    export default function NavHeader() {
      return (
        <div className={classes.navBar}>
          <h1>My Estate</h1>
          <nav className={classes.navLink}>
            <ul>
              <Link to="/" style={{ textDecoration: 'none' }}>
                <li>Home</li>
              </Link>
              <Link to="estates" style={{ textDecoration: 'none' }}>
                <li>Estates</li>
              </Link>
            </ul>
          </nav>
        </div>
      );
    }
// frontend/src/App.js
    import React, { Suspense } from 'react';
    import { Routes, Route } from 'react-router-dom';
    import Nav from './pages/nav/Nav';
    import Home from './pages/home/Home';

    const About = React.lazy(() => import('./pages/about/About'));
    const Estates = React.lazy(() => import('./pages/estates/Estates'));

    export default function App() {
        return (
            <div>
                <Nav />
                <Routes>
                    <Route path="/" element={<Home />} />
                    <Route
                        path="estates"
                        element={
                            <Suspense fallback={<p>Loading...</p>}>
                                <Estates />
                            </Suspense>
                        }
                    />
                    <Route
                        path="estates/:id"
                        element={
                            <Suspense fallback={<p>Loading...</p>}>
                                <About />
                            </Suspense>
                        }
                    />
                </Routes>
            </div>
        );
    }
Inside App.js file above, we implemented a React 18 feature called Suspense API.
According to React’s official page, “Suspense is a new feature that lets you also use <Suspense> to declaratively “wait” for anything else, including data. It’s a mechanism for data-fetching libraries to communicate to React that the **data a component is reading is not ready yet. React can then wait for it to be ready and update the UI”.
// frontend/src/index.js
    import React from 'react';
    import ReactDOM from 'react-dom';
    import { BrowserRouter } from 'react-router-dom';
    import App from './App';

    ReactDOM.render(
        <React.StrictMode>
            <BrowserRouter>
                <App />
            </BrowserRouter>
        </React.StrictMode>,
        document.getElementById('root')
    );
Here’s what the files above do:
- We separated our fetch hook by writing it in the
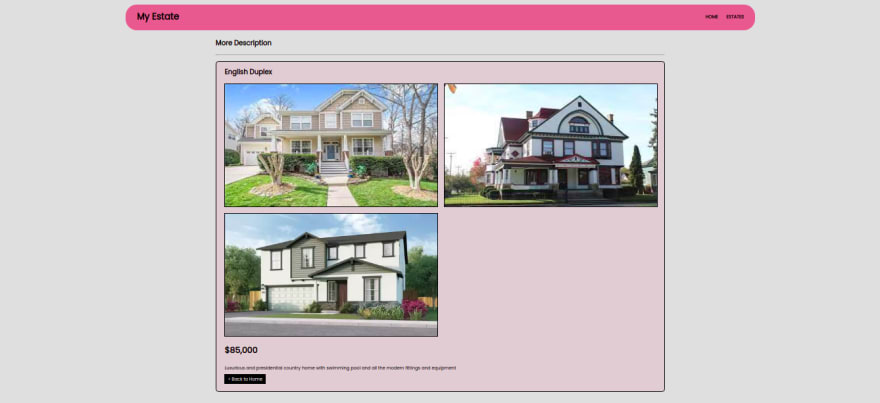
useFetch.jsfile. By doing this, we wouldn’t have to rewrite the same logic every time. Instead, we will invoke it in the components we need it. - We imported it into our Home and Estates components. After our Axios fetch was successful, we mapped through the returned array to display the data. On clicking on each data, we will be redirected to the About page. This page shows the full description of the house with the different available pictures, prices, etc.
-
Nav.jscontains the static nav header on our website that houses the website’s name and the Estate and Home anchor links. - Also,
Home.jshas a form element. We will be using this form for our newsletter signup, which is one of the main focus of this article. - To run the React app and see the result, open up your terminal and run any of the commands below;
    // Yarn
    yarn start
    //Npm
    npm start

Now, we can easily change and add content with Strapi by simply editing any of the current Collection Types or creating new entries.
We have completed the frontend setup and integration. Next, we’ll work on our newsletter integration.
SendGrid Setup
There are so many email providers out there like Mailchimp, MailerLite, Sendinblue, and so on. But for this article, we will be using an email provider called SendGrid.
To set up a SendGrid service, we will first create a SendGrid account. This is because we need to connect SendGrid to Strapi through the SendGrid API. Head over to SendGrid to sign up and create your account.

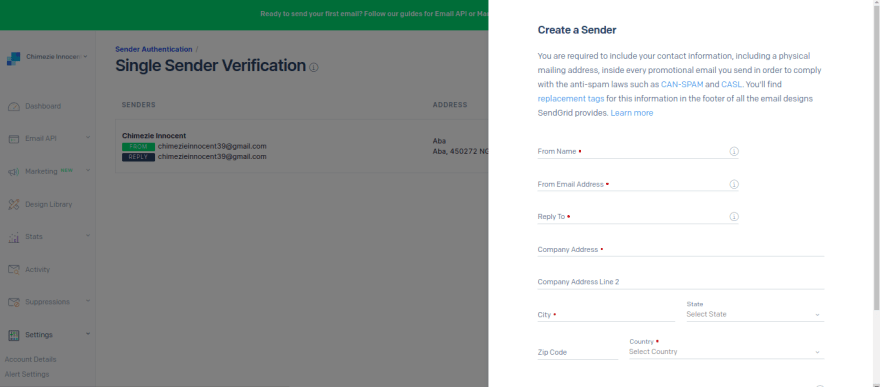
After logging into your dashboard, click on the Settings dropdown on the left side of the dashboard and click on Sender Authentication. Proceed to create a new sender and make sure to verify the email address too.
Next, we will create our API key. On the left side of the dashboard, click on the Settings dropdown again and click on API keys. Click on create API key, give it a name and copy your API key.
Note: Make sure to copy your API key and store it somewhere safe because SendGrid won’t show it to you again. You can always create a new key though if you loose or forget where you stored it.

Next, we will go into our backend folder and run any of the commands below to download strapi email provider plugin.
    // using yarn
    yarn add @strapi/provider-email-sendgrid --save

    // using npm
    npm install @strapi/provider-email-sendgrid --save
After we have successfully downloaded the plugin, we’ll set it up in our backend folder. In the config folder, create a new file called plugins.js and paste the code below:
// config/plugins.js
    module.exports = ({ env }) => ({
        email: {
            provider: 'sendgrid',
            providerOptions: {
                apiKey: env('SENDGRID_API_KEY')
            },
            settings: {
                defaultFrom: 'myemail@protonmail.com',
                defaultReplyTo: 'myemail@protonmail.com'
            }
        }
    });
Replace the settings default emails with your SendGrid verified email. Also, in your .env file, add your SendGrid API key.
SENDGRID_API_KEY=SG.5hoLikrVQXudcUtgaV6n6g.aKttCp***********************************
After that, head over to the api folder inside src folder and create a new folder called subscribe. Inside our subscribe folder, we will also create two extra folders: config and controllers. In our config folder, create a new routes.json file and add the code below.
// src/api/subscribe/config/routes.json
    {
        "routes": [
            {
                "method": "POST",
                "path": "/email",
                "handler": "email.send",
                "config": {
                    "policies": []
                }
            }
        ]
    }
Then, in our controllers folder create an email.js file, and add the following code
// src/api/subscribe/controllers/email.js
    module.exports = {
        send: async (ctx) => {
            let options = ctx.request.body;

            await strapi.plugins.email.services.email.send({
                to: options.to,
                from: 'yourmail@gmail.com',
                replyTo: 'yourmail@gmail.com',
                subject: options.subject,
                text: options.html
            });

            ctx.send('Email sent!');
        }
    };
We will now test our configuration in Postman and see what we get. Before that, make sure you make the email route publicly available in your Strapi admin settings.
(Settings > Users and Permissions Plugin > Roles > Public > Email)

Then, in our postman, let’s test our API to see if it works.
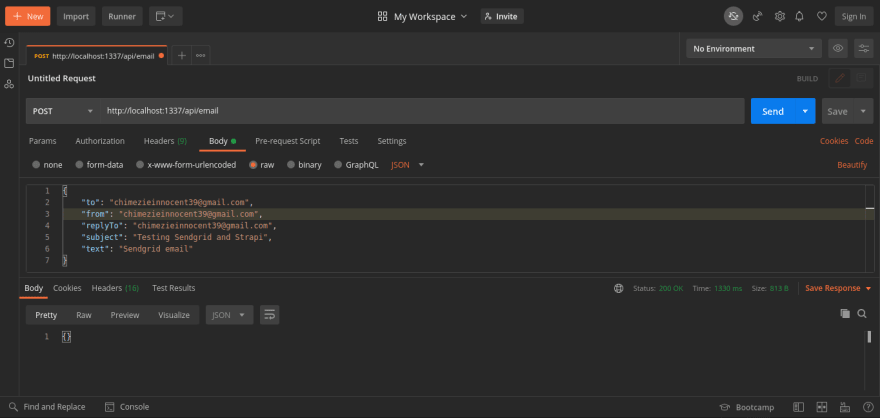
We can see we got a status of 200 meaning the request was sent successfully. Log in to your email account to see the test message.
Finally, We will now integrate our Strapi subscribe functionality into our React app.
Head over to your frontend folder. Under the hooks folder where we created our useFetch.js file, create a new file called usePost.js. We will be putting our POST logic here; then, we will import it into our Home file.
// frontend/src/hooks/usePost.js
    import { useState } from 'react';
    import axios from 'axios';
    const usePost = (url) => {
        const [ signup, setSignup ] = useState('');
        const [ signupError, setError ] = useState(null);
        const [ signupMsg, setSignupMsg ] = useState('');
        const [ signupLoading, setSignupLoading ] = useState(true);

        const handleChange = (e) => {
            setSignup(e.target.value);
        };

        const handleSignup = (e) => {
            e.preventDefault();
            let userData = {
                to: signup,
                from: 'chimezieinnocent39@gmail.com',
                replyTo: 'chimezieinnocent39@gmail.com',
                subject: 'Thanks for signing up',
                html:
                    "<h3>Hi!,</h3> <p>You've been subscribed to our primary newsletter. You can expect to receive an email from us every few weeks, sharing the new things that we've published and new houses to check out. Occasionally, We'll share unique newsletter-only content as well</p><p>Thanks for choosing us!</p>"
            };
            axios
                .post(url, userData)
                .then((res) => {
                    setSignup(res);
                    setSignupMsg(true);
                    setSignupLoading(false);
                })
                .catch((signupError) => {
                    setError(signupError);
                    setSignupLoading(false);
                });
        };

        return { signup, signupError, signupMsg, signupLoading, handleChange, handleSignup };
    };
    export default usePost;
Let us import it in our Home file below:
// frontend/src/pages/home/Home.js
    import React from 'react';
    import { Link } from 'react-router-dom';
    import useFetch from '../../hooks/useFetch';
    import usePost from '../../hooks/usePost';
    import classes from './home.module.css';

    export default function Homepage() {
        const { estate, error, loading } = useFetch('http://localhost:1337/api/estates?populate=*');
        const { signup, signupError, signupMsg, signupLoading, handleChange, handleSignup } = usePost(
            'http://localhost:1337/api/email'
        );

        if (loading && signupLoading) return <p> Loading... </p>;
        if (error) return <p> Error :( </p>;

        return (
            <div className={classes['home']}>
                <section>
                    <h2>Welcome to our Estate</h2>
                    <hr className={classes['horizontal-rule']} />
                    <p>We help you find your new home</p>
                    <form className={classes['home-form']} onSubmit={handleSignup}>
                        <h5>Interested in joining our Newsletter</h5>
                        <h6>Sign up with your email below</h6>
                        <label htmlFor="email">
                            {signupError ? <p> {signupError} </p> : null}
                            Email Address:
                            <input type="email" name="email" value={signup} onChange={handleChange} />
                            {signupMsg ? <p> Thanks for signing up!</p> : null}
                        </label>
                        <button>Signup</button>
                    </form>
                    {estate.splice(0, 2).map((house) => (
                        <article className={classes['home-article']} key={house.id}>
                            <h2>{house.attributes.name}</h2>
                            <section className={classes['home-article-description']}>
                                <img
                                    src={`http://localhost:1337${house.attributes.image.data[0].attributes.url}`}
                                    alt="img"
                                />
                                <div>
                                    <p>{house.attributes.price}</p>
                                    <p>{house.attributes.description}</p>
                                    <Link to={`estates/${house.id}`}>See More...</Link>
                                </div>
                            </section>
                        </article>
                    ))}
                </section>
            </div>
        );
    }
Go ahead and test your app.
Conclusion
We have seen how to use Strapi with React to build a startup website. We’ve also seen how to Integrate SendGrid with Strapi and React to create a newsletter email form.
Lastly, we have seen how to implement one of React’s new features— React Suspense — and what it does. I hope you understood what we did and can now implement same in your projects.

Top comments (0)