
Let’s Understand the Problem

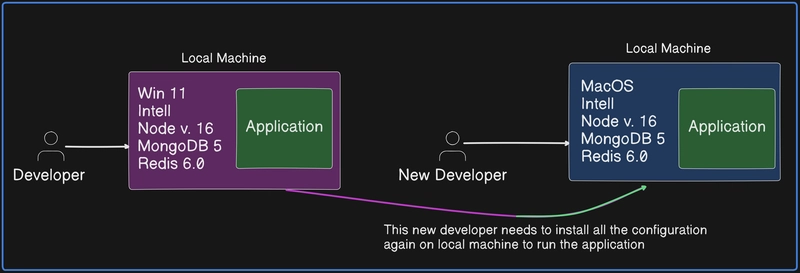
Let's say a developer is working on a project and has set up all the required dependencies and configurations. Everything works fine. However, when a team collaborates on the same project across different operating systems, they may have different dependencies and setups, making it a hassle to configure the environment repeatedly.
For example, if a tool is built for Windows, it won’t run on macOS or Linux, making setup even more difficult. Managing multiple environments and ensuring consistency becomes a challenge.
Docker solves this problem by creating a standardized, portable environment that works the same across all systems, eliminating compatibility issues and simplifying setup.
Before Docker:
- Each application required a dedicated server.
- Running multiple applications on the same server was difficult due to conflicts between dependencies and configurations.
- Companies had to invest in more servers and powerful CPUs, leading to high costs and inefficient resource utilization.
- This approach was not scalable, cost-effective, or environmentally friendly.
Who Solved This Problem?
- Virtual Machines (VMs) provided a solution by allowing multiple applications to run on the same physical server.
- This was an improvement but still had limitations.
Problems with Virtual Machines:
- Each VM required its own full operating system, consuming significant resources.
- Managing dependencies across different environments was still complex.
- “Works on my machine” issues persisted, making development and deployment inconsistent.
Then Containers Came into the Picture
- Containers allow applications to run without needing multiple OS installations.
- Docker simplified containerization, making it easier to build, share, and deploy applications.
- Containers are lightweight, fast, and portable across environments.
- Better resource utilization, run more apps on the same hardware.
- Quick to build, destroy, and deploy, ideal for cloud scaling.
- Standardized workflow from development to production.
Difference between Virtual Machine & Containers
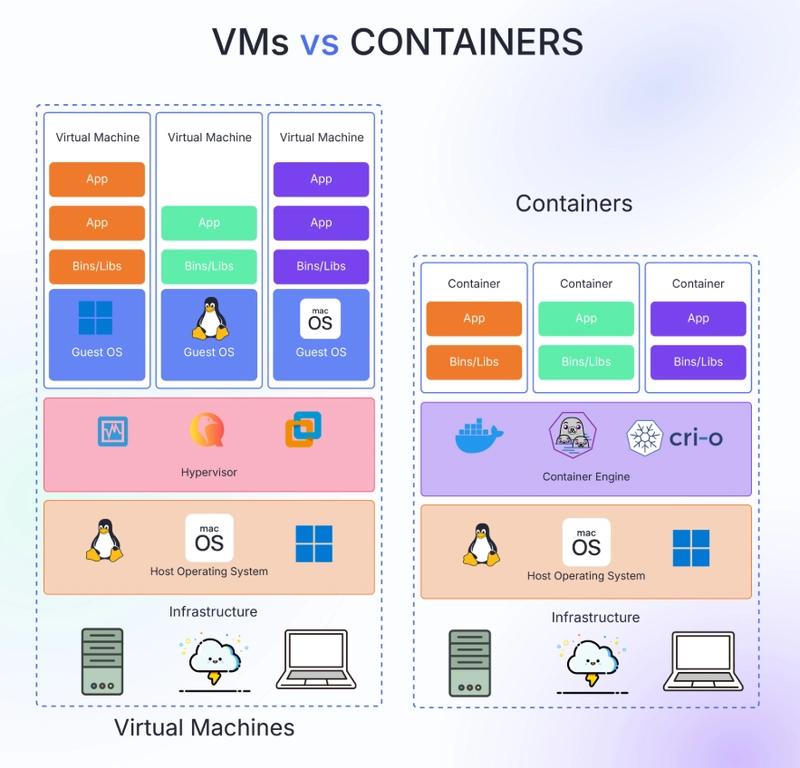
1. Virtual Machines (VMs)
- Each VM runs on a Hypervisor, which allows multiple VMs to share the same physical infrastructure.
- Every VM has its own Guest OS, making it heavyweight since each OS requires its own resources (RAM, CPU, Storage).
- Applications inside VMs come with their own dependencies (Bins/Libs), which can lead to duplication of resources.
- Overhead: Since each VM has a separate OS, it consumes more CPU and memory, making it less efficient for running multiple applications.
2. Containers
- Containers share the same Host OS but are managed by a Container Engine (e.g., Docker, CRI-O, etc.), eliminating the need for separate Guest OS instances.
- Each container has its own dependencies (Bins/Libs) but shares the OS kernel with other containers, making them lightweight and efficient.
- Faster startup and lower overhead compared to VMs since containers don’t require a full OS boot.
- Ideal for microservices and scalable applications since they consume fewer resources and can be deployed rapidly.
Key differences in short:
| Feature | Virtual Machines (VMs) | Containers |
|---|---|---|
| OS Overhead | Each VM has a full Guest OS | Share the same Host OS |
| Startup Time | Slower (OS boot required) | Faster (lightweight) |
| Resource Usage | Heavy (CPU & RAM overhead) | Efficient & lightweight |
| Scalability | Harder to scale due to overhead | Easily scalable |
| Isolation | Stronger (Separate OS per VM) | Process-level isolation |
| Performance | Slower due to OS duplication | Faster & optimized |
What is Docker?
Docker is a containerization platform that simplifies the process of building, shipping, and running applications in isolated environments called containers. Under the hood, Docker utilizes Linux namespaces and cgroups to create lightweight, portable containers. Initially, Docker used LXC (Linux Containers), but later switched to its own container runtime called containerd
According to Docker’s official site:
Docker is an open platform for developing, shipping, and running applications. It allows developers to package software into standardized units called containers, which include everything needed to run: libraries, system tools, code, and runtime.
Why Docker?
- Manages Containers Easily – It provides tooling to handle containers efficiently.
- Simplifies Deployment – Packages an app and its dependencies into a single unit (Docker container).
- Build Once, Run Anywhere – Ensures consistency across development, testing, and production.
- Fast & Lightweight – Containers are quick to create, destroy, and scale.
Installation of Docker
I have listed the official website to install the Docker Engine and Docker Desktop for up to date installation steps.
Official Documentation for Installation(Check according to your device)
Website: Install Docker Desktop
Website: Install Docker Engine
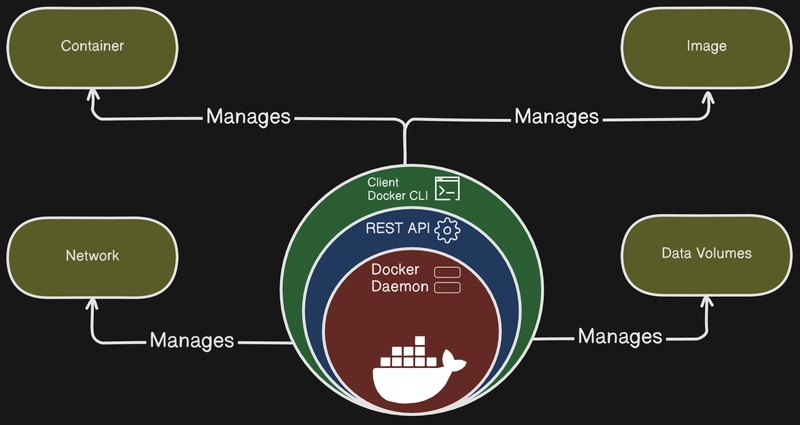
Docker Daemon:
The Docker Daemon (dockerd) is the core engine that runs in the background. It listens for Docker API requests and manages Docker objects such as images, containers, networks, and volumes. The daemon handles all the container operations like starting, stopping, and scaling containers, as well as pulling and creating images.
Docker Desktop:
Docker Desktop is an application for MacOS and Windows that provides a GUI for managing Docker environments. It includes Docker Engine, Docker CLI client, Docker Compose, Kubernetes, and a graphical user interface that allows users to manage containers, images, and other Docker resources visually. Docker Desktop simplifies the process of setting up and using Docker on your local machine.
How Docker Works?
Docker follows a simple process to create, distribute, and run containers. Here’s how it works step by step:
Docker Architecture
1. Docker Client
The developer interacts with Docker using commands like:
-
docker build→ Creates a Docker Image from a Dockerfile. -
docker pull→ Downloads an existing image from the Docker Registry (like Docker Hub). -
docker run→ Creates and starts a container from an image.
2. Docker Daemon
- The Docker Daemon runs in the background and manages everything, including images, containers, networks, and storage.
- It processes the client commands and does the actual work of building, pulling, and running containers.
3. Docker Host
- The Docker Host is where containers run.
- It holds two key components:
- Images: Pre-built packages that contain applications and dependencies (e.g., Ubuntu, Nginx).
- Containers: Running instances of Docker images that execute applications.
4. Docker Registry
- This is a storage location for Docker images like you store you code on GitHub.
- Common registries include Docker Hub, Google Artifact Registry,Azure container registry, Amazon Elastic Container Registry (ECR), GitHub Conainer registry(GCR) and private registries.
- Images can be pulled (
docker pull) from here or pushed (docker push) to share with others.
Process Flow
Step 1: You build an image using docker build .
Step 2: If the image isn’t available locally, Docker pulls it from the registry using docker pull.
Step 3: You run a container using docker run, which creates an instance from the image.

What is a Dockerfile?
A Dockerfile is a script containing a set of instructions to build a Docker Image. It defines the base OS, dependencies, and commands required to set up an environment.
Docker Image
A Docker Image is a lightweight, standalone, and executable software package that includes everything needed to run an application: code, runtime, system tools, libraries, and dependencies. A docker image is built in layers, where each instruction in the Dockerfile creates a new layer. These layers stack on top of each other to form the final image.
-
FROM→ Base image layer (e.g., Ubuntu, Node.js, or Alpine). -
WORKDIR→ Sets the working directory inside the container. -
COPY→ Copies files from the host to the container. -
RUN→ Executes commands inside the image (e.g., installing dependencies). -
EXPOSE→ Declares which ports the container will use. -
CMD/ENTRYPOINT→ Defines the default command when the container starts.
Each layer is immutable—once created, it doesn’t change. Instead, new layers are added when modifications are made.
- Images are immutable (cannot be changed).
- Stored locally or on Docker Hub for sharing.
Writing your first Dockerfile:
FROM ubuntu:latest

WORKDIR /app

COPY package.json package-lock.json ./

COPY . .

EXPOSE 3000

CMD ["npm", "start"]
Docker Layer Caching
Docker optimizes image builds by caching layers. If a layer hasn’t changed, Docker reuses the cached version instead of rebuilding it.
How caching works:
- Docker runs through the
Dockerfileline by line. - If a layer hasn’t changed, it is pulled from cache.
- If a layer changes, all layers after it must be rebuilt.
Containers
A Docker Container is a running instance of an image. It provides a lightweight and isolated environment to run applications.

- Ephemeral (data is lost when deleted unless using volumes).
- Multiple containers can be created from the same image.
Recap with Demo: Dockerizing a Nodejs application
Remember above we have written our first Dockerfile we will be using that.
Now for the practice at your own you can use this github repository, here you will find the nodejs applicaiton code okay: Nodejs Application Code
Dockerfile
Step 1: Writing the Dockerfile
# Use the latest Ubuntu image as the base
FROM ubuntu:latest

# Set the working directory inside the container
WORKDIR /app

# Copy package files first (helps with caching layers efficiently)
COPY package.json package-lock.json ./

# Install dependencies
RUN apt update && apt install -y nodejs npm && npm install

# Copy all remaining project files
COPY . .

# Expose port 3000 to allow external access to the application
EXPOSE 3000

# Start the application using npm
CMD ["npm", "start"]
Step 2: Build the Docker Image
Now, let's build the image using the Dockerfile:
docker build -t mynodeapp .
-
t mynodeapp→ Gives the name mynodeapp to the image. -
.→ Refers to the current directory where the Dockerfile is located.
Step 3: Run the Container
Once the image is built, we can start a container from it:
docker run -d -p 3000:3000 --name mynodejscontainer mynodeapp
-
d→ Runs the container in detached mode (in the background). -
p 3000:3000→ Maps port 3000 of the container to port 3000 of the host. -
name mynodejscontainer→ Names the running container mynodejscontainer. -
mynodeapp→ Uses the mynodeapp image to create the container.
Step 4: Verify the Running Container
To check if the container is running:
docker ps

CONTAINER ID   IMAGE       COMMAND        STATUS        PORTS                  NAMES
abcdef123456   mynodeapp   "npm start"    Up 5 minutes  0.0.0.0:3000->3000/tcp  mynodejscontainer
Step 5: View Logs of the Application
To check logs and ensure the app is running properly:
docker logs -f mycontainer

> mynodeapp@1.0.0 start /
> node server.js
Server is running on port 3000...
Step 6: Access the Application
Now, open your browser and go to:
http://localhost:3000
Now, we have successfully dockerized our Node.js application running inside a Docker container!
This is the flow form writing a dockerfile, building the image out of it and running the container of the image.
Basic Docker Commands
Run a container interactively
# Runs an Ubuntu container in interactive mode (-it)
docker run -it ubuntu

# Run the container using port you have exposed in dockerfile, for example -p (publish)
docker run -it -p hostPort:containerPort <name-of-the-image>
List all running containers
# Shows currently running container
docker container ls

# or
docker ps
List all containers (including stopped ones)
# Lists all containers, including stopped ones
docker container ls -a
Stop a running container
# Stops a running container using its container ID
docker container stop [container_id]
Remove all stopped containers, unused volumes, and networks
# Cleans up unused containers, networks, and images
docker system prune
Exec into the running container
docker exec -it <name-of-your-container> bash
Inspect running processes in a container
# Lists all running processes inside the container after you exec into the container
ps -ef
Image & Container Management
List all Docker images
# Shows all locally available Docker images
docker images
Pull an image from Docker Hub
# Downloads the latest Nginx image
docker pull nginx
Remove an image
# Deletes the specified Docker image
docker rmi nginx
Start a stopped container
# Restarts a stopped container
docker start [container_id]

# Or you can use the name of the container as well
docker start <name-of-the-conatiner>
Restart a container
# Stops and starts a container again
docker restart [container_id]

# Or you can use the name of the container as well
docker restart <name-of-the-conatiner>
Delete a container
# Removes a stopped container permanently
docker rm [container_id]

# Or you can use the name of the container as well
docker rm <name-of-the-conatiner>
Container Logs & Inspection
View container logs
# Shows logs of a specific container
docker logs [container_id]

# Or you can use the name of the container as well
docker logs <name-of-the-conatiner>
Check container details
# Displays detailed information about a container
docker inspect [container_id]

# Or you can use the name of the container as well
docker inspect <name-of-the-conatiner>
Monitor real-time container stats
# Shows real-time CPU, memory, and network stats of containers
docker stats
I’ll be covering these advanced and Important topics in next blog
- Docker Compose
- Docker Networking
- Docker Volumes
- Docker Swarm
- Docker Vs Kubernetes
The End!
I hope you enjoyed this blog and have learned about docker today. See you in the next one.

Top comments (0)