I've just finished up writing a C function to read the ADS1115 ADC board on the Pi. I'll write on that later, but right now, I need to log in something new I've done. As I finished the C function, I knew it needed to be done in another language. I don't like to pigeonhole my code. As I've also been working on learning to use Visual Studio Code and .NET Core on my Linux box (Shhh! whisper Don't tell anyone I'm using Microsoft), I thought I'd see how to do the same C function, but with .NET on the Pi. It took a bit, but it finally worked...at least the beginning parts.
I've just got the basics going. There is still a lot to do before I can work on the ADS1115 code. It was fairly complicated (to me) to get dotnet (or .NET) and all the bits and pieces for coding I/O on the Pi. I write these in order to not forget. I'm old, you know. It's important to note that I had a lot to do since the allegedly easy route didn't please me.
I used parts of the following websites as references to meet my needs:
Daren May's .NET Core and GPIO on the Raspberry PI - LEDs and GPIO
The dotnet/iot github (mainly the bug posts)
Edi Wang's Setup for .NET Core on Raspberry Pi
Now, what it means for my way:
No Docker--Not against Docker. I just don't see it's utility most of the time.
No ASP.NET -- C'mon, one Microsoft product is enough! Besides, I'm using Visual Studio Code on my main Linux box. The ASP.NET bit isn't necessary.
Visual Studio Code via SSH for native development on the board.
What took extra time was that some things (very important things) were not documented in these three web sites. Though at least one of the problems I encountered was on Edi Wang's site, but way down in the comments. I had almost solved it before I found the comment.
Let's begin, after you've logged into your Pi:
Installing .NET SDK and runtime on a Pi 4B using raspbian buster can be tricky. It's not in the repository. You'll have to install it manually. That's where Edi Wang's web site works great. However, you need to make two changes to his instructions. At the point he gives you these instructions:
mkdir dotnet-arm32
tar zxf dotnet-sdk-3.1.102-linux-arm.tar.gz -C $HOME/dotnet-arm32
tar zxf aspnetcore-runtime-3.1.2-linux-arm.tar.gz -C $HOME/dotnet-arm32
Don't use them. Use these instead:
sudo mkdir /usr/share/dotnet
sudo tar zxf dotnet-sdk-3.1.102-linux-arm.tar.gz -C /usr/share/dotnet
These differences allow you to place the dotnet SDK in a shared location because you and root will be needing to know where things are located.
Yep, don't download and install the ASP.NET unless you wish to use it. If you're using Visual Studio Code, this step is not necessary.
Next change is at this point in Edi's instructions:
export DOTNET_ROOT=$HOME/dotnet-arm32
export PATH=$PATH:$HOME/dotnet-arm32
Instead of those, do this:
sudo ln -s /usr/share/dotnet/dotnet /usr/local/bin
In most cases, /usr/local/bin is already in your PATH, so the export instructions would also not be necessary. Test your installation with:
dotnet --info
It should give the same results as in Edi's web site. If not, check through what you did and see if anything went wrong. Is there a dotnet executable under /usr/share/dotnet? Did the symlink appear in /usr/local/bin? Is that in your PATH?
If it did work, then you should be able to follow his instructions to build a basic dotnet console app. From here on, it gets a little more tricky.
Next, we need to get VS Code to work on our Linux box and connect to a folder on your Pi. I'll not give instructions for installing Visual Studio Code here as you can also do this on Windows as well. Go look it up and get it ready, if you aren't already using VS Code.
To set up VS Code for remote development, I followed the Daren May article (link above) to set up my VS Code. While I used his instructions without change, I'll offer one tip. When you've gotten your first connection to your Pi from VS Code, go back and configure an SSH connection in VS Code. After doing this, you can just use the configured connection and give it your Pi login password. That may be especially important if you're working on more than one Pi.
Follow the Daren May article to install the SSH extension and restarting your VS Code. On Code, You should see in the lower left corner a green-ish little block. It's your remote connection block. Click it and a window opens at the top. The drop down has "Remote SSH - Open Configuration File".
Click that and choose the configuration file on your PC. It will look something like this:
Host alias
HostName host
User username
Change alias to a name for the connection.
Change host to the IP address or hostname of your Pi.
Change username to your login username.
From now on, this alias will appear in the connection list when you choose to connect to a configured connection.
Another side tip: If you're running Linux (and I think it can be done on Windows, too), you can connect to your many raspberry pi's with names. Simply add a name in your /etc/hosts file pointing to (hopefully?) the static IP you gave your pi. It has to be a fully-qualified-domain-name to work,though. I just put '.lan' after mine and they work.
After, you have connected, click the folder icon in the top of the left side menu. It should have a blue box to open a folder. Click it and it will give you a menu at the top of the screen where you can walk down your folder tree to the one you want to open. Choose a folder to open and VS Code will set it up and remember it for later as well.
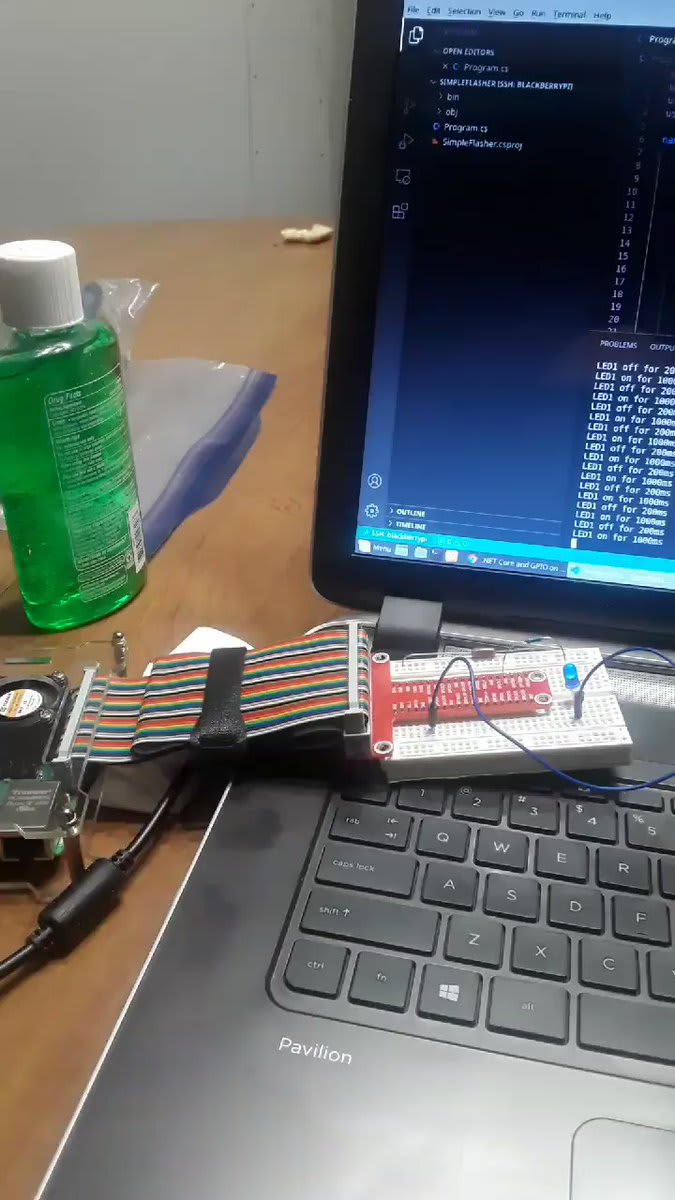
There is only one other thing to note in the Daren May article that isn't documented. While you're beginning the Simple Flasher project, the article says to get the GPIO and IoT packages installed. He gives these two install instructions:
dotnet add package System.Device.Gpio --source https://dotnetfeed.blob.core.windows.net/dotnet-iot/index.json
dotnet add package Iot.Device.Bindings --source https://dotnetfeed.blob.core.windows.net/dotnet-iot/index.json
Each of these will install the correct package, but ONLY TO YOUR WORKING PROJECT!
Type these instructions in a terminal (probably in VS Code) while you are INSIDE the Simple Flasher project folder (later, you'll do this step in any folder that you wish to add these two packages).
These packages are added to your project, not installed permanently on the raspberry pi. I guess it's just my noob-ness in dotnet, but I didnt' get that at first.
Doing the install and set up this way, you should now be able to type 'sudo dotnet run' in a terminal and the Simple Flasher project should build and run. Remember, this is a Pi and we often need to run GPIO apps at sudo. In addition, the 'error 13' I kept getting was referred to in the github bug discussions as, "Oh, you forgot to run as root. We set it up that way." That's the purpose for the changes to the Edi Wang article that I gave above, so you can call dotnet to build your project with 'sudo'.
Just for a bit of explanation. One, you have to run as root when doing GPIO because the folders in Linux for raspbian that handle I/O are all root'ed. Whether its /dev/gpiomem or /sys/ folders, they have to accessed by 'root'. Two, since our install is just un-tar-ing a tarball into a folder, root is very limited on where he (she?) looks for apps to run. Root has no idea that your folders know where everything is, that's why we placed it in a folder area, set up to be accessible by root (and you too, of course).
Finally, after figuring all this out, I was able to watch a blue flashing LED on my Pi. Try it out for yourself. I'll help if I can on problems. Now, back to figuring out what the other useful instructions are in these two packages.

 dave (does not do pretty)@abigmanrunning
 Got it! .NET Core using System.Device.Gpio and Iot.Device.Bindings running on a @Raspberry_Pi 4B native. With @code running remote. May have to write this down in order to save all the steps.19:32 PM - 04 Jul 2020
0
0

Top comments (0)
Some comments may only be visible to logged-in visitors. Sign in to view all comments.