
Authorization
Session based authorization
Earlier developers were using session based authorization.
After the user logs in, a session Id is sent to client in form of a cookie and when there is a user request, the server checks for that cookie and gives access and response.
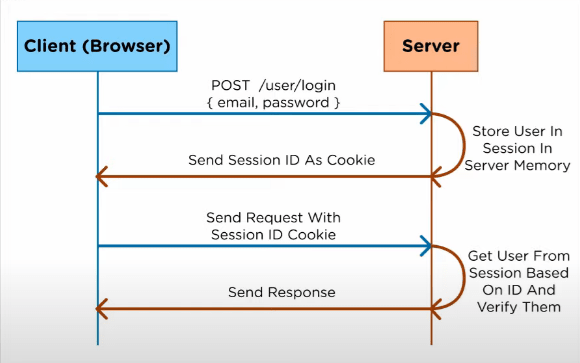
Drawbacks
- The problem is sessions are stored in the server, and when the app scalability increases, user requests also increase which eventually put loads on the server.
- It doesn't support multiple servers. For example, suppose user logs in to the 'Amazon' website then the session id is passed to the client, but if the same user wants to open 'Amazon Prime', the user has to log in once again to create a session id.
JWT based authorization
In this process, when the user logs in, the user information is signed with a secret (which is stored in the server) and a JSON web token is generated and it is sent to the client. Generally, it is stored in browser localStorage, whenever a user sends a request to the server in which the authorization token is present in the headers of the request , the server just verifies that JWT token with the secret it has by unsigning that JWT token and gives users access.
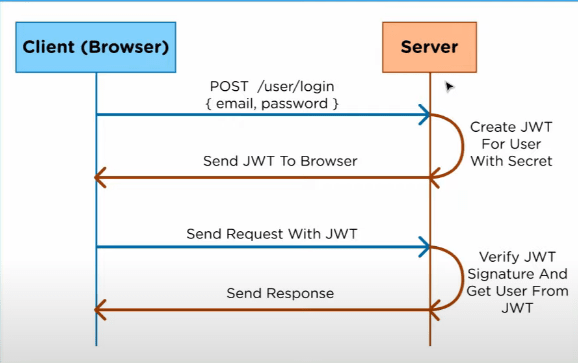
Why JWT?
- All the user state is stored on the client-side, so there is no load on the server.
- It supports multiple servers by just passing the secret to multiple servers for verification.
Implementation using AccessToken and RefreshToken
-
RefreshTokenis used to generate newAccessTokenwhen it expires.AccessTokencontains the user state or information andRefreshToken. - When user logs in, server creates
AccessTokenandRefreshTokenstores the userId or something which when unsigns by someone, the person would not understand the context, and it returns response to the client. UsuallyAccessTokenexpires after a short time andRefreshTokenafter a long time.
router.post('/signin', async (req, res) => {
  try {
    const user = await req.body;
    const { email, password } = user;
    const userEmail = email;

    await User.findOne({ email: userEmail })
      .exec((err, user) => {
        if (err || user === null) {
          return res.status(400).json({
            message: "user does not exists!",
          });
        } else if (!user.authenticate(password)) {
          return res.status(401).json({
            message: "please enter the correct password!",
          });
        }
        const accessToken = jwt.sign(
          { user },
          process.env.ACCESS_TOKEN_SECRET,
          {
            expiresIn: "15m",
          }
        );
        const refreshToken = jwt.sign(
          { userId: user._id },
          process.env.REFRESH_TOKEN_SECRET,
          {
            expiresIn: "7d",
          }
        );
        res.json({ user, accessToken, refreshToken });
      });
  } catch (error) {
    res.status(400).json({
      message: error.message,
    });
  }
})
- Then we can make a middleware for the verification of the token and put it in any route for authorization.
exports.authorizeToken = async (req, res, next) => {
  if (
    !req.headers["authorization"] &&
    typeof req.headers["authorization"] !== "string"
  ) {
    return res.status(401).json({
      message: "No tokens found",
    });
  }

  try {
    const accessToken = req.headers["authorization"].split(" ")[1];
    const { user } = jwt.verify(accessToken, process.env.ACCESS_TOKEN_SECRET);
    req.user = user;
    return next();
  } catch (error) {
    res.status(401).json({
      message: "token cannot be verified! please check it again.",
    });
  }
};
- Before
accessTokengets expire, we generate anotheraccessTokenin server from therefreshTokenwe got from the client's request. Then we send both the tokens to the client.
router.post('/token/access', (req, res) => {
  if (
    !req.headers["refresh-token"] &&
    typeof req.headers["refresh-token"] !== "string"
  ) {
    return res.status(401).json({
      message: "No refresh tokens found",
    });
  }

  try {
    const oldRefreshToken = req.headers["refresh-token"].split(" ")[1];
    const { userId } = jwt.verify(
      oldRefreshToken,
      process.env.REFRESH_TOKEN_SECRET
    );
    const refreshToken = jwt.sign(
      { userId: userId },
      process.env.REFRESH_TOKEN_SECRET,
      {
        expiresIn: "7d",
      }
    );
    const accessToken = jwt.sign(
      { user },
      process.env.ACCESS_TOKEN_SECRET,
      {
        expiresIn: "15m",
      }
    );
    res.json({ accessToken, refreshToken });
  } catch (error) {
    res.status(401).json({
      message: "refresh token cannot be verified! please check it again.",
    });
  }
})
- The
refreshTokenis generally stored in thelocalStorageof the browser and theaccessTokenis stored in the headers of the API requests.
Voila! your app is now secured with the authentication and authorization.
Hope you find this useful.
references
cover image : https://jwt.io/
youtube: https://www.youtube.com/watch?v=7Q17ubqLfaM&t=332s

Top comments (0)