Hello, guys today, I'll be showing you how to create a Contact Form that allows users to submit and you receive a mail directly to Email Account
Installing dependencies
Before we start you need to have Expressjs and Nodejs installed on your computer. Well if you don't have it here's how you install them:
For Expressjs use this command from your terminal
$ npm install express --save
For Nodejs use this command:
$ npm install npm -g
Did you get them installed correctly? Awesome!
Now that you have it installed, open your project directory if you already have it or create one to start building. Once done, you'll need to initialize your package.json using this:
$ npm init -y
Creating server.js
Once done, we'll create a file called server.js. This is where we'll be writing most of our codes for this application. You can create it from the terminal using:
$ touch server.js
Once you have this created. We'll need to install and save express nodemailer nodemailer-mailgun-transport:
$ npm install express nodemailer nodemailer-mailgun-transport -S
while the capital 'S' is saving the packages as a dependency. Once you're done installing them then next is to start working now.
On the server.js we're going to configure our route to render HTML files. More so, we'll be taking it bit by bit. Okay let's start
Place this code on your server.js
const express = require('express');

const log = console.log;
const app = express();
const path = required('path');
const PORT = 8080;

router.get('/', function(req, res) {
    res.sendFile(path.join(__dirname, 'views', 'index.html'));
    //__dirname : It will resolve to your project folder.
});

app.listen(PORT, () => log('Server is starting on PORT,', 8080));
Before we continue we need to create a folder where our HTML files are going to be. Feel free to call it anything. For me, I'll it views*
$ mkdir views

$ touch views/index.html
Creating a simple HTML page named 'index.html'
We'll be creating a very simple HTML file called index.html
<!DOCTYPE html>
<html lang="en">
<head>
    <meta charset="UTF-8">
    <meta name="viewport" content="width=device-width, initial-scale=1.0">
    <title>Mailgun App</title>
    <link href="https://stackpath.bootstrapcdn.com/bootstrap/4.5.0/css/bootstrap.min.css" rel="stylesheet" integrity="sha384-9aIt2nRpC12Uk9gS9baDl411NQApFmC26EwAOH8WgZl5MYYxFfc+NcPb1dKGj7Sk" crossorigin="anonymous">
    <style>
        body {
            box-sizing: border-box;
        }

        form {
            /* margin: 10%; */
            width: 400px;
            /* margin: 10% 40%; */
        }

        .container {
            margin: 10% 30%;
        }

        textarea {
            height: 300px;
        }
    </style>
</head>
<body>
    <div class="container">
Please send your request
        <form>
            <div class="form-group">
                <label for="exampleInputEmail1">Email address</label>
                <input type="email" class="form-control" id="email" aria-describedby="emailHelp" placeholder="Enter email">
                <small id="emailHelp" class="form-text text-muted">We'll never share your email with anyone else.</small>
            </div>
            <div class="form-group">
                <label for="exampleInputEmail1">Subject</label>
                <input type="text" class="form-control" id="subject" aria-describedby="emailHelp" placeholder="Subject">
            </div>
            <div class="form-group">
                <label for="exampleInputPassword1">Message</label>
                <textarea class="form-control" id="mesage" placeholder="Message"></textarea>
            </div>
            <button type="submit" class="btn btn-primary">Submit</button>
        </form>
    </div>

    </body>
</html>
More so we'll need to add this script to the body of our index.html for us to be able to capture the user's input. We can simply do this by putting these lines of code:
<!-- already existing HTML codes above -->

<script src="https://stackpath.bootstrapcdn.com/bootstrap/4.5.0/js/bootstrap.bundle.min.js"></script>

<!-- Here is a script where we will be collecting data from the form  -->
    <script>
        $('form').on('submit', (e) => {
            // e.preventDefault();

            const name = $('#name').val().trim();
            const email = $('#from-email').val().trim();
            const subject = $('#subject').val().trim();
            const text = $('#text').val().trim();

            const data = {
                name,
                email,
                subject,
                text
            };

            $.post('/email', data, function() {
                console.log('Server recieved our data');
            });
        });
        // document.getElementById('#form-data').reset();
    </script>
You can start your server.js using:
$ nodemon server.js
and your application will be listening to port: 8080 to access it, go to your browser address bar and type:
localhost:8080
To continue, we need to make sure that our HTML is at least sending data to our server.js in order for us to get those data from our server and be ready to send them over the email address.
To achieve this, on our server.js, we need to configure our Data parsing so that whenever this data comes in we'll be able to post this data. Use the below code to do that inside the server.js
// Configuring our data parsing
app.use(express.urlencoded({
    extend: false
}));
app.use(express.json());
We'll also be creating an app post which will be receiving data from our client. It'll be called email. This is where we'll be configuring the email sending. But for now, we'll be sending a dummy email just make sure that things are in order before pushing real emails. Just below the code above in the server.js, we'll be adding this line of code:
app.post('/email', (req, res) => {
    //Send an email here but currently dummy email
    console.log('Data:', req.body);
    res.json({message: 'Message received!'})
});
So now, we'll be checking if the program is working. Start the server.js open your browser, before submitting the form open your browser console log then fill and submit the form. you should see Message received! then in your terminal you should see the details you filled in the form. If you're unable to see these, please pause and check your work before moving to the next step.
Creating mail.js
We'll be creating a new file called mail.js, this is where we'll configure everything we need to send our email. Remember the two packages we installed - nodemailer and nodemailer-mailgun-transport?, we'll bring them here and configure it. Create this file outside the views directory:
touch mail.js
Inside it, we'll enter the following lines of code which imports the two packages, then we'll configure authentication for the mailgun with required @params. Don't worry, I'll show you where you can get it.
const nodemailer = require('nodemailer');
const mailGun = require('nodemailer-mailgun-transport');

const auth = {
        auth: {
            api_key: '',
            domain: ''
        }
    };
Then we'll configure our transporter just below the code using the nodemailer and mailGun the calling the auth as the parameter for the mailGun.
const transporter = nodemailer.createTransport(mailGun(auth));
Also, we'll configure our sendMail mailOptions using the id of our input form from the HTML we created
const sendMail = (name, email, subject, text, cb) => {
    const mailOptions = {
        sender: name,
        from: email,
        to: 'recipient@email.com',
        subject: subject,
        text: text
    };

    transporter.sendMail(mailOptions, function(err, data) {
        if (err) {
            cb(err, null);
        } else {
            cb(null, data);
        }
    });

// Exporting the sendmail
module.exports = sendMail;
}
Okay now lets see where to get our email api_keys and the domain from mailGun. Sign up if don't have an account with them.
Once done, on the dashboard page scroll down to the bottom where you'll see sending domain and copy the domain address

On the right-hand side of the page, you'll equally see the API keys Private API key, Public API key, and HTTP WebHook Signing key. In this case, we're only concerned about the Private API Key

Click the eye icon to reveal the hidden key and copy it

Once you get these, place them in the auth object:
const nodemailer = require('nodemailer');
const mailGun = require('nodemailer-mailgun-transport');

const auth = {
        auth: {
            api_key: 'xxxxxxxxxxxxxxx',
            domain: 'sandboxxxxxxxxxxxxx.mailgun.org'
        }
    };
One more thing we need to do on the mailgun site is to authorize the receiving email. failure to do this, you won't be able to receive the submitted form to your email address.
To do this, go back to the sandbox domain address and click on the domain link it'll open another page where you'll invite a recipient email
Authorize a recipient by typing the email address and click invite.
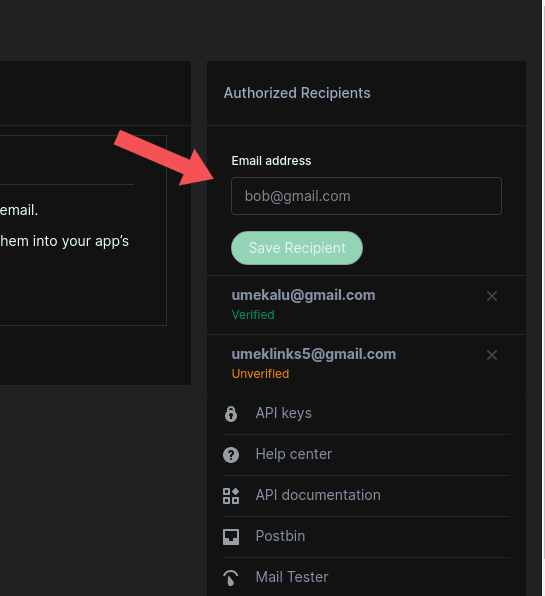
Once done, the recipient receives a validation email for authentication and once validated the recipient is ready to receive emails from the submit form if the email address is placed on the to: of the sendMail mailOptions
One last thing we'll do is to call the sendMail function in our server.js for us to be able to use it.
So the full code for our server.js is now going to be like this:
const express = require('express');
const sendMail = require('./mail');
const log = console.log;
const app = express();
const path = required('path');
const router = express.Router();
const PORT = 8080;

// Configuring our data parsing
app.use(express.urlencoded({
    extend: false
}));
app.use(express.json());

app.post('/email', (req, res) => {
    // res.sendFile(path.join(__dirname + '/contact-us.html'));
    //TODO
    //send email here
    const { name, subject, email, text } = req.body;
    console.log('Data: ', req.body);

    sendMail(name, email, subject, text, function(err, data) {
        if (err) {
            res.status(500).json({ message: 'Internal Error' });
        } else {
            res.status({ message: 'Email sent!!!' });
        }
    });
    // res.json({ message: 'Message received!!!' })
});

router.get('/', function(req, res) {
    res.sendFile(path.join(__dirname, 'views', 'index.html'));
    //__dirname : It will resolve to your project folder.
});

app.listen(PORT, () => log('Server is starting on PORT,', 8080));
Our HTML full code
<!DOCTYPE html>
<html lang="en">

<head>
    <meta charset="UTF-8">
    <meta name="viewport" content="width=device-width, initial-scale=1.0">
    <title>Mailgun App</title>
    <link href="https://stackpath.bootstrapcdn.com/bootstrap/4.5.0/css/bootstrap.min.css" rel="stylesheet" integrity="sha384-9aIt2nRpC12Uk9gS9baDl411NQApFmC26EwAOH8WgZl5MYYxFfc+NcPb1dKGj7Sk" crossorigin="anonymous">
    <style>
        body {
            box-sizing: border-box;
        }

        form {
            /* margin: 10%; */
            width: 400px;
            /* margin: 10% 40%; */
        }

        .container {
            margin: 10% 30%;
        }

        textarea {
            height: 300px;
        }
    </style>
</head>

<body>
    <div class="container">
        <form>
            <div class="form-group">
                <label for="exampleInputEmail1">Email address</label>
                <input type="email" class="form-control" id="email" aria-describedby="emailHelp" placeholder="Enter email" required>
                <small id="emailHelp" class="form-text text-muted">We'll never share your email with anyone else.</small>
            </div>
            <div class="form-group">
                <label for="exampleInputEmail1">Subject</label>
                <input type="text" class="form-control" id="subject" aria-describedby="emailHelp" placeholder="Subject" required>
            </div>
            <div class="form-group">
                <label for="exampleInputPassword1">Message</label>
                <textarea class="form-control" id="text" placeholder="Message" required></textarea>
            </div>
            <button type="submit" class="btn btn-primary">Submit</button>
        </form>
    </div>

    <!--  -->
    <script src="https://stackpath.bootstrapcdn.com/bootstrap/4.5.0/js/bootstrap.bundle.min.js"></script>

    <!-- Here is a script where we will be collecting data from the form  -->
    <script>
        $('form').on('submit', (e) => {
            // e.preventDefault();

            const name = $('#name').val().trim();
            const email = $('#from-email').val().trim();
            const subject = $('#subject').val().trim();
            const text = $('#text').val().trim();

            const data = {
                name,
                email,
                subject,
                text
            };

            $.post('/email', data, function() {
                console.log('Server recieved our data');


            });
        });
        // document.getElementById('#form-data').reset();
    </script>

</body>

</html>
Our mail.js full code:
const nodemailer = require('nodemailer');
const mailGun = require('nodemailer-mailgun-transport');

const auth = {
    auth: {
        api_key: 'put-your-API-key',
        domain: 'put-your-sand-box-domain-from-mailgun'
    }
};

const transporter = nodemailer.createTransport(mailGun(auth));

const sendMail = (name, email, subject, text, cb) => {
    const mailOptions = {
        sender: name,
        from: email,
        to: 'umekalu@gmail.com',
        subject: subject,
        text: text
    };
    transporter.sendMail(mailOptions, function(err, data) {
        if (err) {
            cb(err, null);
        } else {
            cb(null, data);
        }
    });
}

// Exporting the sendmail
module.exports = sendMail;
Now start your server to test your application
$ nodemon server.js
Thanks a lot for your time. Please feel free to drop your comments and also follow for more updates.

Top comments (12)
I tried this but I keep getting the internal error message. I think this is as a result of mailgun's rules whereby unless my credit card details are provided I won't be able to access their services and frankly Nigeria don't do credit cards so I can't access it.
Your debit card should work. Perhaps, you won't be charged unless you use up your free trial. Make sure you have the right mailgun domain and apiKey.
Oh, I stay in Nigeria too.
afaik, you need to export after the bracket
const sendMail = (name, email, subject, text, cb) => {
const mailOptions = {
sender: name,
from: email,
to: 'recipient@email.com',
subject: subject,
text: text
};
}
// Exporting the sendmail
module.exports = sendMail;
You're right but I already have those included inside the mailOptions.
Any reason why mailgun is been used? Is there any difference using the mailgun with nodemailer and sending emails without mailgun with just nodemailer alone? Thanks.
The big deal here is SMTP protocol and Mailgun API.
Nodemailer provides a standard interface for sending both text and HTML-based emails.
Based on the
mailgun-js moduleand thenodemailer module, the Mailgun Transport was born. This is a transport layer, meaning it will allow you to send emails using nodemailer, using the Mailgun API instead of the SMTP protocol!Nodemailer allows you to write code once and then swap out the transport so you can use different accounts on different providers. On top of that, it's a super solid way of sending emails quickly on your node app(s).
The Mailgun transport for nodemailer is great to use when SMTP is blocked on your server or you just prefer the reliability of the web api!
In the full code for server.js, you did
res.status({ message: 'Email sent!!!' });in theelseblock of the sendMail functionYes, that's when no error occurred.
I get one error that is RangeError: Maximum call stack size exceeded error
check your callback functions, something is wrong there. Just the instruction you'll get it working.
not getting mail
Check if your mailGun domain and private key are correct. You also might be missing something. I don't know if you've fixed it by now.