
Purpose of this article
The main purpose of this article is to show you how to deploy your infrastructure using Terraform on Azure DevOps and deploy a sample application on multiple environments.
I've been working on terraform for a while now and as a part of my learning process, thought I should write a blog post to show how to work with terraform on Azure DevOps and deploy an application into multiple environments.
In this post, we'll spin up our infrastructure on Azure by setting up the build & release pipelines and We'll also take a look at what each of the tasks in the build & release pipelines does.
Things you need to follow along
If you would like to do this on your own, following are the prerequisites you need:
- Azure Subscription
- Azure DevOps Account
Assumptions
This blog assumes that you have fair understanding of Azure, Azure DevOps & Terraform. Initially, we'll go through the setup required and then I'll discuss in detail about each of the pipeline steps.
Ok, lets dive right in.
As you may have already known, terraform is one of the infrastructure as code tools that enables us to deploy your landing zones in your respective cloud environments like Azure, AWS, GCP, soon.
Terraform is considered as one of the tools in DevOps toolset.
So, we’ll take a look at how we can deploy our landing zone to different environments using Azure DevOps and deploy a sample application to it.
I’ve taken a Microsoft’s demo application PartsUnlimted and added my terraform code to it.
It also contains the build and release pipeline json files you can import to follow along and replicate the same in your own subscription.
Here are the steps that we’ll do as a part of this our implementation:
- Import the code from my github repo to Azure DevOps
- Setup build pipeline
- Setup release pipeline
- Access the application in Dev
- Deploy the application to PreProd, Prod
- Walk-Through of terraform code, tasks in build & release pipelines
Code import from GitHub & Project Setup
Login to Azure DevOps and create a new project.

Click on ‘Repos’ -> files and import the code. Click on the 3rd option, import


Copy/Paste the following URL in clone URL https://github.com/vivek345388/PartsUnlimited.git and click on import

Once it’s done, it will show that the code is now imported and you will be able to see the repo with code.

In the above folder,
- Infra.Setup folder contains the terraform files that we will be using to deploy our infrastructure.
- Pipeline.Setup folder contains the build &release pipelines json files. Download both the json files from Build Pipeline & Release Pipeline to your local folder

Repeat the same step to download release pipeline json file from the code ReleasePipeline->PartsUnlimitedE2E_Release.json as well to your local folder.
Build Pipeline Setup
Now, let’s setup the build pipeline. Click on pipelines -> pipelines

Click on ‘Import Pipeline’

Click on browse and select the downloaded build Json file.


Once import is successful, you will see below screen where it says some settings needs to attention
For the agent pool, Choose ’Azure Pipelines’

In the agent specification, choose ‘vs2017-win2016’

Click on ‘Save & queue’ to queue a new build.

Choose the defaults and click on ‘save and run’

Once its complete, you should be able to see the pipeline run and its results.

We can also see the published artifacts in the results.

Now this completes the build pipeline setup. Let’s also configure release pipeline.
Release Pipeline Configuration
Click on ‘releases’ and click on 'New pipeline'


Quick Note: At the time of writing this article, we don't have an option to import an existing pipeline from new release pipeline page when you don't have any release pipelines. Hence we have to create a new empty pipeline to get to the screen where we can import the downloaded release pipeline json file.
Choose ‘empty job’ and click on ‘save’


Now, come back to the releases page and click on the releases one more time and choose import pipeline.

Choose release pipeline json that’s downloaded in the beginning.

It would look like below after the pipeline has been imported. Click on ‘Dev’ of the stage to configure the settings.

Quick note: You need to have following tasks installed from Azure Market Place. if you don't have them in your subscription, please get them from here.
Click on ‘Azure cli’ & ‘App service deploy’ tasks and choose the subscription to authorize.
Quick Note: I’m not using service principals/connections here to keep it simple for the purpose of this blog post.


Repeat the same steps for rest of the stages ‘PreProd’ & ‘Prod’. Once you complete all the tasks that needs attention, click on save at the top of the screen to save the pipeline.
Here is how the pipeline should look like after you complete everything.

After you have saved everything, click on ‘Create release’ in above screen.

Click on ‘logs’ option to view the logs for each of the tasks.

After successful deployment to Dev, it would look like this.

Once everything is done, you would see that code is deployed successfully to dev and you can browse the page by accessing the webapp link.
Go to your Azure portal and grab your webapp link and access it.


Back in your Azure DevOps release pipeline, As continuous deployment is enabled, it deploys the code to all the environments one after the other once the deployment is successful.

Now let’s take a minute to examine what each of the files in our Infra.Setup folder does.

I’ve used the concept of modules in terraform to isolate each of the components we are deploying. This is similar to linked templates in ARM templates.
Every terraform file that we author is considered as a module.
In a simple Terraform configuration with only one root module, we create a flat set of resources and use Terraform' s expression syntax to describe the relationships between these resources:
resource "azurerm_app_service_plan" "serviceplan" {
name = var.spName
location = azurerm_resource_group.rg.location
resource_group_name = azurerm_resource_group.rg.name
sku {
tier = var.spTier
size = var.spSKU
}
}
resource "azurerm_app_service" "webapp" {
name = var.webappName
location = azurerm_resource_group.rg.location
resource_group_name = azurerm_resource_group.rg.name
app_service_plan_id = azurerm_app_service_plan.serviceplan.id
}
```
In the above code block, we declare two resources, app service and service plan in a single file. Later, app service is referencing the app service plan in the same file. while this approach is fine for smaller deployments, when the infrastructure grows, it would be challenging to maintain these files.
When we introduce module blocks, our configuration becomes hierarchical rather than flat: each module contains its own set of resources, and possibly its own child modules, which can potentially create a deep, complex tree of resource configurations.
However, in most cases terraform strongly recommend keeping the module tree flat, with only one level of child modules, and use a technique similar to the above of using expressions to describe the relationships between the modules.
```
module "appServicePlan" {
source = "./modules/appServicePlan"
spName = var.spName
region = var.region
rgName = var.rgName
spTier = var.spTier
spSKU = var.spSKU
}
module "webApp" {
source = "./modules/webApp"
name = var.webAppName
rgName = var.rgName
location = var.region
spId = module.appServicePlan.SPID
appinsightskey = module.appInsights.instrumentation_key
}
```
Here you can see that both app service plan and app service are called as modules by main.tf file
> Definition Credits: Terraform.io
#### Benefits of modular based templates
Modules or Linked Templates yields us following benefits:
1. You can reuse the individual components for other deployments.
2. For small to medium solutions, a single template is easier to understand and maintain. You can see all the resources and values in a single file. For advanced scenarios, linked templates enable you to break down the solution into targeted components.
3. You can easily add new resources in a new template and call them via main template.
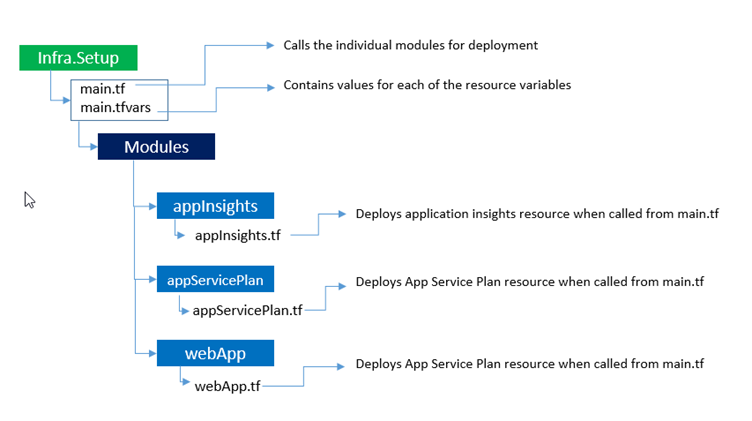
Following are the resources that we deployed as a part of this blog post.
1. App service plan – To host the Webapp
2. App Service – Webapp to host the application.
3. Application insights – To enable monitoring.
Its hierarchy looks like this.
In general when we have a single file for deployments, we pass the variables in the same file or use a .tfvars file to pass the variables.
> Variables are same as Parameters in ARM templates
In the above file structure, each individual template for example: webapp.tf will have its variables that it needs. The values have to be passed to it when this module is called. Remember that each terraform file that we create is considered as a module.
```
variable "name" {}
variable "location" {}
variable "rgName" {}
variable "spId" {}
variable "appinsightskey" {}
resource "azurerm_app_service" "webApp" {
name = var.name
location = var.location
resource_group_name = var.rgName
app_service_plan_id = var.spId
app_settings = {
"APPINSIGHTS_INSTRUMENTATIONKEY" = var.appinsightskey
}
}
resource "azurerm_app_service_slot" "webApp" {
name = "staging"
app_service_name = azurerm_app_service.webApp.name
location = azurerm_app_service.webApp.location
resource_group_name = azurerm_app_service.webApp.resource_group_name
app_service_plan_id = azurerm_app_service.webApp.app_service_plan_id
app_settings = {
"APPINSIGHTS_INSTRUMENTATIONKEY" = var.appinsightskey
}
}
```
Now lets see how the values are passed and modules are called in individual templates.
There are two main files that control the entire deployment.
1. main.tf - Contains the code to call all the individual resources.
2. main.tfvars - Contains variables that are consumed by main.tf file
in the main.tf file, each of the modules will be called as follows:
```
module "appServicePlan" {
source = "./modules/appServicePlan"
spName = var.spName
region = var.region
rgName = var.rgName
spTier = var.spTier
spSKU = var.spSKU
}
module "webApp" {
source = "./modules/webApp"
name = var.webAppName
rgName = var.rgName
location = var.region
spId = module.appServicePlan.SPID
appinsightskey = module.appInsights.instrumentation_key
}
```
the variables are declared in the same file in the variables section.
```
variable "region" {}
variable "rgName" {}
variable "spName" {}
variable "spTier" {}
variable "spSKU" {}
variable "webAppName" {}
variable "appInsightsname" {}
variable "AIlocation" {}
```
The values for above variables will be passed from main.tfvars file.
We use the same templates for deployment to all the environments. so how does Azure DevOps handles deployments to different environments?
We keep place holders `#{placeholdername}#` for each of these values passed in our main.tfvars file.
```
region = #{region}#
rgName = #{ResouceGroupName}#
spName = #{spName}#
spSKU = #{spSKU}#
spTier = #{spTier}#
webAppName = #{webAppName}#
appInsightsname = #{appInsightsname}#
AIlocation = #{AIlocation}#
```
when use the same templates for deploying to multiple environments, We use ‘replace tokens’ task in Azure DevOps and place respective values for each environment. This helps us in choosing different values for each environment.
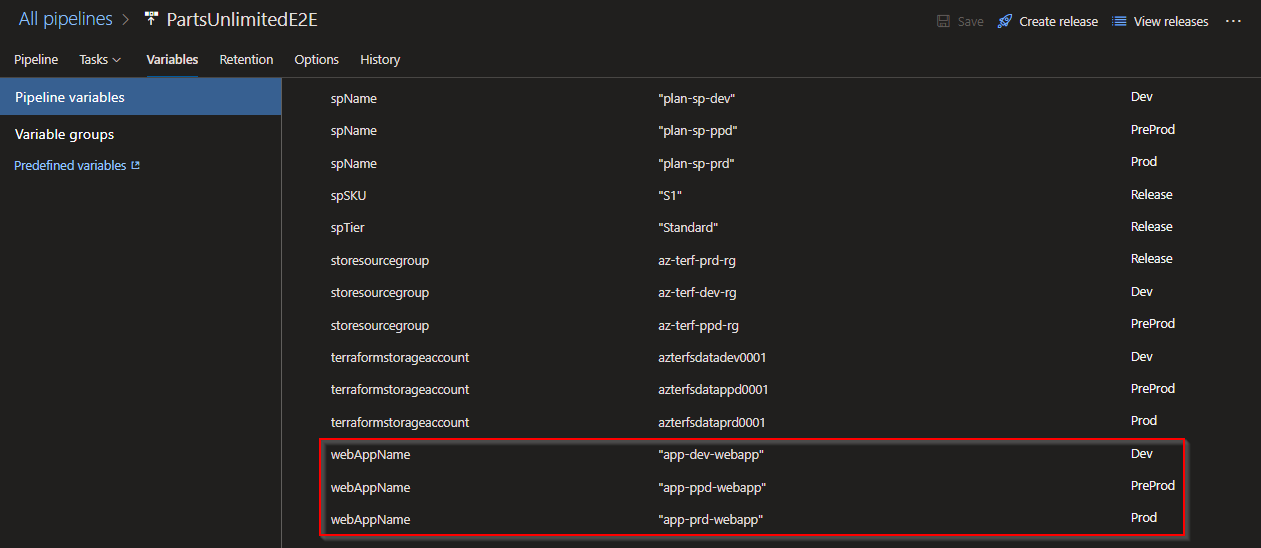
For example, the value for `#{webAppName}#` will be different per environment.
`app-dev-webapp` for dev
`app-ppd-webapp` for preprod
`app-prd-webapp` for prod
While the main.tfvars file has a place holder `#{webAppName}#` for this, we declare the values for it in our variables section of release pipeline
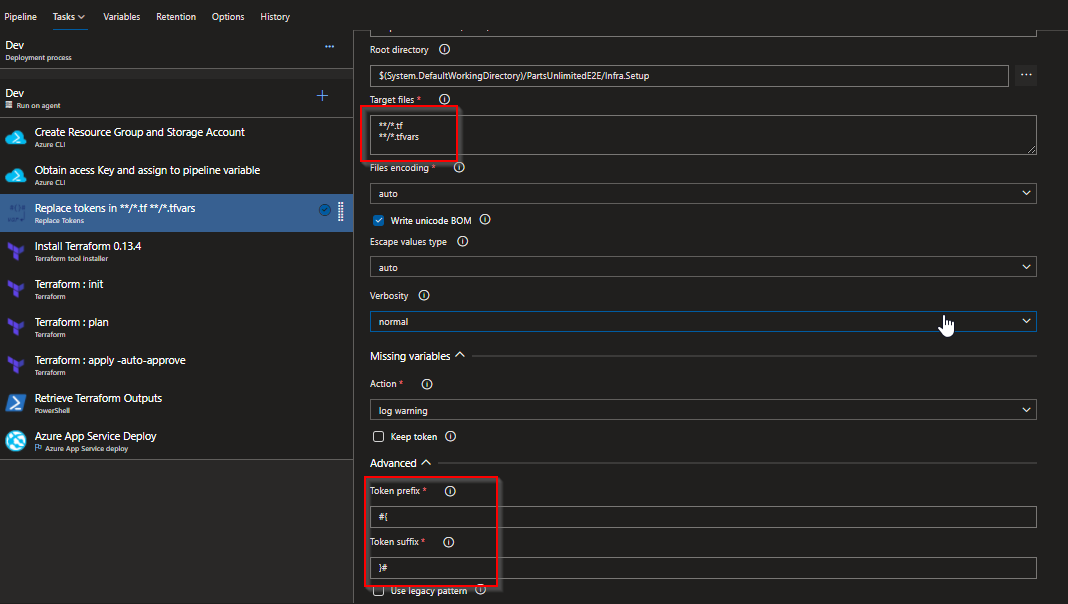
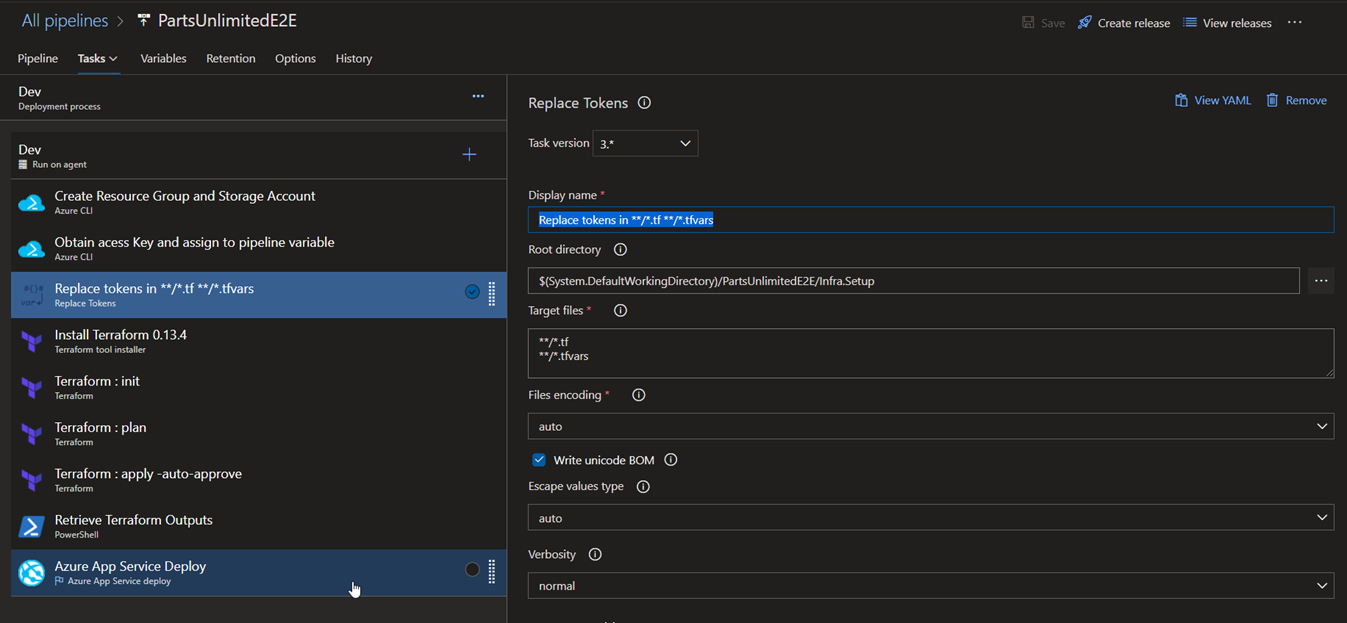
The 'replace tokens' task has an option called token prefix where we can declare the token prefix and suffix for the place holder value in the file we would like to replace in. In the target files, we place the files would like to get targeted for this replacement. Here we gave **/*.tf and **/*.tfvars as the target as these files have the placeholder content.
#### Build Pipeline
Build pipeline is mostly self explanatory as the first couple of tasks complie the application and publish the code.
Take a look at the Publish Artifact: Artifacts, Publish Artifact: Infra.Setup tasks
Publish Artifact: Artifacts : publishes the compiled code to Azure Pipelines for consumption by release pipelines
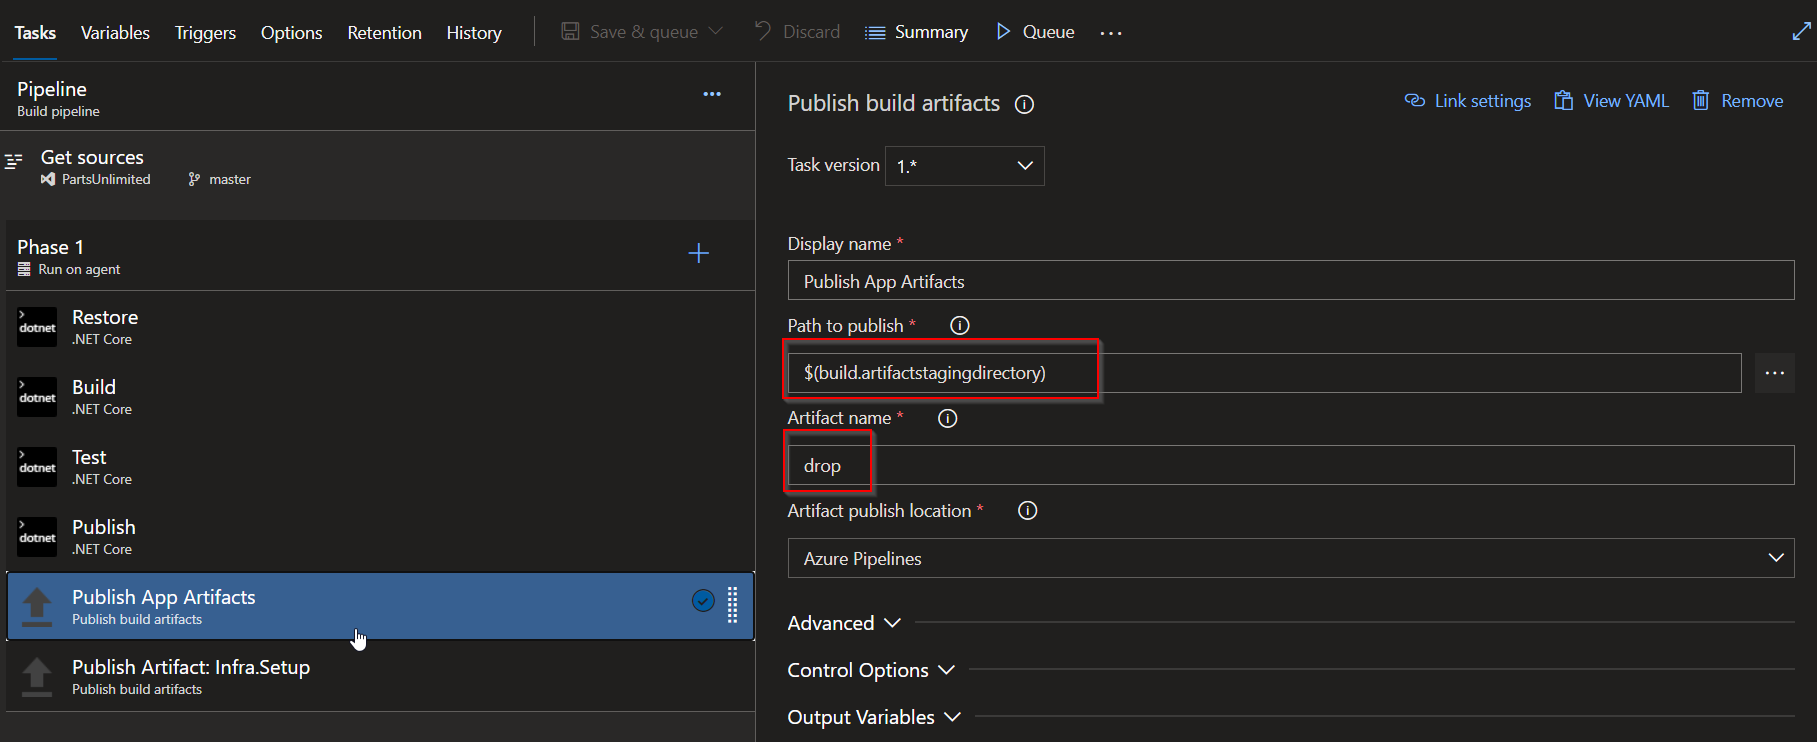
Publish Artifact: Infra.Setup tasks : publishes the terraform templates to Azure Pipelines for consumption by release pipelines. As we dont need to compile them we can directly choose them from the repo as path to publish.

At the end of the build pipeline, it would publish the artifacts as below:

These will be consumed in our release pipeline for deployment.
#### Release Pipeline
You can see that the source artifacts are from our build pipeline.
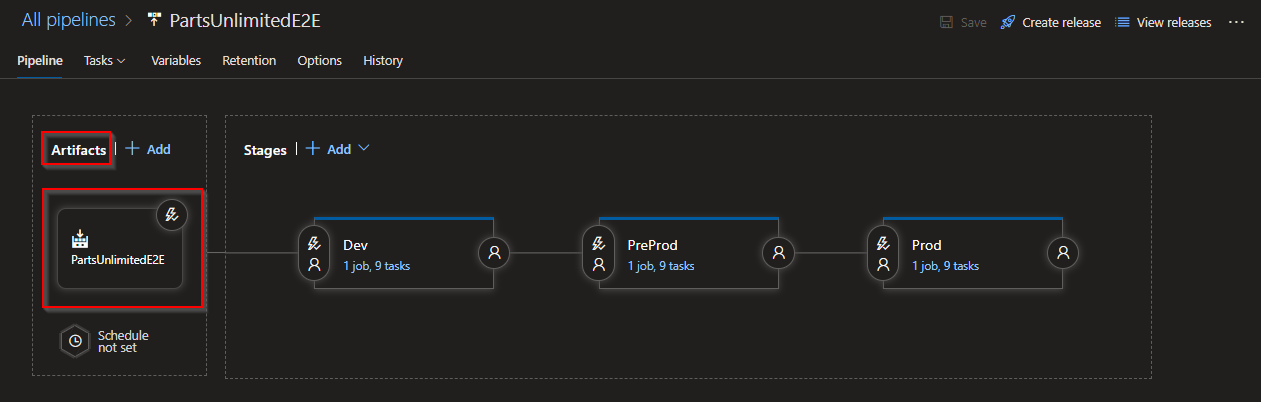
Now lets take a look at each of the release tasks.
1.Create Resource Group and Storage Account: Creates a storage account for storing .tfstate file that terraform stores the configuration of our deployment.

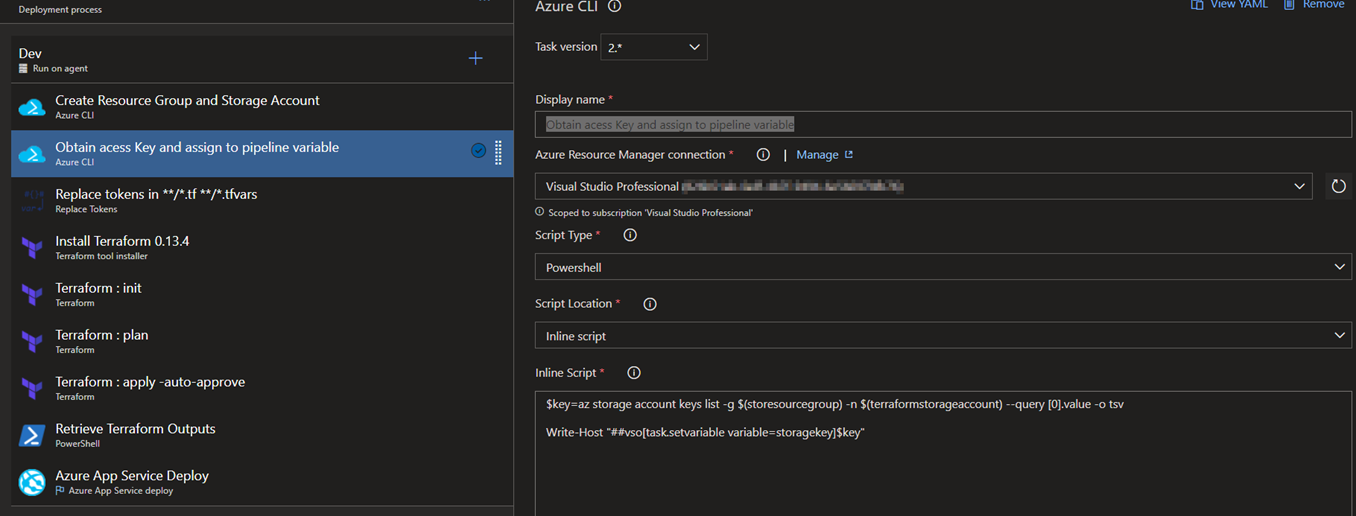
2.Obtain access Key and assign to pipeline variable: Retrieves the storage account key and assigns it to a variable in Azure Pipelines.
3.Replace tokens in **/*.tf **/*.tfvars:
Remember that we have kept place holders to replace the values per environment, this task is responsible for the same. Values for each of the place holders in main.tf file are in variables section of each stage.
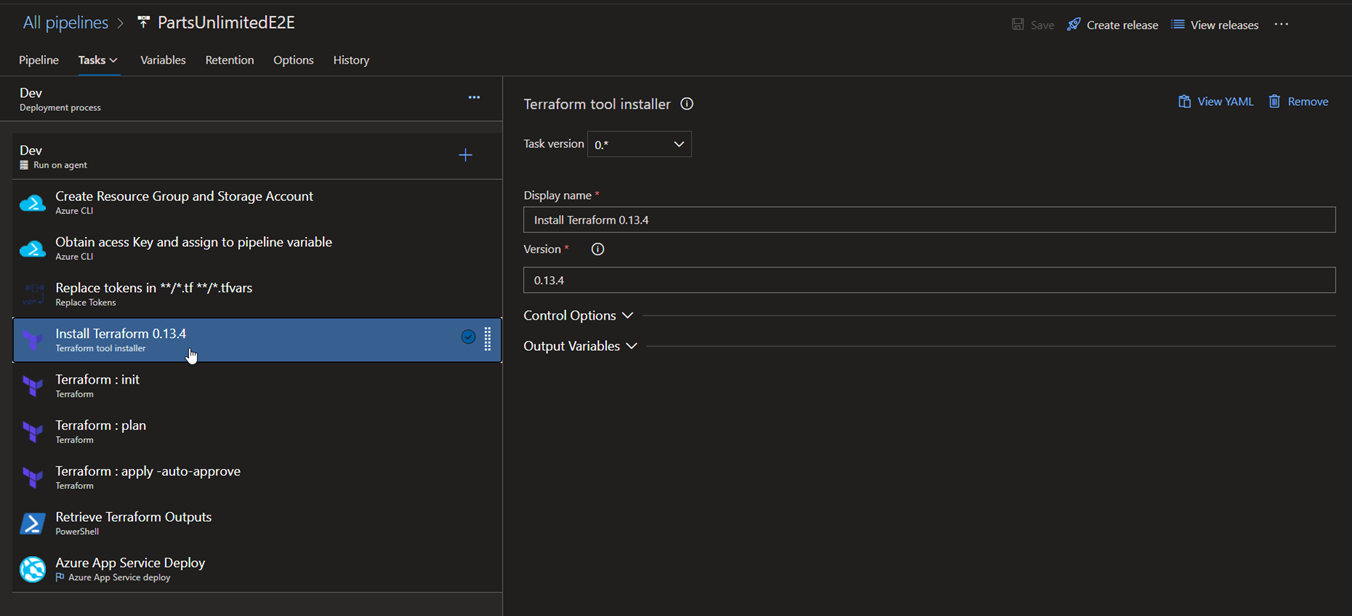
4.Install Terraform 0.13.4: Installs terraform on the release agent.
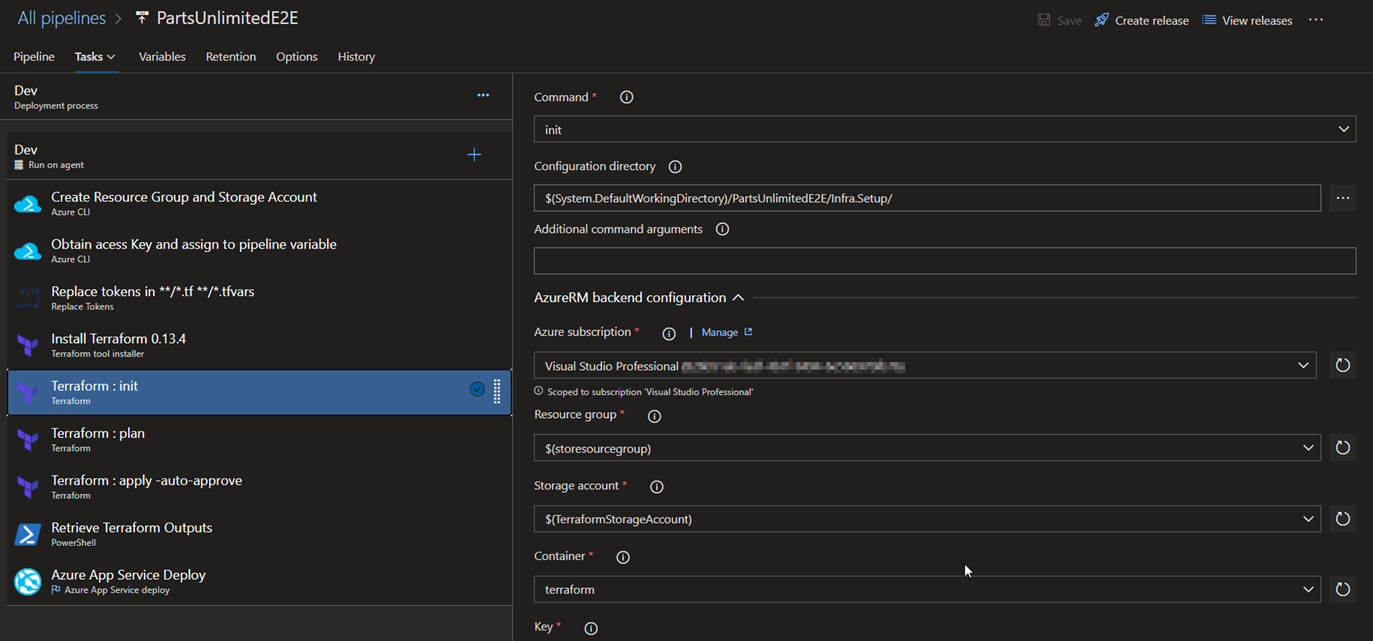
5.Terraform: init : Initializes the terraform configuration and we also have specified the storageaccount resource group and the storage account for it to place the .tfstate file
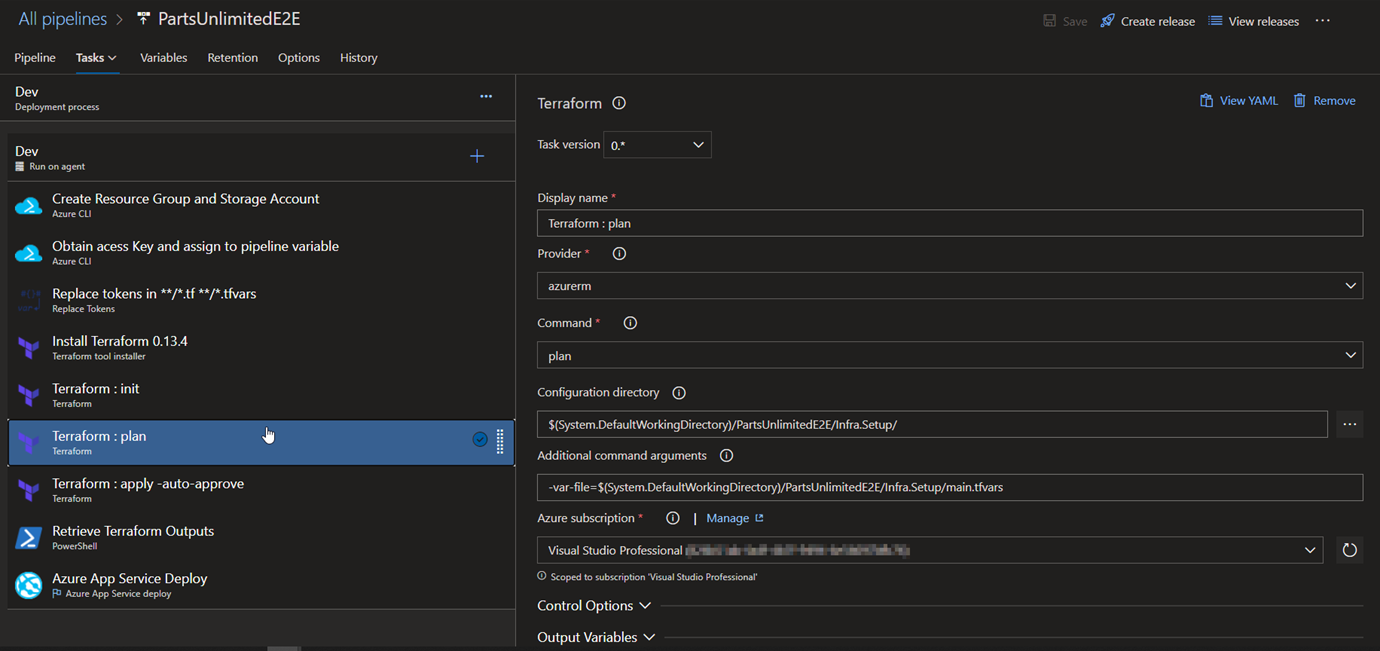
6.Terraform: plan : Runs terraform deployment in dry-run mode
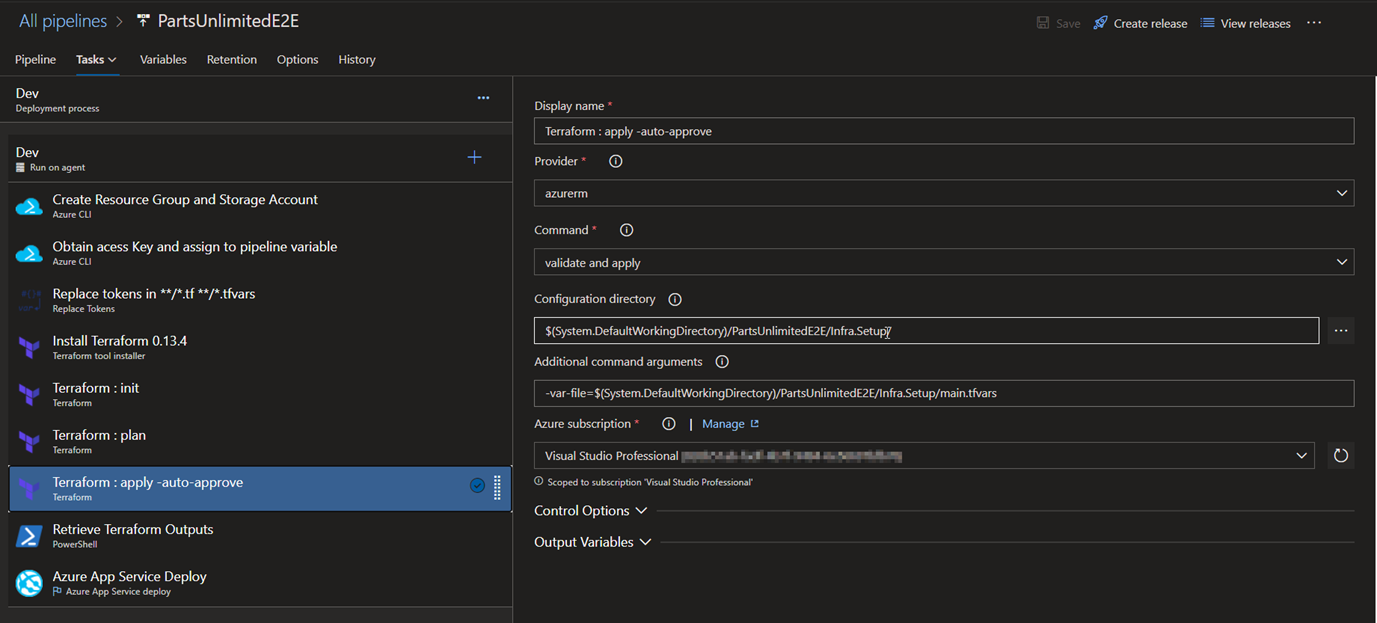
7.Terraform: apply -auto-approve: Applies the configuration based on the dry-run mode in step 6.
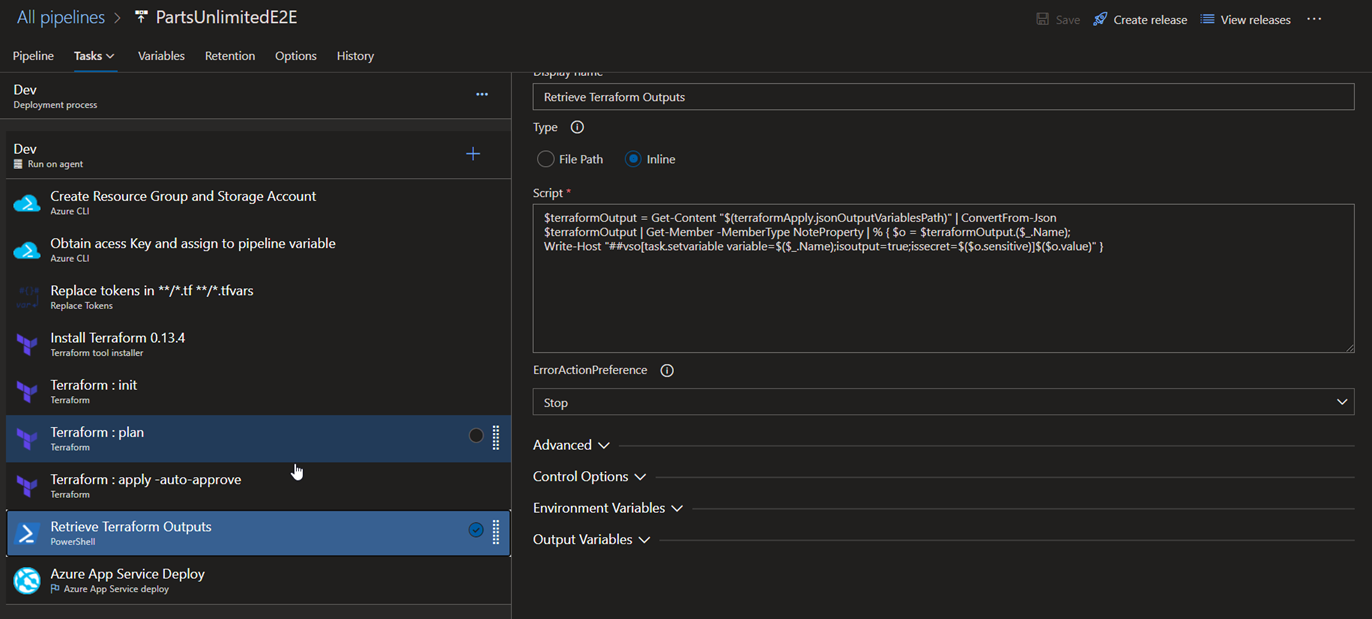
8.Retrieve Terraform Outputs: This task is mainly responsible for retrieving each of the outputs obtained after terraform apply is complete and they are being consumed by the 'App Service Deploy' task. In case of Azure, we have ARM Outputs task readily available for us, here we need to write a small script to get the outputs.
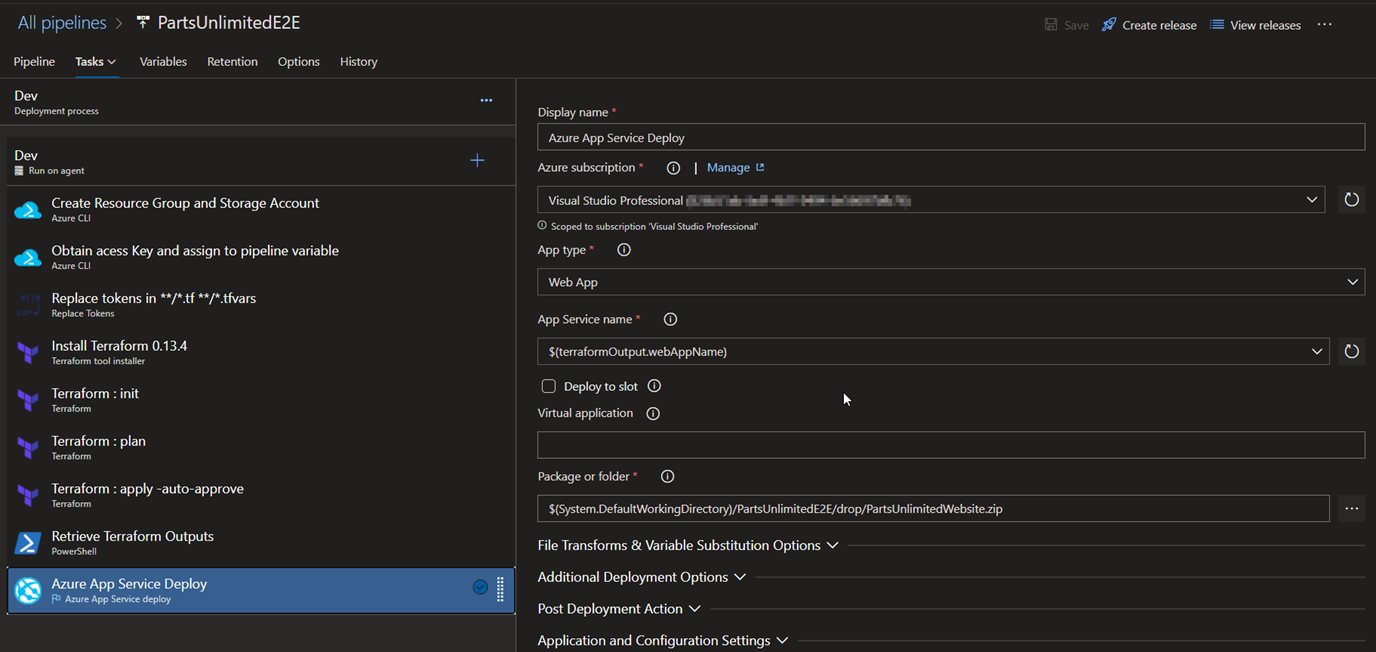
9.Azure App Service Deploy: Deploys the application code into the webapp.
### Conclusion
This brings us to the end of the blog post.
Hope this helps you learn, practice and deploy your infrastructure using Terraform via Azure DevOps!!
Thanks for reading this blog post & Happy Learning..

Top comments (2)
Fantastic. I have one doubt. Can i try this in Azure free subscription? Thanks for sharing
Hi @dev-arjunan, yes you can try this on your Azure Free Subscription