
This is the fourth article in a series of “Getting Started with Nexmo and Node-RED” tutorials.
In the previous tutorials you’ve learnt how to send and receive SMS messages programatically using the Nexmo API and how to handle inbound calls.
Next, you’ll be learning about outbound calls, and by the end of this article, you’ll have made your first text-to-speech (TTS) phone call with Node-RED.
Prerequisites
Before getting started, you’ll need a few things:
- Node.js and Node-RED installed on your machine
- A Nexmo account – create one for free if you haven’t already
- Optional: ngrok – get up to speed with Aaron’s blog post
Getting Your Credentials
In order to interact with the Voice API, you’ll need to make note of a couple of things. Once you’ve created a Nexmo account, go to the dashboard to find your API key and secret.
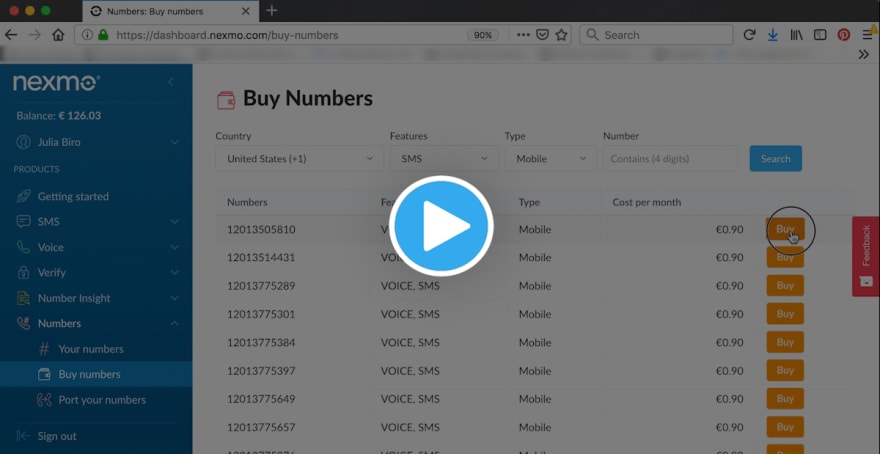
Next, you’ll need a Voice enabled virtual number. Go to Numbers > Buy numbers to get one.
Setting Up Your Node-RED Editor
First, you’ll need to install the runtime and editor. This could be done either on your local machine, on a Single Board Computer (eg Raspberry Pi), or a number of cloud-hosted options. This example will be using your local machine, so once you’ve installed Node-RED globally, just type the command below in your terminal to get started.
$ node-red
You can then access the Node-RED editor by pointing your browser at http://localhost:1880.
Once you have your editor open, you’ll need to install the Nexmo nodes. You can do so under the Manage palette menu, by searching for the node-red-contrib-nexmo package and clicking install.

Now you should see all of the Nexmo nodes appear on the left side of your screen, among the other default nodes.
Make a Text-to-Speech Phone Call with Node-RED
Creating a Nexmo Application
Some of Nexmo’s APIs, including the Voice API, use Nexmo Applications to hold security and config information needed to connect to Nexmo endpoints.
In the Nexmo Node-RED palette, several nodes have the ability to create these applications: getrecording, earmuff, mute, hangup, transfer, createcall, playaudio, playtts and playdtmf.
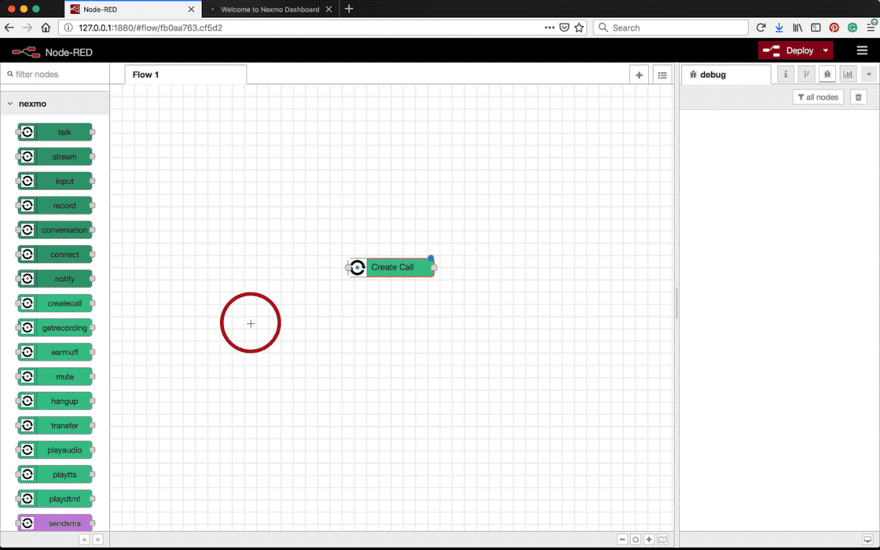
Since the end goal is to make an outbound call, use the createcall node, which will make an outound call using the NCCO created above.
Once you have it in your workspace, double-click on the createcall node to open up the node editor.
Next to the Nexmo Credentials, select “Add new nexmovoiceapp…” from the drop-down menu and click the edit button. Fill in the details below and click Create New Application.
| KEY | DESCRIPTION |
|---|---|
Name |
Choose a name for your Voice Application, for example TTS call Node-RED. |
API Key |
Your Nexmo API key, shown in your account overview. |
API Secret |
Your Nexmo API secret, shown in your account overview. |
Answer URL |
The URL that Nexmo makes a request to when handling inbound calls. Won’t need one for this tutorial, so use http://example.com for now. |
Event URL |
Nexmo will send call events (e.g. ringing, answered) to this URL. If you’d like to receive events about the progress of your call, make sure your server is exposed to the internet, then use YOUR_URL/event for this field. |
Otherwise, feel free to use http://example.com – this will respond with 200 OK.
You could also override this eventURL for a specific createCall node in its node properties. |
Node-RED will then create a new Nexmo Application on your account and fill in the App ID and Private Key fields for you to save. Now you can find this application in your Nexmo Dashboard under Voice > Your Applications.

Build the Nexmo Call Control Object (NCCO)
Nexmo calls are controlled using Nexmo Call Control Objects, also known as NCCOs. An NCCO defines a list of actions to be followed when a call is handled. There are lots of different actions available, find the corresponding nodes under the Nexmo palette in your Node-RED editor or check out the NCCO Reference to find out more about them.
For this tutorial, we’ll be using the talk action.
Once the NCCO is ready, this will be passed on to the createcall node, which will be used to make the outbound call. This createcall node takes 3 types of input for NCCO in the Answer field: JSON, URL or msg.ncco. Depending on which one you choose, there are 3 corresponding ways to build the NCCO, as follows.
msg.ncco
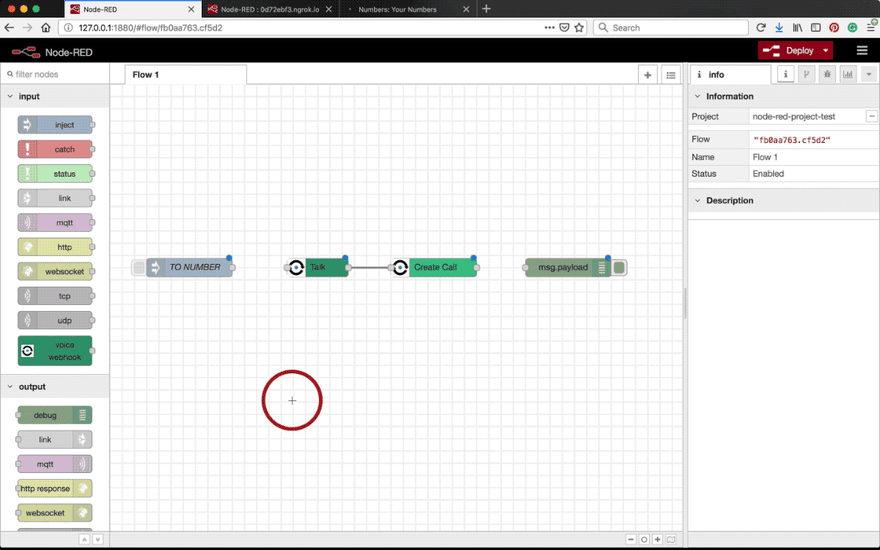
Drag and drop the talk node into your workspace, doule-click on it to open the node properties and set the Text{} field to the message you’d like to be read out when the call is answered. Note the {} sign next to the Text label, indicating that this value can be set dynamically, using Mustache templating. You can also select a Voice Name, see the Text to Speech Guide for the full list of options.
Next, wire talk node’s output into the createcall node, then under the createcall node properties select msg.ncco from the Answer drop-down menu.
JSON
If you’d rather write your NCCO as JSON, instead of using the action nodes, you can do so in the createcall node. Open the node properties and select JSON in the Answer field.
Expand the JSON editor and paste in the snippet below:
[{ "action": "talk", "text": "This is a text to speech message from Nexmo" }]
Make sure you’ve set talk as an action, but feel free to customise the text.

Answer URL
Alternatively, you can serve up the NCCO at an AnswerURL. In this case, you’ll also need to expose your local server to the internet.
Drag and drop the talk node into your workspace, then connect it to a voice webhook input node and a return NCCO output node.
Next, in the voice webhook node, select GET as a method and type something like /answer in the answer URL field.
Finally, go to the talk node properties and set the Text{} field to the message you’d like to be read out when the call is answered. Note the {} sign next to the Text label, indicating that this value can be set dynamically, using Mustache templating.
You can also select a Voice Name, see the Text to Speech Guide for the full list of options.

Exposing your local server to the internet
Next you’ll have to expose your local server to the internet, so that Nexmo can access it. If you’re running Node-RED on a public webserver instead of your local machine, you can skip this stage.
Otherwise, a convenient way to do this is by using a tunneling service like ngrok.
Download and install ngrok , then run it in the terminal to start a tunnel on port 1880.
$ ./ngrok http 1880
Navigate to the URL displayed, to find your Node-RED Editor.

Finally, go to the createcall node properties, select URL from the Answer drop-down, and fill in the field with YOUR_URL/answer.

Making the Outbound Call
Next, let’s have a closer look at the createcall node properties. To actually make the outbound call, you need to fill in a few more details.
First, select Phone from the Endpoint drop-down menu. This will forward the call to a phone number, which you can specify in the text field next to the Number{} label.
Note the {} sign, which means that Mustache templating is supported for these fields. You could hardcode a phone number in here, or pass it in dynamically using an inject node, and in this case, referencing it with {{msg.payload}}.
Moving on to the next step, set one of your virtual numbers as the From{} number.
Add an inject node to the flow and wire it as an input for createcall. In its node properties, select Number from the Payload drop-down menu, and fill in the text field next to it with the phone number you wish to call in E.164 format. For example 447401234567.
To have a bit more insight into what’s happening when you make the call, wire the createcall ‘s output into a debug node.
Now hit Deploy and click the inject node’s button – your phone should be ringing any second now!
Optional: Event Webhook
If you’d like to receive events about the progreess of your call, you can also setup an event webhook.
First, you’ll need to set up an event handler, then expose your local server to the internet.
Setting up a handler for the event URL
Connect a http input node to a http response node, as well as to a debug node, so that you can view your delivery receipt in the debug area.
In the http input node, select POST as a Method and fill in the URL field with something like /event.
The http response node should have 200 set as Status code, but don’t worry about it, this is the default value as well.

Exposing your local server to the internet
Next you’ll have to expose your local server to the internet, so that Nexmo can access it. If you’re running Node-RED on a public webserver, or you’ve opted for serving up the NCCO at an AnswerURL, you can skip this step.
Otherwise, a convenient way to do this is by using a tunneling service like ngrok.
Download and install ngrok , then run it in the terminal to start a tunnel on port 1880.
$ ./ngrok http 1880
Navigate to the URL displayed, to find your Node-RED Editor.
Update the Event URL
Finally, open up the createcall node properties and fill in the Event URL field with YOUR_URL/event.

Hit Deploy and click the inject node’s button – your phone will be ringing any second now! You can now also follow the flow of your call in the debug sidebar.
Where next?
- More about the Voice API
- Check out the NCCO Reference to learn about the many ways to control your call.
- Text to Speech Guide
- How to Receive Phone Calls with Node-RED
- Announcing the Nexmo Node-RED Package
- How to Send SMS Messages with Node-RED
- How to Receive SMS Messages with Node-RED
- Have a closer look at Node-RED
window.addEventListener('DOMContentLoaded', (event) => {
document.querySelectorAll(".gif-player").forEach(image => {
image.src = image.src.replace(/.gif$/g, ".png")
image.addEventListener("click", (event) => {
if (event.target.src.indexOf(".gif") > 0) {
image.src = image.src.replace(/.gif$/g, ".png")
} else {
image.src = image.src.replace(/.png$/g, ".gif")
}
})
})
});
.gif-player {
cursor: pointer;
}
img.alignnone {
border-width: 0px !important;
}
The post How to Make Text-to-Speech Phone Calls with Node-RED appeared first on Nexmo Developer Blog.

Top comments (0)