
This is the first article in a series of “Getting Started with Nexmo and Node-RED” tutorials.
The Nexmo SMS API allows you to send and receive SMS worldwide, using a simple HTTP-based API.
The good news is, interacting with this API—and many others—just got easier with the addition of Nexmo nodes to the Node-RED palette.
In this article, you will learn how to send SMS messages with Node-RED.
Get this flow from the Node-RED Library or follow along.
Prerequisites
Before getting started, you’ll need a few things:
- Node.js and Node-RED installed on your machine
- A Nexmo account – create one for free if you haven’t already
- ngrok – get up to speed with Aaron’s blog post
Getting Your Credentials
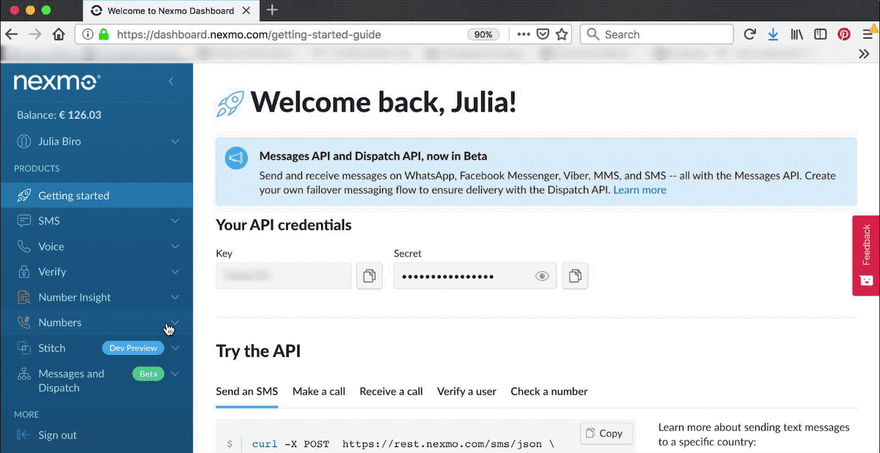
In order to interact with the SMS API, you’ll need to make note of a couple of things. Once you’ve created a Nexmo account, go to the dashboard to find your API key and secret.
Next, you’ll need an SMS enabled virtual number. Go to Numbers > Buy numbers to get it.
While in some countries you can send an SMS without buying a Nexmo Number, other countries like the USA will require you to own the number your SMS messages originate from.
Setting Up Your Node-RED Editor
First, you’ll need to install the runtime and editor. This could be done either on your local machine, on a Single Board Computer (eg Raspberry Pi), or a number of cloud-hosted options. This example will be using your local machine, so once you’ve installed Node-RED globally, just type the command below in your terminal to get started.
$ node-red
You can then access the Node-RED editor by pointing your browser at http://localhost:1880.
Once you have your editor open, you’ll need to install the Nexmo nodes. You can do so under the Manage palette menu, by searching for the node-red-contrib-nexmo package and clicking install.
Now you should see all of the Nexmo nodes appear on the left side of your screen, among the other default nodes.
Sending an SMS with Node-RED
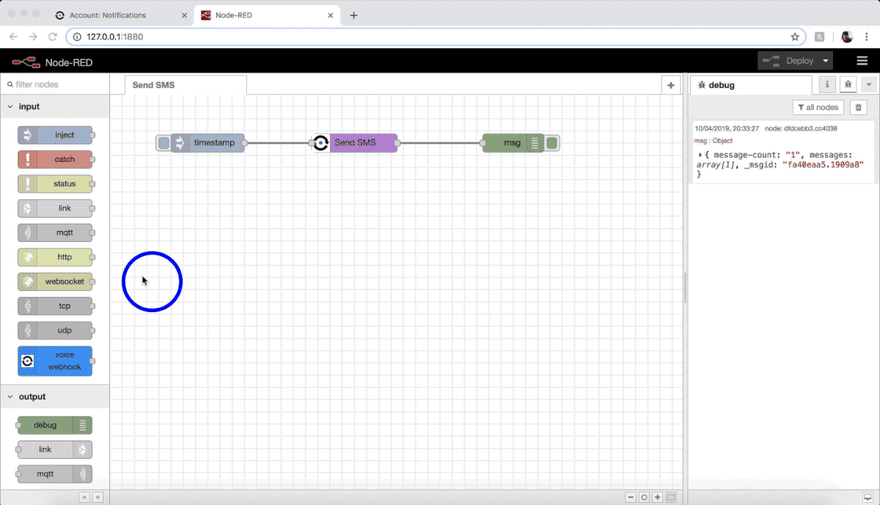
Scroll down to the sendsms node and drag it into your workspace. This will do the heavy lifting in today’s tutorial.
You can set up this node by double clicking on it and filling in the parameters below. You’ll find API KEY and API SECRET by clicking on the edit button next to Nexmo Credentials.
| KEY | DESCRIPTION |
|---|---|
API KEY |
Your Nexmo API key, shown in your account overview. |
API SECRET |
Your Nexmo API secret, shown in your account overview. |
TO |
The number you are sending the SMS to in E.164 format. For example 447401234567. |
FROM |
The number or text shown on a handset when it displays your message. You can set a custom alphanumeric FROM to better represent your brand, if this feature is supported in your country. |
TEXT |
The content of your message. Feel free to get creative, but a ‘Hello World!’ will do just as well. |
Next, add an inject node to the flow and wire it as an input for sendsms.
This is quite a powerful one, it can initiate the flow with a specific payload value. It supports injecting strings, numbers, booleans, JavaScript objects, or flow/global context values, having the timestamp of the current time in millisecs since January 1st, 1970 as default.
You could simply use it to set off your flow, while hardcoding all parameters in the sendsms node, or you could take it a step further.
Next to the TO,FROM and TEXT parameters there is a {} sign, which means that Mustache templating is supported for those fields. This comes in handy when passing certain values dynamically to the sendsms node.
Knowing that the timestamp is injected, let’s add this value to the message text by referencing {{msg.payload}} , for example:
Hello World! The timestamp is `{{msg.payload}}`.
To have a bit more insight into what’s happening when you send an SMS, wire the sendsms ‘ output into a debug node. Double click on it and set the Output to complete msg object.
Hit Deploy and click the inject node’s button – your SMS should be on its way!

When you make a successful request to the SMS API, it returns an array of message objects. Ideally each of these have a status of 0, indicating that your message has successfully been scheduled for sending, and a few other details like recipient number, message-id, remaining balance, price and the carrier network that will be used for sending the SMS.
You can have a look at this response object in the debug area in the right side of your Node-RED editor.
While inspecting this output is quite helpful in determining what the Nexmo SMS API did, there is no guarantee that the message reached the recipient’s handset.
When the message gets delivered, the mobile phone carrier returns a Delivery Receipt to Nexmo. This will contain the delivery status.
Receiving a Delivery Receipt from a Mobile Carrier
To find out the status of your outbound message, you’ll need to set up a webhook endpoint that Nexmo can forward the Delivery Receipt to.
Defining a Webhook Endpoint
First, connect a http input node to a http response node, as well as to a debug node, so that you can view your delivery receipt in the debug area.
In the http input node, select POST as a Method and fill in the URL field with something like /receipt.
The http response node should have 200 set as Status code, but don’t worry about it, this is the default value as well.
Exposing Your Local Server to the Internet
Next you’ll have to expose your local server to the internet, so that Nexmo can access it. A convenient way to do this is by using a tunneling service like ngrok.
Download and install ngrok , then run it in the terminal to start a tunnel on port 1880.
$ ./ngrok http 1880
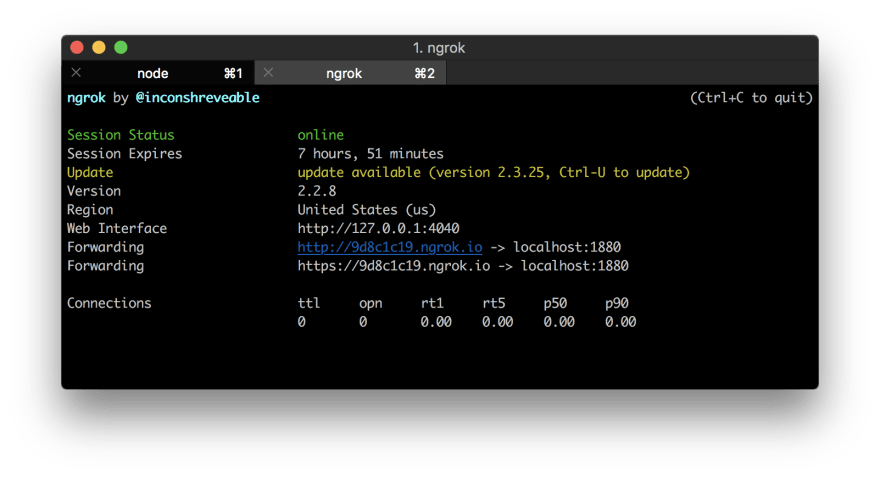
Your local server now has a ngrok URL that can be used as your webhook endpoint.
Setting Up the Endpoint with Nexmo
The last step is letting the Nexmo SMS API know where it should forward the delivery receipts. You can do so under your API settings in the Default SMS Setting section.
Set the default webhook URL for delivery receipts to YOUR_NGROK_URL/receipt, then Save changes.

Now when you go back into your Node-RED editor and send another message, you’ll see the delivery receipt appear in the debug area:

The status and err-code parameters both indicate that the message has successfully been delivered. Learn more about delivery receipt status messages and error codes in the Nexmo docs.
Resources
- Announcing the Nexmo Node-RED Package
- Learn more about the Nexmo SMS API
- Get a better understanding of delivery receipts
- Have a closer look at Node-RED

Top comments (0)