
An IVR or Interactive Voice Response is a menu of options presented to a caller. They then navigate that menu using the numbers on their keypad to send DTMF (Dual Tone Multi-Frequency) signals.
Each option on the IVR can direct the call to a different path, for example forwarding the call to a specific destination, playing a recorded piece of information or even triggering another service such as an SMS.
IVRs are the fundamental navigation method of Voice Call applications. They can have multiple levels, where the selection of one option presents the user with more options, and this can go on to an infinite depth!
For this tutorial we will just create a single level IVR with three possible paths:
- Forward the call to a specific number
- Send caller to voicemail
- Send the caller an SMS
Dependencies
Prerequisites
Before getting started, you’ll need a few things:
- Node.js and Node-RED installed if you’re developing locally
- A Nexmo account — create one for free if you haven’t already
- A way to expose your server to the internet. This either means you’re running a hosted version of Node-RED or using a tunneling service like ngrok – get up to speed with this Getting Started with Ngrok in Node-RED tutorial
Getting Your Credentials
To use the Nexmo nodes in Node-RED you’ll have to provide your credentials, so it’s best to keep them handy. Go to your dashboard to find your API key and secret and make a note of them.
Next, you’ll need a voice-enabled virtual number. Go to Numbers > Buy numbers to get one.

Setting Up Your Node-RED Editor
Access your Node-RED editor by pointing your browser at http://localhost:1880.
Once you have the editor open, you’ll need to install the Nexmo nodes, the Ngrok node(if not using a hosted version of Node-RED) and the default Email node. You can do so under the Manage palette menu, by searching for the corresponding packages and clicking install:
- Nexmo:
node-red-contrib-nexmo - Ngrok:
node-red-contrib-ngrok - Email:
node-red-node-email
After restarting Node-RED, you should see all of these nodes appear on the left side of your screen – in your node palette, among other default nodes.
Expose Your Local Server to the Internet
In case you’re not using a hosted version of Node-RED, the Nexmo Voice API will need another way to access your webhook endpoints, so let’s make your local server accessible over the public internet. If you’re running Node-RED on a public webserver instead of your local machine, you’re all set and ready to move on to the [Create a Nexmo Voice Application] step.
A convenient way to do this is by using a tunneling service like ngrok, and there is a node for it that you’ve just added to your palette.
It takes the strings on and off as input to start/stop the tunnel, and outputs the ngrok host address as the msg.payload. Check out our tutorial on Getting Started with Ngrok in Node-RED to find out more.
Import from Clipboard the snippet below, then open up the ngrok node properties and specify the port number (1880 for Node-RED) and the Region.
[{ "id": "faed0f7.1e524f", "type": "inject", "z": "5b8bbfc3.1a9f18", "name": "", "topic": "", "payload": "on", "payloadType": "str", "repeat": "", "crontab": "", "once": false, "onceDelay": 0.1, "x": 190, "y": 100, "wires": [ [ "8a01baeb.6756d"] ] }, { "id": "11051fa9.75bd1", "type": "inject", "z": "5b8bbfc3.1a9f18", "name": "", "topic": "", "payload": "off", "payloadType": "str", "repeat": "", "crontab": "", "once": false, "onceDelay": 0.1, "x": 190, "y": 160, "wires": [[ "8a01baeb.6756d"] ] }, { "id": "8a01baeb.6756d", "type": "ngrok", "z": "5b8bbfc3.1a9f18", "port": "1880", "creds": "5a9e2b8c.173a2c", "region": "ap", "subdomain": "", "name": "", "x": 400, "y": 140, "wires": [[ "93fd5675.743c1"] ] }, { "id": "93fd5675.743c1", "type": "debug", "z": "5b8bbfc3.1a9f18", "name": "", "active": true, "tosidebar": true, "console": false, "tostatus": false, "complete": "false", "x": 620, "y": 140, "wires": [] }, { "id": "5a9e2b8c.173a2c", "type": "ngrokauth", "z": "" }]
Hit Deploy and click on the on inject node’s button, then navigate to the URL displayed in the debug area (YOUR_URL for future reference) to find your Node-RED editor at a public address.

Create a Nexmo Voice Application
The Nexmo Voice API uses Nexmo Applications to hold security and config information needed to connect to Nexmo endpoints.
In the Nexmo Node-RED palette, several nodes have the capability to create these applications: getrecording, earmuff, mute, hangup, transfer, createcall, playaudio, playtts and playdtmf.
Drag any of these nodes into your workspace, then double-click on it to open up the node properties.
Next to the Nexmo Credentials, select “Add new nexmovoiceapp…” from the drop-down menu and click the edit button. Fill in the details below and click Create New Application.
| KEY | DESCRIPTION |
|---|---|
Name |
Choose a name for your Voice Application, for example, “Nexmo Voice Application”. |
API Key |
Your Nexmo API key, shown in your account overview. |
API Secret |
Your Nexmo API secret, shown in your account overview. |
Answer URL |
YOUR_URL/answer, you’ll be hosting a Nexmo Call Control Object (NCCO) here. – more about this later on. |
Event URL |
YOUR_URL/event, you’ll need to reference this when setting up the event handler. |
Node-RED will then create a new Nexmo Application on your account and fill in the App ID and Private Key fields. After this step, feel free to delete the Nexmo node you used, as a nexmovoiceapp config node has been created, and that contains all the Nexmo credentials this flow needs.

Set up a Number to Call
Next, you’ll have to link your virtual number to this application.
Find the Voice Application you’ve just created in your Nexmo Dashboard by navigating to Voice > Your Applications.
Click on the name of this application, then under the Numbers tab click on the Link button next to the virtual number you’ve rented earlier.
In case the number you’d like to use is already linked to another app, click on Manage number and configure it to forward incoming calls to your app.

Bonus tip: Use a comment node to take note of the Nexmo number linked to your application, this way you always have it handy.
Log Call Events
While building flows, it’s quite useful to see your call events in the debug area and have a better understanding of what’s really going on, so let’s add an event webhook! This will also help debugging later on, if needed.
Connect an http in node to an http response node, as well as to a debug node, so that you can view your call events in the debug sidebar.
In the http in node, select POST as a Method and fill in the URL field with /event.
The http response node should have 200 set as Status code, but don’t worry about it, this is the default value as well.

Handle Inbound Calls
When you receive an inbound call to your virtual number, the Nexmo Voice API makes a GET request to an endpoint you define, YOUR_URL/answer, and expects a set of instructions on how to handle the call.
First, let’s implement this endpoint.
Define the Webhook Endpoint for Inbound Calls
Add a voice webhook and a return ncco node to your workspace, and wire them together to define a webhook endpoint.
Next, open up the voice webhook node properties, select GET as a Method and type /answer in the URL field, then press Deploy.

Great! Now you have a webhook that returns an NCCO to Nexmo’s API. At this point it doesn’t contain any instructions, so let’s add some!
Build the Nexmo Call Control Object (NCCO)
The instructions expected by the Nexmo API come in the form of a Nexmo Call Control Object, also known as NCCO.
There are lots of different actions available, find the corresponding dark green nodes under the Nexmo palette in your Node-RED editor or check out the NCCO Reference to find out more about them.
In this case, you’ll probably want to greet the caller and explain the different routes they could take, then listen for their input. To do this, you’ll need to add a talk node followed by an input node.
Add them to your workspace, then connect them in between the voice webhook and return ncco nodes.

talk
Next, open up the talk node editor and set the Text{} field to the message you’d like to be read out to the caller.
In this tutorial we’ll be implementing 3 routes:
- get connected to a human
- leave a voice message
- receive an SMS with an online booking link,
so let’s add the
Text{}accordingly. E.g. “Hi! You’ve reached X, please press 1 to get connected, press 2 to leave a message, or press 3 to book online.”
You could also further personalize the experience by selecting a Voice Name or by making use of SSML tags.
Make sure to also tick the Barge In option, which allows the caller to send their input before the text has finished being read. It’s very useful in an IVR and prevents people from having to listen to a long list of options.

input
Next, we configure the input node.
Once the user has entered the required number of digits, those will be sent as a new webhook, so we need to configure that path.
In the URL {} field enter the full address of your NodeRED instance followed by /input1 (YOUR_URL/input1), then set the Method to GET. If we were to later create a second level to our IVR, we would need to send that input to a different address, e.g. /input2.
Let’s take this opportunity to pass along the caller number by updating the URL {} field to YOUR_URL/input1?from={{msg.call.from}}. It might come in handy later on if we want to keep a record of these numbers.
Leave Submit on Hash unchecked for now – this would cause the input to be sent by the user pressing the # key, e.g. for collecting something like an account number. Keep the default value of Time Out, but set Max Digits to 1. This ensures that the user can only press a single key before the input is sent, leaving us with a maximum of 9 options in our menu.

Handle the Input
After the caller has submitted their input, we need to listen to it at the new webhook for the input event.
First, we’ll have to implement this endpoint to capture the input value, then based on this value, continue with the route chosen by the caller.
To make a decision based on the input value, we’ll use a switch node, then for each of the options we’ll build the NCCO by wiring together action nodes, closed off by a return NCCO output node.
voice webhook
Start by adding a voice webhook node to your workspace. In its node properties, select POST as a method and type /input in the answer URL field.
If you were to connect a debug node after it, after finishing and running the flow, you would see the parameters returned to the /input URL:
| Name | Description |
|---|---|
uuid |
The unique ID of the Call leg for the user initiating the input. |
conversation_uuid |
The unique ID for this conversation. |
timed_out |
Returns true if this input timed out based on the value of Time Out. |
dtmf |
The numbers input by your caller, in order. |
In our use case, we are trying to get the dtmf value, as this is the route chosen by the caller.
Having a closer look at the debug sidebar on completion, we can see that it’s going to be in the dtmf property of the call object nested inside the msg object, so we can reference it as {{msg.call.dtmf}} in the other nodes of this path.
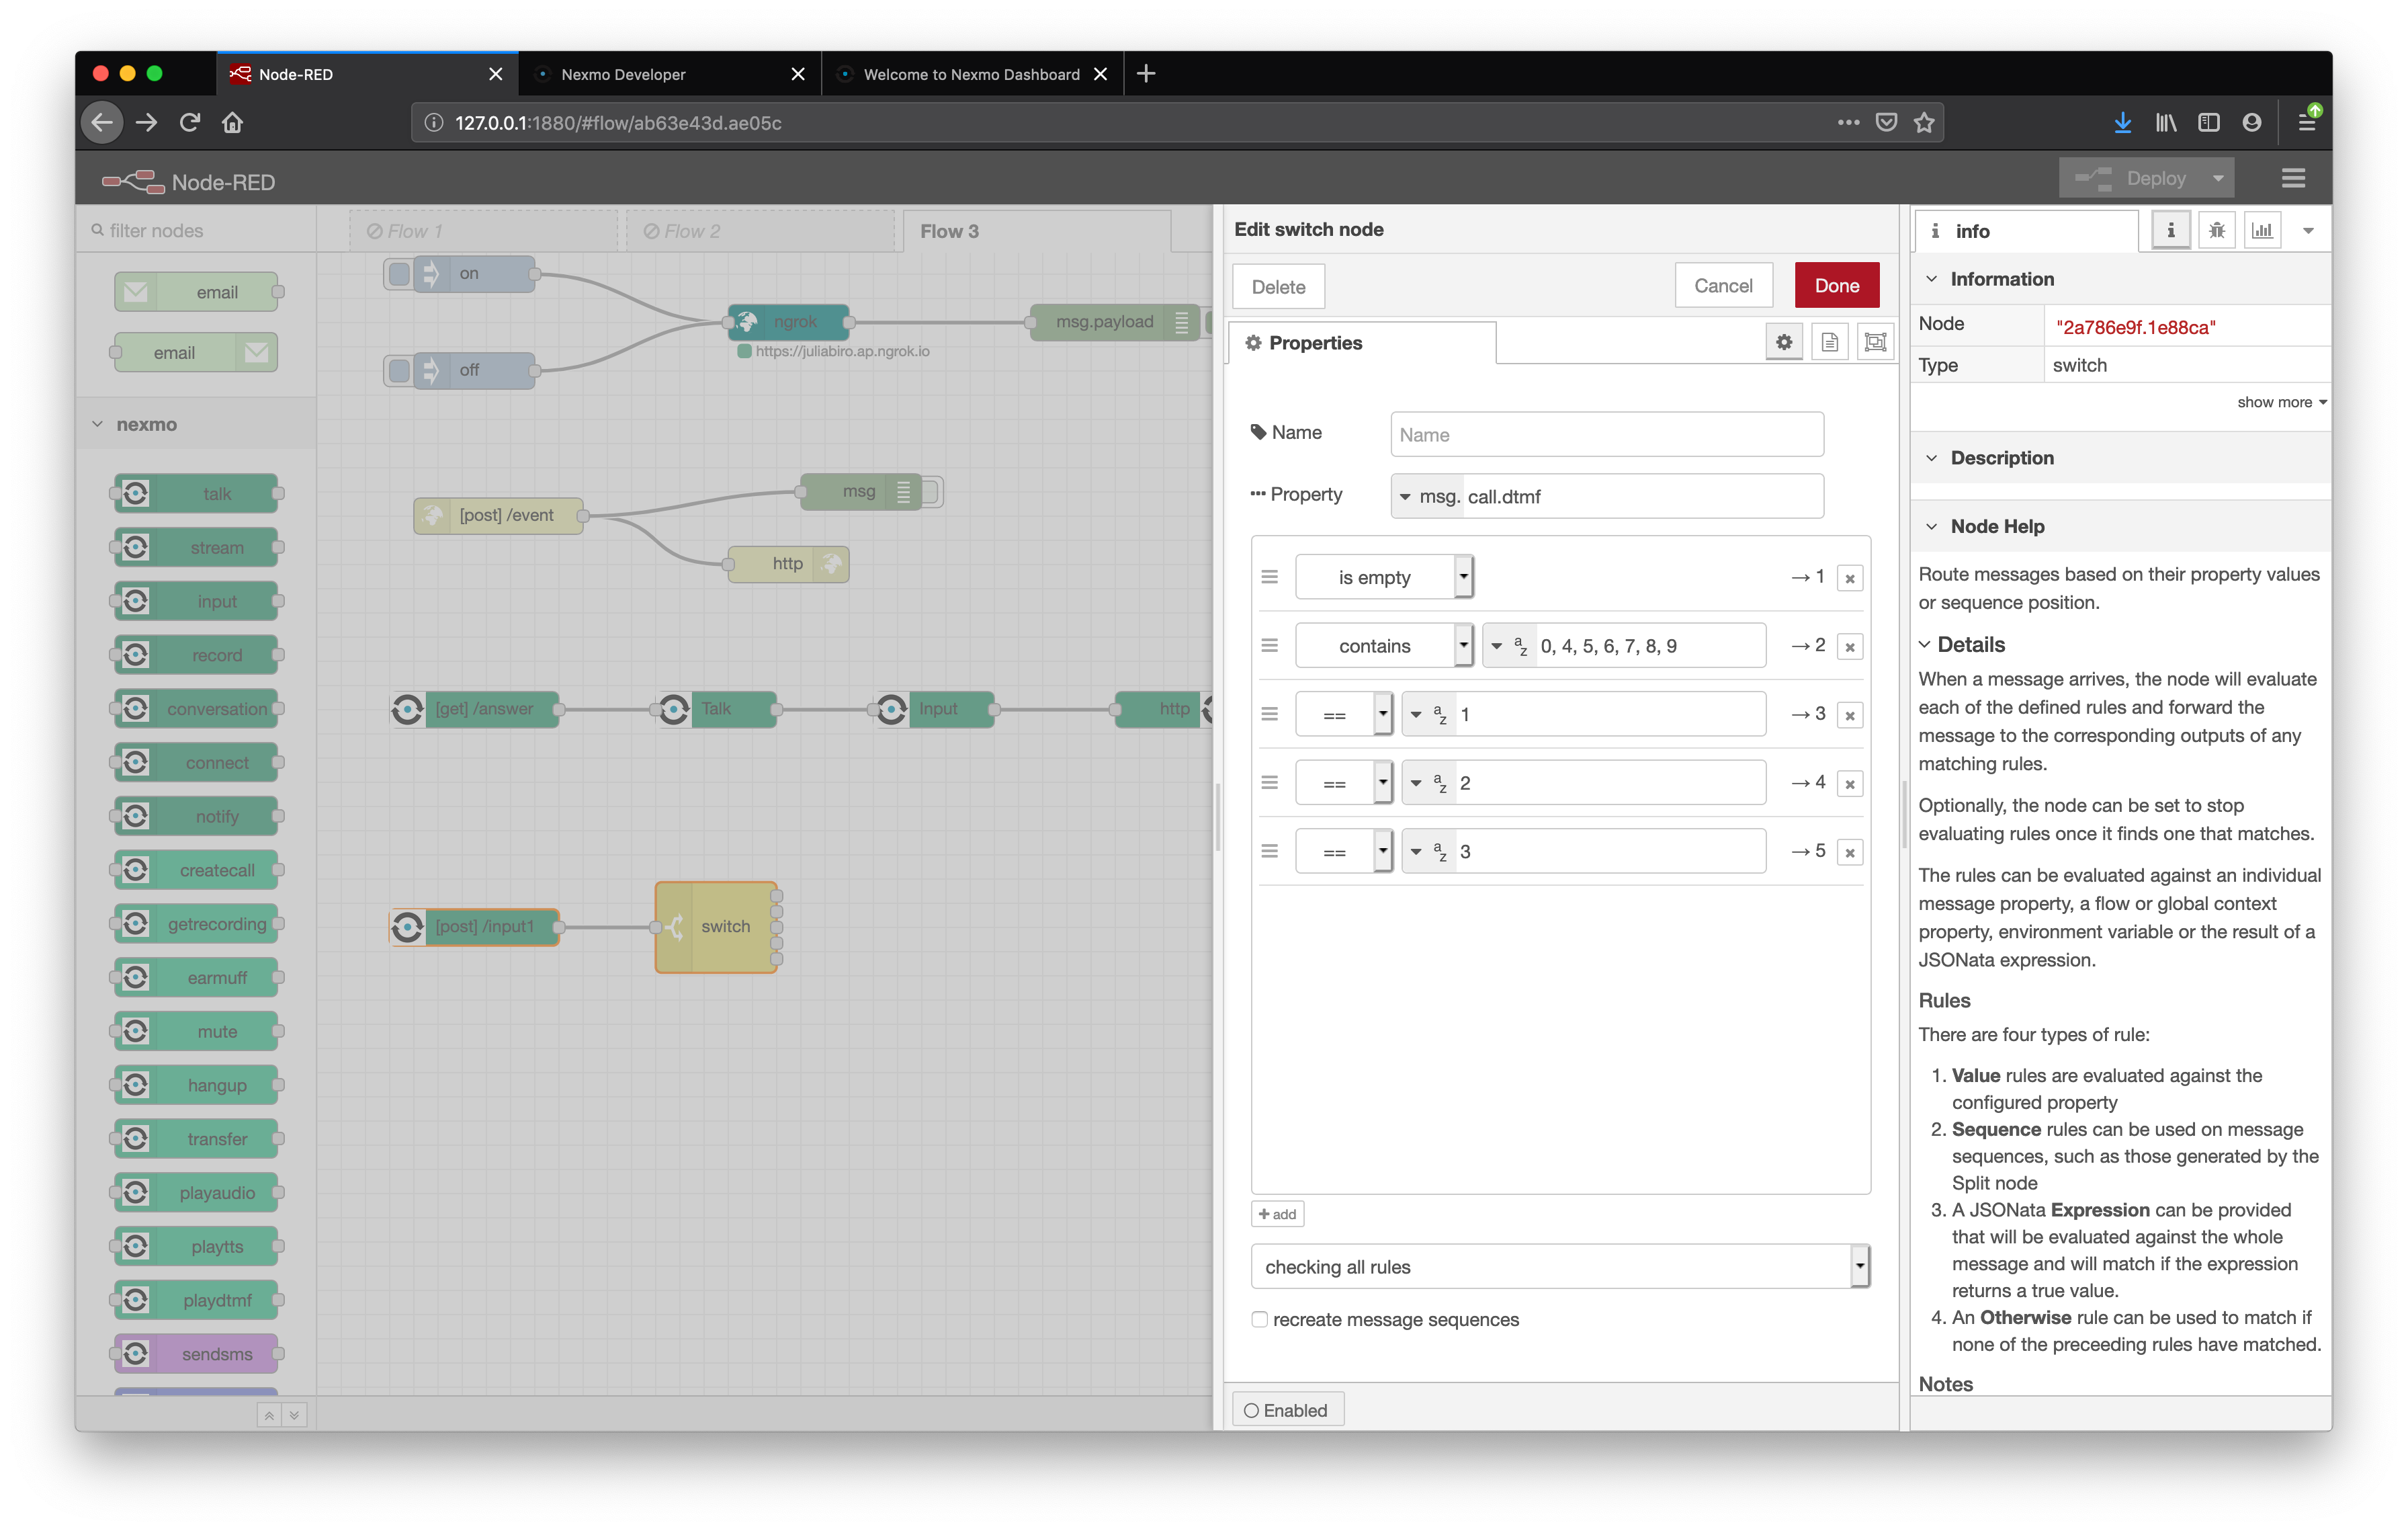
switch
Next, we will separate the different routes based on the {{msg.call.dtmf}} value as follows:
- is empty -> read out the options again
- It’s not one of the options given (contains 0, 4, 5, 6, 7, 8, 9) -> read out the options again
- = 1 -> connect caller
- = 2 -> send to voicemail
- = 3 -> send online booking link via SMS to the caller.
To do so, add a switch node to your canvas, in its node editor set Property to {{msg.call.dtmf}}, then define rules for the five cases mentioned above.
Route 1 & 2: Invalid Input
Connect the first two outputs of the switch node into the talk node’s input. This way if the caller gives an invalid input (not 1, 2 or 3), the initial TTS message will be repeated, listing the available options.

Route 3: Connect Caller
To forward the incoming call, we need to connect it to a new endpoint – in this case, a phone number. To do so, we need a connect action. Optionally, we could also add a talk node to notify the caller that the connection is being made.
Wire a talk node into the switch node’s third output, then follow with a connect and a return ncco node.
First, let’s notify the caller that they are being connected. In the talk node properties, set Text {} to something like Please wait while we connect you. or the message of your choice. Feel free to customize this experience by selecting a Voice Name or by using SSML tags.
Next, open up the connect node editor, select Phone as an Endpoint and type in the number you’d like to call in the Number {} field.
Leave the From {} field empty for the Caller ID to appear as unknown, or fill it in with one of your Nexmo virtual numbers.

If you’d like to have a sneak peek of the finished product, call your Nexmo number and try it out! Just make sure you don’t press 2 or 3, as we haven’t implemented those routes yet.
You might also want to check out our Forward a Call via a Voice Proxy with Node-RED blog post for a more detailed explanation of this path.
Route 4: Send to Voicemail
The next case we’re going to cover is when the caller presses 2, opting for leaving a voice message.
If you’d like to build the voicemail from scratch, head over to our Build Your Own Voicemail With Node-RED and the Nexmo Voice API tutorial for a step-by-step guide.
Otherwise, import from Clipboard the following JSON file into your Node-RED Editor:
[{ "id": "1a10292a.0468d7", "type": "talk", "z": "5b66a8fe.c283c", "text": "Please leave your message at the tone.", "voicename": "", "bargein": false, "loop": "", "level": "", "x": 150, "y": 140, "wires": [ [ "9f6c7f15.1e4d48"] ] }, { "id": "9f6c7f15.1e4d48", "type": "record", "z": "5b66a8fe.c283c", "format": "mp3", "channel": "", "endonsilence": "3", "endonkey": "", "timeout": "", "beepstart": true, "eventurl": "YOUR\_URL/record?from={{msg.call.from}}", "eventmethod": "post", "x": 360, "y": 140, "wires": [[ "f5ae270b.51ba6"] ] }, { "id": "3062ef0c.58d478", "type": "http in", "z": "5b66a8fe.c283c", "name": "", "url": "/record", "method": "post", "upload": false, "swaggerDoc": "", "x": 230, "y": 300, "wires": [[ "5b9e35c2.78611c", "a0e2a9ff.c666d8", "200966c.00b679a"] ] }, { "id": "200966c.00b679a", "type": "http response", "z": "5b66a8fe.c283c", "name": "", "statusCode": "", "headers": {}, "x": 510, "y": 300, "wires": [] }, { "id": "5b9e35c2.78611c", "type": "getrecording", "z": "5b66a8fe.c283c", "creds": "", "filename": "recordings/{{msg.req.query.from}}\_{{msg.payload.timestamp}}.mp3", "x": 460, "y": 360, "wires": [[ "1c3d166.591956a"] ] }, { "id": "a0e2a9ff.c666d8", "type": "debug", "z": "5b66a8fe.c283c", "name": "", "active": false, "tosidebar": true, "console": false, "tostatus": false, "complete": "true", "targetType": "full", "x": 470, "y": 240, "wires": [] }, { "id": "a4651c0b.926068", "type": "e-mail", "z": "5b66a8fe.c283c", "server": "smtp.gmail.com", "port": "465", "secure": true, "tls": true, "name": "", "dname": "", "x": 930, "y": 360, "wires": [] }, { "id": "1c3d166.591956a", "type": "change", "z": "5b66a8fe.c283c", "name": "", "rules": [{ "t": "set", "p": "topic", "pt": "msg", "to": "'Voicemail from ' & msg.req.query.from", "tot": "jsonata" }], "action": "", "property": "", "from": "", "to": "", "reg": false, "x": 720, "y": 360, "wires": [[ "a4651c0b.926068"] ] }, { "id": "5a0c6126.26ff9", "type": "return ncco", "z": "5b66a8fe.c283c", "name": "", "x": 770, "y": 140, "wires": [] }, { "id": "f5ae270b.51ba6", "type": "talk", "z": "5b66a8fe.c283c", "text": "Thank you, good bye!", "voicename": "", "bargein": false, "loop": "", "level": "", "x": 550, "y": 140, "wires": [[ "5a0c6126.26ff9"] ] }]
There are a couple of things you’ll need to do for this to work.
First, connect the
switchnode’s 4th output into thetalknode.Next, in the
recordnode properties replace YOUR_URL with the address you’re hosting the Node-RED editor at (YOUR_URL/record?from={{msg.call.from}}).In the
Get Recordingnode under Nexmo Credentials select your Voice Application from the drop-down menu.In the
emailnode, setToto the email address where you’d like to send the voice recordings, then provide your email client credentials in theUseridandPasswordfields.
Hit Deploy, then your voicemail should be up and running. Give it a try!

Route 5: Link via SMS
The last route we have to build is for the case when the caller presses 3, choosing to receive an online booking link via SMS.
First, let’s Import from Clipboard the snippet below:
[{ "id": "a69bd1e4.39586", "type": "sendsms", "z": "5b66a8fe.c283c", "creds": "", "to": "{{msg.call.from}}", "fr": "", "text": "This is supposed to be your link :)", "unicode": false, "x": 550, "y": 660, "wires": [ [ "3fd04afe.60abf6"] ] }, { "id": "3fd04afe.60abf6", "type": "debug", "z": "5b66a8fe.c283c", "name": "", "active": true, "tosidebar": true, "console": false, "tostatus": false, "complete": "true", "targetType": "full", "x": 750, "y": 660, "wires": [] }, { "id": "2af4d230.bb1bbe", "type": "talk", "z": "5b66a8fe.c283c", "text": "Your message is on its way!", "voicename": "", "bargein": false, "loop": "", "level": "", "x": 350, "y": 600, "wires": [[ "a69bd1e4.39586", "6f1df801.8db2e8"] ] }, { "id": "6f1df801.8db2e8", "type": "return ncco", "z": "5b66a8fe.c283c", "name": "", "x": 610, "y": 600, "wires": [] }]
After adding it to your workspace, connect the switch node’s last output into the talk node’s input.

Next, let’s have a closer look at the individual nodes in this path.
talk
We use the talk node to give feedback to the caller that something is happening. Feel free to get creative with custom voice names or SSML tags, but a simple “Your message is on its way!” will suffice as well.
return NCCO
It is followed by a return NCCO node to close off this path as well and send our “set of instructions” back to the Nexmo API. There’s no setup needed here.
Send SMS
The Send SMS node does the heavy lifting of this path, as it is the one sending the SMS.
You can set up this node by double clicking on it and filling in the parameters below. You’ll find API KEY and API SECRET by clicking on the edit button next to Nexmo Credentials, after selecting Add new nexmobasic from the drop-down.
| KEY | DESCRIPTION |
|---|---|
API KEY |
Your Nexmo API key, shown in your account overview. |
API SECRET |
Your Nexmo API secret, shown in your account overview. |
TO |
The number you are sending the SMS to. In this case {{msg.call.from}}, the caller. |
FROM |
The number or text shown on a handset when it displays your message. You can set a custom alphanumeric FROM to better represent your brand, if this feature is supported in your country. Otherwise, add one of your Nexmo numbers. |
TEXT |
The content of your message. Time to get creative 🙂 |

The debug node is completely optional, but it does come in handy when you want to see a bit more details in the debug sidebar.
You might want to glance over at our How to Send SMS Messages with Node-RED guide to find out more about using the SMS API.
Try It!
Congratulations! You’ve just built yourself a fully functional Interactive Voice Response Menu! It’s finally time to try it out, so enjoy!

Where Next?
Resources
- Input NCCO Reference
- Record NCCO Reference
- Voice API Reference
- Using SSML Tags
- Text-to-Speech Voice Names
- SMS API Reference
- Get Started with ngrok in Node-RED

Top comments (0)