
Originally published in Medium.

Overview
In Part 1 we integrated Firebase into our React Native project.
In this part, we’ll add a great open-source library to let users access their device camera or their photo library to upload photos from their phones to Firebase. We’ll also, for the purpose of this series, relax the storage-security rules to allow unauthenticated users to access the storage bucket to get the photos URLs.
Let’s jump right into it.
1. Add React Native Image Picker
The library in question is react-native-image-picker. To add it to your project, run the following in your terminal.
yarn add react-native-image-picker
The next step is to add the necessary permissions to comply with the specific platforms.
1.1. Permissions for iOS
In your RNFirebase/ios/RNFirebase/info.plist, add the following permissions.
<plist version="1.0">
  <dict>
    ...
    <key>NSPhotoLibraryUsageDescription</key>
    <string>
     $(PRODUCT_NAME) would like access to your photo gallery to let   you upload your pictures to the feed.
    </string>
    <key>NSCameraUsageDescription</key>
    <string>
     $(PRODUCT_NAME) would like to use your camera to take picture and share them on your feed.
    </string>
    <key>NSPhotoLibraryAddUsageDescription</key>
    <string>
     $(PRODUCT_NAME) would like to save photos to your photo gallery to upload pictures to your feed.
    </string>
    <key>NSMicrophoneUsageDescription</key>
    <string>
     $(PRODUCT_NAME) would like to use your microphone for videos sharing on your feed.
    </string>
  </dict>
</plist>
Save and close. Now go back to your terminal, and type the following.
cd ios
pod install
This should update the pod dependencies for the iOS app.
Time to rebuild the project.
cd ..
npx react-native run-ios
The app should launch without issues.
1.2 — Permissions for Android
Add the following permissions in your RNFirebase/android/app/src/main/AndroidManifest.xml file.
<manifest xmlns:android="http://schemas.android.com/apk/res/android" package="com.rnfirebase">
 <uses-permission android:name="android.permission.INTERNET" />

 <uses-permission android:name="android.permission.CAMERA" />
 <uses-permission android:name="android.permission.WRITE_EXTERNAL_STORAGE"/>

</manifest>
Save and close. You can now rebuild the app.
npx react-native run-android
Note
If your iOS or Android builds fail, then you need to first run the RNFirebase.xcworkspace or the build.gradle from your Xcode or Android emulator, respectively in order to force instantiate a new build.
2. Configure Firebase Storage Rules
For the purpose of this series, you want to give all users access to the Firebase Storage without the need for authentication, as authentication is a tedious process and is outside the scope of this article.
Configuring the storage rules can easily be done inside the Firebase console. Under the Storage section, go to the Rules tab (see the figure below).
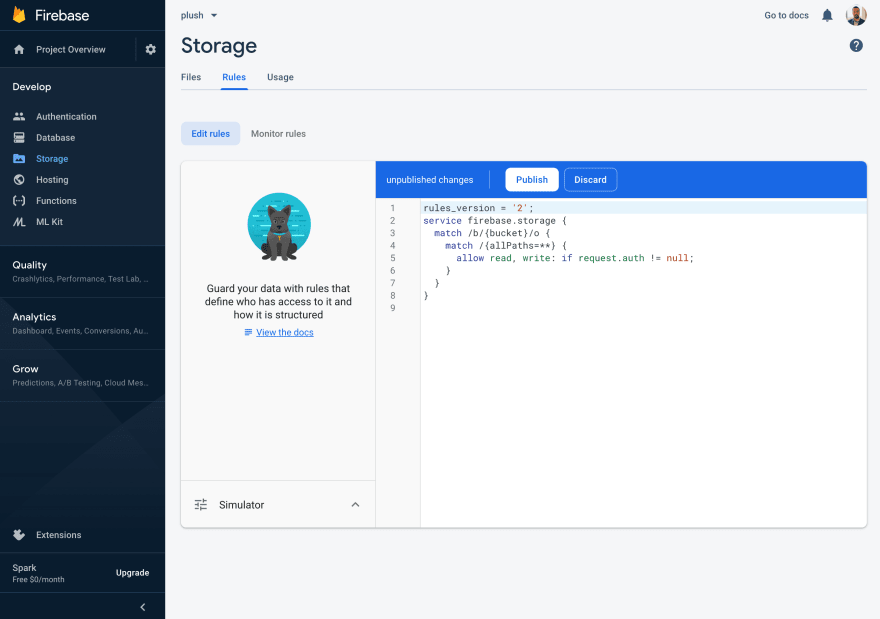
In order to allow unauthenticated users to access Firebase Storage, replace the current rule you have with this one.
rules_version = '2';
service firebase.storage {
  match /b/{bucket}/o {
    match /{allPaths=**} {
      allow read, write;
    }
  }
}
Press the Publish button to save the new rules. Now, all users can write and read to this bucket.
3. Upload Photos Locally With Image Picker
Time to implement photo uploading with react-native-image-picker.
Create the following file structure at the root of your project (i.e., where package.json is located).
src|
   components|
             UploadFile|
                       index.js
   styles|
         index.js
   utils|
        index.js
For styling, we’ll use the library styled-components. Add it to your app.
yarn add styled-components
Styled-components is a great library that allows CSS-like styling to React Native, which encourages code sharing between web (e.g., React) and mobile.
Open App.js, and delete all the boilerplate code generated by react-native-cli. Replace it with the following code.
import React from 'react';
import UploadFile from './src/components/UploadFile';
const App = () => <UploadFile />;
export default App;
The above code is straightforward. App.js is rendering the UploadFile component that’ll hold all our business logic.
Next, add the necessary styling (to be used in UploadFile.js) in the styles/index.js file.
import styled from 'styled-components/native';
export const Container = styled.SafeAreaView`
  flex: 1;
  justify-content: center;
`;
export const Picture = styled.Image.attrs({
  resizeMode: 'contain',
})`
  height: 300;
  width: 100%;
`;
The Container and Picture styled-components inherit the primitive React Native views SafeAreaView and Image, respectively. We added the attribute resizeMode: 'contain' to make sure the photo is rendered with its original aspect ratio inside the Picture container.
Time to use the react-native-image-picker. Add the following code to your UploadFile/index.js file.
import React, { useState } from 'react';
import { Button, StatusBar } from 'react-native';
import ImagePicker from 'react-native-image-picker';
import { imagePickerOptions } from '../../utils';
import { Container, Picture } from '../../styles';
const UploadFile = () => {
  const [imageURI, setImageURI] = useState(null);
  const uploadFile = () => {
    ImagePicker.launchImageLibrary(imagePickerOptions, response => {
      if (response.didCancel) {
        alert('Post canceled');
      } else if (response.error) {alert('An error occurred: ',   response.error);
      } else {setImageURI({ uri: response.uri });
        console.log(response);
      }}
    );
  };
  return (
    <Container>
      <StatusBar barStyle="dark-content" />
      <Button title="New Post" onPress={uploadFile} color="green" />
        {imageURI && <Picture source={imageURI} />}
    </Container>
  );
};
export default UploadFile;
Inside the FileUpload component, we define a function called uploadFile.
This function — called from the button by an onPress event — uses the ImagePicker.launchImageLibrary(options, response) function, which takes an options object as its first argument and a response object as its second argument.
We check if the response is successful, and if so, we use a useState hook to write the response URI (i.e., response.uri) to the local state then display it on the screen using the Picture component.
Define the options for ImagePicker and export it from utils/index.js as the following.
export const imagePickerOptions = {
  noData: true,
};
We set the noData field to true. This disables the base64 data field from being generated, which greatly improves performance. The options argument can hold many fields for customization. More on this is in the official API docs.
Time to test the app. Refresh the simulator. By pressing the New Post button, you should be able to access the photos library in the simulator and upload a photo to the screen.
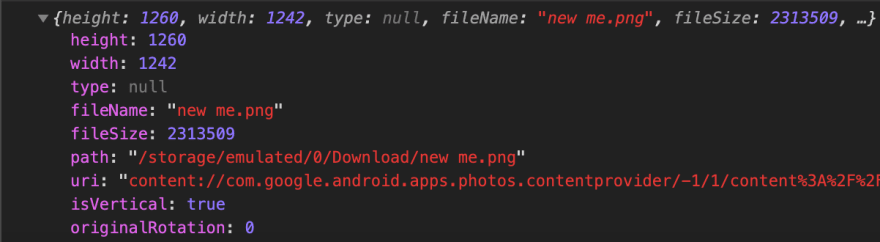
In the Chrome DevTools Console, you should see the response returned from ImagePicker (see figures below).
If you don’t know how to debug in React Native, check the docs here.
Android response.
iOS response.

The response objects from Android and iOS differ slightly. In iOS, the uri parameter gives the local path to the photo, while in Android, this info is given by the path parameter.
Both these parameters will be used in the next part to upload the photo to Firebase Storage.
Conclusion
In this part, you installed react-native-image-picker and used its API to access your photos library, select a photo, and display it on the screen. You also defined custom storage rules for your Firebase Storage bucket.
In the next part, you’ll learn how to save the photo into Firebase Storage then fetch it from its remote URL to be displayed on the screen.
Read part 3 here.

Top comments (0)