![Cover image for [Python] Coding a TCP Room in 200 lines](https://media2.dev.to/dynamic/image/width=1000,height=420,fit=cover,gravity=auto,format=auto/https%3A%2F%2Fdev-to-uploads.s3.amazonaws.com%2Fuploads%2Farticles%2F49ymqyh6cnj5101emj5j.png)
Coding made easy, maybe try making a TCP chat room?

This post is also on Medium you may also have a look at it and share both links if one doesn't work!
Introduction
Coding a TCP Room in about 200 lines, let’s dive into our adventure! TCP is a transmission control protocol which is one of the main protocols of an Internet protocol suite. This simple program helps us learn about sockets and Client Side Architecture! Python in general is a great language to start with from beginners to advanced! And of course, it allows us to create solid applications very fast and easily. For a further challenge, you can also add custom features like chat rooms, commands, roles, send images etc…
What is Client Side Architecture?
Our application, will need client-server architecture, meaning we will have many clients (the users) and one central server that hosts everything and provides the data for the clients. Hence, we are going to write two Python scripts. One of the scripts will be starting the server and one will be for the client. We will have to run the server first, so that there is a chat, which the clients can connect to. The clients themselves, are not going to directly communicate to each other but via the central server.
Staring the Server
Let’s start implementing the server first, for this we require two modules named socket and threading. Socket is used for network connection and threading is used for performing various tasks at the same time.
import threading
import socket
Module requirements
Next, we define our connection data and to initialise our socket. We will need an IP-address for the host and a free port number for our server. In this example, we will use the localhost address (127.0.0.1) and the port 5000. The port is actually irrelevant but you have to make sure that the port you are using is free and not reserved. If you are running this script on an actual server, specify the IP-address of the server as the host.
host = '127.0.0.1'
port = 5000
server = socket.socket(socket.AF_INET, socket.SOCK_STREAM)
server.bind((host, port))
server.listen()
clients = []
aliases = []
Socket definition and port initiation
When we define our socket, we need to pass two parameters. These define the type of socket we want to use. The first one (AF_INET) indicates that we are using an internet socket rather than an UNIX socket. The second parameter stands for the protocol we want to use (SOCK_STREAM) indicates that we are using TCP and not UDP. After defining the socket, we bind it to our host and the specified port by passing a tuple that contains both values. We then put our server into listening mode, so that it waits for clients to connect. At the end we create two empty lists, which we will use to store the connected clients and their aliases later on.
def broadcast(message):
    for client in clients:
        client.send(message)
Broadcast function
Here we define a little function that is going to help us broadcasting messages and makes the code more readable. What it does is just sending a message to each client that is connected and therefore in the clients list.
Now we will start with the implementation of the first major function. This function will be responsible for handling messages from the clients.
def handle_client(client):
    while True:
        try:
           message = client.recv(1024)
           broadcast(message)
        except:
           index = clients.index(client)
           clients.remove(client)
           client.close()
           alias = aliases[index]
           broadcast(f'{alias} has left the chatroom!'.encode('utf-8'))
           aliases.remove(alias)
           break
While-Loop Function
As you can see, this function is running in a while-loop. It won’t stop unless there is an exception because of something that went wrong. The function accepts a client as a parameter. Every time a client connects to our server we run this function for it and it starts an endless loop.
def receive():
    while True:
        print('Server is running and listening ...')
        client, address = server.accept()
        print(f'connection is established with {str(address)}')
        client.send('alias?'.encode('utf-8'))
        alias = client.recv(1024)
        aliases.append(alias)
        clients.append(client)
        print(f'The alias of this client is {alias}'.encode('utf-8'))
        broadcast(f'{alias} has connected to the chat room!'.encode('utf-8'))
        client.send('You are now connected!'.encode('utf-8'))
        thread = threading.Thread(target=handle_client, args=(client,))
        thread.start()
Receiving / Listening Function
When we are ready to run our server, we will execute this receive function. It also starts an endless while-loop which constantly accepts new connections from clients. Once a client is connected it sends the string ‘alias’ to it, which will tell the client that its nickname is requested. After that it waits for a response (which hopefully contains the alias) and appends the client with the respective aliases to the lists. After that, we print and broadcast this information. Finally, we start a new thread that runs the previously implemented handling function for this particular client. Now we can just run this function and our server is done.
Notice that we are always encoding and decoding the messages here. The reason for this is that we can only send bytes and not strings. So we always need to encode messages (for example using UTF-8), when we send them and decode them, when we receive them.
if __name__ == "__main__":
    receive()
Receive Function
Implementing The Client
The server on its own is pretty useless without clients to connect with it. So now we are going to implement our client. For this, we will again need to import the same libraries. Notice that this is now a second separate script.
import threading
import socket
Module implements
The first steps of the client are to choose an alias and to connect to our server. We will need to know the exact address and the port at which our server is running.
alias = input('Choose an alias --> ')
client = socket.socket(socket.AF_INET, socket.SOCK_STREAM)
client.connect(('127.0.0.1', 5000))
Alias input and socket initialisation
As you can see, we are using a different function here. Instead of binding the data and listening, we are connecting to an existing server. Now, a client needs to have two threads that are running at the same time. The first one will constantly receive data from the server and the second one will send our own messages to the server. So we will need two functions here. Let’s start with the receiving part.
def client_receive():
    while True:
        try:
            message = client.recv(1024).decode('utf-8')
            if message == "alias?":
                client.send(alias.encode('utf-8'))
            else:
                print(message)
        except:
            print('Error!')
            client.close()
            break
Receive data function
Again we have an endless while-loop here. It constantly tries to receive messages and to print them onto the screen. If the message is alias however, it doesn’t print it but it sends its nickname to the server. In case there is some error, we close the connection and break the loop. Now we just need a function for sending messages and we are almost done.
def client_send():
    while True:
        message = f'{alias}: {input("")}'
        client.send(message.encode('utf-8'))
Client send function
The writing function is quite a short one. It also runs in an endless loop which is always waiting for an input from the user. Once it gets some, it combines it with the nickname and sends it to the server. That’s it we are nearly there. The last thing we need to do is to start two threads that run these two functions.
receive_thread = threading.Thread(target=client_receive)
receive_thread.start()
send_thread = threading.Thread(target=client_send)
send_thread.start()
Starting threads for listening and sending
Demonstration
Here is the fun part of this project! Let’s go for a test run. Just keep in mind that we always need to start the server first because otherwise the clients can’t connect to a non-existing host. Here you can see an example of a chat with two clients (you can also connect with 20 if you want):
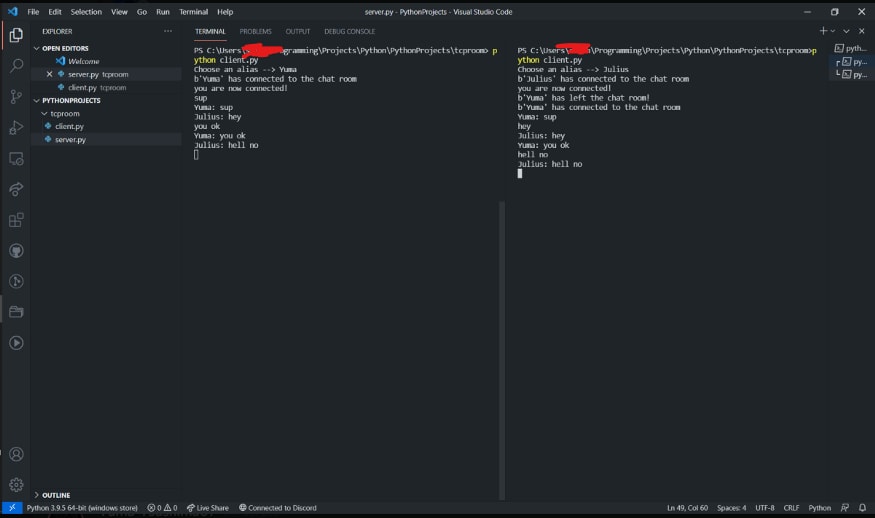
As you can see, it works very well! You can now modify and customize your chat however you want. Maybe you want to have multiple chat rooms or maybe you want to have different roles like admin and moderator. Be creative!
Source Code
Here is the source code:
TCP ChatRoom
Check out my repo as well!!
https://github.com/Yuma-Tsushima07/tcpchatroom
I hope you enjoyed this tutorial and you learned something. If you are interested in a GUI version of this chat, please leave a comment. It works quite differently, since it works more with events than with endless loops. Also, if you want to tell me something or ask questions, feel free to ask in the comments! Check out my Github page , if you are interested in more! Stay tuned!
Credits
Thank you! Cinnamon1212 (Cinnamon#7617) for this project idea!
- Check out his Github: https://github.com/Cinnamon1212
- Check out our Discord Support Server: https://discord.gg/DxCvp627AT
Follow me!
- Github: https://github.com/Yuma-Tsushima07
- Medium: https://0xv37r1x3r.medium.com/
- SoundCloud: https://soundcloud.com/0c7av3h4ck5
Discord Servers!!
Bounty Hunters: An amazing bug hunting community full of developers and exploiters!!!
CyberArtByte: My server full of bling and joy!!
Author: Yuma-Tsushima07

Top comments (0)