As of 04th June 2020, this post is a living document and will be updated as the DEV UI changes.
Introduction
Welcome, this post is a quick rundown of the dev.to editor and how to make the most of it.
The target audience of this post are beginners on DEV who would like to write a post but need help finding their way around the editor.
This post also serve as an introduction to Markdown in the section – What is markdown and the example video embedded under the section youtube videos is a crash course on markdown by Traversy Media.
This post is by no means a comprehensive guide compared to the official guide , but it covers stuff you'll use/need most often.
And if you take note you will realize there are some features used in this post but not discussed. Examples include Table of contents and in page navigation.
Let's begin.
This guide could serve as a reference therefore a table of contents is necessary.
Table of Contents
- Editor versions
- What is markdown
- Common editor features in "rich + markdown" version
- Common editor features in "basic markdown" version
- What you can insert in your post
EDITOR VERSIONS
The editor is available in two versions which are:
- basic markdown version
- rich + markdown version
Both serve the same purpose — publishing a post but, they have one major difference which is:
- The User Interface (UI)
The user interface determines how you use and interact with the editor and of course how you publish your posts.
Take a look at the following images:


You can switch between both editors from the UX section.

Both editor allow you to write your post in Markdown but, rich + markdown has some GUI components.
After reading that last paragraph the question that might come to your mind is: What is Markdown? Let's talk about that.
WHAT IS MARKDOWN
From the Markdown specification:
Markdown is a text-to-HTML conversion tool for web writers. Markdown allows you to write using an easy-to-read, easy-to-write plain text format, then convert it to structurally valid XHTML (or HTML).
Markdown allow you to wrap specific characters around text and the parser will render it in standard HTML. We'll discuss this in depth in this post, but for now let's talk about the features that's common in both editors.
The following features are available in the editors but, how to use them differs:
- Post title
- Tags
- Inserting images
- Cover image
- Canonical URL
- Series name
To make things simple and easier to follow let's discuss how to use these features in the rich + markdown verson then we'll proceed to the basic markdown version.
HOW TO USE COMMON EDITOR FEATURES IN "RICH + MARKDOWN"
The post title is the title of your post and you'll write it in the big input at the top of the editor.

The tags are keywords associated with your post. Inserting tags is quiet easy as depicted in the following image.
![]()
Inserting images in rich + markdown editor
Images can be uploaded on DEV for two purposes:
- Cover image
- Body images
- Cover image
- Cover image will appear at the top of your post before the post title
- Body images
- Body images will be used in your post
Inserting an image is quiet straight forward, all you have to do is click the Upload image icon at the top left corner of the editor.

Wait for the upload to complete and a Mardown image format will appear beside the Upload image icon.

Copy the Markdown Images and insert in your post.
We will talk more in depth about Markdown Images and Direct URLS in the section inserting images.
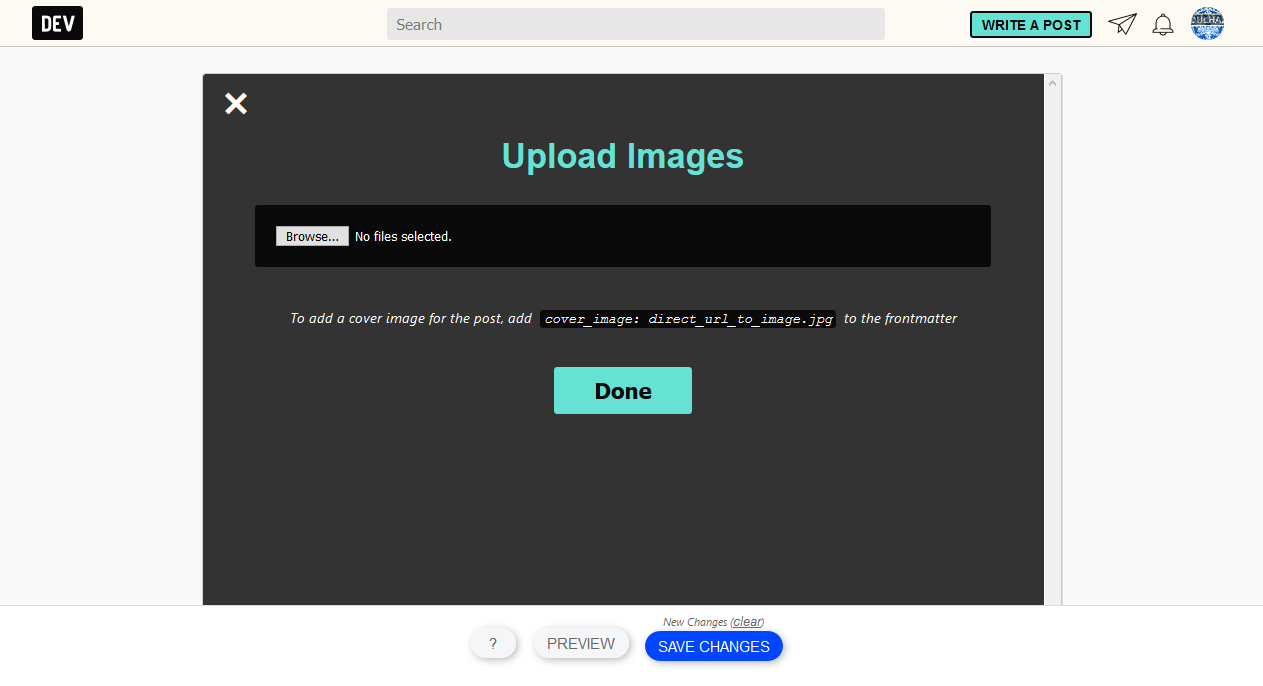
If you would like to upload a cover image click on the Add cover image button.

When the upload is complete image will appear before the title input in the editor.

You can remove the cover image by clicking the image icon and clicking the Remove button besid the Change button.
Inserting a canonical URL in "rich + markdown" editor
The canonical url is the URL of the post if the post has been published elsewhere on the internet.
To insert a canonical url click the icon beside the Save Draft button. The following image will appear and the first form input is an option to insert a canonical url.

Type the url and click done.
Inserting a series name in "rich + markdown" editor
The series name is the name given to related articles.
The series name should be included in the first article in the series then subsequent articles can be added to the series.
The series name is the second form option in the previous image. Here is it again.

When the post is published a box similar to the one below will appear before the first and last paragraph of each post in the series.

HOW TO USE COMMON EDITOR FEATURES IN BASIC MARKDOWN VERSION
The common features mentioned (with the exception of inserting images) are attached to a post in a format called Front Matter . This is depicted in the image below:

To insert an image in the basic markdown version of the editor follow the same step as outlined under Common editor features in "rich + markdown" version.
To upload a cover image copy the Direct URL from the Markdown format of the image. An example of direct url is given below:
https://dev-to-uploads.s3.amazonaws.com/i/xeoz36tpdc958agh2dqf.png
After the image upload and add it to the Front Matter as depicted in the image below.

WHAT YOU CAN INSERT IN YOUR POST
Inserting images
We've talked about how to insert images before in the section inserting images under common editor features for rich + markdown. This is a continuation of that discussion.
When you upload an image the image will be uploaded via Ajax request and if the size of the file is large this might take a while.
Upon completion of the upload a Markdown link will appear in the following format:
You can turn the Markdown link into a direct link by deleting the sorrounding charcaters around the link until you are left with something in the following format:
https://thepracticaldev.s3.amazonaws.com/i/0q8ewwsa7psjma2sqw18.png
The direct links is mostly used for inserting cover images while Markdown links will be inserted into your post.
Please ensure you provide an alt text for the image for accessibility reasons.

If you want to get nerdy you can check the Network Request tab in the Developer Tools during the file upload.

Inserting links
When you want a link in your post you will use a pair of square brackets – [] and a pair of round brackets – ().
The square brackets will contain the link text and the round brackets will contain the URL
The format is:
[Dev.to](https://dev.to)
The parser will render it as:
<a href="https://dev.to">Dev.to</a>
The output in the browser will be:
Bold text
Bold text can be used to draw a readers attention to a particular section of text.
In markdown you add double underscores as a prefix and suffix and the text will be rendered in bold.
The format is:
__i want to bold this__
The parser will render it as:
<strong>i want to bold this</strong>
The output in the browser will be:
i want to bold this
Italicized text
Text in italic format can also be used to draw a users attention to a particular text.
In markdown you add a single underscore as a prefix and suffix and the text will be rendered in italic format.
The format is:
_i want this to be in italic format_
The parser will render it as:
<em>i want this to be in italic format</em>
The output in the browser will be:
i want this to be in italic format
Tables
HTML tables are quiet tricky to insert in your post and words can not do justice in explaining how to go about them. Its best if we see a code example.
| column 1     | column 2      | column 3  |

| --------- |:---------:| -------:|

| some data     | some data     | some data |

| some data     | some data     | some data |

| some data     | some data     | some data |
This would be rendered as:
| column 1 | column 2 | column 3 |
|---|---|---|
| some data | some data | some data |
| some data | some data | some data |
| some data | some data | some data |
Code snippets
Code snippets can be included in your post if a particular technical explanation requires it.
Code snippets on DEV are displayed in a dedicated division on the page on a black background and if you specify the language of the code, it will be displayed with the appropriate syntax highlighting.
A minimum of three requirement is required if you want your code snippet rendered in a dedicated division of the page. They are:
- Three back-ticks ( ```) as prefix
- The code snippet(s)
- Three back-ticks (``` ) as suffix
In markdown this would be:
An example code would be rendered as:
function helloWorld() {
  console.log("hello world ");
}
But, if you want syntax highlighting for the code you'll have to include the language before the code snippet(s).
In markdown:
The previous code snippet would be rendered as:
function helloWorld() {
  console.log("hello world ");
}
Remember to replace JavaScript with your language of choice e.g CSS, HTML , Python e.t.c
Code embeds
Code from online code editors like codepen, codesandbox or jsfiddle can be embedded in you post.
To embed a post you'll need something called a Liquid tag.
The Liquid tag format is:
{% <online code editor> <url|embed_id> %}
For example to insert a code embed from codepen, you'll have to write this:
{% codepen https://codepen.io/alvaromontoro/pen/JxMPqa %}
And it would be rendered as:
For codesandbox, you'll write
{% codesandbox staggered-animated-cards-with-vue-and-tailwindcss-okwst %}
Note: The "staggered-animated-cards-with-vue-and-tailwindcss-okwst" above is the codesandbox id.
And it would be rendered as:
For other online editors, remember to replace codepen, or jsfiddle with the editor name and embed id respectively.
YouTube Videos
Its an open secret that youtube is the most used video platform.
Youtube videos can be included in your post by using the video id along with liquid tags.
The format is:
{% youtube <video id> %}
The full liquid tag would be:
{% youtube HUBNt18RFbo %}
This is would be rendered as:
Vimeo videos
The procedure is similiar to youtube videos, all you need is the video id.
The format is:
{% vimeo <video id> %}
The full liquid tag would be:
{% vimeo 33678526 %}
This would be rendered as:
GitHub repository
To insert a github repository all you need is the username of the repo author and the repository name with liquid tags.
The format:
{% github <repo name> %}
The full liquid tag would be:
{% github getify/You-Dont-Know-JS %}
This would be rendered as:
 getify
/
You-Dont-Know-JS
getify
/
You-Dont-Know-JS
A book series (2 published editions) on the JS language.
You Don't Know JS Yet (book series) - 2nd Edition
This is a series of books diving deep into the core mechanisms of the JavaScript language. This is the second edition of the book series:


To read more about the motivations and perspective behind this book series, check out the Preface.
If you're looking for the previous first edition books, they can be found here.
Titles
I recommend reading the second edition books in this order:
- Get Started | Buy on Leanpub | Buy on Amazon
- Scope & Closures | Buy on Leanpub | Buy on Amazon
- "The Unbooks" (ebook) | Buy on Leanpub | Buy on Amazon
- Objects & Classes (draft stable)
- Types & Grammar (rough draft)
Sync & Async (canceled)ES.Next & Beyond (canceled)
If you're looking for the previous first edition books, they can be found here.
Publishing
As always, you'll be able to…
DEV User embed
To embed a user profile, all you need is the username.
The format:
{% user <username> %}
The full liquid tag would be:
{% user xtrp %}
This would be rendered as:
![[deleted user] image](https://media2.dev.to/dynamic/image/width=150,height=150,fit=cover,gravity=auto,format=auto/https%3A%2F%2Fthepracticaldev.s3.amazonaws.com%2Fi%2F99mvlsfu5tfj9m7ku25d.png)
[Deleted User]
DEV post embed
To embed a post, you will need the URL of the post and a liquid tag.
The format is:
{% link <url here> %}
The full liquid tag would be:
{% link https://dev.to/lydiahallie/javascript-visualized-the-javascript-engine-4cdf %}
This would be rendered as:

Raw HTML
If you know enough HTML you can embed them in your post from subscripts, superscript to horizontal lines.
The following HTML is a definition list:
<dl>
  <dt><b>Definition term</b></dt>
  <dd>Definition Description</dd>

  <dt><b>Definition term</b></dt>
  <dd>Definition Description</dd>
</dl>
This code can be included directly in the body of the editor as depicted in the image below.

This would be rendered as:
- Definition term
- Definition Description
- Definition term
- Definition Description
Credit to Yechiel Kalmenson for the Github gist.
You can visit his profile below:


Top comments (22)
Very easy to follow guide on how to customize dev post. When I first started posting I just wanted to get my post out there and I was not aware of all the cool things that can be done with this editor until I saw other people post but I was not sure what they did to get that result. Now I understand and will use the editor to the fullest. Thanks again!!
You are welcome.
Amazing your words will help me to work in the future. Learn more html dd beginnerwebdeveloper.com/blog/html...
Great post, learned quite a few DEV editor features I had not heard of before! Thanks so much for featuring me in your explanation of DEV user embed within the editor :).
One editor feature I'm personally really looking forward to trying out (when it is properly released) is DEV polls.
Thanks again for featuring me, and great post!
— Gabriel
Thanks, and you are welcome.
Polls would be an awesome addition
nice article for newbies on dev.thanks for the content.
How do I get a codesandbox liquid tag generated from my github url?
For example: codesandbox.io/p/github/jdgamble55...
?
Awesome post!
Thank you.
How to add a video (present on your computer) in your post on Dev.to ?
Please reply as soon as possible.
I have not tried that before, I'll advise that upload to a video platform that DEV supports like Youtube or Vimeo then you can embed it in your post.
DEV allow you to upload video, like I said earlier I have not used or tried this feature before. Here is the process:
Navigate to your dashboard and click Upload Video button:

This will bring up another interface that will allow you to select and upload a video from your computer

Then how can you embed it in your post? I don't know, but I'll find out.
Thanks, I have uploaded the video according to the aforementioned steps. Waiting for the further steps on adding the video to a post. Thank you!
Why do feel like this is better than the dev documentation. Thanks a million! 💯
You are welcome.
But how to add whitespace? The vertical spacing on dev.to is awful. The only way I've found is what you have used in your post, which is to add a horizontal line with
<hr>Awesome post! thanks for the content.
You are welcome 🤗
How do you add a description in the "rich + markdown" post?