
Inspired by other posts across the Internet

This Video Has 15,608,459 Views - YouTube

This Post Has 2,233 Views, 154 Reactions And 23 Comments - DEV
I decided to try to accomplish the same on Twitter with my username field and the number of followers I have.
The process is pretty straight forward, lets outline it
1. Connect to twitter API
2. Get my current number of followers
3. Update my username field
4. Repeat every 10 minutes
Now that we’ve outlined the process lets breakdown the code and infrastructure
For this project I decided to use Python3. I really like using it for quick scripts over node.js because I don’t want to deal with asynchronous code; its nice to have code that runs one line, after the next, with no interruptions.
You will need Twitter API credentials for this project, if you don’t have them yet, you’ll have to apply for them at https://developers.twitter.com.
To connect to the Twitter API I’ll be using Tweepy. It’s great, it works easily and has built in support for Twitter API’s rate limiting.
For hosting and scheduling I like to use Heroku. Heroku allows you to run your code and have an exposed web service, capable of handling web requests and serving up content. In this project we won’t be handling any external request, nor serving up data, but we will still need to make sure our code plays well with Heroku, so we’ll be sure to add a web server, in this case Flask easily fills the gap.
For our code to run on a schedule or every X minutes, we will enable a Heroku add-on for our project, Heroku Scheduler which once configured will launch our script on our defined schedule.
Awesome, let’s dive into the code!
import tweepy
from flask import Flask
First up we have our import statements, these statements allow us to use functionality provided by 3rd party libraries.
The os library gives us access to the underlying operating system and allows us to run commands directly on the host.
Tweepy is going to enable us to connect and communicate with the Twitter API.
Flask is a micro web framework enabling us to handle http requests and many other features, for this project we’re using it to satisfy heroic deployment needs.
Next up is authentication
# Authenticate to Twitter
auth = tweepy.OAuthHandler("consumer_key", "consumer_secret")
auth.set_access_token("token_key", "token_secret")
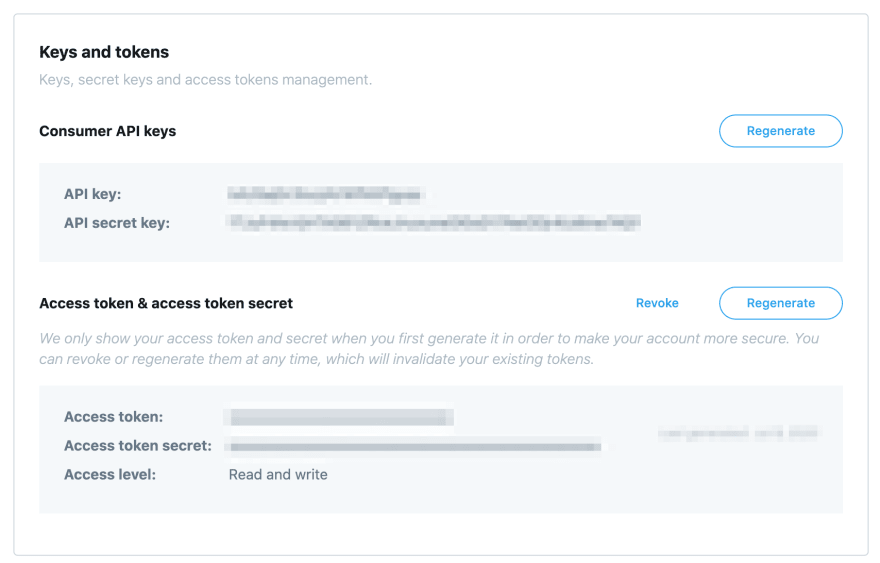
We need two sets of keys to authenticate, both can be found on the twitter developers page on your app, similar to the screenshot below.
Once you’ve added those keys, the next step is connecting to the API server and getting some data.
# Create API object
api = tweepy.API(auth)

#get my user object
iam = api.me()
followers_count = iam.followers_count
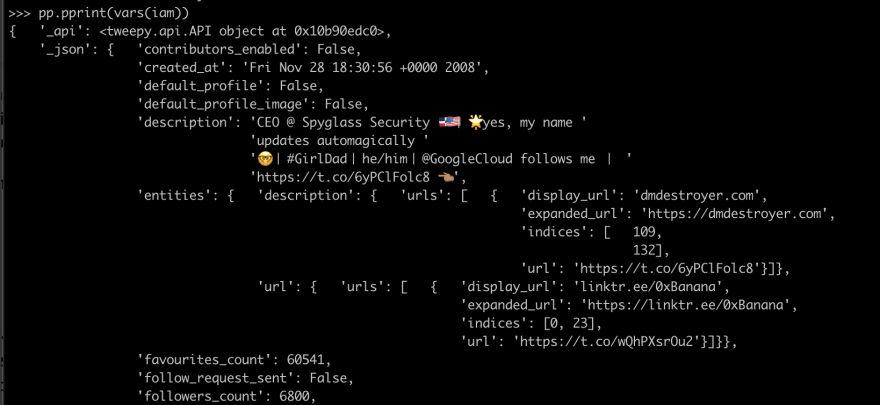
The me() method of the tweepy object connects to the twitter API and pulls down the current authenticated users user data.
The user data object thats returned to us can accessed by using the dot . operator, in this case we want the followers_count attribute.

If you don’t know the attributes of an object you can use these builtins:
dir(object)
vars(object)
__dict(object)__
Combine that with PrettyPrint for some legibility:
BONUS CODE SNIPPET
import pprint
pp = pprint.PrettyPrinter(indent=4)
pp.pprint(vars(object))
Now that we’re done with that little detour, let’s get back on track.
The next part of the code should update our username
api.update_profile(name=“Jason Alvarez is {} new friends away from 10k".format(10000 - int(followers_count)))
Tweepy provides us a function called update_profile which will update our profile depending on the parameters supplied to it. In this case we’re passing the name parameter and giving it the following string
“Jason Alvarez is {} new friends away from 10k”.format(10000 - int(followers_count)))
Rather than insert just a number, I decided to use the space as a countdown to a specific target.
Format takes a string with placeholders {} and inserts the values supplied (value1, value2…)
string.format(value1, value2…)
This same technique can be applied to any editable field in a profile and any data that the API won’t reject for input; please refer to Docs — Twitter Developers for more details on valid and invalid characters.
The last segment of code is needed for the script to gracefully run on Heroku’s infrastructure. While not specific for this project, let’s go over what it does and what it’s not doing.
app = Flask(__name__)
app.run()
Flask as mentioned above is a micro web framework, it’s used normally to create servers that handle http(s) requests and other really neat things. In this case we need to start a server so that Heroku knows our deployment was successful.
One of the big uses for Flask, is to create your own API Microservices, where you can define your own HTTP routes, a feature we are not using in this case, and is outside the scope of this writeup but I highly suggest you look into it!
OKAY THE CODE IS DONE!
Great! We’ve finished writing our script and that means we’re all done and can deploy, right? ALMOST!
To deploy to Heroku successfully we need two more files:
requirements.txt
Procfile
requirements.txt outlines the libraries needed for our code to run successfully and this isn’t something you need to create manually.
To generate your requirements.txt run this command in your project directory pip3 freeze > requirements.txt
From Heroku’s documentation
Heroku apps include a Procfile that specifies the commands that are executed by the app on startup.
Our’s is going to be real simple and just launch that web server we declared in our script.
Edit your Procfile so it has the following contents
web: FLASK_APP=update_username.py flask run --port $PORT --host 0.0.0.0
$PORT will be supplied to us by the operating system shell environment, and will be random, so don’t try and set anything here.
Great, if you’ve made it this far your directory should look like the following
.
├── Procfile
├── requirements.txt
└── update_username.py
NOW WE CAN FINALLY DEPLOY!
Create a new project on heroku.com and follow the onscreen instructions, it’s a lot like setting up a GitHub repo.
* Create a project
* init
* add
* push
(Follow their instructions for more details)
If your push and deploy were successful, you should see something like the following in your terminal
app[scheduler.5678]: * Running on http://0.0.0.0:48547/ (Press CTRL+C to quit)
heroku[scheduler.5678]: State changed from starting to up
heroku[scheduler.5678]: Cycling
heroku[scheduler.5678]: State changed from up to complete
At this point your Twitter user name should now be updated with the string you used in the script. In my use case I want my user name to be pretty in sync with the number of followers I have, so let’s set it up to run on a schedule.
To accomplish this we’re going to use a Heroku project add-on called “Heroku Scheduler”, it’s free and shouldn’t bump up the cost of your dyno, add it to the project, then click it to configure the jobs.
To stay as in sync as I can I chose a “Every 10 minutes” job and for the run command, I used the same content that’s in the Procfile -
FLASK_APP=update_username_num_followers.py flask run —port $PORT —host 0.0.0.0
Save the job and you’re all done.
Let’s go over what we’ve accomplished.
1. We have a script that will update our Twitter username
2. It communicates with Twitter API for data
3. Our code project is deployed on a managed service
Thats not bad for a little fun script!
Enjoyed the post? Let me know! 💛🦄🔖

Oldest comments (5)
Hi. We had the same idea :) I commented on the other post already.
Here my Golang code to do this :)
Oh cool! I’ve been meaning to learn more golang thank you for sharing this!
I learning Golang in the Moment for fun. It's cool.
Yes, even if nothing changed the functions would still run.
Audiences quickly lose interest if content isn't vibrant, doesn't change, and doesn't respond to current events. That's why dynamism, rapid updates, fresh formats, experimentation with presentation, and active engagement with trends are now valued, and projects like kumplo demonstrate how this is implemented in practice. Services, tools, and mechanics are designed to stimulate movement rather than create the feeling of a frozen profile.