In this video, we will be learning about the essential HTML element tags you will most often need to develop with HTML. The two categories we will discuss are tags that contain other HTML, and tags to contain content.
This is the third post and video in a series on learning web development. You may need to check out the first post to learn how to get set up to begin coding:

You may watch the following video or follow along with the expanded transcript that follows.
To begin this lesson, open the starter project you began in episode 1.
Open the terminal if it's not already, and type in the command npm run start to run the project. This will open a new browser tab which will automatically reload as you save your HTML.
In VSCode, open the src directory and then click on the index.html file.
There is one tag populated in this file, which is an h1 and it is one of the available heading tags. There are 6 total heading tags that are available to give your content hierarchy, and those are designated as h1-h6. Let's place the remaining tags in our HTML file. You can simply use the word "Headline".
<body>
  <h1>Hello World</h1>
  <h2>Headline</h2>
  <h3>Headline</h3>
  <h4>Headline</h4>
  <h5>Headline</h5>
  <h6>Headline</h6>
</body>
Save the file, then switch to the browser to preview. You can see how the browser automatically gives these a font size that is scaled from largest to smallest, beginning with the h1. In the next lesson, we will cover when to use each of these headings.

Note that the h1 is purple due to a bit of CSS in the stater - but we'll get to that in the near future!
In the previous episode, you wrote your first content tag: <p>. This tag is used to wrap paragraphs. Let's add a paragraph with the content of your choosing, I'm going to write "I love website development."
<p>I love website development</p>
The next very important tag is for links, represented as <a>. Let's add an <a> tag with the text "Visit my website".
<a>Visit my website</a>
Now, for this link to actually go anywhere, we need to add an href attribute. Attributes are additional parts of HTML tags that add a bit more information for the browser on dealing with the tag and vary depending on what the tag is. If the attribute takes a value, it is written with an equals sign and quotations around the value. For this link, href is the attribute where we place the URL for the page we want the link to go to. So, for this href, let's simply put in https://google.com.
<a href="https://google.com">Visit my website</a>
Note that we didn't just type "google.com" - if we had, the browser would treat the link like it was located on the same website instead of navigating over to Google's website. We will cover more about creating website navigation in the capstone project.
Next up, let's make a list. There are two main types of lists: unordered which typically means a bulleted list, and ordered, which means a numbered list.
For an unordered list, use the tag <ul> and for an ordered one, use <ol>. Both of them need to contain <li> tags, and use one <li> tag per item in your list. So let's add 3 <li> tags in both, and the text "one", "two", "three".
<ul>
  <li>one</li>
  <li>two</li>
  <li>three</li>
</ul>
<ol>
  <li>one</li>
  <li>two</li>
  <li>three</li>
</ol>
Save the file and go check it out in the browser to see how the browser added bullets to the ul and numbers to the ol and also added indentation to both.

In a future lesson about creating a blog layout in HTML, we will cover how to add additional tags to style your content, such as bolding some words.
Now let's talk about containing this content. The most essential container tag is <div> and it is what you will use most of the time to create groups of content.
Let's add a <div> around each list, then we'll save and go look in the browser.
  <div>
    <ul>
      <li>one</li>
      <li>two</li>
      <li>three</li>
    </ul>
  </div>
  <div>
    <ol>
      <li>one</li>
      <li>two</li>
      <li>three</li>
    </ol>
  </div>
Notice that there doesn't seem to be any visual difference. But we can use a browser tool called the inspector to visualize what the div is doing.
To open the inspector, right-click on the unordered list and choose "Inspect" in Chrome, or "Inspect Element" in Firefox. This will open a new panel.
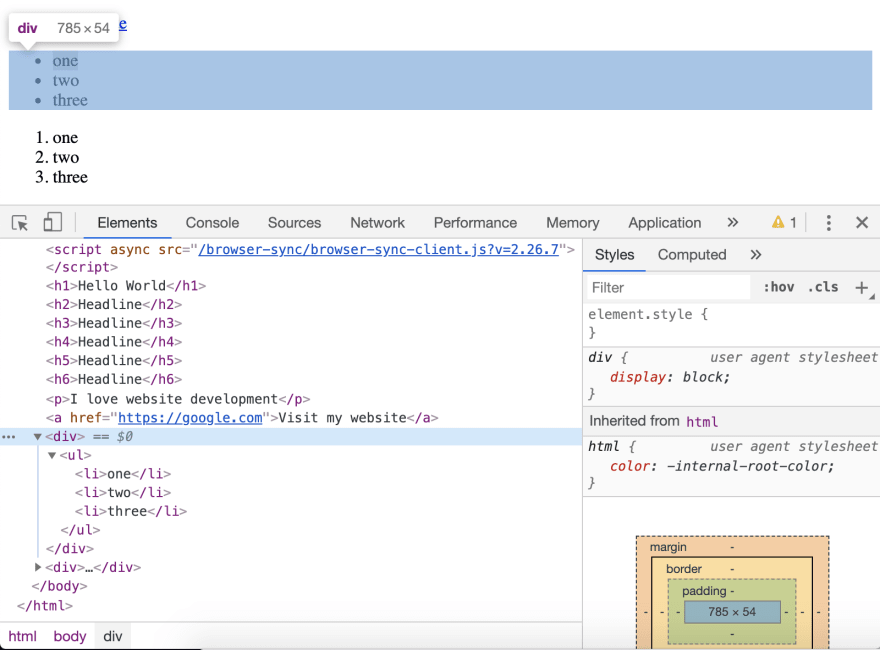
I'm viewing this in Chrome, but Firefox will look similar. You can see that either the <ul> or <li> is highlighted depending on precisely where you clicked. We want to look above where the <ul> tag starts and select the <div>. With your mouse hovered over the <div> tag in the inspector, the browser creates a highlight box over the div. You can see how it wraps the list. The inspector is a very useful tool that we will continue using to better understand how things work to build a website.
Next up in Episode 4: Semantic HTML Structure

Top comments (0)