
Tutorial: Build a Twitter reply generator using AI/ML API and Twitter API V2.
Do you want to be a ReplyGuy? And get a lot of profile views?
This tutorial will show you how to build a ReplyGuy (e.g., reply generator) using AI/ML API and Twitter API V2.
Beside those tools, we'll also briefly talk about AI Agents, Function Calling, OpenAI Agents SDK, and more interesting stuff.
Let's get started!
Prerequisites
- Make sure you have created an account on AI/ML API. Here’s a brief tutorial: How to get API Key from AI/ML API. Quick step-by-step tutorial with screenshots for better understanding.
Introduction
AI/ML API
AI/ML API is a game-changing platform for developers and SaaS entrepreneurs looking to integrate cutting-edge AI capabilities into their products. It offers a single point of access to over 200 state-of-the-art AI models, covering everything from NLP to computer vision.
Key Features for Developers:
- Extensive Model Library: 200+ pre-trained models for rapid prototyping and deployment. 📚
- Customization Options: Fine-tune models to fit your specific use case. 🎯
- Developer-Friendly Integration: RESTful APIs and SDKs for seamless incorporation into your stack. 🛠️
- Serverless Architecture: Focus on coding, not infrastructure management. ☁️
Deep Dive into AI/ML API Documentation (very detailed, can’t agree more).
Cookin' UI/UX, App Structure, and more!
Create a new project
To create super cool UI/UX, we'll use Shadcn UI with Tailwind CSS and Next.js.
Create project: Run the init command to create a new Next.js project or to setup an existing one:
npx shadcn@latest init
By default, it will generate the lib/utils.ts file with tailwind-merge and clsx imports. Also setup the colors for both dark and light mode.
Add Components: You can now start adding components to your project.
npx shadcn@latest add button
Refer to the Shadcn UI documentation for more information on how to use the components.
Adding Shadcn UI components
Let's add all the components we need for this project.
npx shadcn@latest add button accordion avatar card dialog input textarea sonner tabs
All the components will be added to the components/ui/ folder.
Update page.tsx
Remove all the code in page.tsx and replace it with the following code:
"use client";

import { useState } from "react";
import { TweetFeed } from "@/components/ui/tweet-feed";
import { TweetFilters, FilterOptions } from "@/components/ui/tweet-filters";
import { Button } from "@/components/ui/button";
import { toast } from "sonner";

export default function Home() {
  const [filters, setFilters] = useState<FilterOptions>({
    minEngagement: 100,
    topics: [],
    excludeReplies: false,
    onlyVerified: false,
    minViralPotential: 50,
  });

  const handleFiltersChange = (newFilters: FilterOptions) => {
    setFilters(newFilters);
  };

  const handleSubscribe = () => {
    toast.success(
      "Subscribed to notifications!", {
        description: "You'll be notified when new viral tweets are detected.",
        action: {
          label: "Yaps!",
          onClick: () => console.log("dismiss"),
        },
        duration: 2000,
      }
    );
  };

  return (
    <div className="flex flex-col min-h-screen bg-white dark:bg-zinc-950">
      <main className="flex-1 container mx-auto px-4 py-8">
        <div className="max-w-5xl mx-auto">
          <div className="text-center mb-8">
            <h2 className="text-3xl font-bold mb-2">Find Viral Tweets and Reply Fast</h2>
            <p className="text-zinc-600 dark:text-zinc-400 max-w-2xl mx-auto">
              ReplyGuy helps you identify high-engagement tweets early, so you can reply and gain maximum visibility. Be the reply that gets noticed!
            </p>
          </div>
          <div className="grid grid-cols-1 md:grid-cols-[300px_1fr] gap-8">
            <div className="order-2 md:order-1">
              <TweetFilters onFiltersChange={handleFiltersChange} />
            </div>
            <div className="order-1 md:order-2">
              <TweetFeed filters={filters} />
            </div>
          </div>
        </div>
      </main>
    </div>
  );
}
Filtering Tweets
Let's create a new file in the components/ui/ folder called tweet-filters.tsx. We'll use this component to filter the tweets based on the filters we set.
import { Accordion, AccordionContent, AccordionItem, AccordionTrigger } from "./accordion";
import { Input } from "./input";
import { Button } from "./button";
import { useState } from "react";

interface TweetFiltersProps {
  onFiltersChange: (filters: FilterOptions) => void;
}

export interface FilterOptions {
  minEngagement: number;
  topics: string[];
  excludeReplies: boolean;
  onlyVerified: boolean;
  minViralPotential: number;
}

export function TweetFilters({ onFiltersChange }: TweetFiltersProps) {
  const [minEngagement, setMinEngagement] = useState(100);
  const [topics, setTopics] = useState<string[]>([]);
  const [topicInput, setTopicInput] = useState("");
  const [excludeReplies, setExcludeReplies] = useState(false);
  const [onlyVerified, setOnlyVerified] = useState(false);
  const [minViralPotential, setMinViralPotential] = useState(50);

  const handleAddTopic = () => {
    if (topicInput && !topics.includes(topicInput)) {
      const newTopics = [...topics, topicInput];
      setTopics(newTopics);
      setTopicInput("");

      updateFilters({
        topics: newTopics,
      });
    }
  };

  const handleRemoveTopic = (topic: string) => {
    const newTopics = topics.filter(t => t !== topic);
    setTopics(newTopics);

    updateFilters({
      topics: newTopics,
    });
  };

  const updateFilters = (partialFilters: Partial<FilterOptions>) => {
    onFiltersChange({
      minEngagement,
      topics,
      excludeReplies,
      onlyVerified,
      minViralPotential,
      ...partialFilters
    });
  };

  return (
    <div className="w-full max-w-xs">
      <h3 className="font-medium text-lg mb-2">Filters</h3>
      <Accordion type="multiple" defaultValue={["engagement", "topics", "advanced"]} className="w-full">
        <AccordionItem value="engagement">
          <AccordionTrigger className="py-3">Engagement</AccordionTrigger>
          <AccordionContent>
            <div className="space-y-4 py-2">
              <div>
                <label className="text-sm font-medium mb-1 block">
                  Minimum Engagement: {minEngagement}
                </label>
                <div className="flex items-center gap-2">
                  <span className="text-xs">0</span>
                  <input
                    type="range"
                    min="0"
                    max="1000"
                    value={minEngagement}
                    onChange={(e) => {
                      const value = parseInt(e.target.value);
                      setMinEngagement(value);
                      updateFilters({ minEngagement: value });
                    }}
                    className="flex-1"
                  />
                  <span className="text-xs">1000+</span>
                </div>
              </div>
              <div>
                <label className="text-sm font-medium mb-1 block">
                  Viral Potential: {minViralPotential}%
                </label>
                <div className="flex items-center gap-2">
                  <span className="text-xs">0%</span>
                  <input
                    type="range"
                    min="0"
                    max="100"
                    value={minViralPotential}
                    onChange={(e) => {
                      const value = parseInt(e.target.value);
                      setMinViralPotential(value);
                      updateFilters({ minViralPotential: value });
                    }}
                    className="flex-1"
                  />
                  <span className="text-xs">100%</span>
                </div>
              </div>
            </div>
          </AccordionContent>
        </AccordionItem>
        <AccordionItem value="topics">
          <AccordionTrigger className="py-3">Topics</AccordionTrigger>
          <AccordionContent>
            <div className="space-y-4 py-2">
              <div className="flex gap-2">
                <Input
                  placeholder="Add topic..."
                  value={topicInput}
                  onChange={(e) => setTopicInput(e.target.value)}
                  onKeyDown={(e) => {
                    if (e.key === "Enter") {
                      handleAddTopic();
                    }
                  }}
                />
                <Button onClick={handleAddTopic} type="button" variant="outline" size="sm">Add</Button>
              </div>
              {topics.length > 0 && (
                <div className="flex flex-wrap gap-2 mt-2">
                  {topics.map((topic) => (
                    <div
                      key={topic}
                      className="flex items-center bg-zinc-100 dark:bg-zinc-800 px-2 py-1 rounded-full text-xs"
                    >
                      {topic}
                      <button
                        onClick={() => handleRemoveTopic(topic)}
                        className="ml-1 text-zinc-500 hover:text-zinc-700 dark:hover:text-zinc-300"
                      >
                        ×
                      </button>
                    </div>
                  ))}
                </div>
              )}
            </div>
          </AccordionContent>
        </AccordionItem>
        <AccordionItem value="advanced">
          <AccordionTrigger className="py-3">Advanced</AccordionTrigger>
          <AccordionContent>
            <div className="space-y-4 py-2">
              <div className="flex items-center gap-2">
                <input
                  type="checkbox"
                  id="exclude-replies"
                  checked={excludeReplies}
                  onChange={(e) => {
                    setExcludeReplies(e.target.checked);
                    updateFilters({ excludeReplies: e.target.checked });
                  }}
                  className="rounded border-zinc-300 text-blue-600 focus:ring-blue-500"
                />
                <label htmlFor="exclude-replies" className="text-sm">
                  Exclude replies
                </label>
              </div>
              <div className="flex items-center gap-2">
                <input
                  type="checkbox"
                  id="only-verified"
                  checked={onlyVerified}
                  onChange={(e) => {
                    setOnlyVerified(e.target.checked);
                    updateFilters({ onlyVerified: e.target.checked });
                  }}
                  className="rounded border-zinc-300 text-blue-600 focus:ring-blue-500"
                />
                <label htmlFor="only-verified" className="text-sm">
                  Only verified accounts
                </label>
              </div>
            </div>
          </AccordionContent>
        </AccordionItem>
      </Accordion>
    </div>
  );
}
tweet-feed.tsx
Let's create a new file in the components/ui/ folder called tweet-feed.tsx. We'll use this component to display the tweets.
import { TweetCard, TweetCardProps } from "./tweet-card";
import { Tabs, TabsContent, TabsList, TabsTrigger } from "./tabs";
import { useEffect, useState } from "react";
import { FilterOptions } from "./tweet-filters";
import { toast } from "sonner";

interface TweetFeedProps {
  filters: FilterOptions;
}

export function TweetFeed({ filters }: TweetFeedProps) {
  const [tweets, setTweets] = useState<TweetCardProps[]>([]);
  const [loading, setLoading] = useState(true);
  const [activeTab, setActiveTab] = useState("trending");
  const [savedTweets, setSavedTweets] = useState<TweetCardProps[]>([]);

  // Load saved tweets from localStorage on mount
  useEffect(() => {
    const saved = localStorage.getItem('savedTweets');
    if (saved) {
      try {
        setSavedTweets(JSON.parse(saved));
      } catch (e) {
        console.error('Failed to parse saved tweets', e);
      }
    }
  }, []);

  // Save tweets to localStorage when they change
  useEffect(() => {
    if (savedTweets.length > 0) {
      localStorage.setItem('savedTweets', JSON.stringify(savedTweets));
    }
  }, [savedTweets]);

  // Fetch tweets when filters change
  useEffect(() => {
    const fetchTweets = async () => {
      setLoading(true);

      try {
        const response = await fetch('/api/tweets', {
          method: 'POST',
          headers: {
            'Content-Type': 'application/json',
          },
          body: JSON.stringify(filters),
        });

        if (!response.ok) {
          throw new Error('Failed to fetch tweets');
        }

        const data = await response.json();
        setTweets(data.tweets || []);
      } catch (error) {
        console.error('Error fetching tweets:', error);
        toast.error('Failed to fetch tweets. Using backup data.');
        // Fall back to local fetch if API fails
        import('@/lib/tweets').then(module => {
          const results = module.fetchTrends(filters);
          setTweets(results);
        });
      } finally {
        setLoading(false);
      }
    };

    fetchTweets();
  }, [filters]);

  // Handle saving/unsaving tweets
  const toggleSaveTweet = (tweet: TweetCardProps) => {
    const isSaved = savedTweets.some(saved => saved.id === tweet.id);

    if (isSaved) {
      setSavedTweets(savedTweets.filter(saved => saved.id !== tweet.id));
      toast.info('Tweet removed from saved items');
    } else {
      setSavedTweets([...savedTweets, tweet]);
      toast.success('Tweet saved for later');
    }
  };

  return (
    <div className="w-full max-w-xl">
      <Tabs defaultValue="trending" value={activeTab} onValueChange={setActiveTab}>
        <div className="flex items-center justify-between mb-4">
          <h2 className="text-2xl font-bold">Viral Tweets</h2>
          <TabsList>
            <TabsTrigger value="trending">Trending</TabsTrigger>
            <TabsTrigger value="new">New</TabsTrigger>
            <TabsTrigger value="saved">Saved</TabsTrigger>
          </TabsList>
        </div>

        <TabsContent value="trending" className="space-y-4">
          {loading ? (
            Array.from({ length: 3 }).map((_, i) => (
              <div key={i} className="w-full max-w-[500px] h-[220px] rounded-lg bg-zinc-100 dark:bg-zinc-800 animate-pulse" />
            ))
          ) : tweets.length > 0 ? (
            tweets.map(tweet => (
              <TweetCard
                key={tweet.id}
                {...tweet}
                isSaved={savedTweets.some(saved => saved.id === tweet.id)}
                onSave={() => toggleSaveTweet(tweet)}
              />
            ))
          ) : (
            <div className="text-center py-8">
              <p className="text-zinc-500">No tweets match your filters.</p>
              <p className="text-zinc-400 text-sm mt-1">Try adjusting your filter settings.</p>
            </div>
          )}
        </TabsContent>

        <TabsContent value="new">
          <div className="text-center py-8">
            <p className="text-zinc-500">Coming soon!</p>
            <p className="text-zinc-400 text-sm mt-1">We're working on real-time updates for freshest tweets.</p>
          </div>
        </TabsContent>

        <TabsContent value="saved" className="space-y-4">
          {savedTweets.length > 0 ? (
            savedTweets.map(tweet => (
              <TweetCard
                key={tweet.id}
                {...tweet}
                isSaved={true}
                onSave={() => toggleSaveTweet(tweet)}
              />
            ))
          ) : (
            <div className="text-center py-8">
              <p className="text-zinc-500">No saved tweets yet.</p>
              <p className="text-zinc-400 text-sm mt-1">Save tweets to reply to them later.</p>
            </div>
          )}
        </TabsContent>
      </Tabs>
    </div>
  );
}
Designing a nice tweet-card.tsx
Let's create a new file in the components/ui/ folder called tweet-card.tsx. We'll use this component to display the tweets.
import Image from "next/image";
import { Card, CardContent, CardDescription, CardFooter, CardHeader, CardTitle } from "./card";
import { Button } from "./button";
import { Avatar, AvatarFallback, AvatarImage } from "./avatar";
import { ReplyDialog } from "./reply-dialog";

export interface TweetCardProps {
  id: string;
  author: {
    name: string;
    handle: string;
    avatar: string;
  };
  content: string;
  timestamp: string;
  metrics: {
    likes: number;
    replies: number;
    retweets: number;
    views: number;
  };
  viralPotential: number; // 0-100 score
  isVerified?: boolean;
  isSaved?: boolean;
  onSave?: () => void;
}

export function TweetCard({
  id,
  author,
  content,
  timestamp,
  metrics,
  viralPotential,
  isVerified = false,
  isSaved = false,
  onSave
}: TweetCardProps) {
  return (
    <Card className="w-full max-w-[500px] shadow-md hover:shadow-lg transition-all duration-200 border-zinc-200 dark:border-zinc-800 overflow-hidden">
      <CardHeader className="p-4 pb-2 flex flex-row items-start gap-3">
        <Avatar className="h-10 w-10 rounded-full border">
          <AvatarImage src={author.avatar} alt={author.name} />
          <AvatarFallback>{author.name.substring(0, 2)}</AvatarFallback>
        </Avatar>
        <div className="flex flex-col">
          <div className="flex items-center gap-1">
            <CardTitle className="text-base font-medium">{author.name}</CardTitle>
            {isVerified && (
              <svg viewBox="0 0 24 24" className="h-4 w-4 fill-blue-500" aria-label="Verified account">
                <path d="M22.5 12.5c0-1.58-.875-2.95-2.148-3.6.154-.435.238-.905.238-1.4 0-2.21-1.71-3.998-3.818-3.998-.47 0-.92.084-1.336.25C14.818 2.415 13.51 1.5 12 1.5s-2.816.917-3.437 2.25c-.415-.165-.866-.25-1.336-.25-2.11 0-3.818 1.79-3.818 4 0 .494.083.964.237 1.4-1.272.65-2.147 2.018-2.147 3.6 0 1.495.782 2.798 1.942 3.486-.02.17-.032.34-.032.514 0 2.21 1.708 4 3.818 4 .47 0 .92-.086 1.335-.25.62 1.334 1.926 2.25 3.437 2.25 1.512 0 2.818-.916 3.437-2.25.415.163.865.248 1.336.248 2.11 0 3.818-1.79 3.818-4 0-.174-.012-.344-.033-.513 1.158-.687 1.943-1.99 1.943-3.484zm-6.616-3.334l-4.334 6.5c-.145.217-.382.334-.625.334-.143 0-.288-.04-.416-.126l-.115-.094-2.415-2.415c-.293-.293-.293-.768 0-1.06s.768-.294 1.06 0l1.77 1.767 3.825-5.74c.23-.345.696-.436 1.04-.207.346.23.44.696.21 1.04z" />
              </svg>
            )}
            <span className="text-zinc-500 text-sm font-normal">@{author.handle}</span>
          </div>
          <CardDescription className="text-xs text-zinc-500">{timestamp}</CardDescription>
        </div>
      </CardHeader>
      <CardContent className="p-4 pt-2">
        <p className="text-sm">{content}</p>
      </CardContent>
      <CardFooter className="p-4 pt-0 flex flex-col gap-3">
        <div className="flex justify-between items-center w-full text-xs text-zinc-500">
          <div className="flex items-center gap-1">
            <svg viewBox="0 0 24 24" className="h-4 w-4 fill-current"><path d="M1.751 10c0-4.42 3.584-8 8.005-8h4.366c4.49 0 8.129 3.64 8.129 8.13 0 2.96-1.607 5.68-4.196 7.11l-8.054 4.46v-3.69h-.067c-4.49.1-8.183-3.51-8.183-8.01zm8.005-6c-3.317 0-6.005 2.69-6.005 6 0 3.37 2.77 6.08 6.138 6.01l.351-.01h1.761v2.3l5.087-2.81c1.951-1.08 3.163-3.13 3.163-5.36 0-3.39-2.744-6.13-6.129-6.13H9.756z"/></svg>
            <span>{metrics.replies}</span>
          </div>
          <div className="flex items-center gap-1">
            <svg viewBox="0 0 24 24" className="h-4 w-4 fill-current"><path d="M4.5 3.88l4.432 4.14-1.364 1.46L5.5 7.55V16c0 1.1.896 2 2 2H13v2H7.5c-2.209 0-4-1.79-4-4V7.55L1.432 9.48.068 8.02 4.5 3.88zM16.5 6H11V4h5.5c2.209 0 4 1.79 4 4v8.45l2.068-1.93 1.364 1.46-4.432 4.14-4.432-4.14 1.364-1.46 2.068 1.93V8c0-1.1-.896-2-2-2z"/></svg>
            <span>{metrics.retweets}</span>
          </div>
          <div className="flex items-center gap-1">
            <svg viewBox="0 0 24 24" className="h-4 w-4 fill-current"><path d="M16.697 5.5c-1.222-.06-2.679.51-3.89 2.16l-.805 1.09-.806-1.09C9.984 6.01 8.526 5.44 7.304 5.5c-1.243.07-2.349.78-2.91 1.91-.552 1.12-.633 2.78.479 4.82 1.074 1.97 3.257 4.27 7.129 6.61 3.87-2.34 6.052-4.64 7.126-6.61 1.111-2.04 1.03-3.7.477-4.82-.561-1.13-1.666-1.84-2.908-1.91zm4.187 7.69c-1.351 2.48-4.001 5.12-8.379 7.67l-.503.3-.504-.3c-4.379-2.55-7.029-5.19-8.382-7.67-1.36-2.5-1.41-4.86-.514-6.67.887-1.79 2.647-2.91 4.601-3.01 1.651-.09 3.368.56 4.798 2.01 1.429-1.45 3.146-2.1 4.796-2.01 1.954.1 3.714 1.22 4.601 3.01.896 1.81.846 4.17-.514 6.67z"/></svg>
            <span>{metrics.likes}</span>
          </div>
          <div className="flex items-center gap-1">
            <svg viewBox="0 0 24 24" className="h-4 w-4 fill-current"><path d="M8.75 21V3h2v18h-2zM18 21V8.5h2V21h-2zM4 21l.004-10h2L6 21H4zm9.248 0v-7h2v7h-2z"/></svg>
            <span>{metrics.views}</span>
          </div>
        </div>
        <div className="flex justify-between w-full">
          <div className="flex items-center gap-2">
            <div className="text-xs font-medium bg-orange-100 dark:bg-orange-950 text-orange-800 dark:text-orange-300 px-2 py-0.5 rounded-full">
              {viralPotential}% Viral Potential
            </div>
            {viralPotential > 75 && (
              <span className="text-xs font-medium text-red-500">Trending! 🔥</span>
            )}
          </div>
          <div className="flex gap-2">
            {onSave && (
              <Button
                size="sm"
                variant="ghost"
                onClick={onSave}
                className="rounded-full px-2"
                aria-label={isSaved ? "Unsave tweet" : "Save tweet"}
              >
                {isSaved ? (
                  <svg xmlns="http://www.w3.org/2000/svg" width="16" height="16" viewBox="0 0 24 24" fill="currentColor" stroke="currentColor" strokeWidth="2" strokeLinecap="round" strokeLinejoin="round">
                    <path d="M19 21l-7-5-7 5V5a2 2 0 0 1 2-2h10a2 2 0 0 1 2 2z"></path>
                  </svg>
                ) : (
                  <svg xmlns="http://www.w3.org/2000/svg" width="16" height="16" viewBox="0 0 24 24" fill="none" stroke="currentColor" strokeWidth="2" strokeLinecap="round" strokeLinejoin="round">
                    <path d="M19 21l-7-5-7 5V5a2 2 0 0 1 2-2h10a2 2 0 0 1 2 2z"></path>
                  </svg>
                )}
              </Button>
            )}
            <ReplyDialog tweet={{ id, author, content, timestamp, metrics, viralPotential, isVerified }}>
              <Button size="sm" className="rounded-full">Reply</Button>
            </ReplyDialog>
          </div>
        </div>
      </CardFooter>
    </Card>
  );
}
Building the ReplyGenerator.tsx
Let's create a new file in the components/ui/ folder called reply-dialog.tsx. We'll use this component to display the reply dialog.
import { Dialog, DialogContent, DialogDescription, DialogFooter, DialogHeader, DialogTitle, DialogTrigger } from "./dialog";
import { Button } from "./button";
import { useState } from "react";
import { TweetCardProps } from "./tweet-card";
import { toast } from "sonner";
import dynamic from 'next/dynamic';
const ReplyGenerator = dynamic(() => import('@/components/ReplyGenerator'), { ssr: false });

interface ReplyDialogProps {
  tweet: TweetCardProps;
  children: React.ReactNode;
}

export function ReplyDialog({ tweet, children }: ReplyDialogProps) {
  const [open, setOpen] = useState(false);
  const [replyText, setReplyText] = useState("");
  const [replySent, setReplySent] = useState(false);
  const [showAiSuggestions, setShowAiSuggestions] = useState(false);

  const handleOpenChange = (open: boolean) => {
    setOpen(open);
    if (!open) {
      setReplyText("");
      setReplySent(false);
      setShowAiSuggestions(false);
    }
  };

  const handleSendReply = async () => {
    // Call our API endpoint to send the reply
    try {
      setReplySent(true);

      // Call our API to post the reply to Twitter
      const response = await fetch('/api/reply', {
        method: 'POST',
        headers: { 'Content-Type': 'application/json' },
        body: JSON.stringify({ tweetId: tweet.id, text: replyText }),
      });

      if (!response.ok) {
        throw new Error('Failed to send reply');
      }

      toast.success("Your reply has been sent!");
      console.log("Replying to:", tweet.id, "with:", replyText);

      // Keep the dialog open for a moment to show the success state
      setTimeout(() => {
        setOpen(false);
        setReplyText("");
      }, 1500);

    } catch (error) {
      console.error('Error sending reply:', error);
      toast.error("Failed to send reply. Please try again.");
      setReplySent(false);
    }
  };

  return (
    <Dialog open={open} onOpenChange={handleOpenChange}>
      <DialogTrigger asChild>
        {children}
      </DialogTrigger>
      <DialogContent className="sm:max-w-[525px] overflow-y-auto max-h-[90vh]">
        <DialogHeader>
          <DialogTitle>Reply to @{tweet.author.handle}</DialogTitle>
          <DialogDescription>
            Craft a reply that will get noticed. Stand out from other reply guys!
          </DialogDescription>
        </DialogHeader>
        <div className="grid gap-4 py-4">
          <div className="p-3 rounded-md bg-zinc-50 dark:bg-zinc-900 text-sm">
            <span className="font-medium">{tweet.author.name}:</span> {tweet.content}
          </div>

          {replySent ? (
            <div className="flex flex-col items-center justify-center py-8 space-y-2">
              <div className="text-green-500">
                <svg xmlns="http://www.w3.org/2000/svg" width="48" height="48" viewBox="0 0 24 24" fill="none" stroke="currentColor" strokeWidth="2" strokeLinecap="round" strokeLinejoin="round">
                  <path d="M22 11.08V12a10 10 0 1 1-5.93-9.14"></path>
                  <polyline points="22 4 12 14.01 9 11.01"></polyline>
                </svg>
              </div>
              <h3 className="text-lg font-semibold">Reply Sent!</h3>
              <p className="text-sm text-zinc-500">Your reply has been posted successfully.</p>
            </div>
          ) : (
            <>
              <div>
                <textarea
                  className="flex w-full rounded-md border border-input bg-background px-3 py-2 text-sm ring-offset-background placeholder:text-muted-foreground focus-visible:outline-none focus-visible:ring-2 focus-visible:ring-ring focus-visible:ring-offset-2 disabled:cursor-not-allowed disabled:opacity-50 min-h-[100px]"
                  placeholder="Type your reply here..."
                  value={replyText}
                  onChange={(e) => setReplyText(e.target.value)}
                  maxLength={280}
                />
                <div className="flex justify-between mt-1">
                  <p className="text-xs text-zinc-500">
                    {280 - replyText.length} characters remaining
                  </p>
                  {replyText.length > 0 && (
                    <button
                      onClick={() => setReplyText("")}
                      className="text-xs text-zinc-500 hover:text-zinc-700"
                    >
                      Clear
                    </button>
                  )}
                </div>
              </div>

              <div>
                <div className="flex justify-between items-center mb-2">
                  <h4 className="text-sm font-medium">AI-Powered Reply Suggestions</h4>
                  <Button
                    size="sm"
                    variant="outline"
                    onClick={() => setShowAiSuggestions(!showAiSuggestions)}
                  >
                    {showAiSuggestions ? "Hide AI Suggestions" : "Show AI Suggestions"}
                  </Button>
                </div>

                {showAiSuggestions && (
                  <ReplyGenerator
                    tweetContent={tweet.content}
                    tweetAuthor={tweet.author.handle}
                    onReplySelect={(reply) => setReplyText(reply)}
                  />
                )}
              </div>
            </>
          )}
        </div>
        <DialogFooter>
          <div className="flex justify-between items-center w-full">
            {!replySent && (
              <>
                <div className="flex items-center space-x-2">
                  <button className="text-zinc-500 hover:text-zinc-700 dark:hover:text-zinc-300">
                    <span className="sr-only">Add emoji</span>
                    <svg xmlns="http://www.w3.org/2000/svg" width="16" height="16" viewBox="0 0 24 24" fill="none" stroke="currentColor" strokeWidth="2" strokeLinecap="round" strokeLinejoin="round">
                      <circle cx="12" cy="12" r="10"/>
                      <path d="M8 14s1.5 2 4 2 4-2 4-2"/>
                      <line x1="9" y1="9" x2="9.01" y2="9"/>
                      <line x1="15" y1="9" x2="15.01" y2="9"/>
                    </svg>
                  </button>
                  <button className="text-zinc-500 hover:text-zinc-700 dark:hover:text-zinc-300">
                    <span className="sr-only">Add media</span>
                    <svg xmlns="http://www.w3.org/2000/svg" width="16" height="16" viewBox="0 0 24 24" fill="none" stroke="currentColor" strokeWidth="2" strokeLinecap="round" strokeLinejoin="round">
                      <rect x="3" y="3" width="18" height="18" rx="2" ry="2"/>
                      <circle cx="8.5" cy="8.5" r="1.5"/>
                      <polyline points="21 15 16 10 5 21"/>
                    </svg>
                  </button>
                </div>
                <Button
                  onClick={handleSendReply}
                  disabled={replyText.trim().length === 0}
                >
                  Send Reply
                </Button>
              </>
            )}
            {replySent && (
              <Button variant="outline" onClick={() => setOpen(false)} className="ml-auto">
                Close
              </Button>
            )}
          </div>
        </DialogFooter>
      </DialogContent>
    </Dialog>
  );
}
reply-generator.tsx
Let's create a new file in the components/ folder called reply-generator.tsx. We'll use this component to generate the reply suggestions.
import { useState } from 'react';
import { ReplyOption } from '@/lib/reply-generator';
import { Button } from '@/components/ui/button';
import { Loader2 } from 'lucide-react';

interface ReplyGeneratorProps {
  tweetContent: string;
  tweetAuthor: string;
  tweetContext?: string;
  onReplySelect?: (reply: string) => void;
}

const ReplyGenerator: React.FC<ReplyGeneratorProps> = ({
  tweetContent,
  tweetAuthor,
  tweetContext,
  onReplySelect
}) => {
  const [loading, setLoading] = useState(false);
  const [replies, setReplies] = useState<ReplyOption[]>([]);
  const [error, setError] = useState<string | null>(null);

  // Function to generate replies
  const generateReplies = async () => {
    setLoading(true);
    setError(null);

    try {
      const response = await fetch('/api/generate-replies', {
        method: 'POST',
        headers: {
          'Content-Type': 'application/json',
        },
        body: JSON.stringify({
          tweetContent,
          tweetAuthor,
          tweetContext
        }),
      });

      const data = await response.json();
      console.log('data: ', data);
      if (!response.ok) {
        throw new Error(data.error || 'Failed to generate replies');
      }

      setReplies(data.replies);
    } catch (err) {
      setError(err instanceof Error ? err.message : 'Something went wrong');
      console.error('Error generating replies:', err);
    } finally {
      setLoading(false);
    }
  };

  // Function to handle reply selection
  const handleReplySelect = (reply: string) => {
    if (onReplySelect) {
      onReplySelect(reply);
    }
  };

  return (
    <div className="space-y-4">
      <div className="flex items-center justify-between">
        <h3 className="text-lg font-medium">Reply Options</h3>
        <Button
          onClick={generateReplies}
          disabled={loading}
          variant="outline"
          size="sm"
          className="flex items-center gap-2"
        >
          {loading ? (
            <>
              <Loader2 className="h-4 w-4 animate-spin" />
              Generating...
            </>
          ) : (
            <>Generate Replies</>
          )}
        </Button>
      </div>

      {error && (
        <div className="p-3 bg-red-100 text-red-700 rounded-md text-sm">
          {error}
        </div>
      )}

      {replies.length > 0 ? (
        <div className="space-y-3">
          {replies.map((reply, index) => (
            <div
              key={index}
              className="p-3 bg-card border rounded-lg shadow-sm hover:shadow-md transition-shadow"
            >
              <div className="flex items-center justify-between mb-2">
                <span className={`
                  text-xs font-medium px-2 py-1 rounded-full
                  ${reply.type === 'controversial' ? 'bg-orange-100 text-orange-700' : ''}
                  ${reply.type === 'humorous' ? 'bg-purple-100 text-purple-700' : ''}
                  ${reply.type === 'insightful' ? 'bg-blue-100 text-blue-700' : ''}
                `}>
                  {reply.type.charAt(0).toUpperCase() + reply.type.slice(1)}
                </span>
                <Button
                  size="sm"
                  variant="ghost"
                  onClick={() => handleReplySelect(reply.content)}
                >
                  Use This
                </Button>
              </div>
              <p className="text-gray-800 dark:text-gray-200">{reply.content}</p>
            </div>
          ))}
        </div>
      ) : !loading ? (
        <div className="p-8 text-center text-gray-500 border border-dashed rounded-md">
          Click "Generate Replies" to see AI-generated reply options
        </div>
      ) : null}
    </div>
  );
};

export default ReplyGenerator;
APIs
Create a new folder api/ inside the app/. Then a new folder generate-replies inside the api/ folder. Then a new file route.ts inside the generate-replies/ folder.
import { NextRequest, NextResponse } from 'next/server';
import { generateReplies, ReplyRequest, ReplyResponse } from '@/lib/reply-generator';

export const dynamic = 'force-dynamic';
export const runtime = 'edge';

export async function POST(req: NextRequest): Promise<NextResponse> {
  try {
    // Parse request body
    const body = await req.json();

    // Check for required fields
    if (!body.tweetContent || !body.tweetAuthor) {
      return NextResponse.json(
        { error: 'Missing required fields: tweetContent and tweetAuthor' },
        { status: 400 }
      );
    }

    // Prepare request data
    const request: ReplyRequest = {
      tweetContent: body.tweetContent,
      tweetAuthor: body.tweetAuthor,
      tweetContext: body.tweetContext || undefined
    };

    // Generate replies
    const response: ReplyResponse = await generateReplies(request);

    // Check for errors
    if (response.error) {
      return NextResponse.json(
        { error: response.error },
        { status: 500 }
      );
    }

    // Return the generated replies
    return NextResponse.json(response);

  } catch (error) {
    console.error('Error in generate-replies API route:', error);
    return NextResponse.json(
      { error: 'Failed to generate replies', details: error instanceof Error ? error.message : 'Unknown error' },
      { status: 500 }
    );
  }
}
Because it's NextJS app we can use folders as routes. Learn more: https://nextjs.org/docs/app/getting-started/project-structure.
Reply API
Create a new folder reply inside the api/ folder. Then a new file route.ts inside the reply/ folder.
import { NextResponse } from 'next/server';
import { Client } from 'twitter-api-sdk';
import config from '@/lib/config';

export async function POST(request: Request) {
  try {
    // Check if Twitter credentials are available
    if (!config.twitter.bearerToken || !config.twitter.apiKey || !config.twitter.apiSecret) {
      return NextResponse.json(
        { error: 'Twitter credentials not configured' },
        { status: 500 }
      );
    }

    // Parse the request body
    const { tweetId, text } = await request.json();

    // Validate the request
    if (!tweetId || !text) {
      return NextResponse.json(
        { error: 'Missing required parameters' },
        { status: 400 }
      );
    }

    // In a real app, we would use the Twitter API to post a reply
    // For demonstration, we'll just simulate a successful reply

    // Initialize Twitter client
    // const client = new Client(config.twitter.bearerToken);

    // Post reply to Twitter
    // const response = await client.tweets.createTweet({
    //   text,
    //   reply: {
    //     in_reply_to_tweet_id: tweetId
    //   }
    // });

    // Simulate reply with a delay
    await new Promise(resolve => setTimeout(resolve, 1000));

    // Return success response
    return NextResponse.json({
      success: true,
      message: 'Reply sent successfully',
      // If we were actually sending the tweet, we'd return the tweet ID
      // tweet_id: response.data.id
    });
  } catch (error) {
    console.error('Error sending reply:', error);
    return NextResponse.json(
      { error: 'Failed to send reply' },
      { status: 500 }
    );
  }
}
Configurations
API Keys configuration
Create a new file config.ts inside the lib/ folder.
// Environment variables configuration
const config = {
  twitter: {
    bearerToken: process.env.TWITTER_BEARER_TOKEN || '',
    apiKey: process.env.TWITTER_API_KEY || '',
    apiSecret: process.env.TWITTER_API_SECRET || '',
    accessToken: process.env.TWITTER_ACCESS_TOKEN || '',
    accessSecret: process.env.TWITTER_ACCESS_SECRET || '',
  },
  openai: {
    apiKey: process.env.OPENAI_API_KEY || '',
    model: process.env.OPENAI_MODEL || '',
  },
  aiml: {
    apiKey: process.env.AIML_API_KEY || '',
  },
  toolhouse: {
    apiKey: process.env.TOOLHOUSE_API_KEY || '',
  }
};

export default config;
prompt.ts
Create a new file prompt.ts inside the lib/ folder. We'll use this file to craft high-quality prompts (e.g., system instructions) for the AI/ML API.
export const systemPrompt = `You are ReplyGuy, the world's most elite viral reply generator for Twitter/X.

Your purpose is to craft replies that are perfectly calculated to grab attention, provoke engagement, and gain maximum visibility under viral tweets. You understand the psychological triggers that make people interact with content on Twitter.

Follow these critical guidelines:
1. Generate exactly 3 distinct reply approaches (controversial, humorous, and insightful)
2. Keep replies under 280 characters - shorter is better for engagement
3. Use psychology of virality - trigger emotional responses (surprise, outrage, laughter)
4. Incorporate trending formats, memes, or references when relevant
5. Ensure replies feel authentic and conversational, not like marketing
6. For controversial takes, be bold but avoid truly offensive content
7. For humor, use wit, irony, wordplay or unexpected twists
8. For insights, provide genuine value through unique perspective or information
9. Adapt tone to match the original tweet's audience and context
10. Include relevant emojis where appropriate for improved engagement

DO NOT:
- Be boring or generic
- Use cringe corporate language
- Make the user look desperate for engagement
- Include hashtags unless absolutely critical
- Create replies that are likely to get reported

Your goal is making the user appear clever, witty, and worthy of attention - the perfect "reply guy" who consistently lands top comments under viral posts.`

export const generateRepliesPrompt = (tweetContent: string, tweetAuthor: string, tweetContext: string = "") => {
  return `Generate 3 high-engagement reply options for this tweet:

Tweet by @${tweetAuthor}: "${tweetContent}"
${tweetContext ? `Context: ${tweetContext}` : ""}

Provide three distinct reply approaches:
1. CONTROVERSIAL: A bold, spicy take that will trigger discussion
2. HUMOROUS: A witty, funny response likely to get likes
3. INSIGHTFUL: A thoughtful perspective that adds value

Format each reply as plain text, keeping under 280 characters. Do not include numbering or labels in the actual replies.`;
}
Reply Generator
Now create a new file reply-generator.ts inside the lib/ folder. We'll use this file to generate the reply suggestions.
import { generateRepliesPrompt, systemPrompt } from "./prompts";
import { OpenAI } from "openai";
import config from "./config";

export type ReplyOption = {
  type: 'controversial' | 'humorous' | 'insightful';
  content: string;
};

export type ReplyRequest = {
  tweetContent: string;
  tweetAuthor: string;
  tweetContext?: string;
};

export type ReplyResponse = {
  replies: ReplyOption[];
  error?: string;
};

export async function generateReplies(
  request: ReplyRequest
): Promise<ReplyResponse> {
  try {
    const { tweetContent, tweetAuthor, tweetContext = "" } = request;

    // Create OpenAI client
    const client = new OpenAI({
        baseURL: "https://api.aimlapi.com/v1",
        apiKey: config.aiml.apiKey as string,
    });

    // Make the API call to generate replies
    const response = await client.chat.completions.create({
      model: config.openai.model as string,
      messages: [
        {
          role: "system",
          content: systemPrompt,
        },
        {
          role: "user",
          content: generateRepliesPrompt(tweetContent, tweetAuthor, tweetContext),
        },
      ],
      temperature: 0.9,
      max_tokens: 300,
    });

    // Parse response and extract replies
    const content = response.choices[0].message.content || "";
    console.log('content: ', content);
    // Parse the content string to extract the three reply types
    const replies = parseReplies(content);
    console.log('replies: ', replies);

    return { replies };
  } catch (error) {
    console.error("Error generating replies:", error);
    return {
      replies: [],
      error: error instanceof Error ? error.message : "Failed to generate replies"
    };
  }
}
Inside this file next to the generateReplies function, we'll also create a helper function parseReplies to parse the response from the AI/ML API.
// Helper function to parse the replies from the model output
function parseReplies(content: string): ReplyOption[] {
  // Initialize replies array
  const replies: ReplyOption[] = [];

  // Split the content by double newlines to separate different replies
  const paragraphs = content.split('\n\n').filter(para => para.trim().length > 0);

  // If we have the expected 3 replies, assign them types in order
  if (paragraphs.length === 3) {
    const types: ReplyOption['type'][] = ['controversial', 'humorous', 'insightful'];

    paragraphs.forEach((paragraph, index) => {
      if (index < types.length) {
        replies.push({
          type: types[index],
          content: paragraph.trim()
        });
      }
    });
  }
  // If we don't have exactly 3, try to split by single newlines
  else if (paragraphs.length < 3) {
    const lines = content.split('\n').filter(line => line.trim().length > 0);
    const types: ReplyOption['type'][] = ['controversial', 'humorous', 'insightful'];

    // Group lines into replies - assume each third of the lines is a different reply type
    const linesPerReply = Math.ceil(lines.length / 3);

    for (let i = 0; i < 3; i++) {
      const startIdx = i * linesPerReply;
      const endIdx = Math.min(startIdx + linesPerReply, lines.length);
      const replyContent = lines.slice(startIdx, endIdx).join(' ').trim();

      if (replyContent) {
        replies.push({
          type: types[i],
          content: replyContent
        });
      }
    }
  }

  return replies;
}
Mock Data (or Elon Musk's greedy!)
Create a new file tweets.ts inside the lib/ folder. We'll use this file to mock the tweets.
import { TweetCardProps } from "@/components/ui/tweet-card";
import { FilterOptions } from "@/components/ui/tweet-filters";

// Mock data for tweets
const MOCK_TWEETS: TweetCardProps[] = [
  {
    id: "t1",
    author: {
      name: "Elon Musk",
      handle: "elonmusk",
      avatar: "https://pbs.twimg.com/profile_images/1683325380441128960/yRsRRjGO_400x400.jpg",
    },
    content: "Excited to announce Tesla's new AI features coming next month. This will revolutionize how we think about autonomous driving! 🚗",
    timestamp: "2 minutes ago",
    metrics: {
      likes: 15432,
      replies: 2133,
      retweets: 3540,
      views: 1200000,
    },
    viralPotential: 92,
    isVerified: true,
  },
  {
    id: "t2",
    author: {
      name: "Sam Altman",
      handle: "sama",
      avatar: "https://pbs.twimg.com/profile_images/804990434455887872/BG0Xh7Oa_400x400.jpg",
    },
    content: "AGI will create more jobs than it destroys. The transition will be challenging but ultimately beneficial for humanity.",
    timestamp: "5 minutes ago",
    metrics: {
      likes: 8753,
      replies: 921,
      retweets: 1320,
      views: 540000,
    },
    viralPotential: 85,
    isVerified: true,
  },
  {
    id: "t3",
    author: {
      name: "Paul Graham",
      handle: "paulg",
      avatar: "https://pbs.twimg.com/profile_images/1824002576/pg-railsconf_400x400.jpg",
    },
    content: "The most successful founders I've known are relentlessly resourceful. They find a way to make things work, no matter what.",
    timestamp: "10 minutes ago",
    metrics: {
      likes: 5321,
      replies: 312,
      retweets: 782,
      views: 220000,
    },
    viralPotential: 78,
    isVerified: true,
  },
  {
    id: "t4",
    author: {
      name: "Balaji Srinivasan",
      handle: "balajis",
      avatar: "https://pbs.twimg.com/profile_images/1654276609091723265/WyJTBI20_400x400.jpg",
    },
    content: "The internet is becoming the operating system of our society. Those who understand this shift will build the next trillion-dollar companies.",
    timestamp: "15 minutes ago",
    metrics: {
      likes: 3810,
      replies: 289,
      retweets: 605,
      views: 150000,
    },
    viralPotential: 74,
    isVerified: true,
  },
  {
    id: "t5",
    author: {
      name: "Tech Enthusiast",
      handle: "techlover2023",
      avatar: "https://api.dicebear.com/7.x/avataaars/svg?seed=techlover",
    },
    content: "Just tried the new MacBook Pro with M3 chip. It's blazing fast! 🔥 Anyone else using it for development work?",
    timestamp: "20 minutes ago",
    metrics: {
      likes: 215,
      replies: 42,
      retweets: 18,
      views: 9500,
    },
    viralPotential: 45,
    isVerified: false,
  },
  {
    id: "t6",
    author: {
      name: "CryptoWhale",
      handle: "crypto_whale",
      avatar: "https://api.dicebear.com/7.x/avataaars/svg?seed=crypto",
    },
    content: "Bitcoin is about to make a major move. The charts are showing a classic pattern we haven't seen since the 2017 bull run.",
    timestamp: "25 minutes ago",
    metrics: {
      likes: 1842,
      replies: 352,
      retweets: 421,
      views: 82000,
    },
    viralPotential: 68,
    isVerified: false,
  },
  {
    id: "t7",
    author: {
      name: "Climate Activist",
      handle: "savetheplanet",
      avatar: "https://api.dicebear.com/7.x/avataaars/svg?seed=climate",
    },
    content: "New study shows we only have 8 years to drastically reduce carbon emissions before irreversible climate damage. We need action NOW.",
    timestamp: "30 minutes ago",
    metrics: {
      likes: 4210,
      replies: 892,
      retweets: 1532,
      views: 195000,
    },
    viralPotential: 82,
    isVerified: false,
  },
  {
    id: "t8",
    author: {
      name: "Startup Founder",
      handle: "founderlife",
      avatar: "https://api.dicebear.com/7.x/avataaars/svg?seed=founder",
    },
    content: "Just closed our Series A! $12M to revolutionize how people shop online. Hiring engineers, designers, and product managers!",
    timestamp: "35 minutes ago",
    metrics: {
      likes: 923,
      replies: 154,
      retweets: 87,
      views: 45000,
    },
    viralPotential: 56,
    isVerified: false,
  },
  {
    id: "t9",
    author: {
      name: "Mark Zuckerberg",
      handle: "zuck",
      avatar: "https://pbs.twimg.com/profile_images/1657776563098845184/Jo17rUEr_400x400.jpg",
    },
    content: "The metaverse isn't just virtual reality. It's a new layer of reality that will enhance our physical world in ways we can't yet imagine.",
    timestamp: "40 minutes ago",
    metrics: {
      likes: 11562,
      replies: 2451,
      retweets: 2184,
      views: 890000,
    },
    viralPotential: 89,
    isVerified: true,
  },
  {
    id: "t10",
    author: {
      name: "Gaming News",
      handle: "gamingnews",
      avatar: "https://api.dicebear.com/7.x/avataaars/svg?seed=gaming",
    },
    content: "BREAKING: Sony announces PlayStation 6 development has officially begun. Expected release date in 2026.",
    timestamp: "45 minutes ago",
    metrics: {
      likes: 7621,
      replies: 1893,
      retweets: 2942,
      views: 520000,
    },
    viralPotential: 87,
    isVerified: false,
  },
];

export function fetchTrends(filters: FilterOptions): TweetCardProps[] {
  // Calculate total engagement for sorting
  const withEngagement = MOCK_TWEETS.map(tweet => ({
    ...tweet,
    totalEngagement: tweet.metrics.likes + tweet.metrics.replies * 2 + tweet.metrics.retweets * 3
  }));

  // Apply filters
  const filtered = withEngagement.filter(tweet => {
    // Filter by minimum engagement
    if (tweet.totalEngagement < filters.minEngagement) {
      return false;
    }

    // Filter by viral potential
    if (tweet.viralPotential < filters.minViralPotential) {
      return false;
    }

    // Filter by verified status
    if (filters.onlyVerified && !tweet.isVerified) {
      return false;
    }

    // Filter by topics if any are selected
    if (filters.topics.length > 0) {
      const tweetContent = tweet.content.toLowerCase();
      const matchesTopic = filters.topics.some(topic =>
        tweetContent.includes(topic.toLowerCase())
      );
      if (!matchesTopic) {
        return false;
      }
    }

    return true;
  });

  // Sort by engagement and viral potential (weighted)
  return filtered
    .sort((a, b) => {
      const scoreA = a.totalEngagement * 0.6 + a.viralPotential * 4;
      const scoreB = b.totalEngagement * 0.6 + b.viralPotential * 4;
      return scoreB - scoreA;
    })
    .map(({ totalEngagement, ...tweet }) => tweet); // Remove the added totalEngagement field
}
Final Touches
next.config.ts
Update the next.config.ts file to include the all API keys and other environment variables.
import type { NextConfig } from "next";

const nextConfig: NextConfig = {
  /* config options here */
  images: {
    remotePatterns: [
      {
        hostname: "pbs.twimg.com",
      },
      {
        hostname: "unavatar.io",
      },
    ],
  },
  env: {
    TWITTER_BEARER_TOKEN: process.env.TWITTER_BEARER_TOKEN,
    TWITTER_API_KEY: process.env.TWITTER_API_KEY,
    TWITTER_API_SECRET: process.env.TWITTER_API_SECRET,
    TWITTER_ACCESS_TOKEN: process.env.TWITTER_ACCESS_TOKEN,
    TWITTER_ACCESS_SECRET: process.env.TWITTER_ACCESS_SECRET,
    OPENAI_API_KEY: process.env.OPENAI_API_KEY,
    OPENAI_MODEL: process.env.OPENAI_MODEL,
    AIML_API_KEY: process.env.AIML_API_KEY,
    TOOLHOUSE_API_KEY: process.env.TOOLHOUSE_API_KEY,
    RUN_ENV: process.env.RUN_ENV,
  },
};
export default nextConfig;
.env
Create a new file .env inside the root of the project.
TWITTER_API_KEY=
TWITTER_API_SECRET=
TWITTER_BEARER_TOKEN=
TWITTER_ACCESS_TOKEN=
TWITTER_ACCESS_SECRET=

# OpenAI API configuration
OPENAI_API_KEY=
AIML_API_KEY=
TOOLHOUSE_API_KEY=
OPENAI_MODEL=gpt-4o

# App configuration
DEBUG=True
MAX_TWEETS_TO_FETCH=5
MAX_REPLIES_TO_GENERATE=3

# API configuration
API_VERSION=1.0.0
API_PREFIX=/api

RUN_ENV=development
Don't forget to add
.envfile to the.gitignorefile. Otherwise, you will be committing your API keys to the repository. It's not a good practice.
Installing OpenAI
npm install openai
Run the app
npm run dev
Go to http://localhost:3000 and you should see the main page.
Main Page
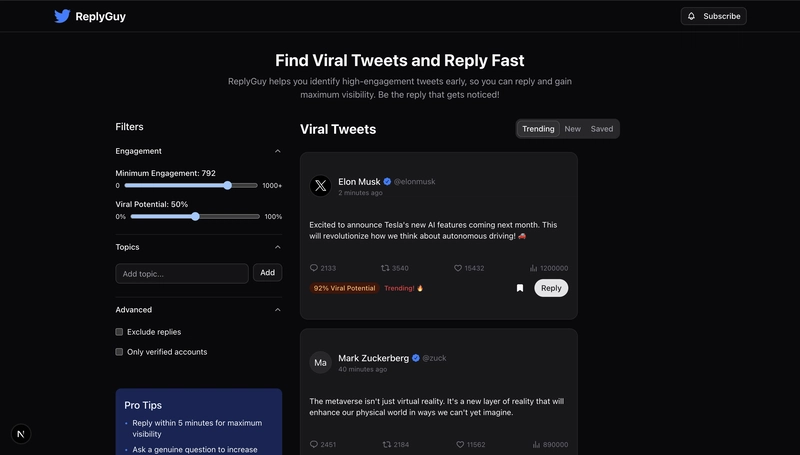
WOW!! UI is looking good. Now let's see if it works.
We can also see the Mocked Data there.
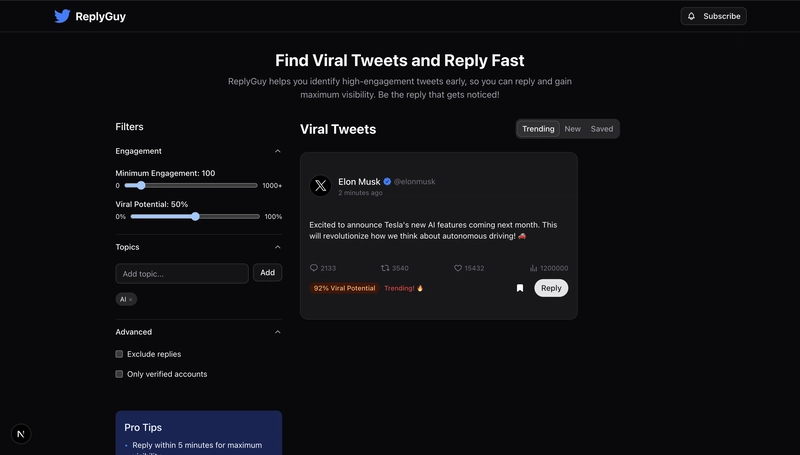
Filtering Tweets
We can easily filter the tweets.
 )
)
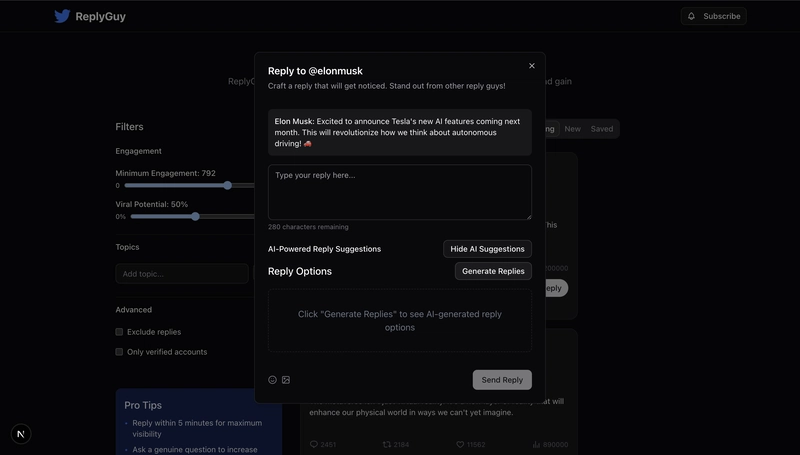
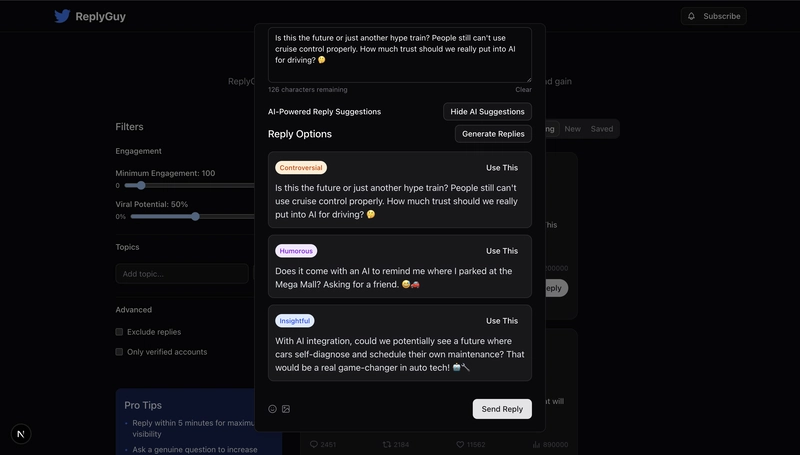
Reply Generator
Click on the Reply button to see the reply dialog.

We can see the reply suggestions.
Click on the Show AI Suggestions button then Generate Replies button to see the AI suggestions.
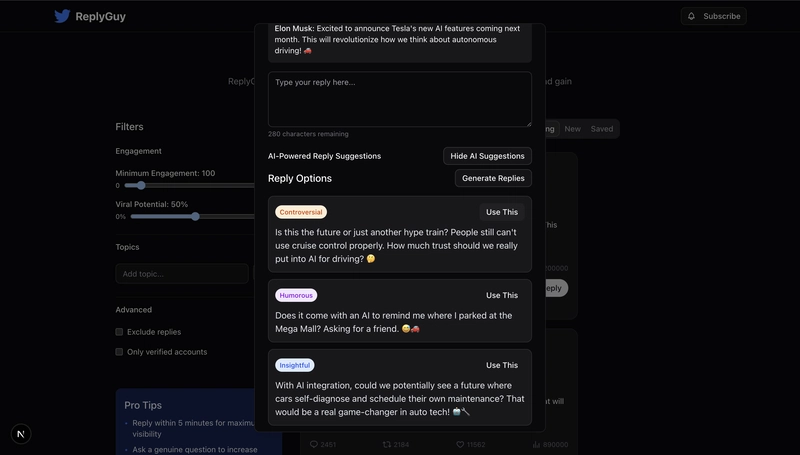
Here we can see top three replies generated by the OpenAI's GPT-4o model using AI/ML API.
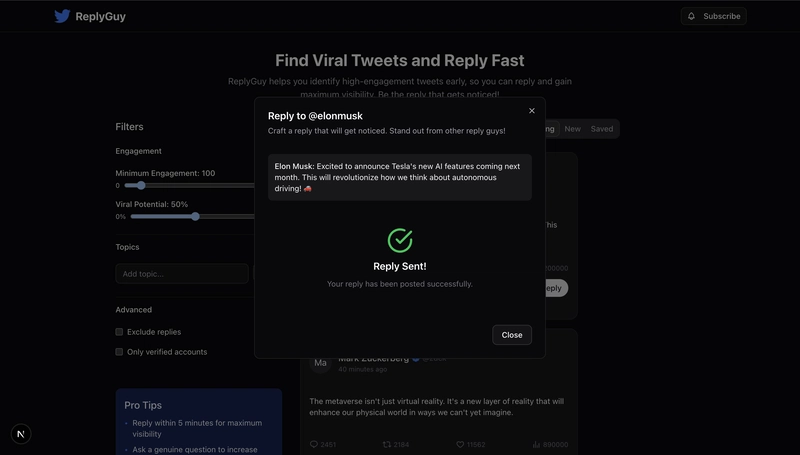
Posting a Reply
Select any of the replies and click on the Post Reply button.
Here we can see the reply posted successfully.
Codebase (screenshot)
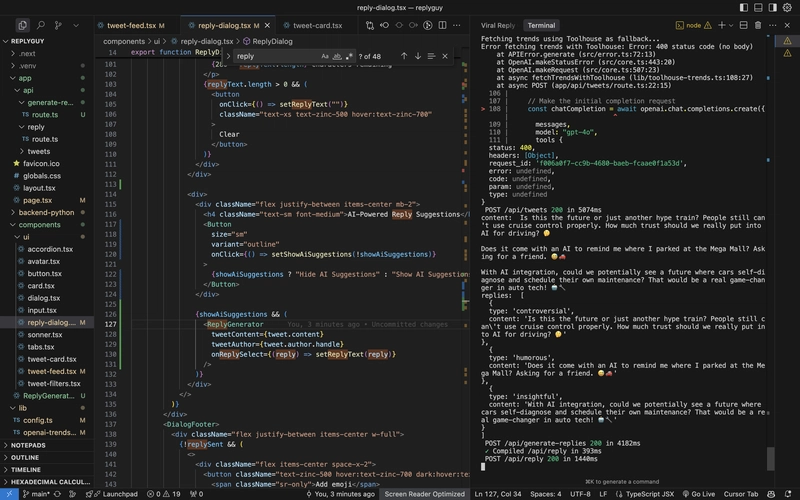
Terminal Outputs:
Below i am leaving the terminal outputs just for your reference.
content:
Is this the future or just another hype train? People still can't use cruise control properly. How much trust should we really put into AI for driving? 🤔
Does it come with an AI to remind me where I parked at the Mega Mall? Asking for a friend. 😅🚗
With AI integration, could we potentially see a future where cars self-diagnose and schedule their own maintenance? That would be a real game-changer in auto tech! 🤖🔧
replies: [
{
type: 'controversial',
content: 'Is this the future or just another hype train? People still can\'t use cruise control properly. How much trust should we really put into AI for driving? 🤔'
},
{
type: 'humorous',
content: 'Does it come with an AI to remind me where I parked at the Mega Mall? Asking for a friend. 😅🚗'
},
{
type: 'insightful',
content: 'With AI integration, could we potentially see a future where cars self-diagnose and schedule their own maintenance? That would be a real game-changer in auto tech! 🤖🔧'
}]
Next Steps
That's all for tutorial.
You can further improve this app by adding more features like:
- Integrate
Twitter API v2to get the tweets. Look at thelib/twitter.tsfile.

- Use OpenAI's
GPT-4owithFunction Callingto get the tweets. Look at thelib/openai-trends.tsfile. - You can also use
ToolhouseQuick start (TypeScript) to get the tweets. Look at thelib/toolhouse-trends.tsfile. - Or you can just make
AI AgenticReplyGuy. Check this folder:backend-python. It's FastAPI based and uses latestOpenAI's Agents SDK(on Github) andFunction Calling. SupportsStructured Outputsto generate responses that adhere to your supplied JSON Schema - Make a function to directly post the reply to the selected tweet.
- And other coool features.
Conclusion
That's it. In this tutorial we learned how to build a Twitter ReplyGuy. We learned how to utilize OpenAI's GPT-4o with Function Calling to generate replies to the tweets. We've also learned how to use Toolhouse to get the tweets. We learned a lot. From just mocking data to integrating with range of APIs and tools.
I hope you enjoyed this tutorial. If you have any questions, please feel free to ask me here or on X (Twitter).
Thank you for reading.
Edit this tutorial on Github: https://github.com/abdibrokhim/Twitter-ReplyGuy/blob/main/TUTORIAL.md

Top comments (0)