
This post was originally published in adityasridhar.com
As a part of this article you will be building 2 simple REST apis Using Springboot. This article will give an idea on how to quickly get started with springboot.
So let's get started 😄
Pre-requisite
Ensure you have Maven Installed in your system before starting with this article.
You can Install Maven from https://maven.apache.org/
Also ensure Maven is set in the PATH so that mvn comands work.
you can verify if maven is installed and can be accessed using the command
mvn -v
Also ensure JAVA_HOME is set.
Project Setup
The first step is to setup your project.
Setting up a Springboot project is pretty easy.
Go to https://start.spring.io/.
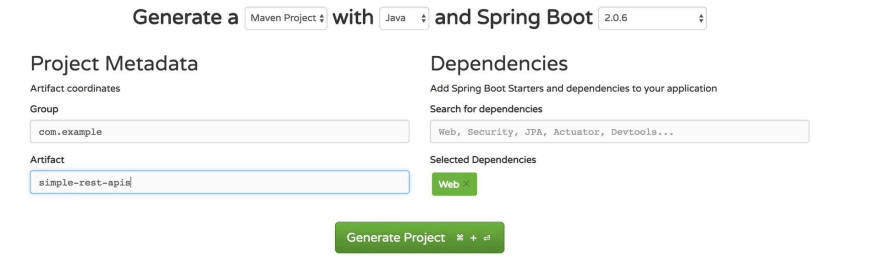
In the Site enter the Artifact name as simple-rest-apis and under dependencies add Web. You can enter any Other Artifact name as well.
Also in the top Ensure you are creating a Maven Project with Java using Springboot version 2.0.6 This is to ensure that the results in this article are reproducible. Once you are done with this article, You can experiment by choosing the other options 😄
Once you enter the information, the screen should look like this
Click on Generate Project, this will download a zip file onto your computer. Extract this zip file. The extracted folder is your springboot project.
You can import the project into your preferred IDE. I used eclipse to try this out.
Project Structure Explained
pom.xml
This file has all the maven dependencies.
The main dependency to note is the following
<dependency>
    <groupId>org.springframework.boot</groupId>
    <artifactId>spring-boot-starter-web</artifactId>
</dependency>
spring-boot-starter-web dependency ensures that the project can be used for web applications
Also one other important thing to notice in pom.xml is the following
<parent>
        <groupId>org.springframework.boot</groupId>
        <artifactId>spring-boot-starter-parent</artifactId>
        <version>2.0.6.RELEASE</version>
        <relativePath/> <!-- lookup parent from repository -->
</parent>
spring-boot-starter-parent is made as the parent of this project. This ensures that any internal dependencies needed by springboot are automatically taken care off, and the developer need not worry about it.
SimpleRestApisApplication.Java
This file is named after the project name followed by an Application.
This file is present inside src/main/java folder and inside com.example.simplerestapis package.
This file has the following piece of code
package com.example.simplerestapis;

import org.springframework.boot.SpringApplication;
import org.springframework.boot.autoconfigure.SpringBootApplication;

@SpringBootApplication
public class SimpleRestApisApplication {

    public static void main(String[] args) {
        SpringApplication.run(SimpleRestApisApplication.class, args);
    }
}
The main highlight here is the annotation @SpringBootApplication. This internally is a combination of the following 3 annotations
- @Configuration: Needed for Manual Spring configurations. Adding this annotation ensures that configuration can be done in a java class itself instead of using a separate xml file.
- @EnableAutoConfiguration: Spring needs a lot of configuration to be done. This annotation ensures that a lot of the configuration is done automatically.
- @ComponentScan: This tells Spring, where all to scan for components.
The Line SpringApplication.run(SimpleRestApisApplication.class, args); bootstraps the application.
Application.properties
This file is present inside src/main/resources. The file can be used to list out the various properties to use while running the application. For example it can be used to mention on which port the application should run.
Code
The code for the API's which are built here can be found here
Create your first API
Our First API will be a simple API demonstrating GET request.
Create a package called com.example.simplerestapis.models. Inside this package create a file called as SampleResponse.java
Copy the following code into SampleResponse.java
package com.example.simplerestapis.models;
public class SampleResponse {
    private String message;
    private long id;

    public String getMessage() {
        return message;
    }

    public void setMessage(String message) {
        this.message = message;
    }

    public long getId() {
        return id;
    }

    public void setId(long id) {
        this.id = id;
    }

}
SampleResponse.java is just a model class. It indicates the fields which are present in the response of your api.
Create a package called com.example.simplerestapis.controller. Inside this package create a file called as WebController.java
Copy the following code into WebController.java
package com.example.simplerestapis.controller;
import org.springframework.web.bind.annotation.RequestMapping;
import org.springframework.web.bind.annotation.RequestParam;
import org.springframework.web.bind.annotation.RestController;

import com.example.simplerestapis.models.SampleResponse;

@RestController
public class WebController {

    @RequestMapping("/sample")
    public SampleResponse Sample(@RequestParam(value = "name",
    defaultValue = "Robot") String name) {
        SampleResponse response = new SampleResponse();
        response.setId(1);
        response.setMessage("Your name is "+name);
        return response;

    }
}
In the Above Code the Annotation @RestController indicates that this class will have Rest End points.
This Annotation basically tells that this class is a controller and the value returned from a function in this class will either be converted to JSON or XML. Default in JSON.
@RequestMapping maps the /sample endpoint to Sample Function
@RequestParam indicates that the endpoint /sample will have one Query parameter called name. The default value of name is "Robot"
The code inside the function is pretty straight forward. The response is being set based on name value.
Go to command prompt. Go into your project folder and run the following command to start the application
mvn spring-boot:run
By Default the application runs on port 8080 in localhost.
In order to test api end points you can use Postman. Download postman from the link given.
Go to postman and type the following url
localhost:8080/sample?name=aditya and hit send.

This will give the following response back
{
    "message": "Your name is aditya",
    "id": 1
}
Now Try the following url
localhost:8080/sample and hit send
This will give the following response back
{
    "message": "Your name is Robot",
    "id": 1
}
Congrats 😄
You have created your first API using springboot. You have learnt how to create a simple GET rest api with a query parameter
Create your second API
The Second API will demonstrate how to create an API which supports POST Request
Inside com.example.simplerestapis.models package, create a java class called PostRequest.java
Copy the following code into PostRequest.java
package com.example.simplerestapis.models;

public class PostRequest {
    int id;
    String name;
    public int getId() {
        return id;
    }
    public String getName() {
        return name;
    }
    public void setId(int id) {
        this.id = id;
    }
    public void setName(String name) {
        this.name = name;
    }

}
A POST Request generally has a POST body which is sent as an input. PostRequest.java indicates all the fields which are present in the input POST body
Inside com.example.simplerestapis.models package, create a java class called PostResponse.java
Copy the following code into PostResponse.java
package com.example.simplerestapis.models;

public class PostResponse {
    int id;
    String message;
    String extra;
    public String getExtra() {
        return extra;
    }
    public int getId() {
        return id;
    }
    public String getMessage() {
        return message;
    }
    public void setExtra(String extra) {
        this.extra = extra;
    }
    public void setId(int id) {
        this.id = id;
    }
    public void setMessage(String message) {
        this.message = message;
    }

}
PostResponse.java indicates the fields which are present in the output of the POST Request.
In WebController.java add the following imports
import org.springframework.web.bind.annotation.RequestBody;
import org.springframework.web.bind.annotation.RequestMethod;

import com.example.simplerestapis.models.PostRequest;
import com.example.simplerestapis.models.PostResponse;
Also add the following function in WebController.java
@RequestMapping(value = "/test", method = RequestMethod.POST)
public PostResponse Test(@RequestBody PostRequest inputPayload) {
    PostResponse response = new PostResponse();
    response.setId(inputPayload.getId()*100);
    response.setMessage("Hello " + inputPayload.getName());
    response.setExtra("Some text");
    return response;
}
This code creates a new endpoint called as /test and maps it to Test function
Also the code method = RequestMethod.POST indicates that /test api end point can accept POST Requests
@RequestBody PostRequest inputPayload indicates that the post request will have an input post body of type PostRequest. The input post body is stored in inputPayload Object.
The code is pretty straightforward wherein the response is set, based on the input that is coming.
The id from input payload is multiplied by 100 and set to the output payload
The name parameter is appended with Hello and set to the output payload
extra paramter is hardcoded to a string value of Some text
The final code code in WebController.java looks as follows
package com.example.simplerestapis.controller;
import org.springframework.web.bind.annotation.RequestBody;
import org.springframework.web.bind.annotation.RequestMapping;
import org.springframework.web.bind.annotation.RequestMethod;
import org.springframework.web.bind.annotation.RequestParam;
import org.springframework.web.bind.annotation.RestController;

import com.example.simplerestapis.models.PostRequest;
import com.example.simplerestapis.models.PostResponse;
import com.example.simplerestapis.models.SampleResponse;

@RestController
public class WebController {

    @RequestMapping("/sample")
    public SampleResponse Sample(@RequestParam(value = "name",
    defaultValue = "Robot") String name) {
        SampleResponse response = new SampleResponse();
        response.setId(1);
        response.setMessage("Your name is "+name);
        return response;

    }

    @RequestMapping(value = "/test", method = RequestMethod.POST)
    public PostResponse Test(@RequestBody PostRequest inputPayload) {
        PostResponse response = new PostResponse();
        response.setId(inputPayload.getId()*100);
        response.setMessage("Hello " + inputPayload.getName());
        response.setExtra("Some text");
        return response;
    }
}
Go to command prompt. Go into your project folder and run the following command to start the application
mvn spring-boot:run
Open Postman and set the values as shown in the image below
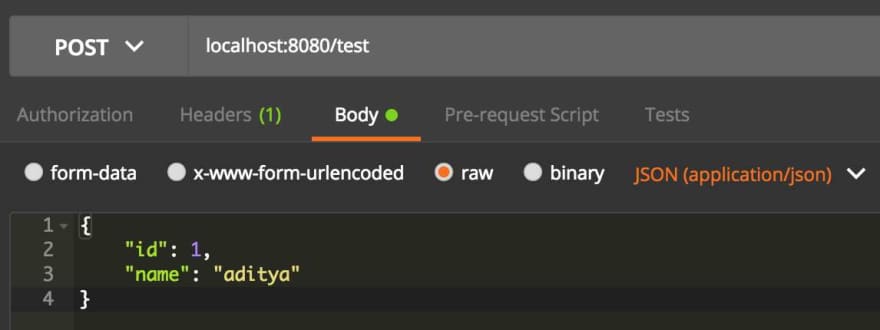
Basically the request type is set to POST
The enpoint URL is entered as localhost:8080/test
To enter the post body, Go to Body, Select raw and select JSON (application/json)
The input POST body given is the following
{
    "id": 1,
    "name": "aditya"
}
On clicking Send, The following output would be shown
{
    "id": 100,
    "message": "Hello aditya",
    "extra": "Some text"
}
You can experiment with this by sending different input post bodies.
Congrats 😄
You now know how to create simple GET and POST request based REST APIS using Springboot 😄
You can checkout https://spring.io/ to Learn more about Spring and Springboot

Latest comments (13)
Always good to see some Java love around here 😊
Two recommendations:
See dev.to/stealthmusic/modern-java-de...
😎
Thank you for the suggestions :)
Will read the article :)
BTW, Lombok is also available at start.spring.io ! Just type it in the dependencies search box.
sure. thanks for letting me know :)
Looks good, I would recommend updating Spring Boot to 2.1.0. Besides that, don't use 'Test' in such tutorials. Keep them realistic and use something like "getAll()" or something.
Why don't you use ResponseEntity<>?
And another good improvement would be to explain how a request flows from the browser of the user through the (Rest)Controller to the Service and into the Repository if needed.
Thank you for the feedback :)
Will use proper naming conventions in the next one :D
I could have used response entity as well. Maybe will use that in the next article.
Planning to write one more article for the flow from controller to service to repository. That's the reason I did not include it here. Wanted to separate them out since having them in one article makes the article long and readers may feel its too much information in one article.
I prefer to use ResponseEntity because it is Spring itself as the tutorial focuses on Spring.
Good luck!
Great timing. I was just experimenting with Spring Boot.
Any tips on connecting a database to store and retrieve model objects?
If you need a fully fledged ORM, you can use Spring Data JPA with Hibernate which is really easy to get started quickly and works very well with Spring Boot. I use a library called JOOQ (Java Object Oriented Query) which allows you to write type safe SQL and provides you with code generation features. It also gives you basic CRUD. Also I use flyway for migrations.
Just have a look at the official guides.
spring.io/guides/
There is one for relational database access (spring.io/guides/gs/relational-dat...) and for others as well.
Hibernate is a good option.
You could also use spring JDBC. Explore both and check :)
Nice post, and glad to see a post about SpringBoot!
Thank you