
This article was first published on Medium. You can take a look at it here
It’s a remarkable beast of a tool, Node.js. If you’re a beginner, aspiring coder, or IT student, it may be hard to wrap your head around it, but when you eventually get used to it, it’s eyeopening. This tutorial will walk you through the basics of API design, teaching you how to set up the backbone of a REST API and how to structure your code in a logical manner.
I’d love if you would follow along and code alongside me, as the tutorial progresses. Every snippet of code will be followed by an explanation, the best way of understanding it correctly will be to code it yourself along the way.
Before I begin there are some things you need to know regarding Node.js and some EcmaScript standards I will be using in the tutorial itself. I will not be using ES6, as I believe it is not as beginner friendly as traditional JavaScript. However, I will expect you already know the basics of Node.js, including how to set up a basic Node server which will return some info based on the route the user is accessing. If not, please take a detour and check this out before proceeding.
Secondly, I will be using basic implementation of CommonJS. Not to worry, this will be explained below. Feel free to check it out here, and here for further reference. Don’t forget to come back to this tutorial though. :)
Lastly, the whole demo is on GitHub if you wish to see it in its entirety . It’s linked at the bottom of the article.
Ready for some code?
Nope, just kidding. We need to set up and install the required dependencies and node modules for the app to work correctly. As we will be creating an API, it’s obvious a database is needed. We’ll be using MongoDB, a NOSQL database. It’s the optimal choice for our needs as we do not have the need for a relational database. Instead of installing and running it locally, we’ll just hook up a sandbox database on mLab, for simplicity’s sake.
Go ahead, create an account, and create a new MongoDB deployment.
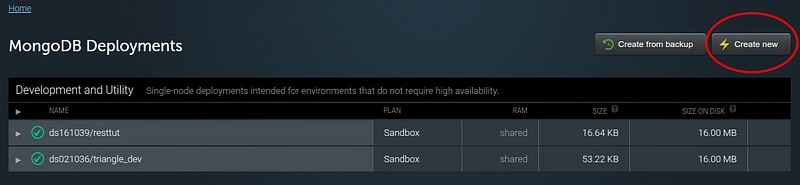
Select the free sandbox database and give it a name of your choice.

Great job, only one more thing to do and your database will be ready for action. Click on your newly created database and follow the instruction written in yellow text. Press the users tab and add a new user.

That’s it. The database is now ready to be used. You will be connecting to it using the MongoDB URI stated beneath the name of the database.
Wrapping that up, you’re ready to start configuring the application itself. Initialize npm and install the following modules:
npm init
npm install express --save
npm install mongoose --save
npm install body-parser --save
We’ll be using Express for this application as it is the de facto standard for a great majority of Node applications today. Mongoose is an ORM – Object Relational Mapper. The official ORM used for MongoDB to be precise. To break it down, we use an ORM to simplify the transfer of data between our application and the database. It maps the data we have in our app to uphold a set of strict rules set by the database. The body-parser module is just a middleware we use to parse our data sent through HTTP requests.
You finally get to write some code.
Let’s jump in head first shall we? To start it off, create an app file and code up a basic set up. Write this in your app.js.
// app.js
var express = require('express');
var app = express();
module.exports = app;
This file will be used for configuring the app, and that alone. All of the logic will be put in its respective directory regarding the specific feature it will be implementing. We use module.exports to make this app object visible to the rest of the program when we call for it using require().
Now we need to tell the app where to listen. Go ahead and create another file, named server.js, and write this down.
// server.js
var app = require('./app');
var port = process.env.PORT || 3000;
var server = app.listen(port, function() {
  console.log('Express server listening on port ' + port);
});
Here you get to require the app and put it in a variable. This app is the actual app object you created in app.js. Continue by choosing a port for the app to run on and finally spin up the server with app.listen. Go ahead and fire up a terminal window and test if this works. Change into the directory where you created these files and run node server.js. You should see Express server listening on port 3000 get logged to the command line.
You’ve got the server running, hooray!
Two down, three to go. With the server up and running, now you need to hook up the database. Go back to your text editor and create a new file, very innovatively name it db.js, as it will be used to store your database connection. It should look like this:
// db.js
var mongoose = require('mongoose');
mongoose.connect('mongodb://yourDatabaseURI');
Change yourDatabaseURI for the URI mentioned above. Go back to your mLab account and copy the MongoDB URI. Paste it in your code, between the two quotes. Change out the and for the credentials you entered for the user you created. Having done this, you now need to tell the app it has a connection available. Simply add a require() in the app.js, like this:
// app.js
var express = require('express');
var app = express();
var db = require('./db'); //ADD THIS LINE
module.exports = app;
By specifying it like this, we are telling require to grab a file in the same directory where app.js is located and include it. That’s it. Now our app knows it has a database ready and waiting to be accessed.
Your program should now have three files. An app.js for configuring the application, a db.js for specifying the connection to the database, and a server.js for spinning up the node server on a specific port of your choice.
You’re now ready to start writing the business logic of your program.
Getting down to business.
Start by creating a new folder named user. This folder will contain all files in any way related to our communication with the database regarding users. You’ll start by creating a user model. This model will serve as a blueprint showing what all users in your database will look like. Create a file named User.js and write this piece of code:
// User.js
var mongoose = require('mongoose');
var UserSchema = new mongoose.Schema({
  name: String,
  email: String,
  password: String
});
mongoose.model('User', UserSchema);
module.exports = mongoose.model('User');
You’re creating a schema which will give every user in the database a specific look. A user will have a name, an email and a password. By specifying mongoose.model('User', UserSchema) you’re binding the layout of the schema to the model which is named 'User' . This is what you will be using to access the data in the database, and that’s exactly why you are exporting it to use in other parts of your program.
Now comes the fun part, creating routes for your app and binding them to respective actions.
Create another file, and name it UserController.js . You’ll be naming it with a controller in its name, not only for simplicity but also because it will contain the actions which control the flow of data into and from your database.
// UserController.js
var express = require('express');
var router = express.Router();
var bodyParser = require('body-parser');
router.use(bodyParser.urlencoded({ extended: true }));
var User = require('./User');
module.exports = router;
Above is the bare layout of the user controller. You’ll be using the express router to create a subset of routes which can be modular and independent from the whole app. If you ever need to re-structure your program, you can easily do so because this approach gives you the ability to just plug it out from one place and plug it in somewhere else. The body-parser module is used as a middleware to handle data in a more elegant way. This will come in handy when sending data through HTTP requests using forms.
The fun part only comes with require('./User'). Now you see why you needed to export the model from User.js. You’ll start using it for real in the UserController.js. Whenever you create a model like you did above, it automagically receives all the necessary methods for interacting with a database, including create, read, update and delete actions. Finally, at the bottom of the file, you export the router as it will be needed in the app.js.
I digress!
Let’s just make a quick intro to REST, to better understand the 4 actions we have on our disposal to interact with a database. They are called CRUD. Standing for Create, Read, Update and Delete. Using HTTP requests, we can use the respective action to trigger every of these four CRUD operations.
- POST is used to send data to a server – Create
- GET is used to fetch data from a server – Read
- PUT is used to send and update data – Update
- DELETE is used to delete data – Delete
The best way to understand this is to jump right in.
Back to business.
// UserController.js
var express = require('express');
var router = express.Router();
var bodyParser = require('body-parser');
router.use(bodyParser.urlencoded({ extended: true }));
var User = require('./User');
// ADD THIS PART
// CREATES A NEW USER
router.post('/', function (req, res) {
    User.create({
            name : req.body.name,
            email : req.body.email,
            password : req.body.password
        },
        function (err, user) {
            if (err) return res.status(500).send("There was a problem adding the information to the database.");
            res.status(200).send(user);
        });
});
// RETURNS ALL THE USERS IN THE DATABASE
router.get('/', function (req, res) {
    User.find({}, function (err, users) {
        if (err) return res.status(500).send("There was a problem finding the users.");
        res.status(200).send(users);
    });
});
module.exports = router;
Looking at the first method you’ll see that the router object has a .post method that takes two parameters. The first is the route which will be linked to a function. This function is the second parameter. It takes another two parameters which represent the request to the server and the response from the server. Inside the function, you will use the user model you required above. The user model has a create method which also takes two parameters. The first being an object and the second a function. The object contains the values to be inserted into the database. You see, they are structured like the schema you created above. After it is created the callback function is called with another two parameters, an error value, and a success value. You will check if there was an error during the creation of the new user, and respond accordingly, or if all was well, respond with the data of the newly created user.
The second method is a bit simpler. The router object also has a .get method which also takes two parameters. Within the function, you now call the find() method on the user model which also takes two parameters. Find is a method which returns values from the database. Its first parameter, an object, defines the requirements which must be fulfilled in order to return values. As in this example, the object is empty, all users from the database will be returned.
Now, you need to let the app know it has a user controller. Add this to your app.js.
// app.js
var express = require('express');
var app = express();
var db = require('./db');
// ADD THESE TWO LINES
var UserController = require('./user/UserController');
app.use('/users', UserController);
module.exports = app;
So what magic is going on here? We’ll nothing really. You’re requiring the user controller and with app.use telling the app to link it to the route /users. Now, the / route within your user controller will get mapped to /users/. This is so cool, right!?
Do you even test, bro?
Phew, that was a handful. Let’s take a break and test our app. For testing APIs, I always use Postman. It’s an awesome tool for testing URLs with all 4 HTTP actions. It also adds the possibility of sending data in the HTTP requests’ body. Exactly what you need to test your app. Download, install and fire up Postman and follow along.
Postman is a pretty basic tool, you enter the URL you want to send an HTTP request to, pick a method, and if needed, enter parameters. Let’s start with sending a POST request to http://localhost:3000/users. This means you will need to enter a set of parameters in the request body.
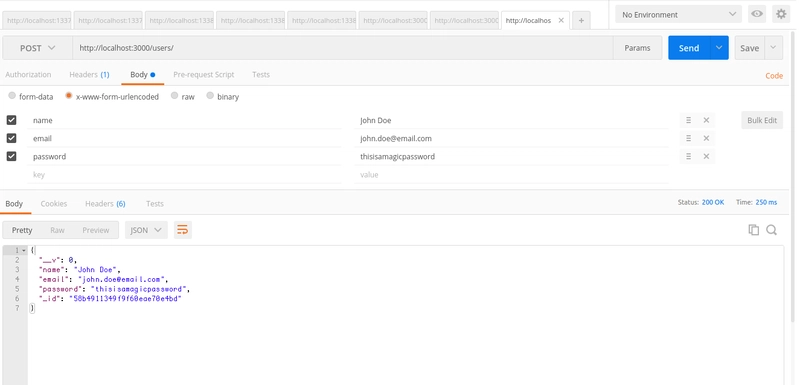
Switch to the body tab, and enter key – value pairs matching the user model you created earlier. You need a name, an email and a password. Hit send. Voilá! A response. If everything went fine, the response will contain data matching the recently created user.
Now, go ahead and change the HTTP method to GET, and hit send once again. You’ll see all the created users get returned from the database. Go ahead and play around a bit with this, add some more users, and watch how the GET request behaves.
Back to code.
So far, you’ve set up a server, configured your application, connected it to a database and created two APIs for communicating with the database. There are three more APIs left to implement. Retrieving a single user from the database, updating a user, and finally, deleting a user. All of these have one thing in common. They will all have a query parameter, often called a route parameter. Don’t get scared. It’s just a value which will be passed along the request. Let’s jump in.
// UserController.js
//...
// GETS A SINGLE USER FROM THE DATABASE
router.get('/:id', function (req, res) {
    User.findById(req.params.id, function (err, user) {
        if (err) return res.status(500).send("There was a problem finding the user.");
        if (!user) return res.status(404).send("No user found.");
        res.status(200).send(user);
    });
});
//...
You’ve now added another GET request but look at the route, the router.get method’s first parameter. It now has a value consisting of a colon followed by some text. This notation means that it’s a placeholder for a query parameter, a simple value, which will be sent along with the request. The value passed to '/:id' will be accessible through the req.params object. Where the name of the query parameter will get mapped to a property with the same name on the req.params object.
Moving on, Mongoose has an awesome method called .findById which will only want the ID by which it will return a user. The ID is the first parameter and the callback function is the second. Can you see a pattern emerging? All of the Mongoose methods want a value as a first parameter and a callback function as the last. This callback will be called after the database has returned the queried value. The same pattern can be seen with the DELETE request as well.
// UserController.js
//...
// DELETES A USER FROM THE DATABASE
router.delete('/:id', function (req, res) {
    User.findByIdAndRemove(req.params.id, function (err, user) {
        if (err) return res.status(500).send("There was a problem deleting the user.");
        res.status(200).send("User "+ user.name +" was deleted.");
    });
});
//...
The router.delete method looks exactly the same as the router.get above. Even the Mongoose method looks the same, with the exception of its name. You will remove a user from the database by giving the method the ID of a user you wish to delete. The .findByIdAndRemove method will find a user just like .findById but will also delete it from the database.
The final step in your application will be to implement a way of updating an existing user in the database. This is done with a PUT request.
// UserController.js
//...
// UPDATES A SINGLE USER IN THE DATABASE
router.put('/:id', function (req, res) {

    User.findByIdAndUpdate(req.params.id, req.body, {new: true}, function (err, user) {
        if (err) return res.status(500).send("There was a problem updating the user.");
        res.status(200).send(user);
    });
});
//...
The router.put request is very similar to the two requests you wrote above. It also takes one query parameter, an ID. What makes it different is that it also takes body parameters, just like the POST request you wrote first. The only HTTP methods which have a body are POST and PUT. Remember that.
Care to guess what .findByIdAndUpdate does? You’re right. This method is a bit different from the ones you wrote above. It takes three main parameters, an ID, an object corresponding to the user whose values will be updated, and of course, a callback function. You’ll be passing along the request body as the second parameter, the object, as it will already be parsed correctly with by the middleware we required and used at the top of UserController.js. A good practice when updating some values is to request the updated value to be sent back to you. This is important as you want to have access to the newly updated value. Hence, you add another, fourth parameter {new:true} which stands for the option of which version of the value, in your case the user, you want to return. The one before the update, or the one after. Returning this value will show you the user you updated.
Ready for some more testing?
Programming is often a balance between chaos and serenity. The chaos of solving problems seemingly illogical, versus the serenity when you finally solve them. Testing is how you gain serenity. I’ve come across a saying rooted deep in the mindset of all coders I’ve ever met.
Writing code that works on the first try, the first compile or the first run, is called a programming jackpot.
– Every Programmer Ever
When it actually happens, if ever, you feel as if the sun has chosen to shine especially upon you. Don’t get used to this. Build up an understanding that this never happens. You need to click stuff, press buttons, and dive into the developer tools to be able to calm the chaos and achieve serenity.
Ready? Let’s press some buttons.
Fire up a command prompt once again and spin up your server with node server.js. Open up Postman and go ahead and try the new methods you just created. An ordinary GET request for a single user would look somewhat like this:
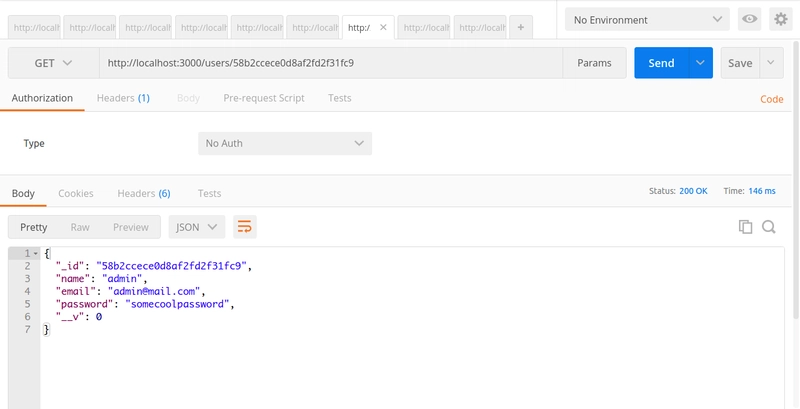
Adding the ID of the user in the URL as a query parameter will indeed only return the user with that particular ID.
Moving on to a PUT request, change the method to PUT, add values to the body (make sure the properties match the properties of the user schema you created above) and hit send.

You’ve changed the name of the “admin” to “imNotTheAdminAnymore”.
If you understand this, the DELETE method will be a piece of cake. Change the method to DELETE, and hit send once again. You will now delete the user with the given ID from the database.

I understand wrapping your head around everything this soon is difficult. This is why I pushed all the code to GitHub. If you get stuck anywhere, feel free to take a look at the whole project in its entirety here.
So you thought that was it?
You have only scraped the tip of a huge iceberg. But, it’s enough for now. Be curious, ask questions, and keep pressing buttons. I’ve given you the basics of many core skill you will need to know on your journey to stardom.
Don’t let Node scare you. It’s just plain JavaScript. View it in the same way you would code you write in a browser. To break it down, it’s just a bunch of event listeners and handlers. For example:
router.get('/:id', function (req, res) {
    User.findById(req.params.id, function (err, user) {
        if (err) return res.status(500).send("There was a problem finding the user.");
        if (!user) return res.status(404).send("No user found.");
        res.status(200).send(user);
    });
});
The server is listening for an HTTP request to hit the route '/:id' with a GET method. When such a request occurs, the callback function will be called. Everything inside this function will be evaluated and executed. Familiar isn’t it?
button.addEventListener('click', function (e) {
    console.log("Well it's very familiar for me.");
});
Hope you guys and girls enjoyed reading this as much as I enjoyed writing it. Be curious, it sure has helped me a lot. Do you think this tutorial will be of help to someone? Do not hesitate to share.
Thanks to my dad, for being my inspiration and always keeping me curious.
![]()

Top comments (16)
This is great for beginners, but if you want to create a more robust API, you might as well use a framework. Especially if you're considering using Angular as a front-end.
I've used (and contributed to) LoopBack (2 and 3) for a while and it's pretty solid (and built on top of Express by the same guys who created it, so quite a bonus). Plus it manages users and permissions out of the box and there are tools to generate services (and models) for Angular. 😉
I did try Sails a while ago but it didn't go so well, as it was lacking compared to LoopBack.
I'd strongly disagree. I've been on the receiving end of a horrible relationship with Sails myself. Never would I want to advise someone to go down that path. Express is incredibly easy to work with, and very flexible. It's already a full-fledged framework. Any more abstraction above it is just overhead, mainly for performance and the cleanliness of your code. Integrating users, permissions and policies is much easier than it sounds. :)
This is just my humble opinion. But, I haven't tried LoopBack yet. Maybe after I do, I'll change my standpoint.
I'm glad you liked the tutorial. Cheers man! :)
I haven't explored Sails enough to know what you're talking about but it might be possible form what I remember. :)
LoopBack does bring a few things that you'd have to manage yourself with Express + Mongoose, like sending the right error codes to the client, modular type checking and multiple datasources (files, MongoDB, MySQL, etc.).
There's actually not that much overhead compared to Express (though it might seem like it at first), and it comes from the same team so it's pretty well integrated and you can still use Express if you need it.
Mongoose is also very strict sometimes and that can lead to some headaches. For APIs, it might sometimes be easier to have a more permissive checking (LoopBack has different settings, so you can adjust that).
Anyway, just sharing a tool, not trying to force anyone to convert to any religion. 🙏
Thanks Adnan!
If you have time, would love a writeup that shows how a more complex data model would be handled.
Seeing the canonical Blog use-case of "user", "post", "comment", "tag" would be extremely helpful, and would be the next step for pretty much everyone reading this post :)
You're welcome! That's a great idea actually. I've been trying to figure out some cool way of building out on this topic for more experienced readers. This might be it. :)
Trying out node.js for the 2nd time, good simple to follow guide. I made this simple app with VS2017, and it worked as I followed the guide. Thanks.
Now it'd be awesome if there's similar one for making the UI for this app using bootstrap or other framework.
I'm actually in the process of writing one using Angular. Stay tuned. :)
Great article, thanks
This probably is the simplest getting started tutorial on REST I have come across
Awesome feedback! Thanks a lot. I'm thrilled you found it useful.
Thanks Adnan, great explanation. I have checked several tutorials dealing with this topic, and honestly, this is the best one I have read. Good job! Hope to read more from you soon
Thank you! Your kind words mean a lot to me. I'm just happy my writing is actually helping people.
Great article! More of that, please :-)
Thank you! I'm glad you liked it. Feel free to check out my latest articles. Many of them continue with similar Node.js topics.
Detailed to explanation. Good job
Thanks! I'm glad you liked it.