
In this post, I will be showing you guys how you can add sign in with Google feature in your app in a few simple steps.
I will be using a React Native Community supported package called react-native-community/google-signin.
Note : This post is made for react-native >= 0.60, if you are using react-native <= 0.59.x then this is not for you

Features
- Support all 3 types of authentication methods (standard, with server-side validation or with offline access (aka server-side access))
- Promise-based API consistent between Android and iOS
- Typings for TypeScript and Flow
- Native signin buttons
Versions
React Native 0.61.5
react-native-community/google-signin 4.0.0
Steps
- First, create the App using this command in terminal
npx react-native init TypeYourAppNameHere
- Navigate to RNGoogleSignInDemo in the terminal like this
cd TypeYourAppNameHere
- Now install
react-native-community/google-signindependency in your app
yarn add @react-native-community/google-signin

OR

npm install --save @react-native-community/google-signin
Since React Native >= 0.60 AutoLinking is supported therefore we don't need to run linking command.
But we do need to do some configuration in the native side but I promise it will be easy.
There are two ways to do this, with or without Firebase and I will be using the one with the Firebase. But for the other one, I can make a separate post for it. Do let me know should I?
Firebase
- Search for Firebase and go to Firebase Console
- Create a project [ I have already created ] by clicking on
Add Project.

- Type your project Name after that click Continue

- Choose whether you want to add Analytics or not it's up to your preferences. By default, it's enabled. Press Continue.

Now your project is created.

- Click the android icon in the firebase Console Dashboard

-
Fill in the following fields of "Add Firebase to your Android app" to generate config file ( i.e. google-services.json)
- Android package name
- Debug signing certificate SHA-1

For App's Package name you can find in
android/app/main/AndroidManifest.xmlfile

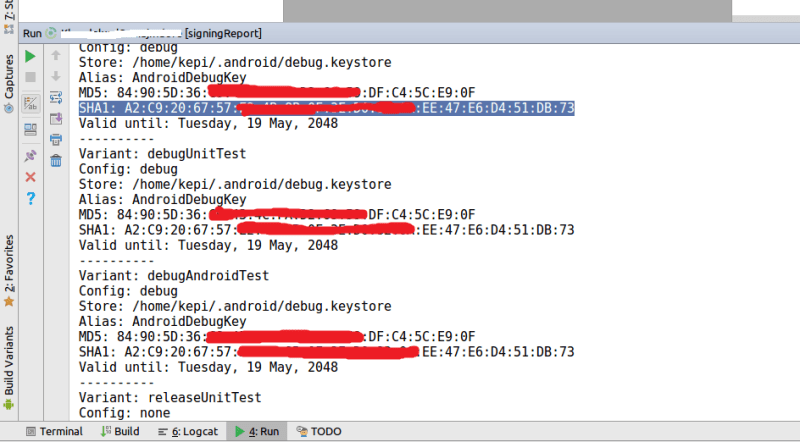
- For Debug signing certificate SHA-1
In terminal type command for Debug SHA1 (root of the project)
Mac/Linux
keytool -J-Duser.language=en -list -v -keystore ~/.android/debug.keystore -alias androiddebugkey -storepass android -keypass android
Windows
– Change the directory to the JDK bin directory. The path of the JDK depends upon the operating system you are using
cd C:\Program Files\Java\jdk1.8.0_121\bin
– Now we have to run the following command using the keytool.exe file in JDK/bin
keytool -list -v -keystore "%USERPROFILE%\.android\debug.keystore" -alias androiddebugkey -storepass android -keypass android

If you don't like terminal then you use can Android Studio instead

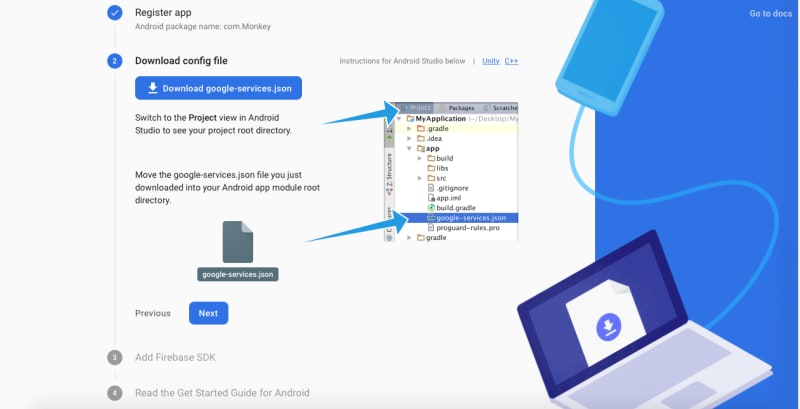
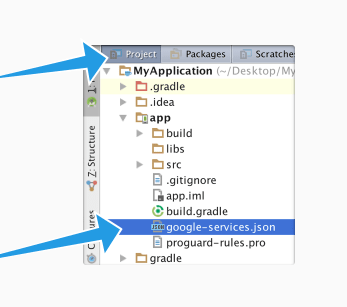
- When you are done registering your android app with firebase then
Download the Config fileand place it inandroid/app
- Add Firebase SDK in Project-level build.gradle i.e.
android/build.gradle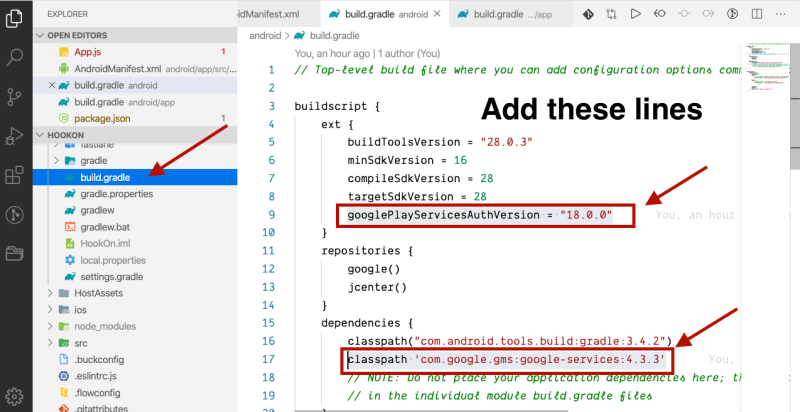
buildscript {
    ext {
        buildToolsVersion = "28.0.3"
        minSdkVersion = 16
        compileSdkVersion = 28
        targetSdkVersion = 28
        googlePlayServicesAuthVersion = "18.0.0" // Add this line
    }
    repositories {
        google()
        jcenter()
    }
    dependencies {
        classpath("com.android.tools.build:gradle:3.4.2")
        classpath 'com.google.gms:google-services:4.3.3' // Add this line
        // NOTE: Do not place your application dependencies here; they belong
        // in the individual module build.gradle files
    }
}
- Add Google Play Services plugin in App-level build.gradle (android/appp/build.gradle):
apply plugin: 'com.google.gms.google-services' // Add at end of the file
e.g.

- In firebase, you will need to enable Google option in SignIn Method section

- While enabling Google, do copy the
Web Client IDfrom there, we need this later on.
Let's get our hands dirty with the code
I will be making a simple app of just two components to App.js (already exists by default) and second will be Home.js.
- Import Public Api of
@react-native-community/google-signin
import {
  GoogleSignin,
  GoogleSigninButton,
  statusCodes,
} from '@react-native-community/google-signin';
- But before you can use above imports you need call once, configure of GoogleSignin. You can call it in ComponentDidMount life Cycle method or you can use useEffect Hook
GoogleSignin.configure({
 webClientId: WebClientID, // client ID of type WEB for your server(needed to verify user ID and offline access)
 offlineAccess: true, // if you want to access Google API on behalf of the user FROM YOUR SERVER
 forceCodeForRefreshToken: true, // [Android] related to `serverAuthCode`, read the docs link below *.
 accountName: '', // [Android] specifies an account name on the device that should be used
    });
- Sign in function
 signIn = async () => {
    try {
      await GoogleSignin.hasPlayServices();
      const info = await GoogleSignin.signIn();
      console.warn({userInfo: info});
      setUserInfo(info);
    } catch (error) {
      if (error.code === statusCodes.SIGN_IN_CANCELLED) {
        // user cancelled the login flow
      } else if (error.code === statusCodes.IN_PROGRESS) {
        // operation (e.g. sign in) is in progress already
      } else if (error.code === statusCodes.PLAY_SERVICES_NOT_AVAILABLE) {
        // play services not available or outdated
      } else {
        // some other error happened
      }
    }
  };
- Sign out function
  signOut = async () => {
    try {
      await GoogleSignin.revokeAccess();
      await GoogleSignin.signOut();
      setUserInfo(null); // Remember to remove the user from your app's state as well
    } catch (error) {
      console.error(error);
    }
  };
Demo App Preview

Do check the official Docs and if you have any questions let me know.
 react-native-google-signin
/
google-signin
react-native-google-signin
/
google-signin
Google Sign-in for your React Native applications

🚧 🚧 New features planned: looking for financial backers and collaborators 🚧 🚧
See this issue
Features
- Support all 3 types of authentication methods (standard, with server-side validation or with offline access (aka server-side access))
- Promise-based API consistent between Android and iOS
- Typings for TypeScript and Flow
- Mock of the native module for testing with Jest
- Native sign in buttons
Requirements
- RN >= 0.60
Project setup and initialization
yarn add @react-native-google-signin/google-signin
Then follow the Android guide and iOS guide
Expo installation
This package cannot be used in the "Expo Go" app because it requires custom native code. However, you can add custom native code to expo by following the guide below.
npx expo install @react-native-google-signin/google-signin
After installing this npm package, add the config plugin to the plugins array of your app.json or app.config.js:
{
  "expo": {
    "android": {
      "googleServicesFile": "./google-services.json"
    }
"ios":…I hope you like this post and I will be posting more post soon and most importantly All suggestions are welcome.


Top comments (8)
I had an error to execute the keytool command. In first you must to go to folder project and then replace by this command:
it just change
~for./BTW, thanks for the post!
For android, I dont seem to understand why we are suppose to use a globally defined keystore when react-native provides one within the project.
if i use the value from globally defined keystore, it raises a
DEVELOPER_ERROR(statusCode = 10)Hi! I have the same problem. I have seen and followed 945481121 tutos but ever same error. Do you know how to solve ?
I'm sorry for my English. (:
Please make another post for signin without firebase :D
Sure , I will soon make a detail post for google signin without firebase
Hey! Thank you for your help! Is the new article ready?
How to code Store user credentials in Firebase backend ?
With this method you only get basic user info like email ,name ,avatar and so on. Unlike login with email where your user has to enter password in the given field ,login with gmail returns a token .
A Token that will be send to custom backend to verify and store user details.