
Tensorflow is an open source platform for machine learning. Using tensorflow, we can easily code, build and deploy our machine learning models.
Tensorflow 2.0 focuses on simplicity and ease of use, featuring updates like:
- Easy model building with Keras.
- Robust model deployment in production on any platform.
- Powerful experimentation for research.
- Simplifying the API by cleaning up deprecated APIs and reducing duplication.
This article is for those who want to know how they can start with Tensorflow 2.0. It will help you to create your own image classification model in less than an hour! So let’s get started 😃
Setting up Tensorflow 2.0
Install Tensorflow 2.0 package using pip -
pip install tensorflow==2.0.0-alpha0
To verify if it is installed correctly, try importing tensorflow and checking its version. (It should point to 2.0.0-alpha0)
Keras Overview
Before we can start with tensorflow, we should have a brief overview of what is Keras. Keras is a high-level neural networks API, written in Python and is capable of running on top of TensorFlow, CNTK, or Theano. Using Keras is extremely user-friendly and it helps you build a model in no time.
The core data structure of Keras is a model, a way to organize layers. The simplest type of model is the Sequential model, a linear stack of layers.
Sequential model is defined as:
from keras.models import Sequential
model = Sequential()
Stacking layers using .add():
from keras.layers import Dense
model.add(Dense(units=64, activation='relu', input_dim=100))
model.add(Dense(units=10, activation='softmax'))
Once the model building is complete, its learning process can be configured with .compile():
model.compile(loss='categorical_crossentropy',
              optimizer='sgd',
              metrics=['accuracy'])
To know more on Keras follow the link
Classification on Fashion MNIST dataset
We are ready to build our very own classification model! This is like “Hello World” in tensorflow 😄
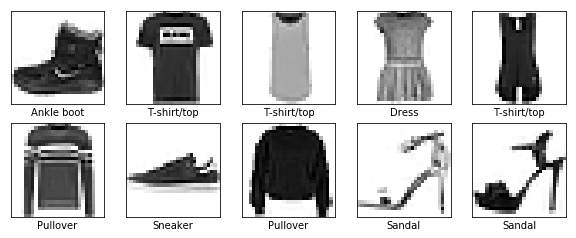
We have taken Fashion MNIST dataset that has 70,000 grayscale images in 10 categories. Each image in the dataset is a type of clothing garment in a resolution of 28 by 28 pixels.
Do the necessary imports
import tensorflow as tf
from tensorflow import keras
import numpy as np
import matplotlib.pyplot as plt
The dataset can be directly loaded from keras.datasets
fashion_mnist = keras.datasets.fashion_mnist
(train_images, train_labels), (test_images, test_labels) = fashion_mnist.load_data()
The training set train_images has 60k images while test_images has 10k images. Each image is a 28x28 array, with pixel values ranging from 0 to 255. The labels are an array of integers, ranging from 0 to 9 which correspond to the class of clothing. 0 corresponds to T-shirt/top, 1 to trouser and so on. These 10 classes of clothing type are mapped to class_names
class_names = ['T-shirt/top', 'Trouser', 'Pullover', 'Dress', 'Coat','Sandal', 'Shirt', 'Sneaker', 'Bag', 'Ankle boot']
Scaling the train and test images so that pixel values for both train and test images are between 0 and 1.
train_images = train_images / 255.0
test_images = test_images / 255.0
You can plot the first 10 images to check the data.
plt.figure(figsize=(10,10))
for i in range(10):
    plt.subplot(5,5,i+1)
    plt.xticks([])
    plt.yticks([])
    plt.grid(False)
    plt.imshow(train_images[i], cmap=plt.cm.binary)
    plt.xlabel(class_names[train_labels[i]])
plt.show()
Building a Sequential model using keras
model = keras.Sequential([
    keras.layers.Flatten(input_shape=(28, 28)),
    keras.layers.Dense(128, activation='relu'),
    keras.layers.Dense(10, activation='softmax')
])
While dealing with images in neural networks we need to flatten the 2D array of 28 by 28 to a 1D array (of 28 * 28 = 784 pixels). tf.keras.layers.Flatten layer performs this task. After this layer, there are two dense layers (fully connected) with 128 and 10 neurons respectively. Softmax activation function in the last layer returns an array of 10 values which correspond to the probability scores that sum to 1. The class for which we get the highest probability is assigned to the input image.
Compiling model
model.compile(optimizer='adam',
              loss='sparse_categorical_crossentropy',
              metrics=['accuracy'])
- Loss function — This measures how accurate the model is during training. We want to minimize this function.
- Optimizer — This is how the model is updated based on the data it sees and its loss function.
- Metrics — Used to monitor the training and testing steps. accuracy measures the fraction of the images that are correctly classified.
Training the model
model.fit(train_images, train_labels, epochs=5)
To start training, we call the model.fit method to fit the model to training data.
Evaluating accuracy on test_images
test_loss, test_acc = model.evaluate(test_images, test_labels)
print('\nTest accuracy:', test_acc)
With this simple model, we achieve an accuracy of ~0.86
Making predictions on test images
predictions = model.predict(test_images)
predictions[0]
predictions[0] gives the probability scores for the 1st test image. We can check the maximum probability or the class which our model has predicted.
np.argmax(predictions[0])
It gives a value 9 which shows that the model has identified this image to be an ankle boot, or class_names[9]. We can verify this result by checking test_labels[0] which also has a value 9. This shows that our model was able to predict the correct value for the first test image :)
This is it! 😛 You have your classification model build with Tensorflow 2.0 and Keras up and running in no time. You can play with the code to check the impacts on changing loss function, the number of epochs, optimizer. In case it is needed, you can have a look for the code for this in my Github repo
Google Colab
Colaboratory allows us to use and share Jupyter notebooks with others without having to download, install, or run anything on your own computer other than a browser. All our notebooks are saved on Google Drive. In Colabs, the code is executed in a virtual machine dedicated to our account. Virtual machines are recycled when idle for a while and have a maximum lifetime enforced by the system. We many times face issue in training our models. It can easily be done using Colab as it provides free GPU and TPU. To setup Colab you can follow the link 😺
This is a very brief overview of getting started with Tensorflow 2.0. I am myself in the process of learning, as I learn I will be writing on how can we do regression, text-classification, saving models, transfer learning, tensors and operations 😸 Do show some ❤ if you found the article helpful. Stay tuned for more tensorflow! 😄

Top comments (4)
Using the keras API completely is a bad way to showcase tensorflow 2.0. This exact same code works on 1.X, the real goodies come from eager execution, tf.function, being able to make your own training loop, etc.
Yes true. Although keras is not the perfect way to show the capabilities of tensorflow 2.0, But this is something to begin with. There is lot more to go.
Your writeups are unique, easy to follow and awesome. Thank You!
Thank you 😊