Amazon EC2 is one of the most famous services of AWS. It's like a first step to move or start using cloud infrastructure. We used to install the server directly on a physical server, using virtualization hosted on a data center, and then the next step is hosting on the cloud. As I said before, this is the first step, not the final step. Since technology has always grown, we still have serverless and more to come. In this section, we won't discuss all of them for now but let's focus on EC2 or Elastic Compute Cloud.
More about Amazon EC2, click here!
Note*: If you heed my previous post about VPC, then this is the next part to host a web server using an EC2 instance. So, I'll launch three EC2 instances and each instance will be placed in a different AZ. Here I'll show you the various ways we can do to launch EC2 instances, 3 in total. Those are:
Directly using all arguments needed
Create Launch Template
Build custom AMI from existing EC2 instance

Then, again! I won't go through the console but I'll use Ansible instead. Why? If you have ever seen my previous posts, you should know why :)
Prerequisites:
Ansible collection for AWS by running
ansible-galaxy collection install amazon.awsandansible-galaxy collection install community.aws.
For the inventory, we will have two versions or groups.
Localhost is used as the target host to create EC2 instances.
EC2 Instances are used as target hosts if the EC2 instances are already created (running) to do some configurations on them.
Inventory: hosts.yml (first version)
---

localhost:
  hosts:
    127.0.0.1:
Playbook: ec2.yml
- name: ec2
  hosts: localhost
  connection: local
  gather_facts: no
  tasks:
1. Launch EC2 Instance + User Data (First Instance)
    - name: launch new instance + user data
      amazon.aws.ec2_instance:
        name: amazonlinux2a
        region: ap-southeast-3
        key_name: ec2-user
        instance_type: t3.micro
        security_group: ssh-web
        vpc_subnet_id: subnet-0276d466994fa3087
        network:
          assign_public_ip: true
          delete_on_termination: true
        image_id: ami-0de34ee5744189c60
        user_data: "{{ lookup('file', 'user_data.sh') }}"
        volumes:
          - device_name: /dev/xvda
            ebs:
              volume_size: 8
              volume_type: gp2
              delete_on_termination: true
      tags:
        - ec2_create
I guess you are already familiar with some arguments above but I have to tell one important thing about vpc_subnet_id. This argument has some implicit information. It already defined which VPC and AZ we will use for the EC2 instance so we don't need to define the VPC ID and AZ parameters anymore.
User data: user_data.sh
#!/bin/bash
yum update -y
yum install -y httpd
systemctl enable httpd
systemctl start httpd
(It's just a simple bash script to install a web server)
Optional: Import Key Pair
Before we launch an EC2 instance, we can create a keypair by creating a new one generated by AWS or by importing your SSH public key. Here I'll choose to import a key pair with the default name of each OS. In this case, I'll use ec2-user since I'll use Amazon Linux 2. Then, when the instance is running. I can directly remote it without enclosing the key file as usual.
    - name: import keypair
      amazon.aws.ec2_key:
        name: ec2-user
        key_material: "{{ lookup('file', '/home/nurulramadhona/.ssh/id_rsa.pub') }}"
      tags:
        - ec2_create
        - ec2_keypair
Let's run the playbook since I already added ec2_create tags on each task of both key-pair and launch instances!
$ ansible-playbook -i host.yml ec2.yml -t ec2_create

PLAY [ec2] **************************************************************************************************************************************************************

TASK [import keypair] ***************************************************************************************************************************************************
changed: [127.0.0.1]

TASK [launch new instance + user data] **********************************************************************************************************************************
changed: [127.0.0.1]

PLAY RECAP **************************************************************************************************************************************************************
127.0.0.1                  : ok=2    changed=2    unreachable=0    failed=0    skipped=0    rescued=0    ignored=0
$ aws ec2 describe-instances --query 'Reservations[].Instances[].{ID:InstanceId, PrivateIP:PrivateIpAddress, PublicIP:PublicIpAddress, Name:Tags[?Key==`Name`].Value}'
[
    {
        "ID": "i-0187e4bb5d2f2007c",
        "PrivateIP": "10.0.1.7",
        "PublicIP": "108.136.226.235",
        "Name": [
            "amazonlinux2a"
        ]
    }
]
2. Launch EC2 Instance From Template + User Data (Second Instance)
Create template:
    - name: create launch template
      community.aws.ec2_launch_template:
        name: amazonlinux2_httpd_template
        image_id: ami-0de34ee5744189c60
        key_name: ec2-user
        instance_type: t3.micro
        region: ap-southeast-3
        network_interfaces:
          - associate_public_ip_address: true
            delete_on_termination: true
            device_index: 0
        block_device_mappings:
          - device_name: /dev/xvda
            ebs:
              delete_on_termination: true
              volume_size: 8
              volume_type: gp2
        user_data: "{{ lookup('file', 'user_data.txt') }}"
      tags:
        - ec2_template
There are two things we can't do when creating the launch template. Those are :
security_groupsargument can't be defined together withnetwork_interfacesargument (so I'll keepnetwork_interfacesand won't usedefine security_groups)device_indexargument should be defined along withnetwork_interfacesargument.The userdata's file should be base64 encoded. So, I encode the
user_data.sh(the same file I used to launch the first instance above).
$ base64 user_data.sh > user_data.txt
Then, since we already defined user_data argument when we created the template. We don't need to define it again on the launch instance task (if you defined it twice, the latest user_data value will be used).
To launch an instance using the template, use launch_template argument.
    - name: launch new instance from template
      amazon.aws.ec2_instance:
        name: amazonlinux2b
        launch_template:
          name: amazonlinux2_httpd_template
        security_group: ssh-web
        vpc_subnet_id: subnet-07bb6501337e4f87b
      tags:
        - ec2_template
As we can see, we remove some arguments on the launch instance task which is already defined on the template.
Let's run our second playbook to launch an instance using the template!
$ ansible-playbook -i host.yml ec2.yml -t ec2_template

PLAY [ec2] **************************************************************************************************************************************************************

TASK [create launch template] *******************************************************************************************************************************************
changed: [127.0.0.1]

TASK [launch new instance from template] ********************************************************************************************************************************
changed: [127.0.0.1]

PLAY RECAP **************************************************************************************************************************************************************
127.0.0.1                  : ok=2    changed=2    unreachable=0    failed=0    skipped=0    rescued=0    ignored=0
$ aws ec2 describe-instances --query 'Reservations[].Instances[].{ID:InstanceId, PrivateIP:PrivateIpAddress, PublicIP:PublicIpAddress, Name:Tags[?Key==`Name`].Value}'
[
    {
        "ID": "i-0187e4bb5d2f2007c",
        "PrivateIP": "10.0.1.7",
        "PublicIP": "108.136.226.235",
        "Name": [
            "amazonlinux2a"
        ]
    },
    {
        "ID": "i-09c46dba004ed7bd8",
        "PrivateIP": "10.0.2.8",
        "PublicIP": "108.136.235.232",
        "Name": [
            "amazonlinux2b"
        ]
    }
]
3. Launch EC2 Instance Using Custom AMI (Third Instance)
To launch an instance using custom AMI, we will use two different tasks which will run separately. Why? Because we need image-id of the custom AMI to launch the instance. To get image-id, the AMI should be created first and here we will create it from the first instance (we created in Step 1).
First task:
    - name: create custom ami from an instance
      amazon.aws.ec2_ami:
        instance_id: i-0187e4bb5d2f2007c
        wait: no
        name: amazonlinux2_httpd_ami
      tags:
        - ec2_ami1
Let's run the third playbook to create AMI!
$ ansible-playbook -i host.yml ec2.yml -t ec2_ami1

PLAY [ec2] **************************************************************************************************************************************************************

TASK [create custom ami from an instance] *******************************************************************************************************************************
changed: [127.0.0.1]

PLAY RECAP **************************************************************************************************************************************************************
127.0.0.1                  : ok=1    changed=1    unreachable=0    failed=0    skipped=0    rescued=0    ignored=0
$ aws ec2 describe-images --filters "Name=name,Values=amazonlinux2_httpd_ami" --query 'Images[].{Name:Name, ID:ImageId}'
[
    {
        "Name": "amazonlinux2_httpd_ami",
        "ID": "ami-0c1cfb0a18f5e4451"
    }
]
Second task:
    - name: launch new instance using custom ami
      amazon.aws.ec2_instance:
        name: amazonlinux2c
        region: ap-southeast-3
        key_name: ec2-user
        instance_type: t3.micro
        security_group: ssh-web
        vpc_subnet_id: subnet-00b4e72d63a2125de
        network:
          assign_public_ip: true
          delete_on_termination: true
        image_id: ami-0c1cfb0a18f5e4451
        volumes:
          - device_name: /dev/xvda
            ebs:
              volume_size: 8
              volume_type: gp2
              delete_on_termination: true
        user_data: "{{ lookup('file', 'user_data2.sh') }}"
      tags:
        - ec2_ami2
As we can see, all arguments we use are just the same as in Step 1. One thing that makes it different is the image-id value which we use as the ID of the custom AMI we just created. The custom AMI gives us a big benefit which the instance is launched faster than when we use the original AMI or even the launch template.
Here we also can use user_data argument in case you want to add or replace some things. For example:
We created an AMI from the first instance (we created in Step 1) which already has HTTPD installed. So, I'll use new user data just for modifying the homepage.
User data: user_data2.sh
#!/bin/bash
echo 'Hello World!' >> /var/www/html/index.html
Let's run the third playbook to launch an instance using the custom AMI!
$ ansible-playbook -i host.yml ec2.yml -t ec2_ami2

PLAY [ec2] **************************************************************************************************************************************************************

TASK [launch new instance using custom ami] *****************************************************************************************************************************
changed: [127.0.0.1]

PLAY RECAP **************************************************************************************************************************************************************
127.0.0.1                  : ok=1    changed=1    unreachable=0    failed=0    skipped=0    rescued=0    ignored=0
$ aws ec2 describe-instances --query 'Reservations[].Instances[].{ID:InstanceId, PrivateIP:PrivateIpAddress, PublicIP:PublicIpAddress, Name:Tags[?Key==`Name`].Value}'
[
    {
        "ID": "i-0187e4bb5d2f2007c",
        "PrivateIP": "10.0.1.7",
        "PublicIP": "108.136.226.235",
        "Name": [
            "amazonlinux2a"
        ]
    },
    {
        "ID": "i-09c46dba004ed7bd8",
        "PrivateIP": "10.0.2.8",
        "PublicIP": "108.136.235.232",
        "Name": [
            "amazonlinux2b"
        ]
    },
    {
        "ID": "i-02c7573fff1215e65",
        "PrivateIP": "10.0.3.11",
        "PublicIP": "108.136.150.180",
        "Name": [
            "amazonlinux2c"
        ]
    }
]
$ curl http://108.136.150.180
Hello World!
Alright! Now we have 3 EC2 instances in total, but we only modified the homepage of the last instance. So I want to modify the homepage of the first two instances as well and I'll use ansible ad-hoc in this case to run the command directly on them. Before that, let's add the IP of all EC2 instances as the target hosts on inventory!
Inventory: hosts.yml (second version)
---

localhost:
  hosts:
    127.0.0.1:

ec2:
  hosts:
    108.136.226.235:
    108.136.235.232:
    108.136.150.180:
$ ansible -i host.yml ec2 --become -u ec2-user -m shell -a 'echo "Hello World!" >> /var/www/html/index.html' -l "108.136.226.235, 108.136.235.232"
The authenticity of host '108.136.226.235 (108.136.226.235)' can't be established.
ECDSA key fingerprint is SHA256:EdObxEIn7UGhb8AmZOI1c0OEU9KUa9mNd4G2siLPKaA.
Are you sure you want to continue connecting (yes/no/[fingerprint])? yes
108.136.235.232 | CHANGED | rc=0 >>

108.136.226.235 | CHANGED | rc=0 >>
Now, we have all web servers with the homepage modified.
$ ansible -i host.yml ec2 --become -u ec2-user -m shell -a 'curl http://localhost'
108.136.235.232 | CHANGED | rc=0 >>
Hello World!  % Total    % Received % Xferd  Average Speed   Time    Time     Time  Current
                                 Dload  Upload   Total   Spent    Left  Speed
100    13  100    13    0     0  18361      0 --:--:-- --:--:-- --:--:-- 13000
108.136.226.235 | CHANGED | rc=0 >>
Hello World!  % Total    % Received % Xferd  Average Speed   Time    Time     Time  Current
                                 Dload  Upload   Total   Spent    Left  Speed
100    13  100    13    0     0  17473      0 --:--:-- --:--:-- --:--:-- 13000
108.136.150.180 | CHANGED | rc=0 >>
Hello World!  % Total    % Received % Xferd  Average Speed   Time    Time     Time  Current
                                 Dload  Upload   Total   Spent    Left  Speed
100    13  100    13    0     0  18465      0 --:--:-- --:--:-- --:--:-- 13000
That's it for the EC2! In the next part, We will discuss Amazon Linux 2 "essential" configurations we need to do before we use the servers for any purposes. Let's move to the next post!
References:
https://docs.ansible.com/ansible/latest/collections/amazon/aws/ec2_instance_module.html
https://docs.ansible.com/ansible/latest/collections/amazon/aws/ec2_key_module.html
https://docs.ansible.com/ansible/latest/collections/amazon/aws/ec2_ami_module.html
https://docs.ansible.com/ansible/latest/collections/community/aws/ec2_launch_template_module.html

Latest comments (4)
Hello, how would you apply in the user_data part of your playbook, but for a Windows host, so you'll have to use powershell comands.
Hello @ramos368 thanks for your question and sorry for late response.
AFAIK, the use of user_data is just the same for all OS. So, just enter the script file name as the value of the user_data. For more information, you can check docs.aws.amazon.com/AWSEC2/latest/...
Let me know if you have any more questions.
My question is really, here is my Ansible Playbook, it works, I am able to create my EC2 instance, but I need that instance to when is up, I need it to have some config, starting with the creation of a local user for example, but it creates the the instance but not the local user.
My win_ec2_user_data is in the same directory as my Ansible playbook and is :
"$UserPassword = ConvertTo-SecureString "xxxx" -AsPlainText -Force
New-LocalUser "local" -Password $UserPassword -Description "local" -Verbose
Add-LocalGroupMember -Group 'Administrators' -Member ('local') -Verbose01~"
Hello @ramos368
I've tried your script and it works. I hope you didn't forget to place your script between powershell tag as the following like the documentation I attached on my previous answer.
Here's the proof:
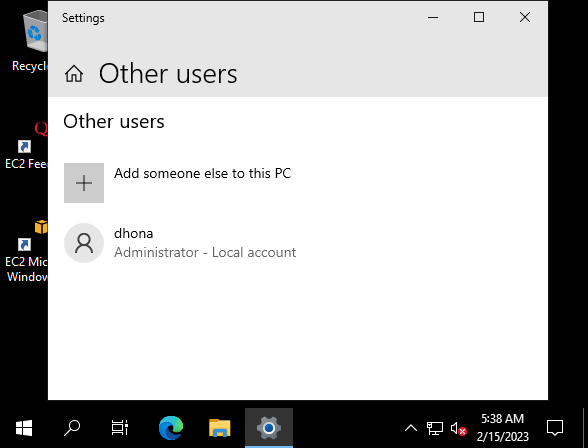
(in this case I created user named dhona)