


A crooked phone photo goes in, a clean straight card image comes out - no GPU, and nothing running when nobody uploads. It runs on the biggest lambda AWS sells, and the biggest is not the same as enough.
Introduction
This is the 3rd article in the series about the image processing pipeline.
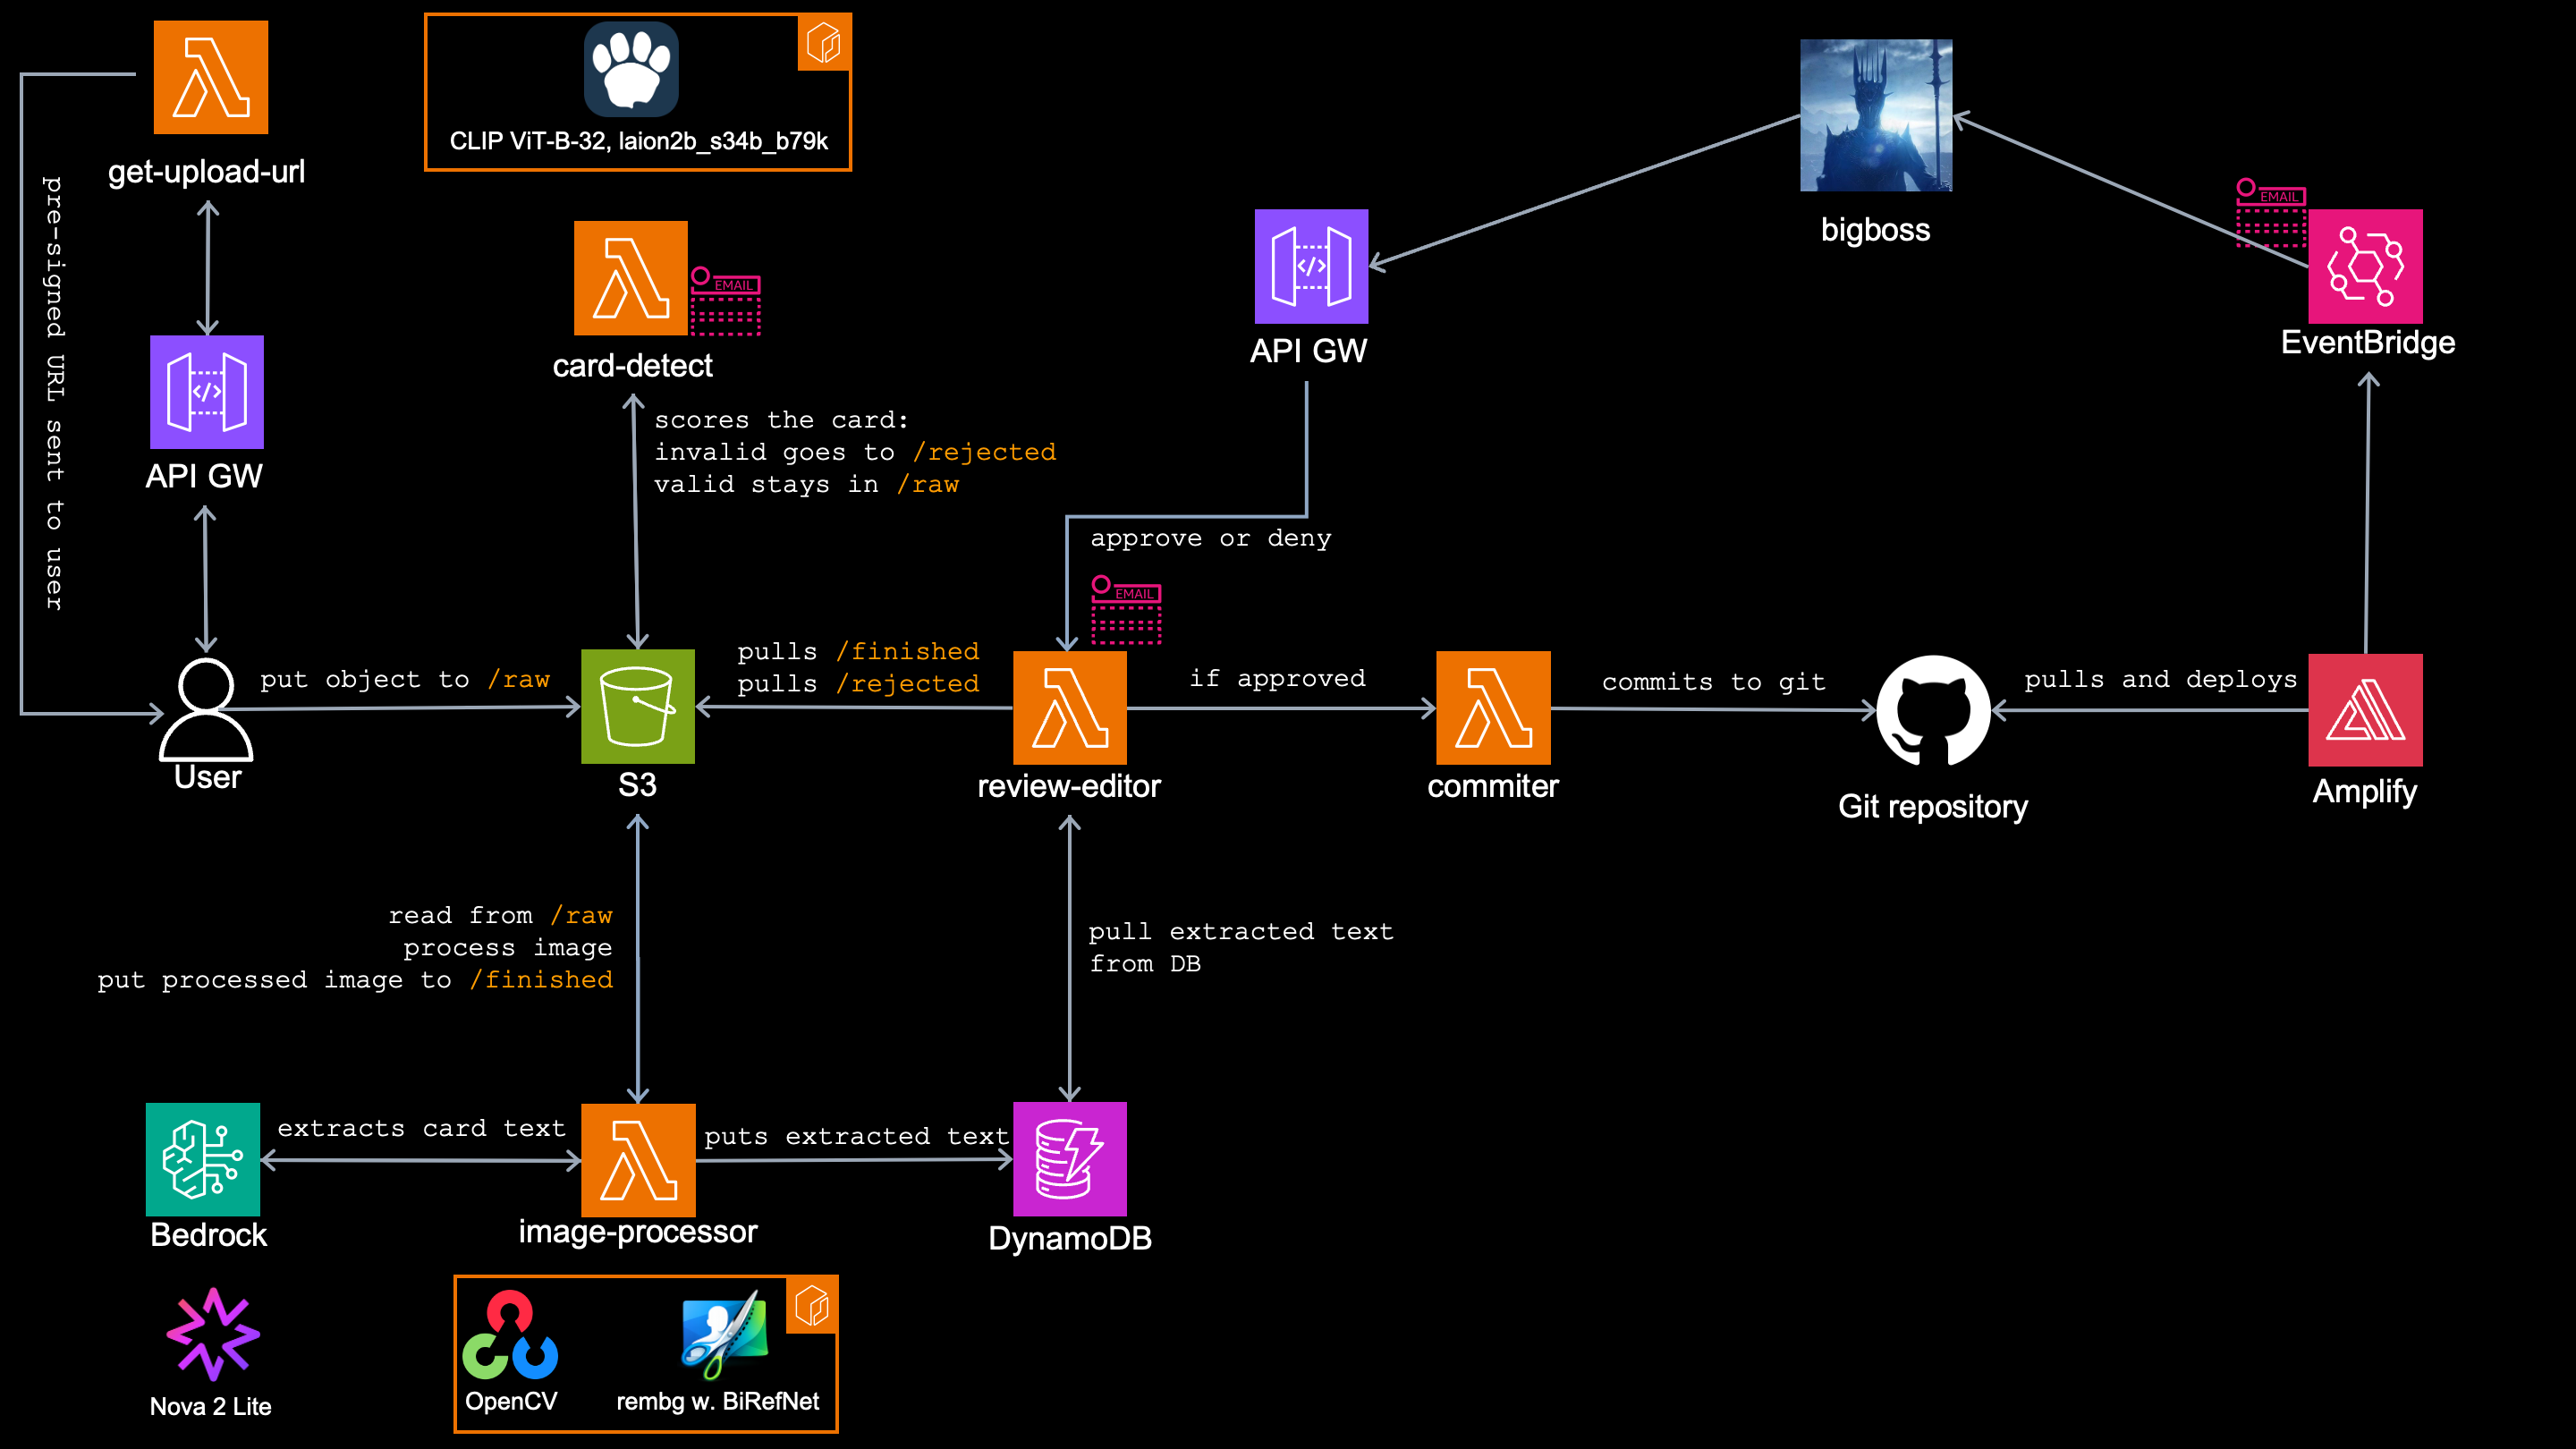
In two previous articles we went over the whole image processing pipeline, which process AWS Builder Cards images:
From anonymous photo to a published page: An event-driven, AI, image processing pipeline on AWS
and also over image classification model running in lambda container, which filters out the uploaded images and filter only valid AWS Builder Card images:
Is this even a valid card? Zero-shot image classification model in a lambda container
Today's article is about vision segmentation model, which also runs in a lambda container, but it's role is to process the filtered image - remove background, straighten it and crop it.
Specifically about this part:
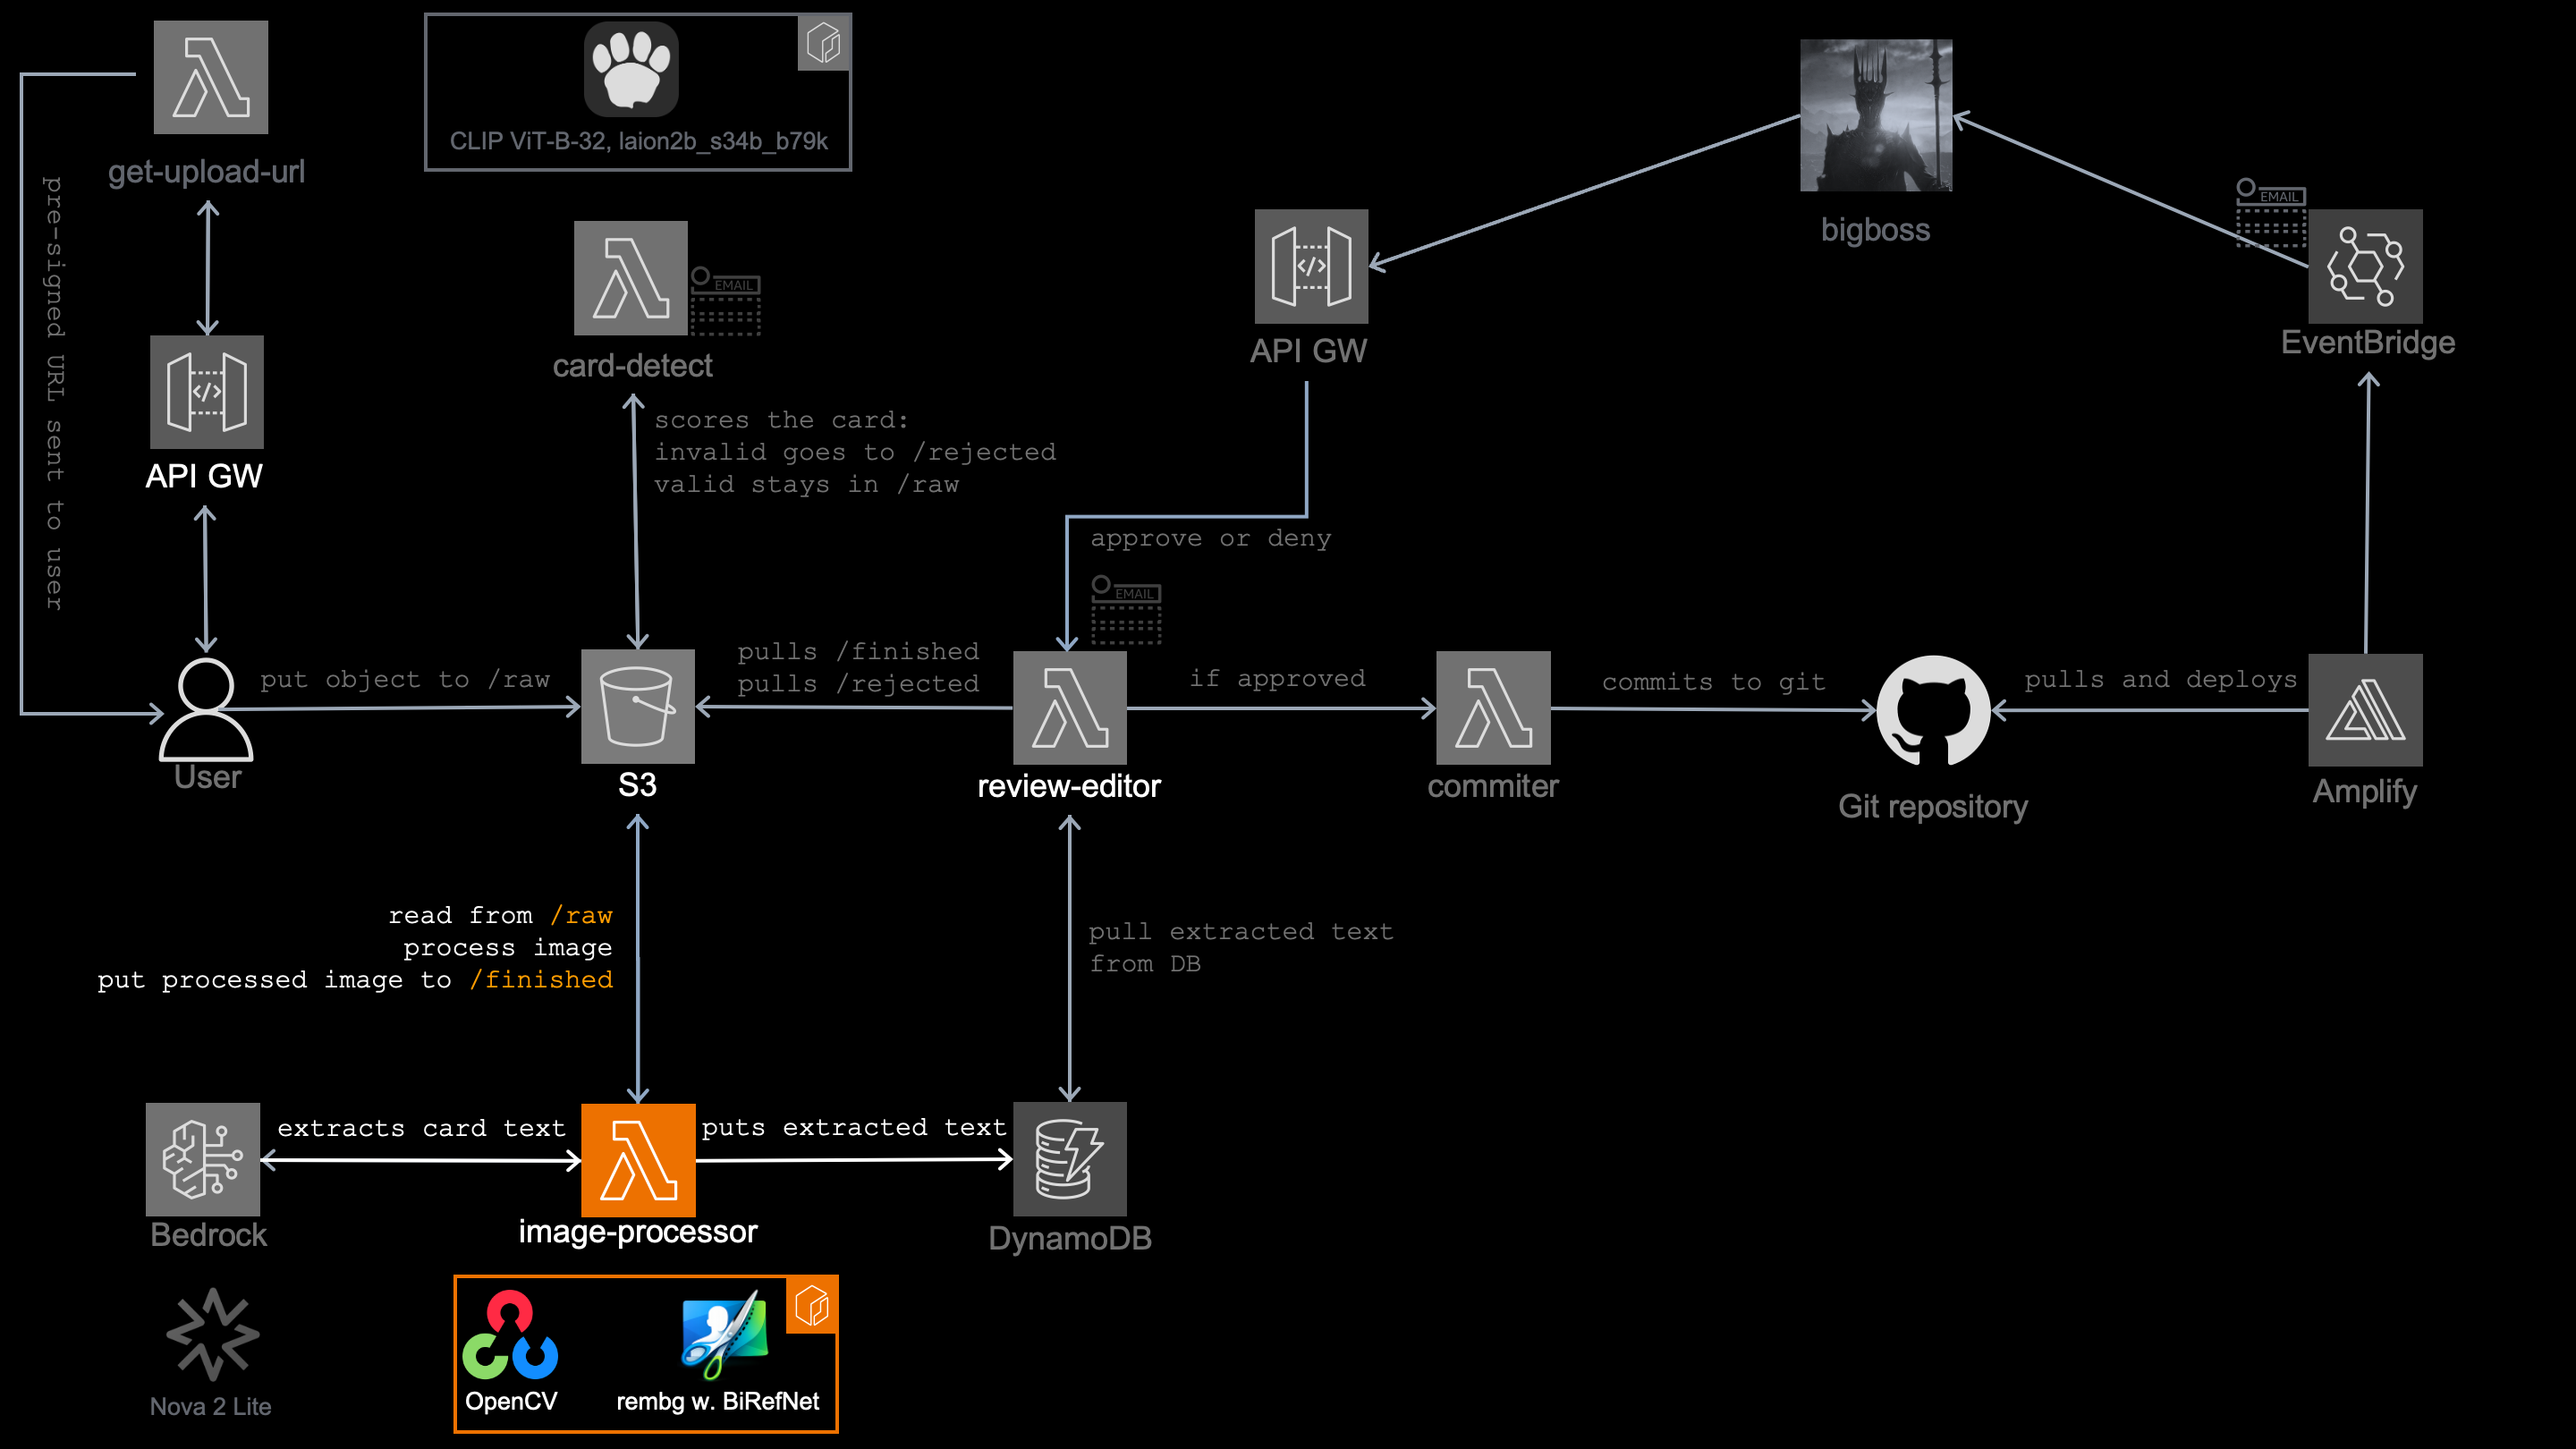
The problem
Somebody photographs an AWS Builder Card lying on their desk and uploads it to my collection. What arrives is not a card - it is a "photo" of a card. Tilted and with some background around it.
One lambda has already looked at it before - a small, container based lambda card-detect, which filtered it as valid AWS Builder Card.
See this article for more info.
Now we have to clean that picture (straighten, crop, remove background), which is a job of lambda function image-processor. That lambda answers the question: Where exactly is the card in this photo?
The coworking between the two lambdas is simple: after the image is put into S3 images/raw/ and filtered by card-detect as a valid one, image-processor overtakes and start to processing the image.
Can I run it in the container?
To process the image as describe above, I need an image segmentation model. The one that goes pixel by pixel and says: "card, background, card, background..."
I need it to run on CPU, inside a lambda container from the same reasons as card-detect (inside AWS, cheap, serverless).
To find a right model to do the job I need to know the answers to the same questions, as with card-detect lambda running CLIP ViT-B-32, laion2b_s34b_b79k:
- How much CPU and memory does it need?
- Where do the weights come from?
- What runs at the inference?
The inference
In this case, this is the easiest one to answer.
It runs on onnxruntime behind a small library called rembg, which means no PyTorch and no training framework anywhere in the image.
The other two get a section each further down, and question 1 is where the story is: the model I picked first barely fit at 10 GB. Lambda also ties vCPU to memory, so that number decides how fast this thing runs, not just whether it survives.
So this is an article about memory, about the bill, and about the geometry that happens after the model has stopped talking.
One thing before we start, so it does not ambush you later: there are two models in this lambda. BiRefNet finds the card. Right at the end, a Bedrock vision model reads the text off the finished image.
But let's start from the beginning
from rembg import new_session
SESSION = new_session("birefnet-general-lite")
The model
As an image segmentation model, I decided to go with BiRefNet-General-Lite, loaded through rembg. The Lite is also the answer to the memory question.
The memory story
Remember it works on my machine meme from previous article?
Here is where I really earned it.
What I was working with locally was the BiRefNet-General model. It worked fine (on my machine 🤣), so I shipped it.
What I never did was to watch how much memory it was eating while it worked.
I started the container at 4 GB memory. The first couple of invocations showed me the problem: Runtime.OutOfMemory, Max Memory Used: 4095 MB of 4096.
So I went to maximum I could - 10 GB memory. It worked fine, but not as per CloudWatch: Max Memory Used: 9930 MB. That's wonderful 97% of maximum container's capacity.
So yet it works, but then I tested 125 MB image and it crashed. There is no 12 GB to escape to, no bigger instance type, no flag to ask for more. With standard <20 MB image 97% of the memory is out of the question.
Because I could not buy more memory, I had to need less of it. The answer was lighter model from the same family: BiRefNet-General-Lite
| Setup | What happened |
|---|---|
4 GB + BiRefNet-General
|
Dies at OOM - 4095/4096 MB used |
10 GB + BiRefNet-General
|
works, but peaks at 9930/10240 MB
|
10 GB + BiRefNet-General-Lite
|
median peak 7540 MB, and results are not different from non-Lite model |
There was a second fix too to lower the memory consumption and that's image resize.
Every upload whose longer side is over 2048px gets downscaled to maximum 2048pxcap.
It shrinks the whole process: smaller composite, smaller sample, smaller arrays, smaller encode. That bought me about 300-400 MB of memory, depending on a picture size.
Maxing the memory does buy me one thing for free. Lambda ties vCPU to memory, so 10 GB also gets me the most vCPUs Lambda could offer (6vCPUs) and this model needs every one, because there is no GPU under a lambda container.
2. Where do the weights come from?
The come from the docker build
There are two ways to get model weights into a container"
- Export them yourself locally and the Dockerfile only
COPYthe files in, as I did withcard-detectlambda (see previous article - Docker downloads them during a build phase
In this case, I went for option 2 and I used rembg to do it.
FROM public.ecr.aws/lambda/python:3.14
# ... (package and requirements installation omitted) ...

ENV U2NET_HOME=/opt/models \
    NUMBA_CACHE_DIR=/tmp \
    MPLCONFIGDIR=/tmp

RUN python -c "from rembg import new_session; new_session('birefnet-general-lite')" \
    && chmod -R a+rX /opt/models

COPY app.py ${LAMBDA_TASK_ROOT}/
CMD ["app.handler"]
new_session() normally loads a model at runtime, but if the model is not already cached, rembg downloads it first. As being called during Docker buildz the BiRefNet weights are downloaded into /opt/models and become part of the resulting image. When Lambda starts, the weights are already there and no model download is needed at the runtime.
The cost
At my volume of the cars this lambda stays still within the free tier. Above the free tier, it'd cost roughly $0.006 per card, but I would never reach it.
A comparable GPU setup would cost hundreds of dollars per month even when nobody is uploading cards and that's exactly what this project is about - mostly idle.
Roughly speaking, the lambda approach would start to lose its cost advantage somewhere around tens of thousands of cards per month, but in this case the lambda is clear winner.
The process flow
The whole lambda is actually five steps:
- Decode and shrink the photo
- Find pixels belonging to card and those from the backgrouind
- Locate the four corners
- Straighten it and cut the background out
- Write bytes as the
PNG.
Not every step here is done by the image segmentation model. This lambda combines AI part - BiRefNet-General-Lite model to distinguish card vs background pixels, everything else is deterministic geometry using OpenCV and numpy.
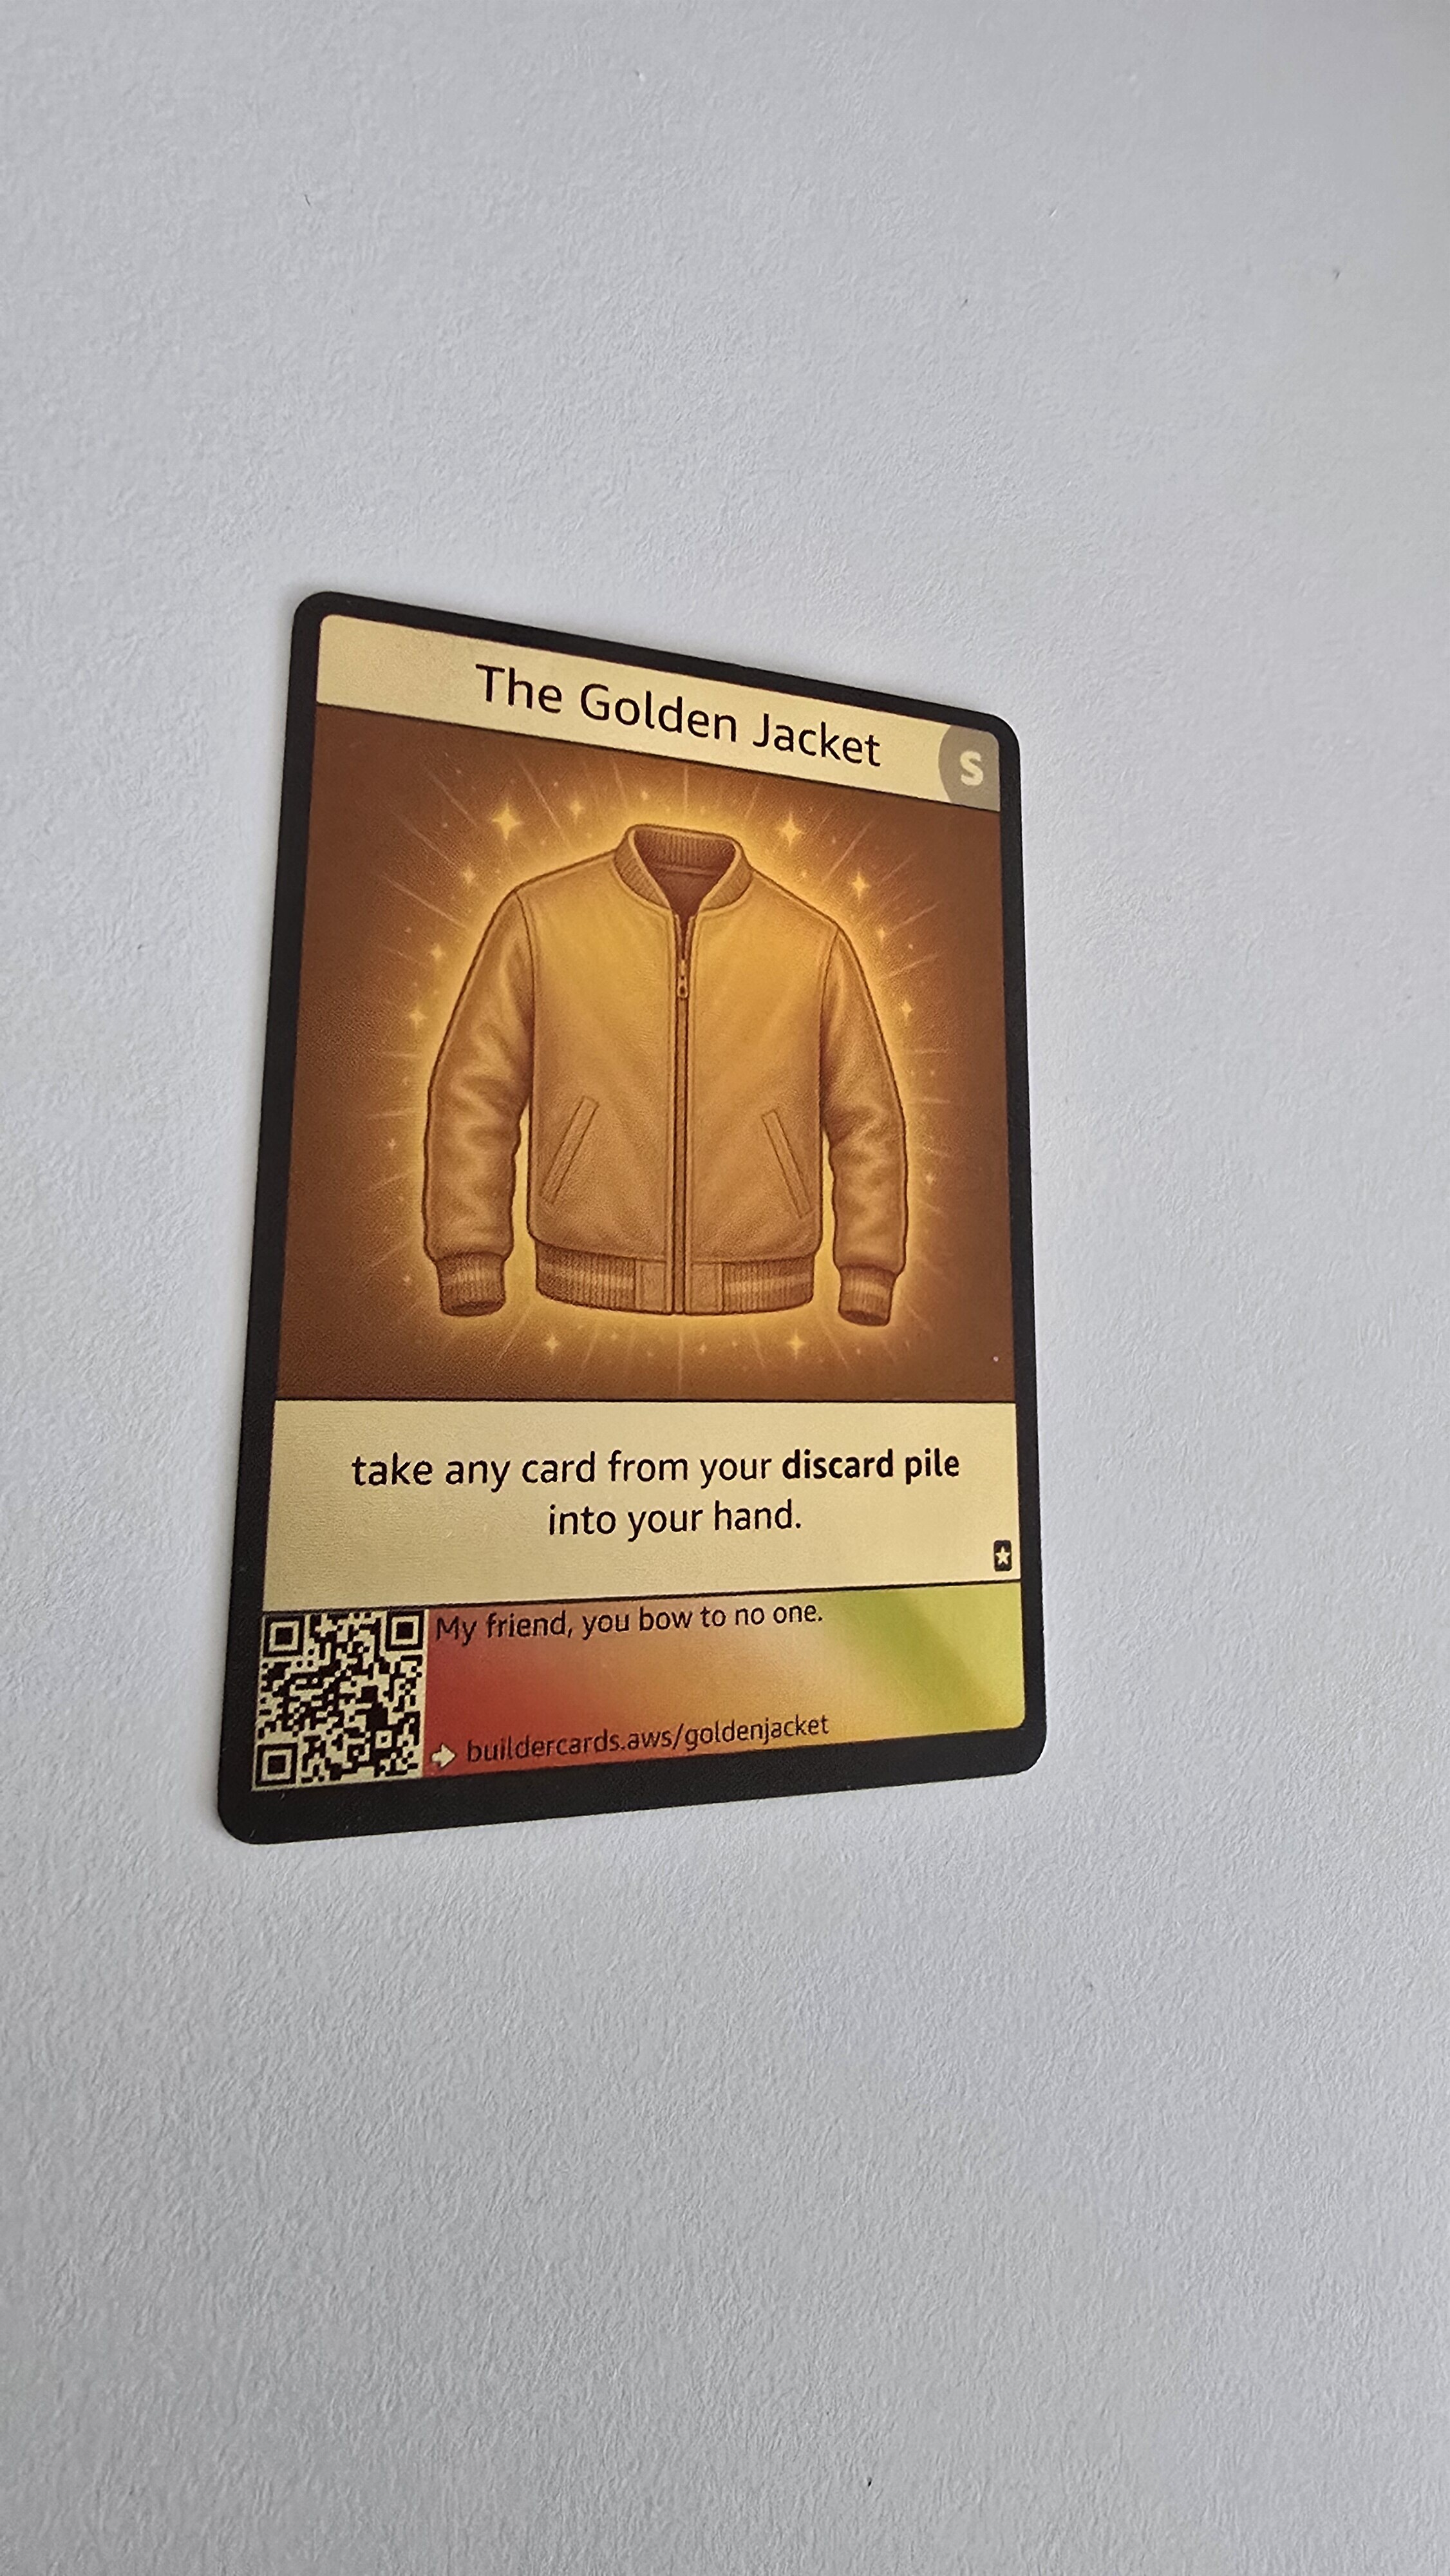
I will run the whole process on this card:
Decode and downscale
First, OpenCV decodes supported file image (.jpg, .png, .webp, .tiff, and .bmp) into an OpenCV image, while Apple's HEIC format is decoded using Pillow with HEIC support.
Then the file size check (for the memory reasons above) happens. If the longest side is over 2048px, lambda downcales it to max cap 2048px, while smaller images are untouched.
This resized image goes into the BiRefNet-general-lite segmentation model to generate the mask (see next step) and the same resized image is what OpenCV warps later.
MAX_DIM = 2048

def process_image(raw_bytes):
    img = _decode_bgr(raw_bytes)
    # ... (error guard and size capture omitted) ...
    img = downscale(img, MAX_DIM)
    # ... (size logging omitted) ...

    ok, buf = cv2.imencode(".png", img)
    # ... (encode guard trimmed) ...
    work_bytes = buf.tobytes()

    # ... (segmentation and geometry processing omitted) ...
Producing the mask
The model has to decide what is the card and what is the background - so the expected output should be something, where every pixel is scored for being part of the card or part of the background.
That something is called the mask, which is nothing more than black and white alpha channel stencil.
That mask is produced by BiRefNet-General-Lite model, where each pixel receives a value on how strong it belongs to the backgrund.
rembg then returns the result as a mask.
The pixel score goes between 0 as most noncard pixel, to 255 as most card pixel. I set up the line on 127:
- pixel scored 0-127 becomes background
- pixel scored 128-255 becomes card
get_mask() then cleans up the result with morphological operations, filling small holes and removing small specks.
The result is a clean black and white stencil of the card. From this point on, the upcoming geometry operations (see next steps) works with that stencil, rather than the original photo.
def get_mask(raw_bytes, session):
    # ... (docstring trimmed) ...

    # BiRefNet segmentation
    cutout = Image.open(
        io.BytesIO(remove(raw_bytes, session=session))
    ).convert("RGBA")

    # Extract and threshold the foreground mask
    alpha = np.array(cutout)[:, :, 3]
    _, mask = cv2.threshold(alpha, 127, 255, cv2.THRESH_BINARY)

    # Remove holes and noise
    k = cv2.getStructuringElement(cv2.MORPH_ELLIPSE, (15, 15))
    mask = cv2.morphologyEx(mask, cv2.MORPH_CLOSE, k)
    mask = cv2.morphologyEx(mask, cv2.MORPH_OPEN, k)

    # Keep only the largest connected component
    n, labels, stats, _ = cv2.connectedComponentsWithStats(mask, 8)
    if n > 1:
        largest = 1 + int(np.argmax(stats[1:, cv2.CC_STAT_AREA]))
        mask = np.where(labels == largest, 255, 0).astype(np.uint8)

    return mask
The returned mask for Golden Jacket card looks like this:
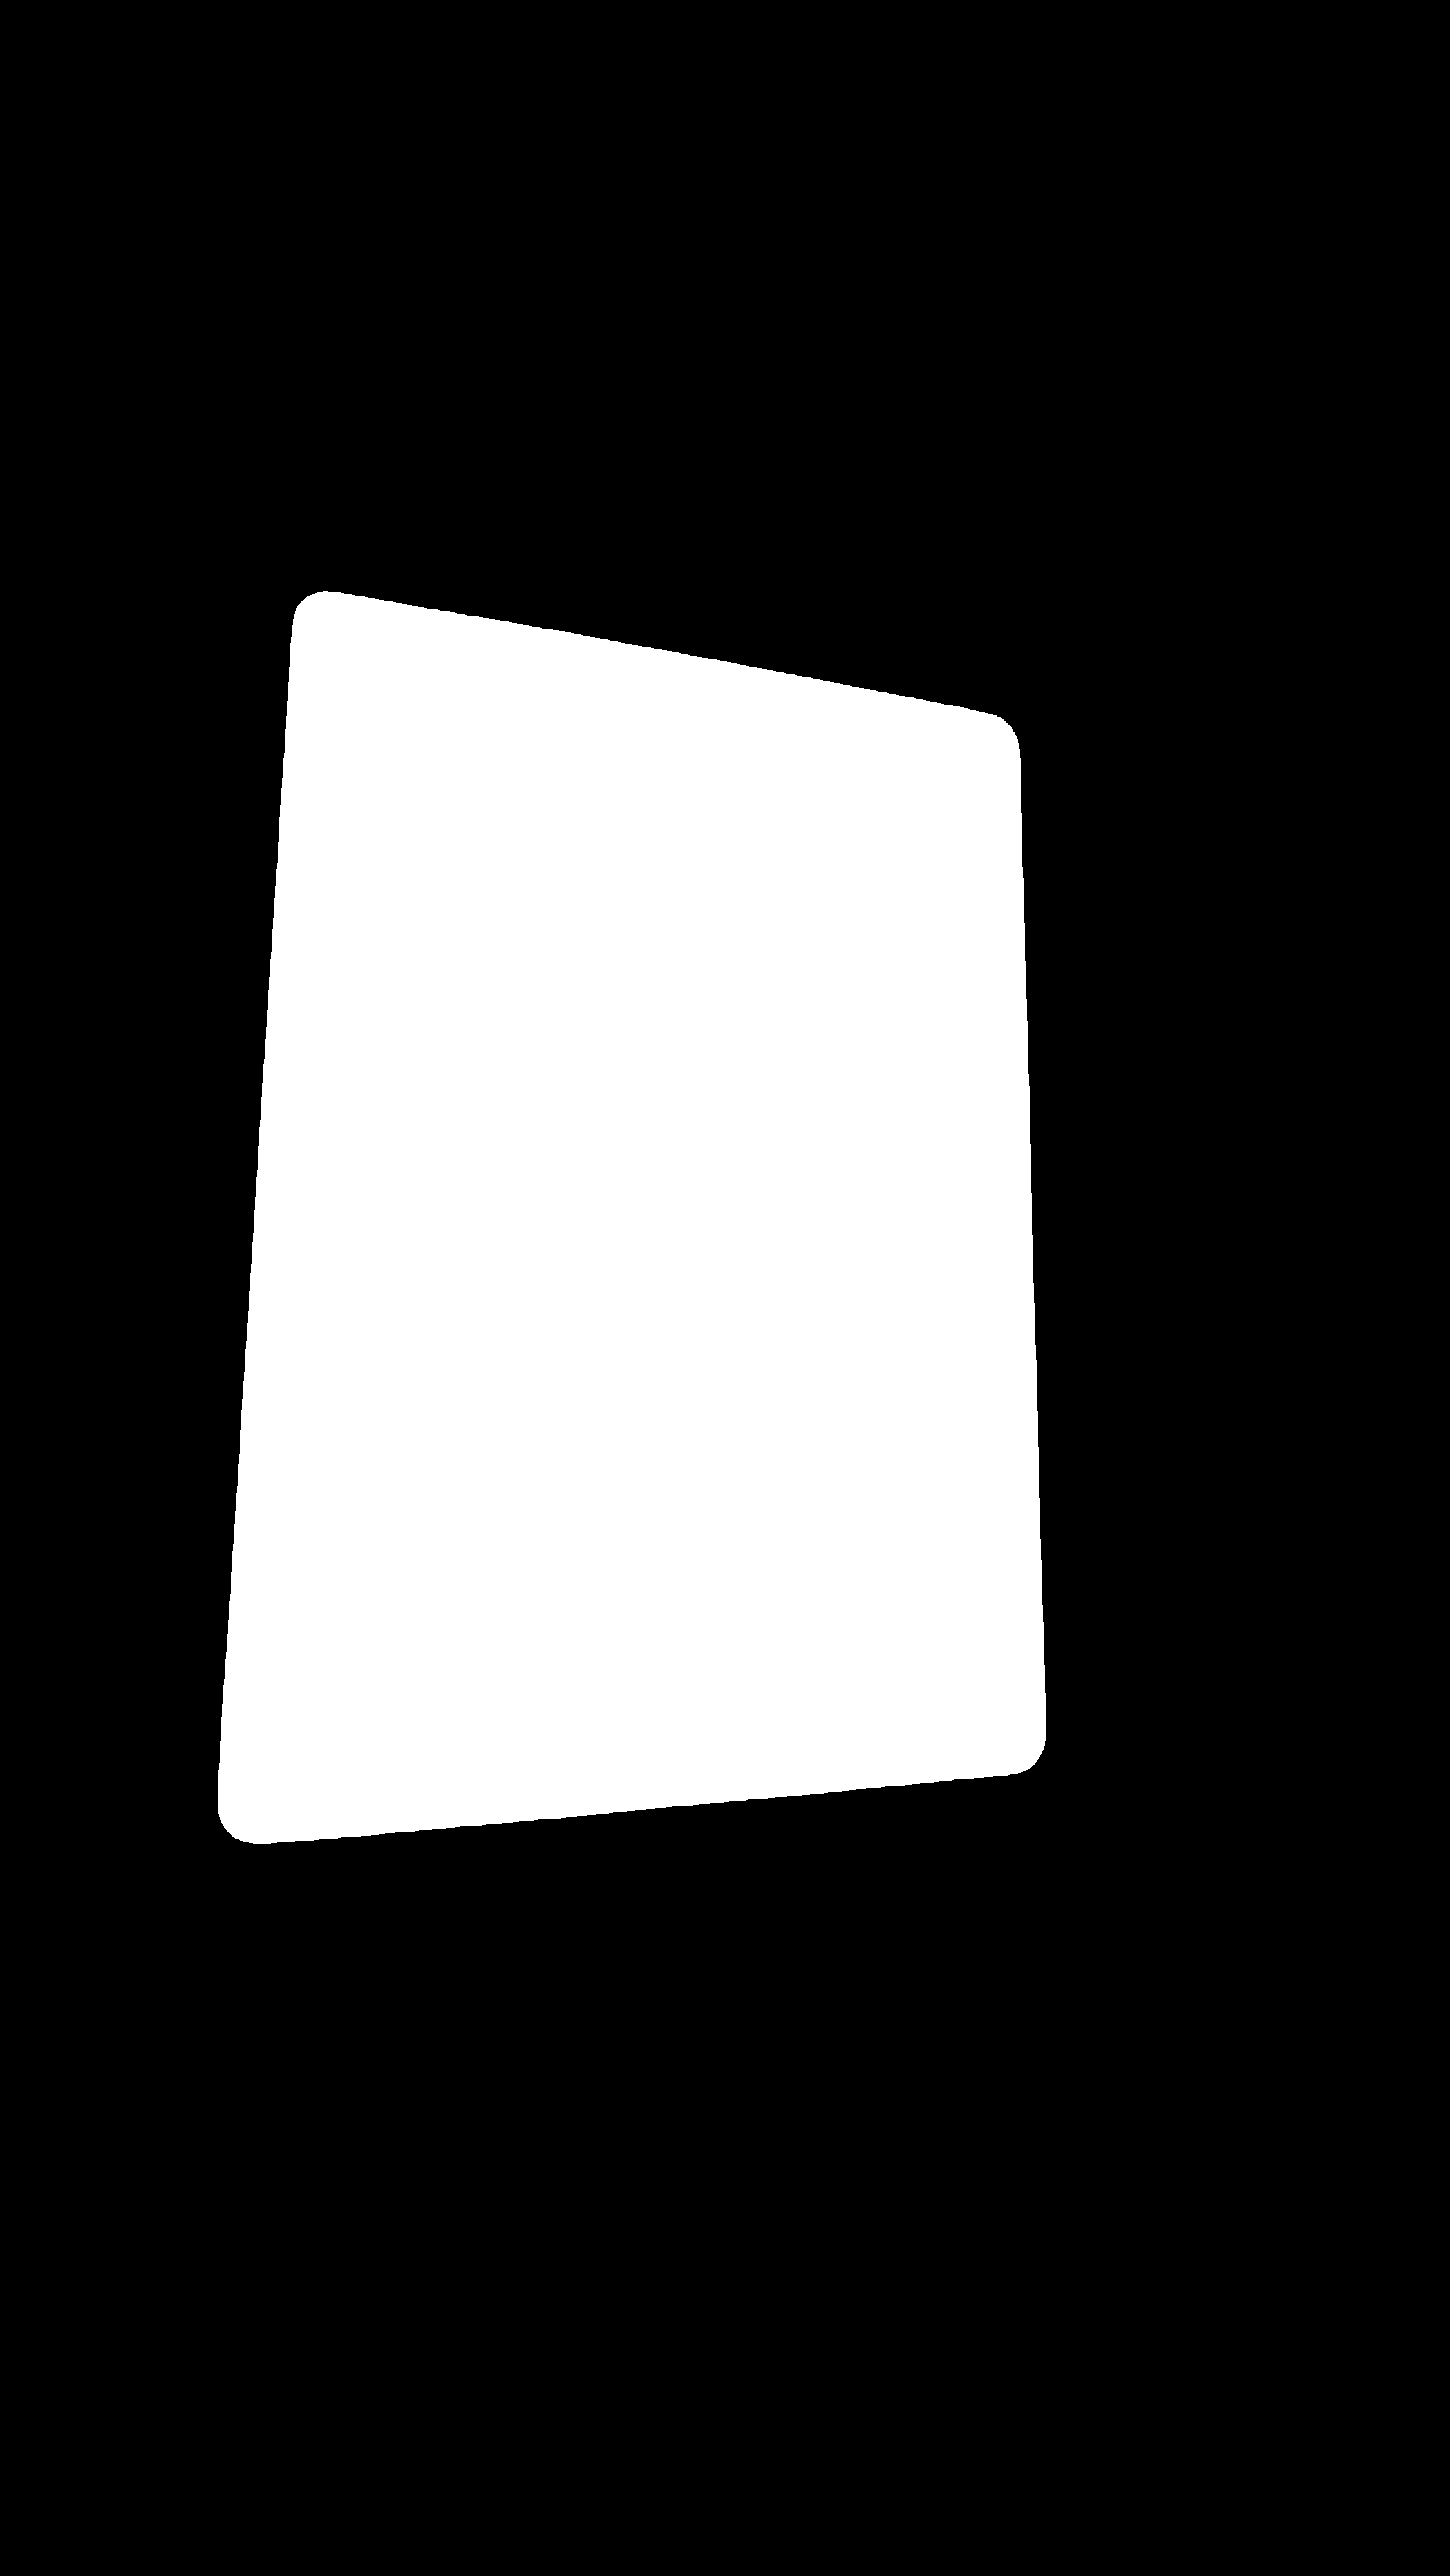
And this is where the segmentation model's job ends. It has separated the card from the background and everything that follows is a deterministic math.
Fight the rounded corners
When I was thinking about straightening the card, I also thought about the eye-to-brain path. Taking a photo of a card from an angle, turns its rectangular shape into a quadrilateral, as you can see in the mask above.
How do I perform a perspective rectification and turn it back into a rectangle?
The answer is in the corners.
Lambda needs to identify the card's four corners first. A standard approach would be use OpenCV function approxPolyDP, which simplifies the detected outline into four corner points.
But here's where Builder Cards fight back: their corners are rounded, so the contour does not have four sharp corners.
For this reason approxPolyDP sometimes mistakenly placed a corner somewhere inside the rounded section, like here:
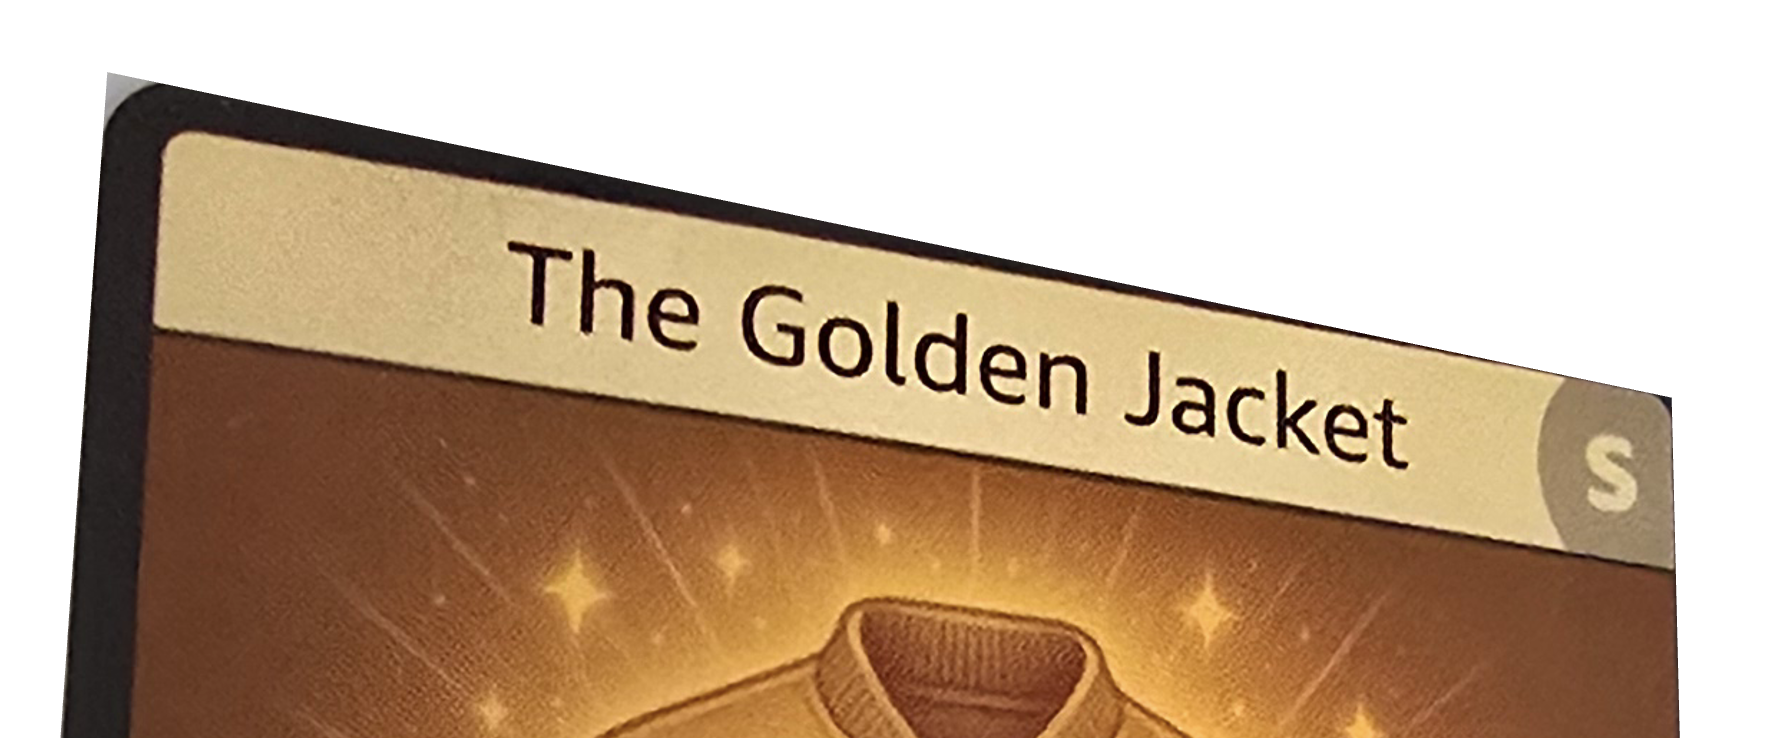
So instead calling a approxPolyDP, the more logical step would be if lambda fits a straight line along each of the four sides of the card. Now the mask comes handy, because it tells exactly where the card's contour is.
Before fitting the lines, it temporarily rotate the contour points so the card is approximately upright. This lets it separate the contour points into top, bottom, left and right edges.
Because the rounded corners would distort the straight line, lambda excludes the outer 18% at each end, when selecting the contour points used for each edge.
In other words, it uses the middle part of each side, where the contour follows the card's straight edge.
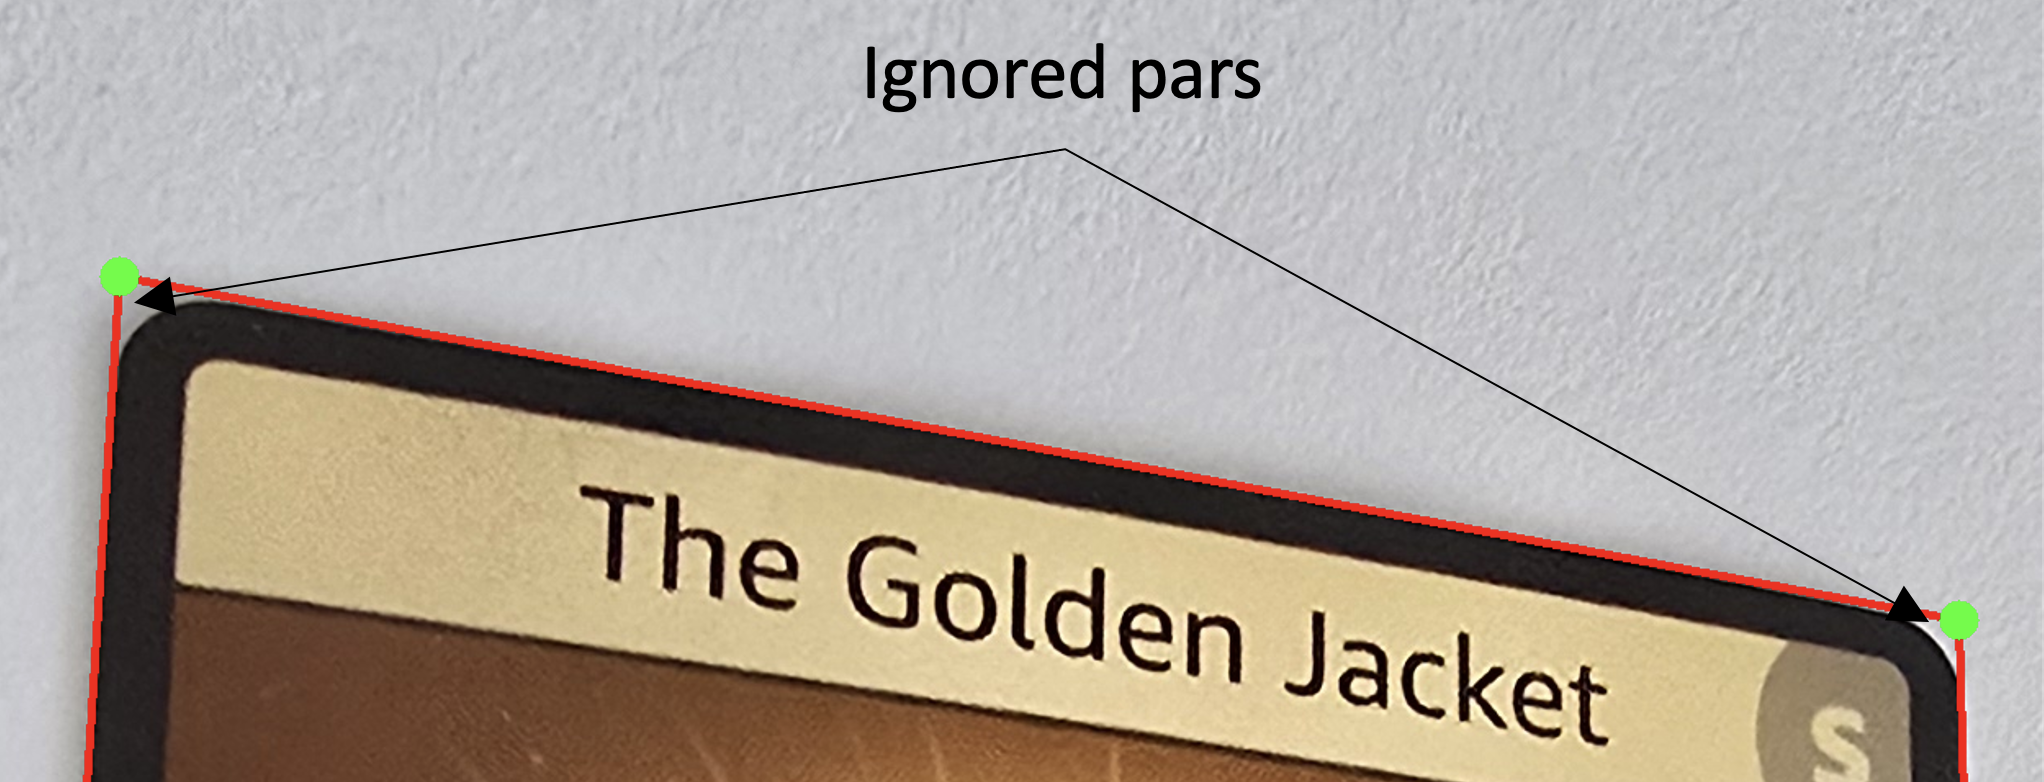
It then fits a straight line to each of those four sections.
Where two neighbouring lines intersect gives us a corner. Because the lines represent the card's straight edges rather than its rounded physical corners, those intersections can lie slightly outside the visible card.
Those four intersections become the card's four corner points. Lambda then transforms those coordinates back to the original image coordinate system. The card itself is not straightened yet. These points are passed to the next step, where they are used for the actual perspective rectification.
def find_quad(mask):
    # ... (docstring and contour extraction omitted) ...

    # Rotate the contour so the card becomes approximately axis-aligned.
    (cx, cy), (rw, rh), ang = cv2.minAreaRect(c)
    M = cv2.getRotationMatrix2D((cx, cy), ang, 1.0)
    P = _rotate_pts(pts, M)

    # Compute the bounding box of the rotated contour.
    minx, maxx = P[:, 0].min(), P[:, 0].max()
    miny, maxy = P[:, 1].min(), P[:, 1].max()
    W, H = maxx - minx, maxy - miny
    bx, by = 0.18 * W, 0.18 * H

    # Ignore the rounded corners when selecting edge points.
    cxlo, cxhi = minx + bx, maxx - bx
    cylo, cyhi = miny + by, maxy - by

    # Split contour points into the four card edges.
    top    = P[(P[:, 1] < miny + by) & (P[:, 0] > cxlo) & (P[:, 0] < cxhi)]
    bottom = P[(P[:, 1] > maxy - by) & (P[:, 0] > cxlo) & (P[:, 0] < cxhi)]
    # ... (left and right the same way) ...

    # Fit a line to each edge and find their intersections.
    if min(len(top), len(bottom), len(left), len(right)) >= 15:
        lt, lb = _fit_line(top), _fit_line(bottom)
        ll, lr = _fit_line(left), _fit_line(right)
        tl, tr = _intersect(lt, ll), _intersect(lt, lr)
        br, bl = _intersect(lb, lr), _intersect(lb, ll)

    # ... (rotate corners back and fallback methods omitted) ...
But wait, should I blindly trust four invisible points? Well, No.
For debugging reasons, encode_corners() draws the detected quadrilateral and its four corner points onto the original image., which is saved as images/raw/<stem>__corners.png.
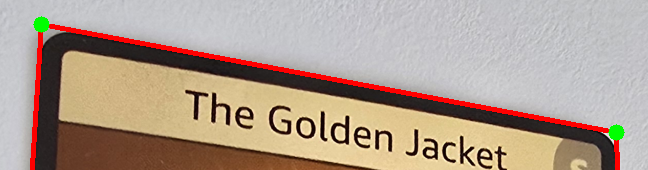
In case a card comes out cropped wrong, I open this overlay and see immediately whether the corners were the problem.
Straighten it and crop it
Now that we have the four corners identified, OpenCV calls getPerspectiveTransform to calculate a perspective transformation that maps those four points onto the four corners of a rectangle, and then warpPerspective applies that transformation to the original image. This is where the card is actually straightened and warped.
The result is a rectangular image containing the straightened card, but the background is still present around the rounded corners.
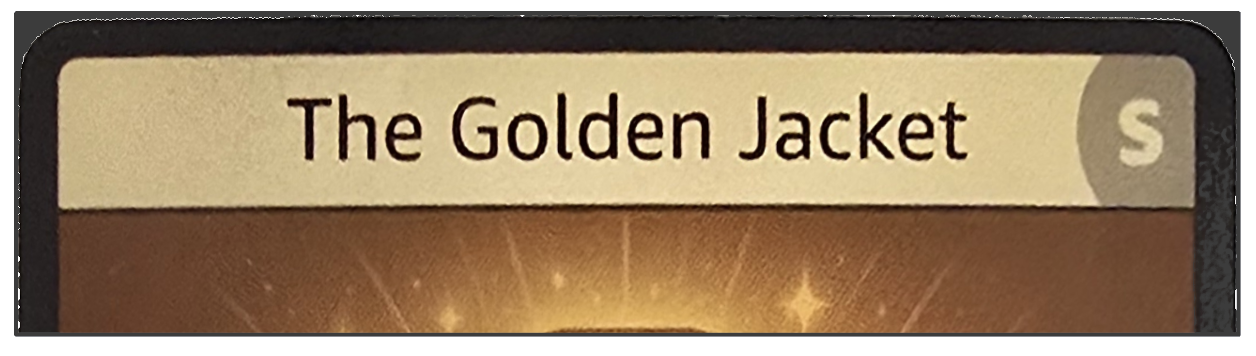
This is where the mask comes back in.
It goes through the exact same perspective transformation as the photo. Once it's straight and perfectly aligned into a rectangle, lambda can replace those corner pixels with the configured background color.
def rectify(img_bgr, quad, mask, background="white"):
    # ... (docstring omitted) ...

    # Order the detected corners consistently.
    src = order_corners(quad)
    tl, tr, br, bl = src

    # Compute the dimensions of the output rectangle.
    w = int(max(
        np.linalg.norm(br - bl),
        np.linalg.norm(tr - tl),
    ))
    h = int(max(
        np.linalg.norm(tr - br),
        np.linalg.norm(tl - bl),
    ))

    # ... (invalid-size guard omitted) ...

    # Map the four card corners to the four corners of the rectangle.
    dst = np.float32([
        [0, 0],
        [w - 1, 0],
        [w - 1, h - 1],
        [0, h - 1],
    ])
    M = cv2.getPerspectiveTransform(src, dst)

    # Straighten the original image.
    warped = cv2.warpPerspective(img_bgr, M, (w, h))

    # Straighten the mask using exactly the same transformation.
    warped_mask = cv2.warpPerspective(
        mask, M, (w, h),
        flags=cv2.INTER_NEAREST,
    )

    # Threshold and erode the transformed mask.
    _, warped_mask = cv2.threshold(
        warped_mask, 127, 255, cv2.THRESH_BINARY
    )
    er = cv2.getStructuringElement(
        cv2.MORPH_ELLIPSE, (3, 3)
    )
    warped_mask = cv2.erode(
        warped_mask, er, iterations=1
    )

    # ... (transparent-background branch omitted) ...

   # Replace the background with the selected solid color
    FILLS = {"white": 255, "black": 0}
    if background not in FILLS:
        logger.warning(
            "[ImageProcessor] unknown BACKGROUND=%r (expected white, black or none) - falling back to black",
            background,
        )
    fill = FILLS.get(background, 0)
    outside = warped_mask == 0
    warped[outside] = fill

    return warped
In this step, we still don't have a proper png as a result, because rectify() *returns raw pixels, not a file. *
The result is a straight rectangular card stored in the memory as an OpenCV image, with the remaining background replaced by the black, white, or made transparent when background is set none. It's still not a valid png file yet.
The background color black, white, or none is defined as an environmental variable in terraform:
resource "aws_lambda_function" "image_processor" {
  # ... (code omitted) ...

  environment {
    variables = {
      BACKGROUND           = "black" # could be also "white" or "none"
  # ... (code omitted) ...
Step 5 - write the final image
Now the bytes resulted from rectify() are turned into proper png by process_image().
def process_image(raw_bytes):
    # ... (image decoding, downscaling, mask generation, corner detection,
    #      and rectification omitted) ...

    out = rectify(img_bgr, quad, mask, background=BACKGROUND)

    ok, png_buf = cv2.imencode(".png", out)
    if not ok:
        raise RuntimeError("PNG encoding failed")

    png = png_buf.tobytes()

    # ... (corners overlay encoding omitted) ...

    return png, corners_png
The reason I choose a .png is because in case of the transparent background, only png supports the aplha channel option.
Finally the handler() puts the image into the images/finished/ prefix of the S3 bucket and that's the final, straightened, backgroundless png image ready to be used.
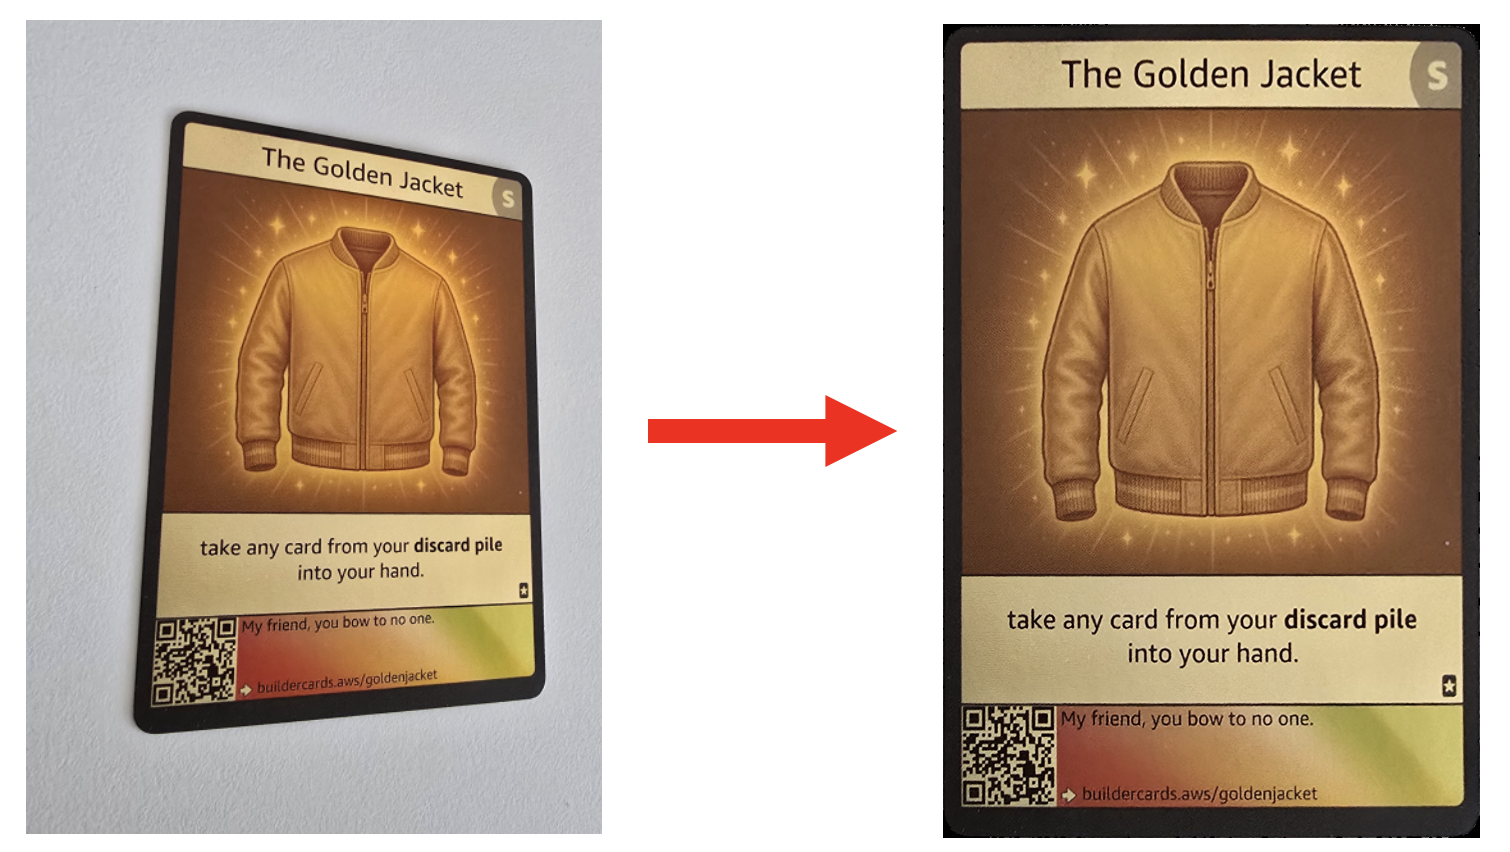
Those were the steps that made the card transform from left to right:
Extracting the text
There are actually two other calls and that's where the second model finally shows up:
- Lambda sends the
pngbytes toBedrockfor amultimodal modelo extract the text from the card, such as title, effect, description and any other text. - Once extracted, it writes it into
DynamoDBas a card's metadata.
def handler(event, context):
    # ... (S3 event parsing, guards, download, and other unrelated code omitted) ...

            png, corners_png = process_image(raw)

            # ... (no-card guard, corners-overlay write, and filename
            #      metadata parsing omitted) ...

            fields = {"title": "", "effect": "", "description": ""}

            try:
                fields = extract_card_fields(png)
            except Exception as ex:
                logger.exception(
                    "[ImageProcessor] Bedrock extraction failed: %s", ex
                )

            try:
                write_card_item(
                    card_id,
                    event_name,
                    year,
                    key,
                    out_key,
                    fields,
                    uploader,
                )
            except Exception as ex:  # noqa: BLE001
                logger.exception(
                    "[ImageProcessor] DynamoDB write failed: %s", ex
                )

            # Upload the rectified card image.
            s3.put_object(
                Bucket=bucket,
                Key=out_key,
                Body=png,
                ContentType="image/png",
            )

    # ... (remaining handler code omitted) ...
More on both steps in this article.
What I got from it
I built this project for collectible (AWS builder) cards, but almost none of it is about it.
Running cheap
GPUs are not always necessary to run the custom or external model inside the AWS. Unless you can fit it under 10GB memory and CPUs are enough to do the job - you have yourself a model doing the job and running very cheap.
You don't need a model to do everything
What can be done deterministically, I'd say it safer to do it that way.
You don't need a model with PhD to do simple job
Lite model is sometimes as good as general one, just test it locally and decide.
Except everything above, the card-detect + image-processor + Bedrok + DynamoDB combo can by used for any other image category, just fork the REPO, modify it o your needs and you are good to go.
The Credits
BiRefNet - the model that draws the mask, by Peng Zheng.
- The paper Bilateral Reference for High-Resolution Dichotomous Image Segmentation
- Model's GitHub repo
- and it's also available at HuggingFace
rembg - the wrapper I load it through, by Daniel Gatis.
- GitHub repo.
The exact file I am running is BiRefNet-general-bb_swin_v1_tiny-epoch_232.onnx - and that bb_swin_v1_tiny inthe name is the whole memory story in one string. Lite means a Swin-v1-Tiny backbone.
Project repo and the remaining articles
From anonymous photo to a published page: An event-driven, AI, image processing pipeline on AWS
Is this even a valid card? Zero-shot image classification model in a lambda container
What does the card say? Text extraction using Amazon Nova Lite 2


Top comments (0)