Dockerizing Python applications is still a complex task, despite all the tools we have at our disposal. Dependency management, environment consistency, image size, and build speed can all become pain points, especially as projects grow.
Enter uv by Astral: a modern tool that aims to simplify and speed up Python dependency resolution. It introduces a fresh approach to Docker workflows, but it comes with configuration choices that may be unclear if you’re not familiar with how they affect image structure and behavior.
The uv GitHub repository provides three example Dockerfiles:
- Single-Stage: Single-stage build that keeps uv in the final image
-
Standalone: Multi-stage build using uv-managed Python, removes
uvin the final stage -
Multi-Stage: Multi-stage build using system Python, removes
uvin the final stage
Each approach has trade-offs, some are faster, some leaner, and some easier to understand. In this post, we’ll compare all three, break down their Dockerfile internals, analyze image size and history, and help you decide which is best for production-grade images.
What Are These Dockerfiles?
Before we dive into pros, cons, and differences, let’s quickly describe each Dockerfile.
Single-Stage Dockerfile
An example of using a single stage with uv pre-installed.
# Use a Python image with uv pre-installed
FROM ghcr.io/astral-sh/uv:python3.12-bookworm-slim

# Install the project into `/app`
WORKDIR /app

# Enable bytecode compilation
ENV UV_COMPILE_BYTECODE=1

# Copy from the cache instead of linking since it's a mounted volume
ENV UV_LINK_MODE=copy

# Install the project's dependencies using the lockfile and settings
RUN --mount=type=cache,target=/root/.cache/uv \
    --mount=type=bind,source=uv.lock,target=uv.lock \
    --mount=type=bind,source=pyproject.toml,target=pyproject.toml \
    uv sync --frozen --no-install-project --no-dev

# Then, add the rest of the project source code and install it
ADD . /app
RUN --mount=type=cache,target=/root/.cache/uv \
    uv sync --frozen --no-dev

# Place executables in the environment at the front of the path
ENV PATH="/app/.venv/bin:$PATH"

# Reset the entrypoint, don't invoke `uv`
ENTRYPOINT []

# Run the FastAPI application by default
CMD ["fastapi", "dev", "--host", "0.0.0.0", "src/uv_docker_example"]
Code Explained
FROM ghcr.io/astral-sh/uv:python3.12-bookworm-slim: This line specifies the base image. It pulls a pre-configured image that includes Python 3.12 and the uv tool. The
bookworm-slimtag indicates it is a minimal Debian-based image (Bookworm) optimized for size (slim variant).WORKDIR /app: Sets the working directory inside the container to /app. All subsequent commands will be executed relative to this directory.
ENV UV_COMPILE_BYTECODE=1: Sets an environment variable to enable Python bytecode compilation (creates
.pycfiles). This can speed up application startup times by avoiding re-compiling Python files each time the container starts.ENV UV_LINK_MODE=copy: Configures the
uvtool to copy files into the container instead of creating symbolic links (symlinks). This is useful when using mounted volumes, preventing potential issues in production due to symlinks.RUN — mount=type=cache…: This command installs the dependencies for the project using the
uv synccommand. The--mount=type=cacheoptimizes caching by storing cached files in a location outside the container, and--mount=type=bindallows the mounting of theuv.lockandpyproject.tomlfiles from the host, ensuring they are synchronized.ADD . /app: This copies the project’s source code into the container at /app.
RUN uv sync — frozen — no-dev: This second
RUNcommand installs the local project.ENV PATH=”/app/.venv/bin:$PATH”: This adds the
.venvdirectory, which contains the virtual environment’s executables, to the PATH environment variable. This ensures the container will use the right Python interpreter and dependencies.ENTRYPOINT []: Resets the entrypoint to an empty array. This means no default executable is set, giving flexibility to specify the command in the
CMD.CMD starts the FastAPI development server.
Standalone Dockerfile
An example of using standalone Python builds with multi-stage images.
# First, build the application in the `/app` directory
FROM ghcr.io/astral-sh/uv:bookworm-slim AS builder
ENV UV_COMPILE_BYTECODE=1 UV_LINK_MODE=copy

# Configure the Python directory so it is consistent
ENV UV_PYTHON_INSTALL_DIR /python

# Only use the managed Python version
ENV UV_PYTHON_PREFERENCE=only-managed

# Install Python before the project for caching
RUN uv python install 3.12

WORKDIR /app
RUN --mount=type=cache,target=/root/.cache/uv \
    --mount=type=bind,source=uv.lock,target=uv.lock \
    --mount=type=bind,source=pyproject.toml,target=pyproject.toml \
    uv sync --frozen --no-install-project --no-dev

ADD . /app
RUN --mount=type=cache,target=/root/.cache/uv \
    uv sync --frozen --no-dev

# Then, use a final image without uv
FROM debian:bookworm-slim

# Copy the Python version
COPY --from=builder --chown=python:python /python /python

# Copy the application from the builder
COPY --from=builder --chown=app:app /app /app

# Place executables in the environment at the front of the path
ENV PATH="/app/.venv/bin:$PATH"

# Run the FastAPI application by default
CMD ["fastapi", "dev", "--host", "0.0.0.0", "/app/src/uv_docker_example"]
Code Explained
FROM ghcr.io/astral-sh/uv:bookworm-slim AS builder: This line specifies the first (builder) stage of the Dockerfile. It uses the same
uvimage as the base, but marks this stage asbuilder. This approach helps modularize the build process by separating build dependencies from runtime dependencies.ENV UV_COMPILE_BYTECODE=1: These environment variables enable bytecode compilation and configure the
uvtool to copy files, just as in the previous Dockerfile.ENV UV_LINK_MODE=copy: Configures the uv tool to copy files into the container instead of creating symbolic links (symlinks). This is useful when using mounted volumes, preventing potential issues in production due to symlinks.
ENV UV_PYTHON_INSTALL_DIR /python: Specifies where Python should be installed within the container. This ensures Python is placed in a consistent directory during the build process.
ENV UV_PYTHON_PREFERENCE=only-managed: Instructs
uvto use only the managed Python version, ensuring consistency between builds and avoiding issues with mismatched Python versions.RUN uv python install 3.12: Installs Python 3.12 inside the builder image. This step is necessary because we need Python available for the application in the next stages.
WORKDIR /app: Similar to the previous Dockerfile, sets the working directory to
/appfor the subsequent commands.RUN — mount=type=cache…: Installs dependencies using
uv syncin a cached manner, like the previous Dockerfile.ADD . /app: Adds source code to the container.
RUN uv sync — frozen — no-dev: This second RUN command installs the project, like in the previous image.FROM debian:bookworm-slim: Switches to a much lighter image (
debian:bookworm-slim), which is used as the base for the final runtime image. This reduces the size of the final container since it excludes build tools like uv, reducing the final image size.COPY — from=builder /python /python: Copies the Python installation from the builder stage into the final image, ensuring that the Python installation is preserved but without the build tools
COPY — from=builder /app /app: Copies the application code from the builder stage to the runtime stage.
ENV PATH=”/app/.venv/bin:$PATH”: Adds the
.venvdirectory to the PATH environment variable, ensuring the container uses the correct Python and dependencies.CMD: Starts the FastAPI development server.
Multi-Stage Dockerfile
An example using multi-stage image builds to create a final image without uv.
# First, build the application in the `/app` directory.
# See `Dockerfile` for details.
FROM ghcr.io/astral-sh/uv:python3.12-bookworm-slim AS builder
ENV UV_COMPILE_BYTECODE=1 UV_LINK_MODE=copy

# Disable Python downloads, because we want to use the system interpreter
# across both images. If using a managed Python version, it needs to be
# copied from the build image into the final image; see `standalone.Dockerfile`
# for an example.
ENV UV_PYTHON_DOWNLOADS=0

WORKDIR /app
RUN --mount=type=cache,target=/root/.cache/uv \
    --mount=type=bind,source=uv.lock,target=uv.lock \
    --mount=type=bind,source=pyproject.toml,target=pyproject.toml \
    uv sync --frozen --no-install-project --no-dev
ADD . /app
RUN --mount=type=cache,target=/root/.cache/uv \
    uv sync --frozen --no-dev


# Then, use a final image without uv
FROM python:3.12-slim-bookworm
# It is important to use the image that matches the builder, as the path to the
# Python executable must be the same, e.g., using `python:3.11-slim-bookworm`
# will fail.

# Copy the application from the builder
COPY --from=builder --chown=app:app /app /app

# Place executables in the environment at the front of the path
ENV PATH="/app/.venv/bin:$PATH"

# Run the FastAPI application by default
CMD ["fastapi", "dev", "--host", "0.0.0.0", "/app/src/uv_docker_example"]
Code Explained
FROM ghcr.io/astral-sh/uv:python3.12-bookworm-slim AS builder: Begins the first stage (builder) using the uv image with Python 3.12 pre-installed.
ENV UV_COMPILE_BYTECODE=1: These environment variables enable bytecode compilation and configure the uv tool to copy files, just as in the previous Dockerfile.
ENV UV_PYTHON_DOWNLOADS=0: Disables downloading Python from external sources, forcing the use of the pre-installed system Python.
WORKDIR /app: Sets the working directory inside the container to /app.
RUN — mount=type=cache…: Installs dependencies using uv sync in a cached manner, like the previous Dockerfile.
ADD . /app: Adds source code to the container.
RUN uv sync — frozen — no-dev: This second RUN command installs the project, like in the previous image.
FROM python:3.12-slim-bookworm: Switches to a slim Python 3.12 image for the final runtime image.
COPY — from=builder /app /app: Copies the application from the builder stage.
ENV PATH=”/app/.venv/bin:$PATH”: Adds the .venv directory to the PATH environment variable, ensuring the container uses the correct Python and dependencies.
CMD: Starts the FastAPI development server.
What are the Main Differences Between the Images?
Single-Stage Dockerfile:
Structure: All operations (dependency installation, code addition, environment setup) happen within one stage.
Image Size: Typically, the largest, since both build and runtime dependencies (e.g., compilers, Python environment, etc.) remain in the final image.
Build Time: It might take longer since all steps, including installation and code addition, happen within a single stage, requiring a complete rebuild when changes are made to any part of the build process.
Modularity: Less modular. Every change to the application or de****pendencies requires a rebuild of the entire image.
Standalone Dockerfile:
Structure: This uses two stages: the builder stage (which uses the
uvimage to install dependencies) and the final stage (which copies over the built application and Python environment from the builder).Image Size: The final image contains only the runtime environment and the application code, excluding unnecessary build tools. However, it still needs Python to be installed from the builder image, which may result in a somewhat larger final image than the multistage approach.
Build Time: Slightly faster than the single-stage image because the standalone uses a dedicated builder stage for dependency installation, which allows better layer caching and separation of concerns.
Modularity: More modular. Each stage is responsible for a specific task, allowing you to optimize each step and cache parts of the build.
Multi-Stage Dockerfile:
Structure: This uses two stages: one for building and one for the final application image. The builder stage installs dependencies and compiles the app, while the final stage copies only the necessary parts into a slim runtime image.
Image Size: The smallest image size because it only includes the final necessary components: application code and runtime environment (no build tools, no redundant Python installation).
Build Time: Build times are comparable to the Standalone approach since both use multi-stage builds. However, rebuilds can be more efficient when only application code changes, as the Python environment in the final stage doesn’t need to be copied from the builder.
Modularity: The final runtime image is as slim as possible, making it an excellent choice for production.
What are the Main Differences Between the Images?
To validate the differences, a benchmark was run on image size and build time across three Docker strategies: Single-Stage, Standalone, and Multi-Stage.
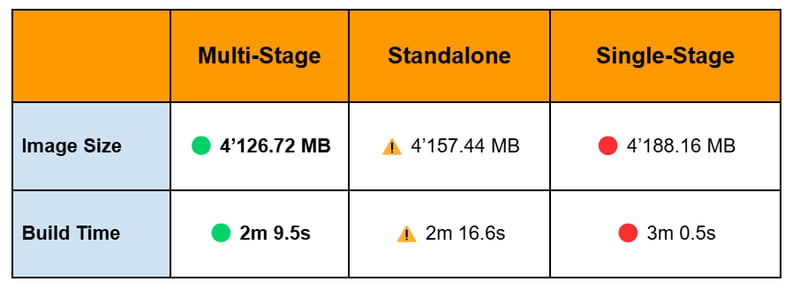
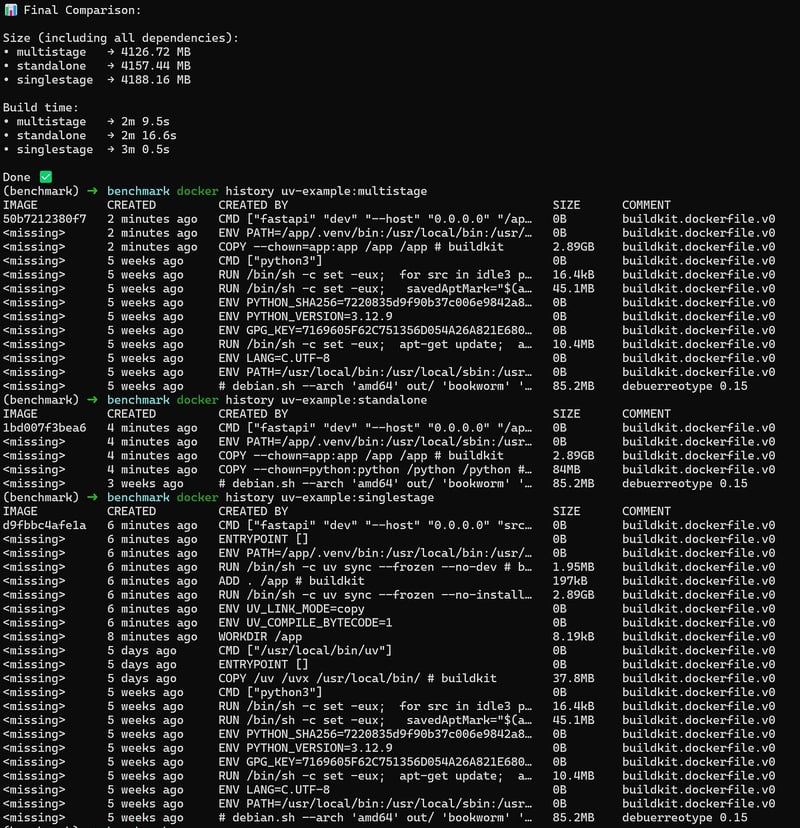
In all three builds, the bulk of the image size (~2.89 GB) comes from the application itself and its installed dependencies, typically residing in .venv/. This layer is identical across builds, which is why the overall image sizes are relatively close despite the structural differences.
However, as the application grows (more dependencies, larger codebase, etc.), the differences between the image sizes (and also build time) will become more pronounced. The multi-stage approach will continue to offer the most significant reduction in size, while the single-stage build will likely see a larger overall size increase.
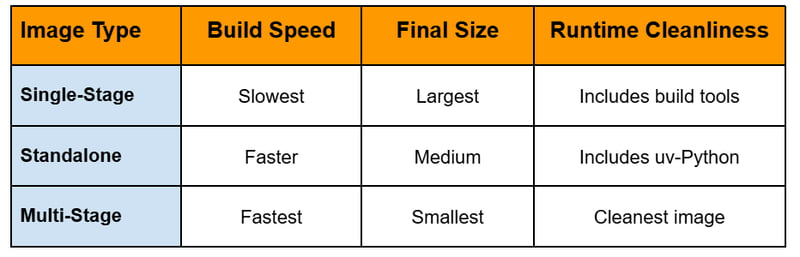
Single-Stage
What’s happening?
Everything, runtime, build tools, dependencies, gets packed into a single image.Image Size: 🟥 Largest
Build Time: 🟥 Slowest
Why?
All dependencies (compilers, wheels, Python runtime, and your app) remain in the final image. There’s no separation between build environment and runtime environment.
Standalone
What’s happening?
Uses two stages: builds with uv in the first stage, then copies both Python runtime and application to a clean final image.Image Size: 🟨 Medium
Build Time: 🟨 Slightly faster
Why?
More lightweight than the single-stage version since it discards build tools. The final image contains just the application, and a full Python installation copied from the builder.
Multi-Stage
What’s happening?
Uses two stages: builds with uv in the first stage, then copies only the application to a slim image with system Python already installed.Image Size: 🟩 Smallest
Build Time: 🟩 Most efficient for production
Why?
The final image has only what’s necessary to run the app, no build tools, no dev dependencies, just your app and the minimal system Python environment.
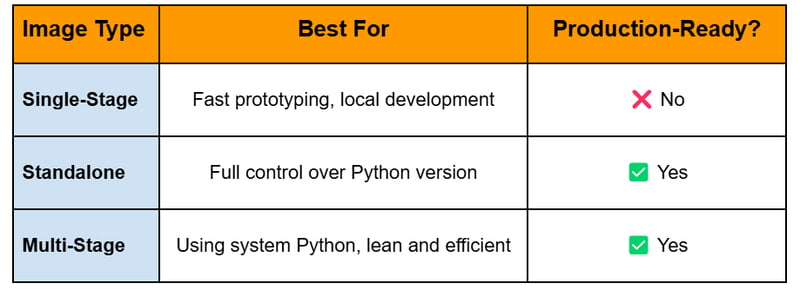
Which One Should You Use in Production?
Single-Stage: Best for quick prototypes or local development of small applications. Not ideal for production due to larger image size and inclusion of unnecessary build tools.
Standalone: Excellent choice when you need precise control over Python versions across environments. Provides a good balance of clean runtime environment and consistent Python installation. Recommended for production when specific Python versions or configurations are critical.
Multi-Stage: The optimal choice for production deployments where minimal image size and security are priorities. Creates the leanest possible container by using system Python in the final image and including only what’s necessary to run your application.
Conclusion
Dockerizing Python applications has always required trade-offs , but with tools like uv, we’re entering a new era of faster builds, cleaner environments, and more efficient dependency management. What stands out across the three approaches isn’t just their technical differences, but the flexibility they offer depending on your team’s priorities.
The real takeaway? There’s no one-size-fits-all Dockerfile. Instead, uv gives you the tools to fine-tune your container strategy, from quick dev spins to production-grade minimalism. Whether you’re chasing performance, reproducibility, or portability, uv-based Dockerfiles let you build with confidence and clarity.
The whole code repository to reproduce the benchmark can be found here.

Top comments (0)