
Often as developers we tend to build services which might require us to get payment from the customers. The best examples could be an e-commerce site. For this purpose we need to integrate a dependable payment gateway in our application. So in this post I'll be writing about how you could integrate PayPal Checkout in your React application and get some money 💰💰.
So let's get going...
And yes, before we start I'd like to recommend you to code along because there are quite a few steps that are to be followed and some could be a bit tricky.
So incase you decide to follow my advice, there are a few links that should be open on your browser to follow up.
Creating the React App
Since this is a React app integration, you'd need one to set up the payment gateway. To create a react app, simply write the command
npx create-react-app paypal
in your terminal and it will create a react app by the name "paypal" for you.
Now with the command cd paypal enter the app directory and run the command npm start to start a development server on your machine hosting your newly created app on localhost:3000.
You should see the following on you browser window.

Now I'll be making a few changes to the files
- /src/App.js
- /src/App.css
to get a UI for calling the payment gateway. After which the app would look like

You can find the code at my GitHub Repository.
And we are done with the basic setup. It's time to start exploring the PayPal dashboard now.
Creating PayPal Sandbox Accounts
Now go to the PayPal Developer Dashboard create a PayPal account and login with it. By default you'll be redirected to the My apps & Credentials section in Sandbox Mode.

We'll now create two sandbox accounts for testing purposes and mimicking live transactions by going to the Accounts tab in the Sandbox section. You'll find two sandbox accounts generated by default in the Sandbox Accounts Section.

We'll create two more for our application. One would be a Business Account that will accept payments while the other one would be Personal Account through which we'll be making the payments. To create them simply click on
- Create account
- Select the type of account
- Select your Country/Region
- Click on Create
By default the accounts will be created with terrible looking details. You can Edit them by clicking on the ... button in the Manage Accounts column.
You now have two PayPal Sandbox Accounts to mimic a transaction. But wait, you'll also need a PayPal app to successfully accept a payment, so let's create one.
Creating a PayPal App
Go back to the My apps & Credentials section. Under the REST API apps you can see one app generated by default. We'll create one for ourselves. To do this simply
- Click on the Create app button
- Give a name to your app, I have named it React-Test
- Link it to the Sandbox Business Account you just created
- Click on Create
You'll now get access to the credentials of your app including the Client ID and Secret.
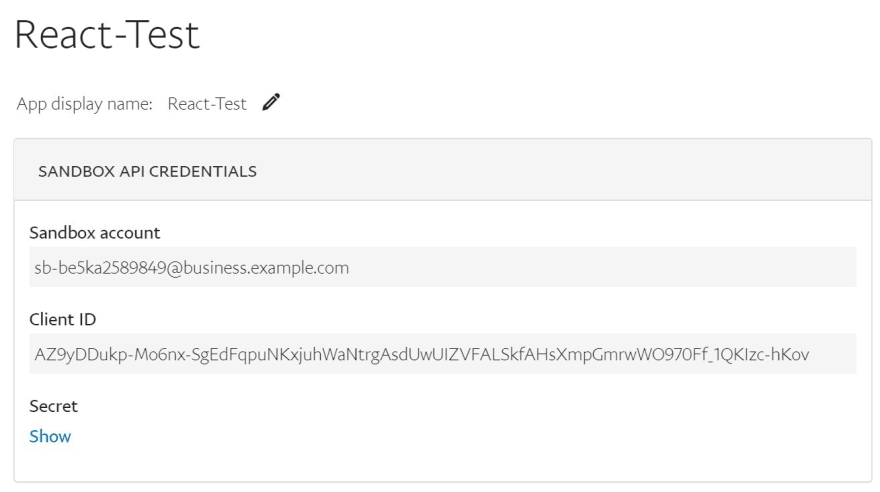
Copy them somewhere, we'll be needing them once we get back to coding our react app.
Before moving any further let us login with our Business Sandbox Account in the PayPal Sandbox Dashboard to check the Business Account Dashboard which would look like this

So now that we have both our sandbox accounts and our PayPal app ready, we can get to the coding part.
Integrating Smart Payment Buttons
Before writing any code for our component we need to integrate the PayPal Smart Payment Button with our application. To do that go to the /public/index.html and paste the following code in the HEAD tag.
<script src="https://www.paypal.com/sdk/js?client-id=YOUR_CLIENT_ID¤cy=INR"></script>
The Client ID is the same that we got on registering our app with PayPal in the above section and yes, don't forget to place the ¤cy=YOUR_CURRENCY after your client ID because it wouldn't work properly without it.
Creating the ReactPayPal Component
Let us now create out main component, the PayPal component. Starting with a basic functional component template
import React from 'react'

export default function reactPayPal() {
    return (
        <div>

        </div>
    )
}
Now we will create two states, one to tell if the payment has been made, and the other to catch if an error occurs
  const [paid, setPaid] = React.useState(false);
  const [error, setError] = React.useState(null);
Now we'll be using the useRef hook to get a mutable paypal ref object.
const paypalRef = React.useRef();
Our next step would be to get the PayPal buttons as soon as the component loads, for which we'll be using the useEffect hook
React.useEffect(() => {
    window.paypal
      .Buttons({
        createOrder: (data, actions) => {
          return actions.order.create({
            intent: "CAPTURE",
            purchase_units: [
              {
                description: "Your description",
                amount: {
                  currency_code: "INR",
                  value: 500.0,
                },
              },
            ],
          });
        },
        onApprove: async (data, actions) => {
          const order = await actions.order.capture();
          setPaid(true);
          console.log(order);
        },
        onError: (err) => {
        //   setError(err),
          console.error(err);
        },
      })
      .render(paypalRef.current);
  }, []);
The window object contains paypal since we included its script in our index.html earlier. Also this object contains a function called Buttons which are to be rendered. Inside buttons we pass an object and once this is successful it renders the buttons. We have to pass three functions in the object that is to be passed to Buttons, they are createOrder, onApprove, onError. You can refer the (docs)[developers.paypal.com/docs] to know more about them.
Once the payment has been made we need to show some confirmation to the user which we'll do using conditional rendering
  // If the payment has been made
  if (paid) {
    return <div>Payment successful.!</div>;
  }

  // If any error occurs
  if (error) {
    return <div>Error Occurred in processing payment.! Please try again.</div>;
  }
and we are done. We simply have to call this component in our main App component where we'll be rendering it once the Checkout button is clicked.
Calling ReactPayPal
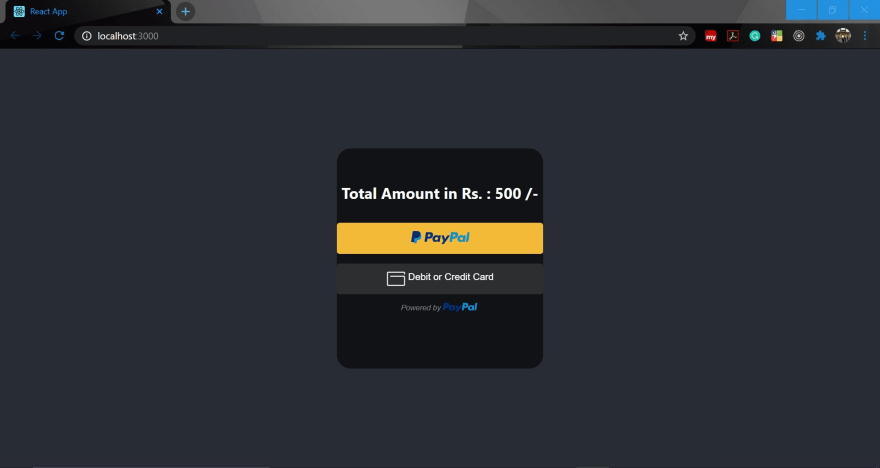
So currently we have a static page with a Checkout button with our ReactPaypal component ready. We want to get PayPal Smart Payment Buttons to access the PayPal payment gateway once we click checkout. So here I'll be doing some conditional rendering to get this done.
{(checkout === true)
  ? <div className="payment-div">
    <ReactPayPal
      total={500}
    />
  </div>

  :<div>
    <h1>React-PayPal</h1>
    <button onClick={() => {setCheckout(true)}} className="checkout-button">Checkout</button>
  </div>
}
To do this I created a state, checkout to know whether the Checkout button us clicked.
So we are finally done,🤓 and if everything went well we should see something like this once you click the Checkout button
Hope this article was of some help. The complete code, as I mentioned earlier is available on my repo, so go check it out.
 coder-KO
/
React-PayPal
coder-KO
/
React-PayPal
Integration of PayPal Commerce Platform in React to add a payment gateway to your website.
Keep coding, and keep enjoying it! 😃

Top comments (4)
It show this error
Looks like you didn't put the paypal script in index.html
Doesn't look like it works with Next Js, may be only regular React
Interesting topic