
Beginners guide to the static sites, the #jamstack way.
Side hustle. Side job. Pet project. By-work. Testing ground. Call it what you want but if you are working on the internet for some time already chances are you either had one or you are having one (or more) at the moment.
In my case, I've been running a digital marketing newsletter theKatapult (2k subscribers) for almost 5years now. It's basically my testing ground for growth hacks and whatnot, but most importantly it is my way of giving back to the community I come from.

I’ve started it out with a friend of mine with a simple idea i.e. to run a curated newsletter for folks interested in digital marketing in Serbia. We don't share CLICKBAIT titles. We hook people with real in-depth articles - is/was our motto.
While it might be a perfect time to blame it on the pandemic the truth is we got lazy and neglected our brainchild so much so we did not send out a newsletter for a couple of months. On top of that website and newsletter needed at least a facelift if not a complete overhaul.
The previous setup was more or less a classic one:
- WordPress as CMS with WP Fastest Cache enabled.
- It had a customized theme ($48 at ThemeForest) with an awesome video background Belgarde 4K.
- Namecheap as domain register but also as a shared hosting option ($2.88 monthly).
- MailChimp (free) + SendinBlue ($20 per month) as a newsletter solution.
And as a classic stack, performance-wise it was poorly executed and managed. A red flag for me that we needed to do a website re-do asap.

Originally I was set out to get myself more into Jamstack coding vise. Though I started with HTML and CSS 20years ago, WordPress got me code lazy. Don't get me wrong, my previous coding (if you can call it that) knowledge helped me utilize available WP themes to their fullest potential. If I'm being completely honest HTML, operating knowledge of PHP and Google was my stack.
Life and work took me on a different path, one paved with my true interest in SEO and general digital marketing. But this time I was determined to start coding again.
Juggling between family, real work, and pet project is hard. And being a resourceful MVP oriented guy made me think differently. Well, that and stumbling upon Stackbit.
So...I cheated!
In all honesty, I wanted to start with Gatsby first, then setting up Netlify acc maybe even Netlify Dev on my laptop and finally opt-out for a headless CMS but, as fate would have it, I've heard about Stackbit.
Played with it for a while and decided to give it a go. This is a story of how easy it is to reap up the benefits of a modern-day web dev architecture, Jamstack, and build a future proof side hustle or an MVP (minimum viable product) for example.
Day 1 - Setting things up and ‘designing’ the website
First things first. Don't mix up your business accounts (email, Github, Twitter, Facebook, etc) with your private stuff. With that being said it took me a while to move everything from business email to a private one even though it was all pretty much a straightforward thing. Should be said that I used my GitHub account for both Stackbit and Netlify accounts (and you’ll need them both).
Next, let's set up a new project in Stackbit. The process has been covered many times before. The best one I found is this one from Vojtech Ruzicka so go check that out. For this project, I used Azimuth theme, Gatsby as a static site generator, DatoCMS as headless CMS (because I have a soft spot for them), and in just a couple of minutes, the website was online.

By default, your site is accessible via a Netlify subdomain, in my case thekatapult.netlify.app. This is extremely useful as you can work on it, test it before you set up a custom domain i.e. move your domain over to them. I will talk about this a bit later.
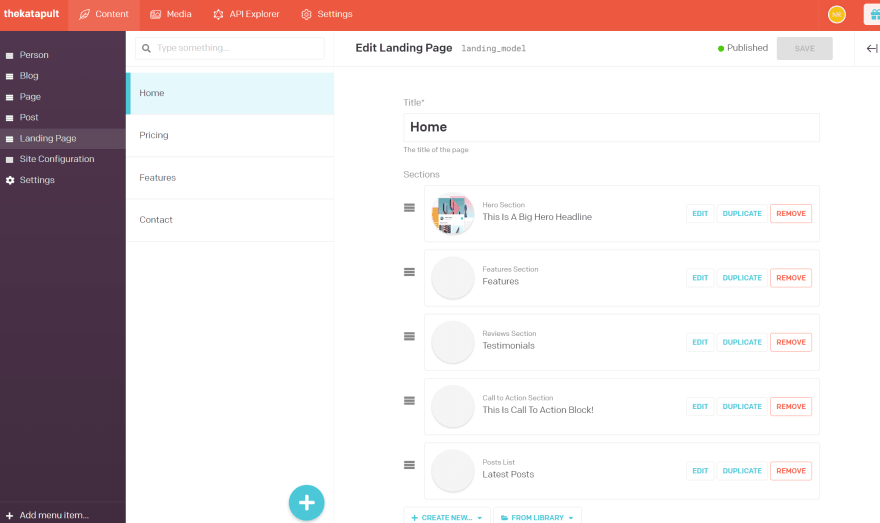
The theme comes with dummy content so now it's time to put those hidden designers skills at work. I've found DatoCMS to be one of the most intuitive headless CMS solutions at the moment. I mean, just look at how easy and accessible changes to home screen are.
One thing that constantly surprises me is how much of the free resources you have at your disposal today. Stackbit is free, Gatsby is free, DatoCMS is free, and even Netlify is free (for low traffic websites like mine). But so are the illustrations that I’ve used on my website. I’ve used blush.design and control.rocks illustrations. And I consulted colors.lol for a color pallet.
The logo is my friends doing (believe me there is a story behind it but I don’t have the time for it now) but if you need help with it as well check this free logo maker.
With all the setup in place, I spent pretty much the rest of the day playing with the design with the main point being capturing potential users’ attention to sign up for the newsletter. I’ve found this post from Unbounce useful.
What about marketing?
At the same time, Nenad started working on growth strategy and newsletter facelift 10days earlier. While that’s for another post (comment if you’ll like me to cover it) I’ll share a quick TO DO list (time frame 4weeks) that we came up with.
- Take care of branding essentials i.e. logo, color palette, typography, imagery, etc. Standardize slogans, brand voice, mission statement.
- Work on the official content style guide + resources (after all we are curation newsletter in essence).
- Define buyers persona (up to 3) and find their favorite digital hangouts.
- Build and engage with the audience via social channels we already have.
- Make / own social media channels. This includes setting up Linkedin and Facebook groups and Reddit channel. Build their audience and engage with it.
- Quick keyword research and then map out content marketing strategy.
- Newsletter facelift.
Even though this is our pet project, we should track the work right? A simple Notepad (yes, that Notepad), G.docs and G.sheets are enough for me. But Notion, Airtable or Trello can come handy, I'll admit that. Try not to jump into over tracking and over measuring or you’ll end up most of your time making notes, tracking, and measuring instead of working.
Day #2 - Adding Form
Most of my day 2 was spent on design tweaks, hard time accepting that launch will have to go without introductionarry keyword-oriented posts, and setting up submission form on the index page that proved rather difficult to me.
This could be done simply by adding the URL to Mailchimp form on each of the CTA buttons. Thing is it is one click too many for the users and I’d probably be losing people because of it.
Now, I’m using 2 newsletter services Mailchimp and Sendinblue. The simple reason really. Mailchimp has a much better API and a supported solution from Gatsby + it has a free plan that includes up to 2,000 contacts and 10,000 sends per month. Sendinblue, on the other hand, has a much better price for our projected growth i.e. an unlimited number of contacts with 40,000 emails/mo for $35.
Basically I’ll be using Mailchimp to handle new subscribers and Sendinblue for the old ones.
Before I get my hands code dirty I had to build a form and translate all the automatic emails that are going to be sent (thankfully Mailchimp has a Serbian translation already and being an MVP I did not need to personalize it much).
Coding form 😱
If this is your first time with git and github workflow fear not as it is really interesting and it will come handy one day. Till then check the link. Or check out GitHub guides. Yes, there is a lot of initial configuration but you’ll only do it once on your machine.
Be sure to take a look at your websites’ Github repo for information on how to run your site locally so you can play with it offline. Before we go any further I have to thank Brian from Stackbit and Daniel from Bejamas for helping me out.
Now, since I’m using Gatsby as my static site generator and Mailchimp as newsletter/form provider I am a lucky man because there is an official Gatsby Mailchimp plugin that really eases things a lot.
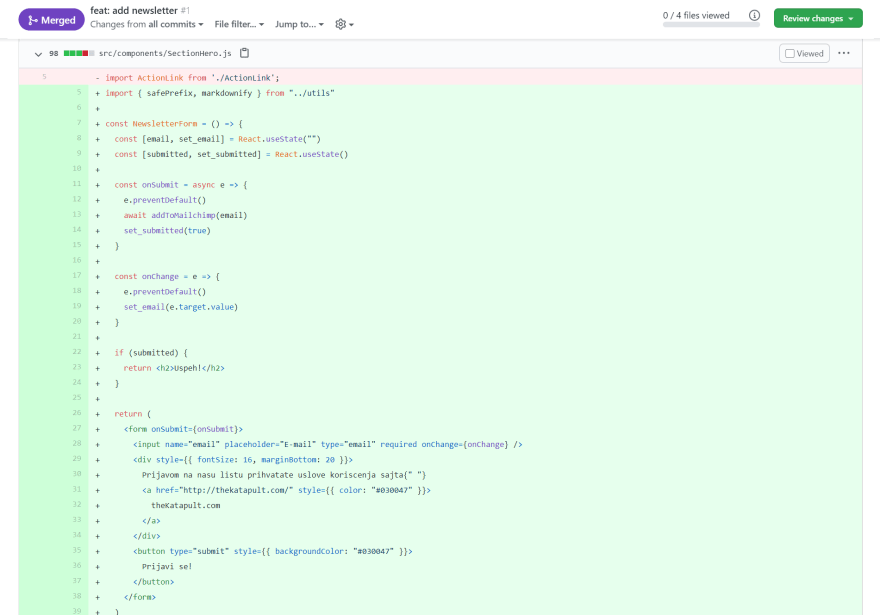
Basically I've created a react component NewsletterForm with a form inside. The gatsby-plugin-mailchimp gives us addToMailchimp function that handles everything ie when user clicks submit button it gets triggered and it sends the email to the Mailchimp. The email is stored in a much-telling email variable, which changes every time the user types anything ie onChange. There's also submitted variable, which is set to true after Mailchimp does its thinking, then based on that form is hidden and a success message appears (edited).
How does this sound? Too complicated? It took me more than an hour of blood, sweat, and tears to do it (with help) so you might be better off with Brian's explanation here.
As far as our marketing efforts are concerned, channels we agreed on have been set earlier and we already got some growth work done.
But I had a coding headache so that was it for me that day.
Day #3 - DNS and other stuff.
With my hosting re-bill on the horizon, I needed to move my domain over to Netlify. The process is pretty simple. Under your project in the Netlify dashboard just click on Domain management. Select the Custom domain and follow the process. Copy the nameservers they gave you and paste them into your domain registrar account (for me that’s Namecheap). Shit! Now I have to wait up to 48h before it all propagates.
What can I do in the meantime? Let’s set Google Analytics code first. Stackbit offers nice documentation here. All you have to do is use the Netlify feature called snippet injection for your GA code and that's it. Easy-peasy. A free HTTPS comes with Netlify, so, sitemap.xml and Google search console submission will have to wait on domain transfer to finish.
OK. Let me help with growth/marketing tasks😬
Day #4 - Unofficial launch
With domain name transferred to Netlify, there were only 2 things to set ie sitemap and search console. Both are pretty straight processes. For sitemaps use gatsby-plugin-sitemap and follow the instructions explained in the link above.
For the search console, login to the search console dashboard and click on Add Property. A simple process really.
That’s it! The website is live and ready. And best off all with great performance stats. Take a look:

How’s that for a performance bump out of the box? Sure there is room for improvement but with such an easy setup this is awesome!
Wrap up!
4 days. That’s how much it took for me to re-do my website.
Now what?
Well, making the website is just half of the story. The other half is our marketing efforts and I’ll cover them in a separate post that is in making.
There are many people pondering over the idea they have, not being able to test it mostly out of fear of $ investment needed. I don’t say it is always the case but sometimes you can test your idea for $0.
This ☝️ is just one of the ways to do it.
Further reading
Want to explore more? Take a swing at the following:
Intro to Stackbit: Build a Custom JAMstack Site in Minutes - https://hashnode.com/post/intro-to-stackbit-build-a-custom-jamstack-site-in-minutes-cjy4h0e4j0009x3s1l76m0son
Migrating From Medium - A Developer's Guide - https://www.stackbit.com/blog/migrating-from-medium-a-developers-guide/
A Beginner’s Journey to Launching a Website - https://css-tricks.com/a-beginners-journey-to-launching-a-website/
Publishing DEV-powered websites with Stackbit - https://dev.to/stackbit/project-benatar-publishing-dev-powered-websites-with-stackbit-lfo
That’s all, for now!
I’d love to know what you think just as much as I’d love to answer any of your questions. Hit the comments below. Or you can find us both, Nebojsa and Nenad, on Twitter.

Top comments (1)
Thanks for sharing.
For me, starting a "new" page always takes more time than I'd like it to do. I just launched the landing page for Indiemy yesterday: indiemy.com
The making of the page with Mailchimp integration took about 1h and another 30 minutes to setup CI/CD. The only reason this went so fast is because I've done it a number of times over the past three months and know exactly what stack I like working with (you can see the "making of" in the video). With the stack I chose, deployment is $4/month because I need a Github pro account, but I could shave that to $0/month by switching to Gitlab.
What performance tool that you are using?